


You can install VMware Tanzu Application Service for VMs (TAS for VMs) to VMware Cloud (VMC) on Amazon Web Services (AWS).
VMC provides Software Defined Data Centers (SDDCs) that run on AWS with a high level management console to configure networking rules.
This topic describes the procedures for configuring and installing TAS for VMs on VMC using public IP addresses for ingress.
To install and configure TAS for VMs on VMC:
Prerequisites
Before you install and configure TAS for VMs on VMC:
- Create a VMC account. See VMware Cloud.
- Deploy an SDDC. See Deploy an SDDC from the VMC Console.
- Enable browser access to vCenter from your SDDC. See Enable Browser Access to vCenter.
- Download Tanzu Operations Manager for vSphere from Broadcom Support.
- Download TAS for VMs from Broadcom Support.
- Install the govc CLI to your local workstation or jump host. See govmomi on GitHub.
(Optional) If you plan to connect to the VMC SDDC using a VPN or Direct Connect Virtual Interfaces (VIFs):
- To use a VPN to connect your network to the VMC SDDC, configure the VPN connection before you install TAS for VMs. See Configure a VPN Connection Between Your SDDC and On-Premises Data Center.
- To use VIFs to connect your network to the VMC SDDC, configure the VIFs before you install TAS for VMs. See Configure AWS Direct Connect Between Your SDDC and On-Premises Data Center.
Activate browser access to vCenter
By default, ingress to vCenter is not activated. If you are not using a VPN or other network, you must create a firewall rule in SDDC to allow vCenter access from your workstation’s public IP address.
To activate browser access to vCenter:
- Go to the VMC console.
- Select SDDCs.
- Click View Details on your datacenter tile.
- Select Networking & Security, and then select Security.
- Click Gateway Firewall.
- Click Management Gateway.
- Click + Add Rule.
- Name: Enter
vCenter Browser Inbound Rule. - Sources:
- Click User Defined Groups.
- Click Add Group.
- For Group name, enter
public ip address. - Click Set Members.
- Select IP Addresses.
- Enter your public IP address. For example,
66.170.99.1.You can locate your public IP address by going to
https://ifconfig.me/. - Press Enter.
- Click Apply.
- For Group name, enter
- Click Save.
- Destinations: Select vCenter and then click Apply.
- Services: Enter
HTTPS, ICMP, SSO.
- Name: Enter
- Click Publish.
Record vCenter credentials
To gather login credentials for the vCenter instance in your SDDC:
- Go to the VMC console.
- Select SDDCs.
- Click Open vCenter on your datacenter tile.
- A dialog box appears with the text: Before you can log into vCenter, you must open network access to vCenter through the management gateway. Choose an option for opening network access.
- Click Show Credentials.
- Record the credentials.
After activating browser access and recording your vCenter credentials, you can access and authenticate with your cluster’s vCenter server.
Install Tanzu Operations Manager
To install Tanzu Operations Manager on VMC:
-
Find the VMC pre-installed network to use for the BOSH infrastructure network:
- Go to the VMC console.
- Select SDDCs.
- Click View Details on your datacenter tile.
- Select Networking & Security.
- Select Network, and then select Segments.
- Record the segment name for sddc-cgw-nework-1.
- Record the subnet 192.168.1.1/24. SDDC combines the gateway IP address and CIDR into a single value.
-
If nothing has changed, create a file named
options.jsonwith the following contents:{ "NetworkMapping": [ { "Name": "Network 1", "Network": "sddc-cgw-network-1" } ], "PropertyMapping": [ { "Key": "ip0", "Value": "192.168.1.10" }, { "Key": "netmask0", "Value": "255.255.255.0" }, { "Key": "gateway", "Value": "192.168.1.1" }, { "Key": "DNS", "Value": "8.8.8.8" }, { "Key": "ntp_servers", "Value": "time.google.com" } ] } -
Replace the example text in the following code, then run the commands to upload the Tanzu Operations Manager file to VMC:
EXAMPLE-PASSWORD: the vCenter password you recorded in Record vCenter Credentials.www.example.com: your vCenter URL.PATH-TO-OPS-MANAGER: the path to your Tanzu Operations Manager OVA file.
export GOVC_DATACENTER=SDDC-Datacenter
export GOVC_DATASTORE=WorkloadDatastore
export GOVC_RESOURCE_POOL=Compute-ResourcePool

export GOVC_URL='[email protected]':'EXAMPLE-PASSWORD©'@www.example.com

govc library.create tas
govc library.import tas PATH-TO-OPS-MANAGER
govc library.deploy -options options.json /tas/ops-manager-vsphere-2.##.#-build.### ops-manager
govc pool.create /SDDC-Datacenter/host/Cluster-1/Resources/az{1,2,3}
VMware recommends using
govc library.*commands instead ofgovc import.ova.
Thegovc import.ovacommands depend on access to the ESXi hosts, which is not configured by default in VMC. Using these commands can cause errors like the following:govc: Post "https://10.2.32.4/nfc/5224a51f-114e-4627-8ca8-547c2e2e9488/disk-0.vmdk": dial tcp 10.2.32.4:443: i/o timeout -
Log in to vCenter:
- Go to the VMC console.
- Select SDDCs.
- Click Open vCenter on your datacenter tile.
- Select Show Credentials, and then click Open vCenter.
- Find the Tanzu Operations Manager VM.
- Open the Hosts & Clusters view.
- Open the
Compute-ResourcePooland select theops-managerVM. - Click ▶ to power on the Tanzu Operations Manager VM.
-
Create public IP addresses for Tanzu Operations Manager and HAProxy:
- Go to the VMC console.
- Select SDDCs.
- Click View Details on your datacenter tile.
- Select Networking & Security.
- Select Public IPs, and then select Request New IP.
- For Notes, enter
ops-managerand click Save. - Record the IP address. For example,
54.190.190.190.
- For Notes, enter
- Click Request New IP.
- For Notes, enter
HAProxyand click Save. - Record the IP address. For example,
54.180.180.180.
- For Notes, enter
-
Create a second network segment to use as the BOSH deployment network:
- Go to the VMC console.
- Select SDDCs.
- Click View Details on your datacenter tile.
- Select Networking & Security.
- Select Network, and then select Segments.
- Click Add Segment:
- For Segment Name, enter
bosh-network. - For Type, enter
routed. - For Subnets, enter a subnet. For example,
192.168.2.1/24.
- For Segment Name, enter
-
Assign public IP addresses to Tanzu Operations Manager and HAProxy:
- Go to the VMC console.
- Select SDDCs.
- Click View Details on your datacenter tile.
- Select Networking & Security.
- Select NAT, and then click Add NAT Rule.
- For Rule Name, enter
ops-manager. - For Public IP, enter the IP address you created for Tanzu Operations Manager in a previous step. For example,
54.190.190.190. - For Internal IP, enter
192.168.1.10. - Click Save.
- For Rule Name, enter
- Select Add NAT Rule.
- For Rule Name, enter
HAProxy. - For Public IP, enter the IP address you created for HAProxy in a previous step. For example,
54.180.180.180. - For Internal IP, enter
192.168.2.2. - Click Save.
- For Rule Name, enter
-
Add firewall rules that allow ingress to Tanzu Operations Manager and HAProxy:
- Go to the VMC console.
- Select SDDCs.
- Click View Details on your datacenter tile.
- Select Networking & Security, and then select Security.
- Select Gateway Firewall, and then Compute Gateway.
- Click Add Rule.
- Select the newly-created rule:
- For Rule Name, enter
opsman-ingress. - For Sources, select Any.
- Configure Destinations:
- Click Add Group.
- For Group name, enter
OM. - Click Set Members.
- Select IP Addresses.
- Enter the Tanzu Operations Manager internal IP address,
192.168.1.10. - Press Enter.
- Click Apply.
- For Group name, enter
- Click Save.
- Click Apply.
- Click Publish.
- Click Add Group.
- For Rule Name, enter
- Click Add Rule.
- Select the newly-created rule:
- For Rule Name, enter
HAProxy-ingress. - For Sources, select Any.
- Configure Destinations:
- Click Add Group.
- For Group name, enter
HAProxy. - Click Set Members.
- Select IP Addresses.
- Enter the HAProxy internal IP address,
192.168.2.2. - Press Enter.
- Click Apply.
- For Group name, enter
- Click Save.
- Click Apply.
- Click Publish.
- Click Add Group.
- For Rule Name, enter
-
Add a firewall rule that allows egress for the 192.168.1.x and 192.168.2.x subnets:
- Go to the VMC console.
- Select SDDCs.
- Click View Details on your datacenter tile.
- Select Networking & Security, and then select Security.
- Select Gateway Firewall, and then select Compute Gateway.
- Click Add Rule.
- Select the newly-created rule:
- For Rule Name, enter
tas-egress. - Edit Sources.
- Click Add Group.
- For Group name, enter
tas. - Click Set Members.
- Select IP Addresses.
- Enter the first subnet CIDR,
192.168.1.0/24. - Press Enter.
- Enter the second subnet CIDR,
192.168.2.0/24. - Press Enter.
- Click Apply.
- For Group name, enter
- Click Save.
- Click Add Group.
- Click Apply.
- For Destinations, select Any.
- For Rule Name, enter
- Click Publish.
-
Add a firewall rule that allows ingress to vCenter from the TAS for VMs control plane:
- Go to the VMC console.
- Select SDDCs.
- Click View Details on your datacenter tile.
- Select Networking & Security, and then select Security.
- Click Gateway Firewall, and then select Management Gateway.
- Click Add Rule.
- Select the newly-created rule:
- For Rule Name, enter
vCenter Inbound Rule. - Edit Sources:
- Click User Defined Groups.
- Click Add Group.
- For Group name, enter
Tanzu Operations Manager public IP. - Click Set Members.
- Select IP Addresses.
- Enter your Tanzu Operations Manager public IP address. For example,
54.190.190.190. - Press Enter.
- Click Apply.
- For Group name, enter
- Click Save.
- Click Add Group.
- For Group name, enter
Workloads Compute NAT public IP. - Click Set Members.
- Select IP Addresses.
- Enter your Workloads Compute NAT public IP address. For example,
44.232.216.160.You can locate your Workloads Compute NAT public IP address in the Networking & Security Overview.
- Press Enter.
- Click Apply.
- For Group name, enter
- Click Save.
- Edit Destinations: Select vCenter and then click Apply.
- Edit Services: Enter
HTTPS, ICMP, SSO.
- For Rule Name, enter
- Click Publish.
-
Add a firewall rule that allows ingress to ESXi from the TAS for VMs control plane:
- Go to the VMC console.
- Select SDDCs.
- Click View Details on your datacenter tile.
- Select Networking & Security, and then select Security.
- Click Gateway Firewall, and then select Management Gateway.
- Click Add Rule.
-
Select the newly-created rule:
- For Rule Name, enter
ESXi Inbound Rule. - Edit Sources:
- Click User Defined Groups.
- Click Add Group.
- For Group name, enter
Tanzu Operations Manager private IP. - Click Set Members.
- Select IP Addresses.
- Enter the Tanzu Operations Manager private IP address,
192.168.1.10. - Press Enter.
- Click Apply.
- For Group name, enter
- Click Save.
- Click Add Group.
- For Group name, enter
BOSH Director private IP. - Click Set Members.
- Select IP Addresses.
- Enter the BOSH Director private IP address,
192.168.1.11. - Press Enter.
- Click Apply.
- For Group name, enter
- Click Save.
- Edit Destinations: Select vCenter and then click Apply.
- Edit Services: Enter
HTTPS, ICMP, SSO.
- For Rule Name, enter
- Click Publish.
Configure BOSH Director
The procedure in this section contains only the configuration information that is specific to VMC. For more information about configuring BOSH on vSphere, see Configuring BOSH Director on vSphere.
Important When you configure the BOSH Director, do not configure NSX-T networking. Instead, select Standard vCenter Networking.
To configure BOSH Director for VMC:
-
Log in to Tanzu Operations Manager:
- Go to the IP address you configured for Tanzu Operations Manager. For example, https://54.190.190.190/.
- Enter a Username, Password, and Password confirmation to create an Admin user.
- Enter a Decryption passphrase and the Decryption passphrase confirmation. This passphrase encrypts the VMware Tanzu Operations Manager datastore and is not recoverable.
-
Select the BOSH Director for vSphere tile and configure BOSH as follows:
- Settings, then vCenter Config
- vCenter Host: your vCenter URL. For example,
vcenter.sddc-35-162-72-214.vmwarevmc.com. - vCenter Username:
[email protected] - vCenter Password: Enter the password you gathered from the SDDC.
- Datacenter Name: Enter
SDDC-Datacenter. - Virtual Disk Type: Select Thin.
- Ephemeral Datastore Names: Enter
WorkloadDatastore. - Persistent Datastore Names: Enter
WorkloadDatastore. - Select Standard vCenter Networking.
- vCenter Host: your vCenter URL. For example,
- Settings, then Director Config
- NTP Servers: Enter an NTP server of your choice. For example,
time.google.com.
- NTP Servers: Enter an NTP server of your choice. For example,
- Settings, then Create Availability Zones
- az1:
- Name:
az1 - Clusters:
- Cluster:
Cluster-1 - Resource Pool:
az1
- Cluster:
- Name:
- az2:
- Name:
az2 - Clusters:
- Cluster:
Cluster-1 - Resource Pool:
az2
- Cluster:
- Name:
- az3:
- Name:
az3 - Clusters:
- Cluster:
Cluster-1 - Resource Pool:
az3
- Cluster:
- Name:
- az1:
- Settings, then Create Networks, then Networks
- infra:
- Name:
infra - Subnets:
- vSphere Network Name:
sddc-cgw-network-1 - CIDR:
192.168.1.0/24 - Reserved IP Ranges:
192.168.1.1-192.168.1.10 - DNS:
8.8.8.8 - Gateway:
192.168.1.1 - Availability Zones:
az1, az2, az3
- vSphere Network Name:
- Name:
- deployment:
- Name:
deployment - Subnets:
- vSphere Network Name:
bosh-network - CIDR:
192.168.2.0/24 - Reserved IP Ranges:
192.168.2.1 - DNS:
8.8.8.8 - Gateway:
192.168.2.1 - Availability Zones:
az1, az2, az3
- vSphere Network Name:
- Name:
- infra:
- Settings, then Assign AZs and Networks
- Singleton Availability Zone:
az1 - Network:
infra
- Singleton Availability Zone:
- Settings, then Security
- Include Tanzu Ops Manager Root CA in Trusted Certs: Select the check box.
- Settings, then vCenter Config
-
After you finish configuration, click Apply Changes. The following warning appears:
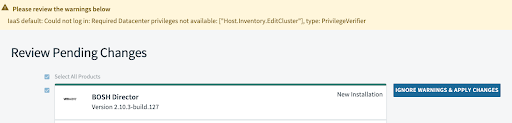
Click Ignore Warnings & Apply Changes.
EditClusterpermission is not required.
Install TAS for VMs
To configure TAS for VMs for VMC:
-
Configure the TAS for VMs tile as follows:
- Settings, then Assign AZs and Networks
- Network: Select
deployment. - Click Save.
- Network: Select
- Settings, then Domains
- Set up a wildcard domain and ensure that it maps to the HAProxy public IP address you configured earlier. For example:
- System domain:
sys.54.180.180.180.nip.io - Apps domain:
run.54.180.180.180.nip.io
- System domain:
- Set up a wildcard domain and ensure that it maps to the HAProxy public IP address you configured earlier. For example:
- Settings, then Networking
- Set the HAProxy IP address to the one you specified in the NAT rule. This is the first available IP address in the
deploymentnetwork.- HAProxy IPs:
192.168.2.2
- HAProxy IPs:
- Generate a certificate for the Gorouter and HAProxy:
- Certificates and private keys for the Gorouter and HAProxy: Click Add.
- Name:
haproxy cert - Click Generate RSA Certificate.
- Add
*.domains for your system and apps domain, separated by a comma. For example,*.**sys.54.180.180.180.nip.io,*.run.54.180.180.180.nip.io.
- Name:
- Certificates and private keys for the Gorouter and HAProxy: Click Add.
- Set HAProxy as the TLS termination point:
- TLS Termination: HA Proxy
- Deactivate TLS forwarding for HAProxy:
- HAProxy forwards all requests to the Gorouter over TLS: Click Disable.
- Set the HAProxy IP address to the one you specified in the NAT rule. This is the first available IP address in the
- Settings, then UAA
- For UAA configuration, generate a SAML certificate for *.login.SYSTEM-DOMAIN:
- SAML service provider credentials
- Click Generate RSA Certificate.
- Enter your domain. For example,
*.login.sys.54.180.180.180.nip.io - Click Generate.
- SAML service provider credentials
- For UAA configuration, generate a SAML certificate for *.login.SYSTEM-DOMAIN:
- Settings, then Resource Config:
- Scale the HAProxy instances up to 1.
- HAProxy
- Set Instances to 1.
- Click Save.
- Settings, then Assign AZs and Networks
-
After you finish configuration, click Apply Changes. The following warning appears again:
-
Click Ignore Warnings & Apply Changes.
EditClusterpermission is not required.
