


This topic describes how to grant Kubernetes users access to Kubernetes clusters and configure namespace permissions in VMware Tanzu Kubernetes Grid Integrated Edition (TKGI).
Overview
Tanzu Kubernetes Grid Integrated Edition admin users can grant Kubernetes users, such as developers, permissions to specific clusters.
If you are an Tanzu Kubernetes Grid Integrated Edition admin user, you can do the following:
- Grant user access to a cluster with a
ClusterRoleor a namespace within a cluster with aRole. See Grant Cluster Access to a User below. - Grant group access to a cluster with a
ClusterRoleor a namespace within a cluster with aRole. See Grant Cluster Access to a Group below.
After you grant user or group access to an Tanzu Kubernetes Grid Integrated Edition-provisioned cluster, Kubernetes users can connect to the cluster through the Kubernetes CLI (kubectl). Kubernetes users cannot create, resize, or delete clusters.
Example Workflow
The following diagram outlines the workflow to grant cluster access to users who belong to an identity provider group:
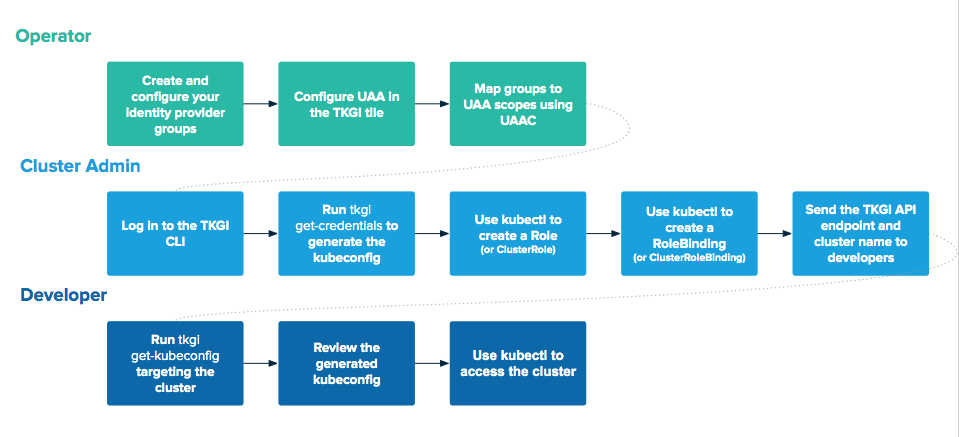
View a larger version of this image.
For more information, see RoleBinding and ClusterRoleBinding and Default Roles and Role Bindings in the Kubernetes documentation.
Prerequisites
Before setting up cluster access for users in Tanzu Kubernetes Grid Integrated Edition, you must have the following:
- Access to an Tanzu Kubernetes Grid Integrated Edition admin user account. For information about how to create Tanzu Kubernetes Grid Integrated Edition admin users, see Managing Tanzu Kubernetes Grid Integrated Edition Users with UAA.
- Fully qualified domain name (FQDN) of your TKGI deployment.
- OpenID Connect (OIDC) provider for your Kubernetes clusters, configured using one or both of the following:
- Global OIDC provider configuration for all clusters in Ops Manager Installation Dashboard > Tanzu Kubernetes Grid Integrated Edition > Settings > UAA > Configure created clusters to use UAA as the OIDC provider. For instructions, see UAA in the Installing topic for your IaaS.
- Custom OIDC provider configuration for individual clusters through a Kubernetes profile. For instructions, see Adding an OIDC Provider.
Grant Cluster Access to a User
To grant cluster access to a user, do the following:
-
Log in to Tanzu Kubernetes Grid Integrated Edition by running following command:
tkgi login -u USERNAME -p PASSWORD -a TKGI-API --ca-cert CERT-PATHWhere:
USERNAMEis your cluster admin user name.PASSWORDis your cluster admin password.TKGI-APIis the FQDN you use to access the TKGI API.CERT-PATHis the path to your root CA certificate.
Provide the certificate to validate the TKGI API certificate with SSL.
Note: If your operator has configured Tanzu Kubernetes Grid Integrated Edition to use a SAML identity provider, you must include an additional SSO flag to use the above command. For information about the SSO flags, see the section for the above command in TKGI CLI. For information about configuring SAML, see Connecting Tanzu Kubernetes Grid Integrated Edition to a SAML Identity Provider
-
Confirm that you can successfully connect to a cluster and use kubectl as a cluster admin by running the following command:
tkgi get-credentials CLUSTER-NAMEThis step creates a
ClusterRoleBindingfor the cluster admin.Note: If your operator has configured Tanzu Kubernetes Grid Integrated Edition to use a SAML identity provider, you must include an additional SSO flag to use the above command. For information about the SSO flags, see the section for the above command in TKGI CLI. For information about configuring SAML, see Connecting Tanzu Kubernetes Grid Integrated Edition to a SAML Identity Provider
-
When prompted, re-enter your password.
-
Create a YAML file for either
RoleorClusterRole. Use the following example as a template:kind: ROLE-TYPE apiVersion: rbac.authorization.k8s.io/v1 metadata: namespace: NAMESPACE name: ROLE-OR-CLUSTER-ROLE-NAME rules: - apiGroups: resources: RESOURCE verbs: API-REQUEST-VERBWhere:
ROLE-TYPEis the type of role you are creating. This must be eitherRoleorClusterRole.NAMESPACEis the namespace within the cluster. This is omitted when creating aClusterRole.ROLE-OR-CLUSTER-ROLE-NAMEis the name of theRoleorClusterRoleyou are creating. This name is created by the cluster admin.RESOURCEis the resource you are granting access to. It must be specified in a comma-separated array. For example:["pod-reader"].API-REQUEST-VERBis the request verb used to specify resource requests. For more information, see Determine the Request Verb in the Kubernetes documentation.
-
Create the
RoleorClusterRoleresource defined in your YAML file by running the following command:kubectl create -f ROLE-CONFIGURATION.ymlWhere
ROLE-CONFIGURATION.ymlis the YAML file you created in the above step. -
Create a YAML file containing either a
ClusterRoleBindingor aRoleBindingfor the Kubernetes end user. Use the following example as a template:kind: ROLE-BINDING-TYPE apiVersion: rbac.authorization.k8s.io/v1 metadata: name: ROLE-OR-CLUSTER-ROLE-BINDING-NAME namespace: NAMESPACE subjects: - kind: User name: USERNAME apiGroup: rbac.authorization.k8s.io roleRef: kind: ROLE-TYPE name: ROLE-OR-CLUSTER-ROLE-BINDING-NAME apiGroup: rbac.authorization.k8s.ioWhere:
ROLE-BINDING-TYPEis the type of role binding you are creating. This must be eitherRoleBindingorClusterRoleBinding.ROLE-OR-CLUSTER-ROLE-BINDING-NAMEis the name of the role binding. This is given by the cluster admin.NAMESPACEis the namespace within the cluster. This is omitted when creating aClusterRole.USERNAMEis the Kubernetes end user user name. This is the user name created for your organization’s LDAP or SAML identity provider.
Note: If you configured an OIDC user name prefix in Ops Manager Installation Dashboard > Tanzu Kubernetes Grid Integrated Edition > Settings > UAA or in a Kubernetes profile, you must prepend
USERNAMEwith the prefix you configured. For more information, see UAA in the Installing topic for your IaaS and Adding an OIDC Provider.
*ROLE-TYPEis the type of role you created in the previous step. This must be eitherRoleorClusterRole.
*ROLE-OR-CLUSTER-ROLE-NAMEis the name of theRoleorClusterRoleyou created in the previous step. -
Create the
RoleBindingorClusterRoleBindingresource defined in your YAML file by running following command:kubectl apply -f ROLE-BINDING-CONFIGURATION.ymlWhere
ROLE-BINDING-CONFIGURATION.ymlis the YAML file you created in the above step. -
Share the following information with your Kubernetes end users:
- TKGI API FQDN
- Cluster name
Obtain Cluster Access as a User
To obtain access to a Tanzu Kubernetes Grid Integrated Edition-provisioned cluster, the end user must do the following:
-
Fetch the kubeconfig file by running one of the following command:
-
If you want to validate the TKGI API certificate with SSL, run the following command:
tkgi get-kubeconfig CLUSTER-NAME -u USERNAME -a TKGI-API --ca-cert CERT-PATHWhere:
CLUSTER-NAMEis the cluster name provided by the cluster admin.USERNAMEis the Kubernetes end user user name. This is the user name created for your organization’s LDAP or SAML identity provider.TKGI-APIis the FQDN you use to access the TKGI API.CERT-PATHis the path to your root CA certificate. Provide the certificate to validate the TKGI API certificate with SSL.
For example:
$ tkgi get-kubeconfig my-cluster -u naomi -a api.tkgi.example.com \ --ca-cert /var/tempest/workspaces/default/root_ca_certificate -
If your CA is trusted and you want to skip SSL validation, run the following command:
tkgi get-kubeconfig CLUSTER-NAME -u USERNAME -a TKGI-API -kWhere
-kis the shortcut flag to skip SSL validation.
For example:$ tkgi get-kubeconfig my-cluster -u naomi -a api.tkgi.example.com -k
Note: If your operator has configured Tanzu Kubernetes Grid Integrated Edition to use a SAML identity provider, you must include an additional SSO flag to use the above command. For information about the SSO flags, see the section for the above command in TKGI CLI. For information about configuring SAML, see Connecting Tanzu Kubernetes Grid Integrated Edition to a SAML Identity Provider
-
-
When prompted, enter your password.
-
The TKGI CLI generates a kubeconfig for the cluster you have access to. Review the following example kubeconfig file:
apiVersion: v1 clusters: - cluster: certificate-authority-data: PROVIDED-BY-ADMIN server: PROVIDED-BY-ADMIN name: PROVIDED-BY-ADMIN contexts: - context: cluster: PROVIDED-BY-ADMIN user: PROVIDED-BY-USER name: PROVIDED-BY-ADMIN current-context: PROVIDED-BY-ADMIN kind: Config preferences: {} users: - name: PROVIDED-BY-USER user: auth-provider: config: client-id: pks_cluster_client cluster_client_secret: "" id-token: PROVIDED-BY-USER idp-issuer-url: https://PROVIDED-BY-ADMIN:8443/oauth/token refresh-token: PROVIDED-BY-USER name: oidc -
Access the cluster using kubectl. For more information about kubectl commands, see Overview of kubectl in the Kubernetes documentation.
Grant Cluster Access to a Group
Cluster admins can grant access to an identity provider group by creating a ClusterRoleBinding or RoleBinding for that group. You can grant access to an identity provider group only if you use a LDAP or SAML identity provider for UAA. You can configure a LDAP or SAML identity provider in Ops Manager Installation Dashboard > Tanzu Kubernetes Grid Integrated Edition > Settings > UAA.
Note: If you are using a LDAP group, you must confirm that the LDAP group you are giving access is in the allowlist in the Tanzu Kubernetes Grid Integrated Edition tile. To do this, review External Groups Whitelist in Ops Manager Installation Dashboard > Tanzu Kubernetes Grid Integrated Edition > Settings > UAA.
To grant cluster access to an identity provider group, do the procedure in Grant Cluster Access to a User above and replace step 6 with the following:
-
In the YAML file for a
ClusterRoleBindingor aRoleBinding, replace thesubjectssection with the following:subjects: - kind: Group name: NAME-OF-GROUP apiGroup: rbac.authorization.k8s.ioUse the following example as a template:
kind: ROLE-BINDING-TYPE
apiVersion: rbac.authorization.k8s.io/v1
metadata:
  name: ROLE-OR-CLUSTER-ROLE-BINDING-NAME
  namespace: NAMESPACE
subjects:
- kind: Group
  name: NAME-OF-GROUP
  apiGroup: rbac.authorization.k8s.io
roleRef:
  kind: ROLE-TYPE
  name: ROLE-OR-CLUSTER-ROLE-NAME
  apiGroup: rbac.authorization.k8s.io
Where:
ROLE-BINDING-TYPEis the type of role binding you are creating. This must be eitherRoleBindingorClusterRoleBinding.ROLE-OR-CLUSTER-ROLE-BINDING-NAMEis the name of the role binding. This is given by the cluster admin.NAMESPACEis the namespace within the cluster. This is omitted when creating aClusterRole.-
NAME-OF-GROUPis the identity provider group name. This name is case sensitive.Note: If you configured an OIDC groups prefix in Ops Manager Installation Dashboard > Tanzu Kubernetes Grid Integrated Edition > Settings > UAA or in a Kubernetes profile, you must prepend
NAME-OF-GROUPwith the prefix you configured. For more information, see UAA in the Installing topic for your IaaS and Adding an OIDC Provider. ROLE-TYPEis the type of role you created in the previous step. This must be eitherRoleorClusterRole.ROLE-OR-CLUSTER-ROLE-NAMEis the name of theRoleorClusterRoleyou are binding the Group to.
