


This topic describes how to use and configure the vSphere Container Storage Interface (CSI) Driver to enable VMware Tanzu Kubernetes Grid Integrated Edition (TKGI) provisioned clusters on vSphere to use external container storage. On vSphere, TKGI automatically installs the vSphere CSI Driver to all TKGI-provisioned clusters.
Overview
vSphere Cloud Native Storage (CNS) provides comprehensive data management for stateful, containerized apps, enabling apps to survive restarts and outages. Stateful containers can use vSphere storage primitives such as standard volume, persistent volume, and dynamic provisioning, independent of VM and container lifecycle.
You can install vSphere CNS on TKGI-provisioned clusters by configuring TKGI to automatically install a vSphere CSI Driver. To enable automatic CSI driver installation on your clusters, see Storage in Installing TKGI on vSphere.
When automatic vSphere CSI Driver installation is enabled, your clusters use your tile Kubernetes Cloud Provider storage settings as the default vSphere CNS configuration.
The automatically deployed vSphere CSI Driver supports high availability (HA) configurations. HA support is automatically enabled on clusters with multiple control plane nodes and uses only one active CSI Controller.
Use the vSphere client to review your cluster storage volumes and their backing virtual disks, and to set a storage policy on your storage volumes or monitor policy compliance. vSphere storage backs up your cluster volumes.
For more information about VMware CNS, see Getting Started with VMware Cloud Native Storage.
For more information about using the Kubernetes CSI Driver, see Persistent Volumes in the Kubernetes documentation.
In TKGI, you can configure the vSphere CSI Driver to:
-
Customize, deploy and manage vSphere CNS volumes:
- To customize file volumes, see Customize vSphere File Volumes below.
- To use and customize CNS Volumes, see Create or Use CNS Block Volumes below.
- To migrate in-tree storage volumes to the vSphere CSI Driver, see Migrate an In-Tree vSphere Storage Volume to the vSphere CSI Driver below.
-
Customize clusters to support vSphere Topology-Aware Volume Provisioning:
- To apply vSphere Topology-Aware Volume Provisioning to your cluster, see Customize a Cluster with vSphere Topology-Aware Volume Provisioning below.
-
Customize and manage vSphere CNS:
- To use CNS in a multi-data center environment, see Configure CNS Data Centers below.
- Customize the maximum number of snapshots for a volume
- To customize the maximum number of snapshots for each persistent volume, see Customize the Maximum Number of Volume Snapshots below.
Requirements and Limitations of the vSphere CSI Driver
For information about the supported features and the known limitations of the vSphere CSI Driver, see:
vSphere CSI Driver Supported Features and Requirements
The vSphere CSI Driver supports different features depending on driver version, environment and storage type.
TKGI supports only the following vSphere CSI Driver features:
- Dynamic Block PV support
- Dynamic File PV support
- Dynamic Virtual Volume (vVols) PV support
- Encryption support via VMcrypt
- Enhanced Object Health in UI for vSAN Datastores
- Kubernetes Multi-node Control Plane support
- Offline volume expansion (Block volumes only)
- Online volume expansion (Block volumes only)
- Raw block volume support
- Static PV Provisioning
- Topology-aware volume provisioning
- Volume snapshot and restore
- XFS file system
For more information about these supported vSphere CSI Driver features, see the relevant sections in the VMware vSphere Container Storage Plug-in documentation:
-
Usage Limitations, environment, and version requirements: Supported Kubernetes Functionality in Compatibility Matrices for vSphere Container Storage Plug-in.
-
Scaling Limitations: Configuration Maximums for vSphere Container Storage Plug-in.
-
vCenter, Datastore, and cluster types: vSphere Functionality Supported by vSphere Container Storage Plug-in.
Unsupported Features and Limitations
vSphere Storage DRS, Manual Storage vMotion, and other VMware vSphere features are not supported by the vSphere Container Storage Plug-in and cannot be used by the TKGI clusters that use or migrate to the vSphere CSI Driver.
For more information on the limitations of the VMware vSphere Container Storage Plug-in, see vSphere Functionality Supported by vSphere Container Storage Plug-in in the VMware vSphere Container Storage Plug-in documentation.
Customize vSphere File Volumes
To create, modify or remove a customized vSphere file volume:
- Create a Cluster with Customized File Volume Parameters
- Modify a Cluster with Customized File Volume Parameters
- Remove File Volume Parameters from a Cluster
Prerequisites
To use file volumes, you must enable vSAN File Services in the vSphere vCenter. For information about enabling vSAN File Services, see Configure File Services in the VMware vSphere documentation.
Create a Cluster with Customized File Volume Parameters
To create a new cluster with a vSphere file volume:
-
Create a JSON or YAML formatted volume configuration file containing the following:
{
  "target_vsan_fileshare_datastore_urls": "DS-URLS",
  "net_permissions": [
    {
      "name": "PERMISSION-NAME",
      "ips": "IP-ADDRESS",
      "permissions": "PERMISSION",
      "rootsquash": "ACCESS-LEVEL"
    },
    {
      "name": "PERMISSION-NAME",
      "ips": "IP-ADDRESS",
      "permissions": "PERMISSION",
      "rootsquash": "ACCESS-LEVEL"
    }
  ]
}
Where:
DS-URLSis a comma-separated list of datastores for deploying file share volumes. For example:"ds:///vmfs/volumes/vsan:52635b9067079319-95a7473222c4c9cd/".PERMISSION-NAMEis your name for a NetPermission.IP-ADDRESSis the IP range or IP subnet affected by a NetPermission restriction.PERMISSIONis the access permission to the file share volume for a NetPermission restriction.ACCESS-LEVELis the security access level for the file share volume for a NetPermission restriction.
For information, see File Volume Configuration below.
-
To create a cluster with attached file volumes:
tkgi create-cluster CLUSTER-NAME --config-file CONFIG-FILEWhere:
CLUSTER-NAMEis the name of your cluster.CONFIG-FILEis the name of your configuration file.
For example:
tkgi create-cluster demo -e demo.cluster --plan Small --config-file ./conf1.json
Modify a Cluster with Customized File Volume Parameters
To modify an existing cluster with a vSphere file volume:
- Create a file volume configuration file. For information, see File Volume Configuration below.
-
To update your cluster with file volumes:
tkgi update-cluster CLUSTER-NAME --config-file CONFIG-FILEWhere:
CLUSTER-NAMEis the name of your cluster.CONFIG-FILEis the name of your configuration file.
WARNING: Update the configuration file only on a TKGI cluster that has been upgraded to the current TKGI version. For more information, see Tasks Supported Following a TKGI Control Plane Upgrade in About Tanzu Kubernetes Grid Integrated Edition Upgrades.
Remove File Volume Parameters from a Cluster
To remove a vSphere file volume configuration from a cluster:
-
Create a file volume configuration file containing either the
disable_target_vsan_fileshare_datastore_urlsordisable_net_permissionsparameters set totrueto deactivate an existing file volume parameter.
For more information, see File Volume Configuration below. -
To remove the configured file volume parameter from your cluster:
tkgi update-cluster CLUSTER-NAME --config-file CONFIG-FILEWhere:
CLUSTER-NAMEis the name of your cluster.CONFIG-FILEis the name of your configuration file.
WARNING: Update the configuration file only on a TKGI cluster that has been upgraded to the current TKGI version. For more information, see Tasks Supported Following a TKGI Control Plane Upgrade in About Tanzu Kubernetes Grid Integrated Edition Upgrades.
File Volume Configuration
Create a JSON or YAML formatted File Volume configuration file to enable or deactivate vSphere file volume support.
For example:
-
The following configuration enables all File Volume features:
{ "target_vsan_fileshare_datastore_urls": "ds:///vmfs/volumes/vsan:52635b9067079319-95a7473222c4c9cd/", "net_permissions": [ { "name": "demo1", "ips": "192.168.0.0/16", "permissions": "READ_WRITE", "rootsquash": false }, { "name": "demo2", "ips": "10.0.0.0/8", "permissions": "READ_ONLY", "rootsquash": false } ] } -
The following configuration deactivates File Volume features:
{
  "disable_target_vsan_fileshare_datastore_urls": true,
  "disable_net_permissions": true
}
File Volume DataStores Configuration
The following are accepted Datastore URLs parameters:
| Name | Type | Description |
|---|---|---|
| target_vsan_fileshare_datastore_urls | string | A comma separated list of datastores for deploying file share volumes. |
| disable_target_vsan_fileshare_datastore_urls | Boolean | Deactivate the target_vsan_fileshare_datastore_urls. Values: true, false.Default Value: false. |
File Volume NetPermissions Object Configuration
The following are accepted NetPermissions objects:
| Name | Type | Description |
|---|---|---|
| net_permissions | Array | Properties defining a NetPermissions object. |
| disable_net_permissions | Boolean | Deactivate the net_permissions. Values: true, false.Default Value: false. |
The following are supported NetPermissions object parameters:
| Name | Type | Description |
|---|---|---|
| name | string | Name of the NetPermission object. |
| ips | string | IP range or IP subnet affected by the NetPermission restrictions. Default Value: “*”. |
| permissions | string | Access permission to the file share volume. Values: “READ_WRITE”, “READ_ONLY”, “NO_ACCESS”.Default Value: “READ_WRITE”. |
| rootsquash | Boolean | Security access level for the file share volume. Values: true, false.Default Value: false. |
For more information on NetPermissions object parameters, see Procedure in Create a Kubernetes Secret for vSphere Container Storage Plug-in.
Create or Use CNS Block Volumes
To dynamically provision a block volume using the vSphere CSI Driver:
- Create a vSphere Storage Class
- Create a PersistentVolumeClaim
- Create Workloads Using Persistent Volumes
For more information on vSphere CSI Driver configuration, see the example/vanilla-k8s-block-driver configuration for the CSI driver version you are using in vsphere-csi-driver in the VMware kubernetes-sigs GitHub repo.
Create a vSphere Storage Class
To create a vSphere Storage Class:
- Open vCenter.
-
Open the vSAN Datastore Summary pane.
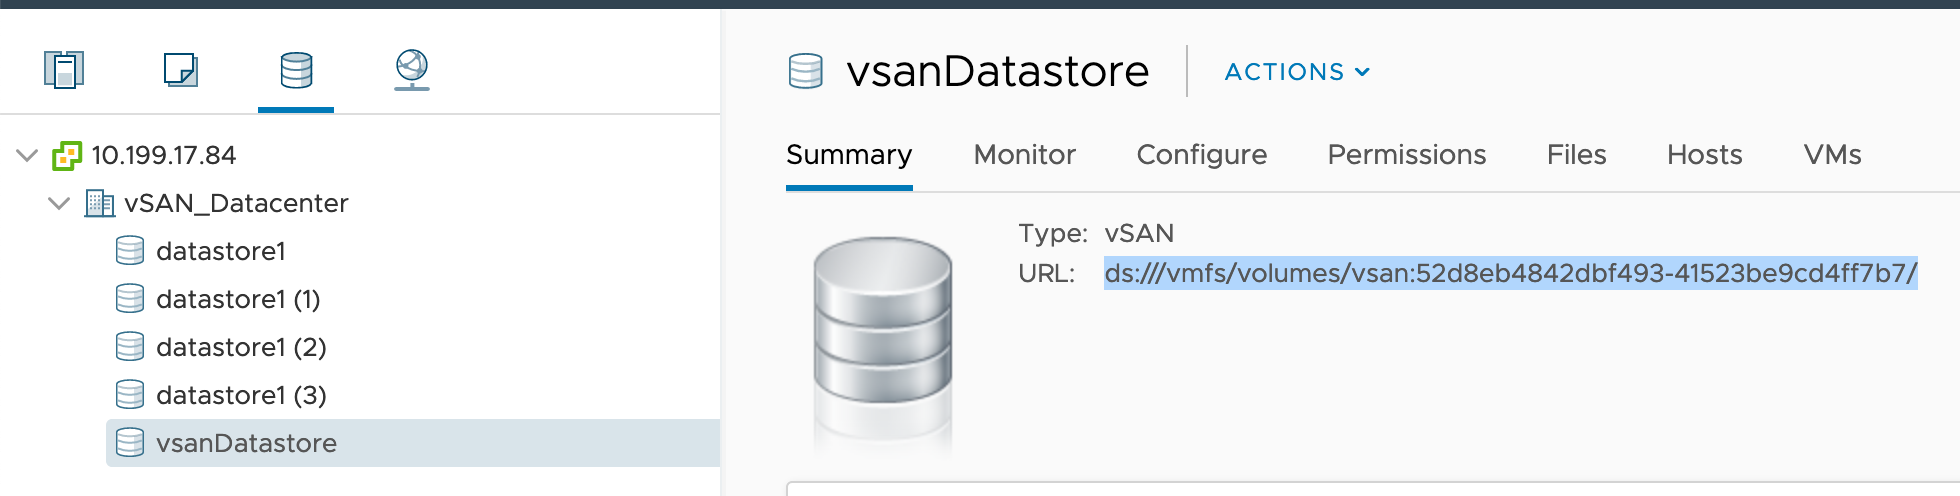
-
Determine the
datastoreurlvalue for your Datastore. -
Create the following YAML:
apiVersion: storage.k8s.io/v1
kind: StorageClass
metadata:
  name: demo-sts-storageclass
  annotations:
      storageclass.kubernetes.io/is-default-class: "true"
provisioner: csi.vsphere.vmware.com
allowVolumeExpansion: ALLOW-EXPANSION
parameters:
  datastoreurl: "DATASTORE-URL"
Where:
ALLOW-EXPANSIONdefines whether the cluster’s persistent volume size is either resizable or static. Set totruefor resizable andfalsefor static size.DATASTORE-URLis the URL to your Datastore. For a non-vSAN datastore, thedatastoreurlvalue looks likeds:///vmfs/volumes/5e66e525-8e46bd39-c184-005056ae28de/.
For example:
apiVersion: storage.k8s.io/v1
kind: StorageClass
metadata:
  name: demo-sts-storageclass
  annotations:
      storageclass.kubernetes.io/is-default-class: "true"
provisioner: csi.vsphere.vmware.com
allowVolumeExpansion: true
parameters:
  datastoreurl: "ds:///vmfs/volumes/vsan:52d8eb4842dbf493-41523be9cd4ff7b7/"
For more information about StorageClass, see Storage Classes in the Kubernetes documentation.
Create a PersistentVolumeClaim
To create a Persistent Volume using the vSphere CSI Driver:
- Create a Storage Class. For more information, see Create a vSphere Storage Class below.
- To apply the StorageClass configuration:
kubectl apply -f CONFIG-FILEWhere
CONFIG-FILEis the name of your StorageClass configuration file. -
Create the PersistentVolumeClaim configuration for the file volume. For information about configuring a PVC, see Persistent Volumes in the Kubernetes documentation.
For example:apiVersion: v1 kind: PersistentVolumeClaim metadata: name: example-vanilla-block-pvc spec: accessModes: - ReadWriteOnce resources: requests: storage: 5Gi storageClassName: example-vanilla-block-sc -
To apply the PVC configuration:
kubectl apply -f CONFIG-FILEWhere
CONFIG-FILEis the name of your PVC configuration file.
Create Workloads Using Persistent Volumes
-
Create a Pod configuration file containing
volumeMountsandvolumesparameters.
For example:apiVersion: v1 kind: Pod metadata: name: example-vanilla-block-pod spec: containers: - name: test-container image: gcr.io/google_containers/busybox:1.24 command: ["/bin/sh", "-c", "echo 'hello' > /mnt/volume1/index.html && chmod o+rX /mnt /mnt/volume1/index.html && while true ; do sleep 2 ; done"] volumeMounts: - name: test-volume mountPath: /mnt/volume1 restartPolicy: Never volumes: - name: test-volume persistentVolumeClaim: claimName: example-vanilla-block-pvc -
To apply the Pod configuration to your workload:
kubectl apply -f CONFIG-FILEWhere
CONFIG-FILEis the name of your configuration file.
For more information and examples of Pod configurations, see the example configurations for the CSI driver version you are using in vsphere-csi-driver in the VMware kubernetes-sigs GitHub repo.
Customize a Cluster with vSphere Topology-Aware Volume Provisioning
TKGI supports the vSphere Container Storage Plug-in’s topology-aware volume provisioning features.
For more information on volume provisioning features, see Allowed Topologies in the Kubernetes documentation and Topology-Aware Volume Provisioning in the VMware vSphere Container Storage Plug-in documentation.
Topology Overview
TKGI supports clusters with topology-aware volume provisioning.
To create a cluster with topology-aware volume provisioning:
- Prepare for Topology
- See Guidelines and Best Practices for Deployment with Topology in Deploying vSphere Container Storage Plug-in with Topology in the VMware vSphere Container Storage Plug-in documentation.
- Create a Cluster with Topology
To manage a cluster configured with topology-aware volume provisioning:
- Prepare for Topology
- See Guidelines and Best Practices for Deployment with Topology in Deploying vSphere Container Storage Plug-in with Topology in the VMware vSphere Container Storage Plug-in documentation.
- Manage Clusters with Topology-Aware Volumes
Note: You cannot add topology-aware volume provisioning to an existing cluster within TKGI.
Prepare for Topology
Before creating a new cluster with Topology-aware volume provisioning:
- Verify your environment meets the requirements listed in Topology Limitations and Prerequisites below.
- Review the vSphere CSI Topology deployment recommendations. For more information, see Guidelines and Best Practices for Deployment with Topology in Deploying vSphere Container Storage Plug-in with Topology in the VMware vSphere Container Storage Plug-in documentation.
- Create vSphere Center categories and tags as described in Procedures in Deploying vSphere Container Storage Plug-in with Topology in the VMware vSphere Container Storage Plug-in documentation.
For more information on creating vSphere Center tags and categories, see Create, Edit, or Delete a Tag Category in the VMware vSphere documentation.
Topology Limitations and Prerequisites
In TKGI you can create a new cluster with topology-aware volume provisioning enabled. You cannot add topology-aware volume provisioning to an existing cluster.
TKGI support for Topology-aware volume provisioning requires:
-
The vSphere CSI Driver Integration option must be enabled on the TKGI tile. For more information, see Storage in installing TKGI on vSphere.
-
You have created vSphere CSI topology categories and tags in your vSphere environment. For more information, see Prepare for Topology below.
-
You have prepared your environment as described in the vSphere CSI Topology deployment recommendations. For more information, see Guidelines and Best Practices for Deployment with Topology in Deploying vSphere Container Storage Plug-in with Topology in the VMware vSphere Container Storage Plug-in documentation.
-
The topology zone tags you create on your vSphere Client must be consistent with the existing AZs created in BOSH. Create topology zone tags on your vSphere Client using only AZ names existing for BOSH.
-
The topology feature does not support clusters with a Compute Profile that includes AZ settings.
Create a Cluster with Topology
To create a new cluster with a vSphere Topology configuration:
-
Create a JSON or YAML configuration file containing the following:
{
  "csi_topology_labels": {
    "topology_categories": "REGION-TAG,ZONE-TAG"
  }
}
Where:
REGION-TAGis the vSphere Center region tag you created in Prepare for Topology above.ZONE-TAGis one of the vSphere Center zone tags you created in Prepare for Topology above.
For example:
{
  "csi_topology_labels": {
    "topology_categories": "k8s-region,k8s-zone"
  }
}
For more information, see Guidelines and Best Practices for Deployment with Topology in Deploying vSphere Container Storage Plug-in with Topology in the VMware vSphere Container Storage Plug-in documentation.
-
To create a cluster with Topology-aware volume provisioning:
tkgi create-cluster CLUSTER-NAME --config-file CONFIG-FILEWhere:
CLUSTER-NAMEis the name of your cluster.CONFIG-FILEis the name of your configuration file.
For example:
tkgi create-cluster demo -e demo.cluster --plan Small --config-file ./conf1.json
Manage Clusters with Topology-Aware Volumes
As you manage your clusters with topology-aware volume provisioning enabled, note the following limitations on existing clusters.
When running tkgi update-cluster on a cluster created with a topology-aware volume:
-
You must use the same
csi_topology_labelsconfiguration that was used during cluster creation. -
You cannot add or remove topology-aware volume provisioning from the cluster.
Configure vSphere CSI for Windows
You can use the vSphere CSI Driver with TKGI Windows worker nodes.
Note: vSphere CSI driver support for Windows worker nodes is in Alpha.
Overview
Before using the vSphere CSI Driver with a TKGI Windows worker node:
- Verify that your environment meets the Prerequisites.
- Verify that the Limitations of the vSphere CSI Driver meet your requirements.
To use the vSphere CSI Driver with a Windows worker:
Prerequisites
vSphere CSI Driver support for Windows workers has the following requirements:
- Windows worker nodes must have Windows Server 2019.
- CSI Proxy must be installed on each Windows node.
- The vSphere CSI Driver also has role and privilege requirements that apply to both Linux and Windows worker nodes. For more information, see vSphere Roles and Privileges in the VMware vSphere Container Storage Plug-in documentation.
For more information, see Prerequisite in the Kubernetes SIG vsphere-csi-driver GitHub repository.
Limitations of the vSphere CSI Driver
The vSphere CSI driver supports Windows worker nodes as an Alpha feature. This support has additional limitations compared to Linux worker node support.
The vSphere CSI driver does not support the following features for Windows worker nodes:
ReadWriteManyvolumes based on vSAN file service.- Raw Block Volumes.
The vSphere CSI Driver has additional limitations. For more information, see Introduction in the Kubernetes SIG vsphere-csi-driver GitHub repository.
Prepare a Windows Stemcell for vSphere CSI
To create a Windows stemcell for vSphere CSI:
- Prepare a CSI Proxy.
- Create a Windows Stemcell for vSphere CSI.
- Upload and Test the Windows Stemcell.
Prepare a CSI Proxy
The vSphere CSI Driver requires you install a CSI Node Proxy, which exposes local storage operation APIs to Windows nodes, on each Windows node.
To create a CSI Node Proxy, build a CSI Proxy binary. For more information, see Build in the kubernetes-csi / csi-proxy GitHub repository.
Create a Windows Stemcell for vSphere CSI
To create a Windows stemcell that supports vSphere CSI:
-
Complete the steps in Step 1: Create a Base VM for the BOSH Stemcell.
-
Complete the steps in Step 2: Configure the Base VM.
-
Copy the
csi-proxy.exeexecutable file created above to a location for the Windows stemcell. For example, copy the executable toC:\etc\kubernetes\node\bin\. -
To install csi-proxy.exe, complete the steps in Installation in the kubernetes-csi / csi-proxy GitHub repository.
Note: If you copied
csi-proxy.exeto a location other thanC:\etc\kubernetes\node\bin\you must change thebinPathproperty in the installation script to match. -
Complete the remainder of the standard Windows stemcell creation procedure:
Upload and Test the Windows Stemcell
To test your Windows stemcell:
-
In Ops Manager, navigate to Stemcell Library.
-
Upload the Windows stemcell.
-
To test your Windows stemcell:
- Create a test windows cluster.
- Complete the steps in Apply a CSI Manifest to a Windows Cluster below.
Prepare vSphere CSI for a Windows Cluster
To use vSphere CSI with a TKGI Windows worker:
Apply a CSI Manifest to a Windows Cluster
To prepare and apply a vSphere CSI Windows manifest to a Windows worker:
-
Create a Windows CSI Node manifest file containing the contents listed in Windows CSI Node Manifest below.
-
Update your cluster with the Windows CSI Node manifest.
Provision a Windows Persistent Volume
To provision a Windows persistent volume for a Windows application, configure a Windows PersistentVolumeClaim. For more information, see Deploying vSphere Container Storage Plug-in on Windows in the VMware vSphere Container Storage Plug-in documentation.
Customize and Manage vSphere CNS
To configure or manage your vSphere CSI Driver:
- Customize the Maximum Number of Persistent Volumes
- Customize the Maximum Number of Volume Snapshots
- Configure CNS Data Centers
- Manage Topology After Switching to the Automatically Deployed vSphere CSI Driver
To configure or manage vSphere CSI on a Windows cluster:
Customize the Maximum Number of Persistent Volumes
You can limit the number of persistent volumes attached to a Linux cluster node on vSphere. You can configure the maximum number of node persistent volumes on an existing cluster and during cluster creation.
By default, TKGI configures Linux clusters on vSphere with a maximum of 45 attached persistent volumes. You can decrease the maximum number of attached persistent volumes from 45 down to a minimum of 1. On vSphere 8 you can also increase the maximum number of attached persistent volumes. Contact VMware Support to determine the maximum number of attached persistent volumes supported by your vSphere environment.
To configure the maximum number of persistent volumes attached to a Linux cluster node:
-
Create a configuration file containing the following:
{
  max_volumes_per_node: MAX-VOLS
}
Where
MAX-VOLSis the maximum number of persistent volumes that can be attached to a cluster’s nodes. On vSphere 7 the range of supportedmax_volumes_per_nodevalues is1to45. On vSphere 8 the theoretical range is from1to192. Contact VMware Support to determine the maximum number of attached persistent volumes supported by your vSphere environment.For example:
{ max_volumes_per_node: 45 } -
To update an existing cluster with the configuration:
tkgi update-cluster CLUSTER-NAME --config-file CONFIG-FILEWhere:
CLUSTER-NAMEis the name of your cluster.CONFIG-FILEis the name of the configuration file you created in the preceding steps.
Customize the Maximum Number of Volume Snapshots
The vSphere CSI driver lets you customize the maximum number of snapshots for a persistent volume. By default, the system sets a maximum of three volume snapshots as suggested by the VMware snapshots best practices in a vSphere environment.
In your cluster configuration file, use the following parameters to customize the maximum number of snapshots:
global-max-snapshots-per-block-volumefor the block volumes on VMFS datastores. If you do not use this parameter, the system sets the maximum snapshots for the block volumes to 3.granular-max-snapshots-per-block-volume-vsanfor the volumes on VMware vSAN. If you do not use this parameter, the system sets the maximum snapshots for the vSAN volumes to the value specified forglobal-max-snapshots-per-block-volume.
To customize the maximum number of snapshots on a persistent volume, create a JSON or YAML formatted configuration file containing the following:
{
  "snapshot_parameters":{
      "global_max_snapshots_per_block_volume": NUMBER
  }
}
Where:
NUMBERis the maximum number of snapshots on the volume.
For example:
{
  "snapshot_parameters":{
      "global_max_snapshots_per_block_volume": 4
  }
}
To customize the maximum number of snapshots on a vSAN volume, create a JSON or YAML formatted configuration file containing the following:
{
  "snapshot_parameters":{
      "granular_max_snapshots_per_block_volume_vsan": NUMBER
  }
}
Where:
NUMBERis the maximum number of snapshots on the volume.
For example:
{
  "snapshot_parameters":{
      "granular_max_snapshots_per_block_volume_vsan": 4
  }
}
To create a new cluster or update an existing cluster with the new snapshot configuration:
-
To create a cluster:
tkgi create-cluster CLUSTER-NAME --config-file CONFIG-FILEWhere:
CLUSTER-NAMEis the name of your cluster.CONFIG-FILEis the name of your configuration file.
For example:
tkgi create-cluster demo -e demo.cluster –plan Small –config-file ./snapshot.json -
To update an existing cluster:
tkgi update-cluster CLUSTER-NAME --config-file CONFIG-FILEWhere:
CLUSTER-NAMEis the name of your cluster.CONFIG-FILEis the name of your configuration file.
For example:
tkgi update-cluster demo --config-file ./snapshot.jsonWARNING: Update the configuration file only on a TKGI cluster that has been upgraded to the current TKGI version. For more information, see Tasks Supported Following a TKGI Control Plane Upgrade in About Tanzu Kubernetes Grid Integrated Edition Upgrades.
For more information on volume snapshots, see Volume Snapshot and Restore in VMware vSphere Container Storage Plug-in Documentation.
Configure CNS Data Centers
If your clusters are in a multi-data center environment, configure the data centers that must mount CNS storage for the clusters.
Note: You must configure CNS data centers when the Topology feature is enabled in a multi-data center environment.
To configure CNS data centers for a multi-data center environment:
-
Create a JSON or YAML formatted configuration file containing the following:
{
  "csi_datacenters": "DATA-CENTER-LIST"
}
Where:
DATA-CENTER-LISTis a comma-separated list of vCenter data centers that must mount your CNS storage. The default data center for a cluster is the data center defined on the TKGI tile in Kubernetes Cloud Provider > Datacenter Name.
For example:
{
  "csi_datacenters": "kubo-dc1,kubo-dc2"
}
For more information on the
csi_datacentersparameter, see the description ofdatacentersin Procedure in Create a Kubernetes Secret for vSphere Container Storage Plug-in. -
To create a new cluster or update an existing cluster with your vCenter data centers:
-
To create a cluster:
tkgi create-cluster CLUSTER-NAME --config-file CONFIG-FILEWhere:
CLUSTER-NAMEis the name of your cluster.CONFIG-FILEis the name of your configuration file.
For example:
tkgi create-cluster demo -e demo.cluster --plan Small --config-file ./conf1.json -
To update an existing cluster:
tkgi update-cluster CLUSTER-NAME --config-file CONFIG-FILEWhere:
CLUSTER-NAMEis the name of your cluster.CONFIG-FILEis the name of your configuration file.
WARNING: Update the configuration file only on a TKGI cluster that has been upgraded to the current TKGI version. For more information, see Tasks Supported Following a TKGI Control Plane Upgrade in About Tanzu Kubernetes Grid Integrated Edition Upgrades.
-
Manage Topology After Switching to the Automatically Deployed vSphere CSI Driver
After switching from a manually installed vSphere CSI Driver to the TKGI automatically deployed CSI Driver, the topology configuration must not be changed.
Configure topology based on the manually installed vSphere CSI Driver configuration:
-
Region and Zone Topology Labels:
You must continue to use
region, andzonelabels if your manually deployed vSphere CSI Driver was configured using the legacyregion, andzonetopology configuration labels.Your revised cluster configuration file must include a
csi_topology_labelsparameter that assignsregionandzonevalues.For example, if your vSphere Secret configuration for the manually installed vSphere CSI driver included the following:
[Labels]
region = k8s-region
zone = k8s-zone
Your new cluster configuration must include the following instead:
{ "csi_topology_labels": { "region: "k8s-region" "zone": "k8s-zone" } } -
topology_categories Topology Label:
You must continue to use the
topology_categorieslabel if your manually deployed vSphere CSI Driver was configured using thetopology_categoriestopology configuration label.Your revised cluster configuration file must include a
csi_topology_labelsparameter that assigns atopology_categoriesvalue.For example, if your vSphere Secret configuration for the manually installed vSphere CSI driver included the following:
[Labels]
topology-categories = "k8s-region, k8s-zone"
Your new cluster configuration must include the following instead:
{ "csi_topology_labels": { "topology_categories": "k8s-region,k8s-zone" } } -
Topology Deactivated:
You must not enable topology if topology was not enabled while using the manually deployed vSphere CSI Driver.
Windows CSI Node Manifest
---
kind: ServiceAccount
apiVersion: v1
metadata:
  name: vsphere-csi-node
  namespace: vmware-system-csi
---
kind: ClusterRole
apiVersion: rbac.authorization.k8s.io/v1
metadata:
  name: vsphere-csi-node-cluster-role
rules:
  - apiGroups: ["cns.vmware.com"]
    resources: ["csinodetopologies"]
    verbs: ["create", "watch", "get", "patch"]
  - apiGroups: [""]
    resources: ["nodes"]
    verbs: ["get"]
---
kind: ClusterRoleBinding
apiVersion: rbac.authorization.k8s.io/v1
metadata:
  name: vsphere-csi-node-cluster-role-binding
subjects:
  - kind: ServiceAccount
    name: vsphere-csi-node
    namespace: vmware-system-csi
roleRef:
  kind: ClusterRole
  name: vsphere-csi-node-cluster-role
  apiGroup: rbac.authorization.k8s.io
---
kind: Role
apiVersion: rbac.authorization.k8s.io/v1
metadata:
  name: vsphere-csi-node-role
  namespace: vmware-system-csi
rules:
  - apiGroups: [""]
    resources: ["configmaps"]
    verbs: ["get", "list", "watch"]
---
kind: RoleBinding
apiVersion: rbac.authorization.k8s.io/v1
metadata:
  name: vsphere-csi-node-binding
  namespace: vmware-system-csi
subjects:
  - kind: ServiceAccount
    name: vsphere-csi-node
    namespace: vmware-system-csi
roleRef:
  kind: Role
  name: vsphere-csi-node-role
  apiGroup: rbac.authorization.k8s.io
---
kind: DaemonSet
apiVersion: apps/v1
metadata:
  name: vsphere-csi-node-windows
  namespace: vmware-system-csi
spec:
  selector:
    matchLabels:
      app: vsphere-csi-node-windows
  updateStrategy:
    type: RollingUpdate
    rollingUpdate:
      maxUnavailable: 1
  template:
    metadata:
      labels:
        app: vsphere-csi-node-windows
        role: vsphere-csi-windows
    spec:
      priorityClassName: system-node-critical
      nodeSelector:
        kubernetes.io/os: windows
      serviceAccountName: vsphere-csi-node
      containers:
        - name: node-driver-registrar
          image: k8s.gcr.io/sig-storage/csi-node-driver-registrar:v2.5.1
          args:
            - "--v=5"
            - "--csi-address=$(ADDRESS)"
            - "--kubelet-registration-path=$(DRIVER_REG_SOCK_PATH)"
          env:
            - name: ADDRESS
              value: 'unix://C:\csi\csi.sock'
            - name: DRIVER_REG_SOCK_PATH
              value: 'C:\var\lib\kubelet\plugins\csi.vsphere.vmware.com\csi.sock'
          volumeMounts:
            - name: plugin-dir
              mountPath: /csi
            - name: registration-dir
              mountPath: /registration
          livenessProbe:
            exec:
              command:
              - /csi-node-driver-registrar.exe
              - --kubelet-registration-path=C:\var\lib\kubelet\plugins\csi.vsphere.vmware.com\csi.sock
              - --mode=kubelet-registration-probe
            initialDelaySeconds: 3
        - name: vsphere-csi-node
          image: gcr.io/cloud-provider-vsphere/csi/ci/driver:latest
          args:
            - "--fss-name=internal-feature-states.csi.vsphere.vmware.com"
            - "--fss-namespace=$(CSI_NAMESPACE)"
          imagePullPolicy: "Always"
          env:
            - name: NODE_NAME
              valueFrom:
                fieldRef:
                  apiVersion: v1
                  fieldPath: spec.nodeName
            - name: CSI_ENDPOINT
              value: 'unix://C:\csi\csi.sock'
            - name: MAX_VOLUMES_PER_NODE
              value: "59" # Maximum number of volumes that controller can publish to the node. If value is not set or zero Kubernetes decide how many volumes can be published by the controller to the node.
            - name: X_CSI_MODE
              value: node
            - name: X_CSI_SPEC_REQ_VALIDATION
              value: 'false'
            - name: X_CSI_SPEC_DISABLE_LEN_CHECK
              value: "true"
            - name: LOGGER_LEVEL
              value: "PRODUCTION" # Options: DEVELOPMENT, PRODUCTION
            - name: X_CSI_LOG_LEVEL
              value: DEBUG
            - name: CSI_NAMESPACE
              valueFrom:
                fieldRef:
                  fieldPath: metadata.namespace
            - name: NODEGETINFO_WATCH_TIMEOUT_MINUTES
              value: "1"
          volumeMounts:
            - name: plugin-dir
              mountPath: 'C:\csi'
            - name: pods-mount-dir
              mountPath: 'C:\var\lib\kubelet'
            - name: csi-proxy-volume-v1
              mountPath: \.\pipe\csi-proxy-volume-v1
            - name: csi-proxy-filesystem-v1
              mountPath: \.\pipe\csi-proxy-filesystem-v1
            - name: csi-proxy-disk-v1
              mountPath: \.\pipe\csi-proxy-disk-v1
            - name: csi-proxy-system-v1alpha1
              mountPath: \.\pipe\csi-proxy-system-v1alpha1
          ports:
            - name: healthz
              containerPort: 9808
              protocol: TCP
          livenessProbe:
            httpGet:
              path: /healthz
              port: healthz
            initialDelaySeconds: 10
            timeoutSeconds: 5
            periodSeconds: 5
            failureThreshold: 3
        - name: liveness-probe
          image: k8s.gcr.io/sig-storage/livenessprobe:v2.7.0
          args:
            - "--v=4"
            - "--csi-address=/csi/csi.sock"
          volumeMounts:
            - name: plugin-dir
              mountPath: /csi
      volumes:
        - name: registration-dir
          hostPath:
            path: 'C:\var\lib\kubelet\plugins_registry\'
            type: DirectoryOrCreate
        - name: plugin-dir
          hostPath:
            path: 'C:\var\lib\kubelet\plugins\csi.vsphere.vmware.com\'
            type: DirectoryOrCreate
        - name: pods-mount-dir
          hostPath:
            path: 'C:\var\lib\kubelet'
            type: Directory
        - name: csi-proxy-disk-v1
          hostPath:
            path: \.\pipe\csi-proxy-disk-v1
            type: ''
        - name: csi-proxy-volume-v1
          hostPath:
            path: \.\pipe\csi-proxy-volume-v1
            type: ''
        - name: csi-proxy-filesystem-v1
          hostPath:
            path: \.\pipe\csi-proxy-filesystem-v1
            type: ''
        - name: csi-proxy-system-v1alpha1
          hostPath:
            path: \.\pipe\csi-proxy-system-v1alpha1
            type: ''
      tolerations:
        - effect: NoExecute
          operator: Exists
        - effect: NoSchedule
          operator: Exists
