


Linux Custom Machine Images
This procedure walks you through building a Linux custom machine image to use when creating clusters. For more information about cluster types in Tanzu Kubernetes Grid, see Workload Cluster Types.
- Linux Image Prerequisites lists what you need to successfully build and use a custom Linux image.
- Build a Linux Image shows you how to use Kubernetes Image Builder and Docker to customize and build an image.
- Create a TKr for the Linux Image shows you how to convert your Linux image to a Tanzu Kubernetes release (TKr), which would make your image the default for future Kubernetes versions and give you more options for using and managing it.
- Use a Linux Image for a Management Cluster shows you how to deploy a management cluster that uses your custom image as a template.
- Use a Linux Image for a Workload Cluster shows you how to deploy a workload cluster that uses your custom image as a template.
As noted within the procedures, some steps differ depending on whether you are building an image for a class-based or plan-based (legacy) cluster.
Linux Image Prerequisites
To build a Linux custom machine image, you need:
- A vSphere account.
-
A macOS or Linux workstation with the following installed:
Note
To build a RHEL 8 image you need a Linux workstation, not macOS.
(Class-Based, vSphere) Retrieve the OS Image Version
Before building an image to use for class-based clusters on vSphere, you must retrieve the OS image version that is associated with the default Ubuntu OVA for the Kubernetes version that you want to use for your custom image. You will assign this OS image version to your custom image in the Build a Linux Image step below.
To retrieve the OS image version, do one of the following depending on your use case:
-
If you have a running management cluster that was created using the default Kubernetes version for the current Tanzu Kubernetes Grid version, you can retrieve the OS image version from the cluster:
-
Set your
kubectlcontext to the management cluster. -
From the list of available TKrs, choose the Tanzu Kubernetes Release (TKr) for the Kubernetes version that you want to use for you custom image. For example,
v1.28.11---vmware.1-tkg.1. To list available TKrs, run:kubectl get tkr -
Open the TKr and record the
osImagesproperty. This property specifies the names ofOSImageobjects associated with the TKr. -
List
OSImageobjects in Kubernetes:kubectl get osimages -
In the output, find the
OSImageobject listing that matches the TKrosImagesname for the default Ubuntu OVA. -
Record the
NAMEproperty of theOSImagelisting and replace its embedded---with a+character. For example,v1.28.11+vmware.2-tkg.2-7820f47053de95b5aaf7e33a17511e47.
-
-
If you do not have a running management cluster that was created using the default Kubernetes version for the current Tanzu Kubernetes Grid version, you can retrieve the OS image version directly from the default Ubuntu OVA, either locally or from vSphere:
-
To retrieve the OS image version locally:
- Download the default Ubuntu OVA for your target Kubernetes version:
- Go to the Broadcom Support Portal and log in with your VMware customer credentials.
- Go to the Tanzu Kubernetes Grid downloads page and select 2.5.2.
- Download the OVA. For example, Ubuntu 2204 Kubernetes v1.28.11 OVA.
- Unpack the downloaded OVA using the extraction tool of your choice.
- In the unpacked directory, locate the
.ofvfile. -
In the
.ofvfile, search for the OVAVERSIONproperty and record its value. For example,v1.28.11+vmware.2-tkg.2-7820f47053de95b5aaf7e33a17511e47. The property looks similar to the following:<Property ovf:key="VERSION" ovf:type="string" ovf:userConfigurable="false" ovf:value="v1.28.11+vmware.2-tkg.2-7820f47053de95b5aaf7e33a17511e47"/>
- Download the default Ubuntu OVA for your target Kubernetes version:
-
If you already uploaded the default Ubuntu OVA for your target Kubernetes version to vSphere, you can alternatively retrieve the OS image version by inspecting the OVA VM properties in the vSphere UI or by using the
govcCLI. To use this method, retrieve the OS image version before converting the OVA VM to a template.-
To retrieve the OS image version from the vSphere UI:
- Locate the OVA VM and open the Configure tab on the OVA VM summary page.
- Go to Settings –> vApp Options.
- In the Properties table, locate the VERSION key and record its Default Value. For example,
v1.28.11+vmware.2-tkg.2-7820f47053de95b5aaf7e33a17511e47.
-
To retrieve the OS image version using the
govcCLI, run thegovc vm.infocommand. For example:govc vm.info -json /dc0/vm/ubuntu-2204-kube-v1.28.11+vmware.1-tkg.1 | jqIn the output, search for
"Id": "VERSION"and record the value of the"DefaultValue"property. For example:{ "Key": 10, "ClassId": "", "InstanceId": "", "Id": "VERSION", "Category": "Cluster API Provider (CAPI)", "Label": "VERSION", "Type": "string", "TypeReference": "", "UserConfigurable": false, "DefaultValue": "v1.28.11+vmware.2-tkg.2-7820f47053de95b5aaf7e33a17511e47", "Value": "", "Description": "" }
-
-
Build a Linux Image
-
Set up authentication for your infrastructure:
Create a credentials JSON file and fill in its values:
{ "cluster": "", "convert_to_template": "false", "create_snapshot": "true", "datacenter": "", "datastore": "", "folder": "", "insecure_connection": "false", "linked_clone": "true", "network": "", "password": "", "resource_pool": "", "template": "", "username": "", "vcenter_server": "" } -
Download the Linux resource bundle container from
projects.registry.vmware.com:-
Ensure that your workstation can access the VMware image registry
projects.registry.vmware.com. -
Download and run the container with the Kubernetes Linux binaries that Image Builder needs to build a Linux OVA:
docker pull projects.registry.vmware.com/tkg/linux-resource-bundle:v1.28.11_vmware.1-tkg.3

docker run -d -p 3000:3000 projects.registry.vmware.com/tkg/linux-resource-bundle:v1.28.11_vmware.1-tkg.3
-
-
Download the Image Builder configuration directory:
-
Determine the Image Builder configuration version that you want to build from.
- From the Broadcom Communities, obtain the
TKG Image Builderpackage for the desired Kubernetes version by searching fortkg-image-builder-for-kubernetes. The versions for TKG v2.5.x are the following:- TKG Image Builder for Kubernetes v1.30.2 on TKG v2.5.2
- TKG Image Builder for Kubernetes v1.29.6 on TKG v2.5.2
- TKG Image Builder for Kubernetes v1.28.11 on TKG v2.5.2
- TKG Image Builder for Kubernetes v1.27.15 on TKG v2.5.2
- TKG Image Builder for Kubernetes v1.26.14 on TKG v2.5.2
- TKG Image Builder for Kubernetes v1.28.7 on TKG v2.5.1
- TKG Image Builder for Kubernetes v1.27.11 on TKG v2.5.1
- TKG Image Builder for Kubernetes v1.26.14 on TKG v2.5.1
- TKG Image Builder for Kubernetes v1.28.4 on TKG v2.5.0
- TKG Image Builder for Kubernetes v1.27.8 on TKG v2.5.0
- TKG Image Builder for Kubernetes v1.26.11 on TKG v2.5.0
- Each Image Builder version corresponds to its compatible Kubernetes and Tanzu Kubernetes Grid versions. For example,
TKG-Image-Builder-for-Kubernetes-v1.28.11-on-TKG-v2.5.2-master.zipbuilds a Kubernetes v1.28.11 image for Tanzu Kubernetes Grid v2.5.2. - If you need to create a management cluster, which you must do when you first install Tanzu Kubernetes Grid, choose the default Kubernetes version of your Tanzu Kubernetes Grid version. For example, in Tanzu Kubernetes Grid v2.5.2, the default Kubernetes version is v1.28.11. For workload clusters, you can also build Kubernetes v1.30.2, v1.29.6, v1.27.15 or v1.26.14 clusters, in addition to v1.28.11.
Note
The steps below explain how to build a Kubernetes v1.28.11 image for Tanzu Kubernetes Grid v2.5.2.
- From the Broadcom Communities, obtain the
-
Download the configuration code zip file, and unpack its contents.
-
cdinto theTKG-Image-Builder-directory, so that thetkg.jsonfile is in your current directory.
-
-
vSphere For vSphere, create a
metadata.jsonfile in the image builder directory that sets a version string to match what you list in your custom TKr in the later steps:-
Class-based: Use the value that you retrieved in the Retrieve the OS Image Version step above, for example:
{ "VERSION": "v1.28.11+vmware.2-tkg.2-7820f47053de95b5aaf7e33a17511e47" } -
Plan-based: The image-builder gives the OVAs that it creates a version string that identical to the VMware-published OVAs, like
v1.28.11+vmware.1-tkg.1. For custom images, VMware recommends replacing the-tkg.1with a string meaningful to your organization, for example:{ "VERSION": "v1.28.11+vmware.1-myorg.0" }
-
-
Edit the
tkg.jsonfile to fill in<IP>and<PORT>settings and customizations forcontainerd_urlandkubernetes_http_source, where:IPcorresponds to the IP of the machine running the Docker container.PORTassociates an unused port on the Docker host with port 3000 on the container, for example3001:3000. The container exposes the artifacts over port 3000.
-
To include the following options, continue editing the
tkg.jsonfile:-
Photon: If building a Photon-5 or Photon-3 OVA, edit
"extra_rpms"intkg.jsonto reflect additional custom packages supported:"extra_rpms": "sysstat nfs-utils ethtool apparmor-parser" -
STIG and CIS Hardening: To harden your custom Ubuntu image above default levels:
-
Add a line that sets
ansible_user_varsto some or all of the following variables totrue. These default tofalse: -
STIG:
install_aide- Activate AIDE (Advanced Intrusion Detection Environment)install_sshd_login_banner- Install DoD login bannerremove_existing_ca_certs- Keep DoD PKI Infrastructureinstall_audispd_plugins- Install event multiplexor (audispd) plugins
-
CIS:
install_aide- Activate AIDE (Advanced Intrusion Detection Environment)install_clamav- Activate ClamAV AntiVirusinstall_systemd_timesyncd- Use timesyncd instead of chronyinstall_protect_kernel_defaults- Set kernel-protect defaults upstream
-
Modify the
custom_role_namessetting by adding/home/imagebuilder/stig_ubuntu_2204for STIG or/home/imagebuilder/cis_ubuntu_2204for CIS.
For example, for additional CIS hardening:
  "ansible_user_vars": "install_aide=true install_clamav=true install_systemd_timesyncd=true install_protect_kernel_defaults=true",
  "custom_role_names": "/home/imagebuilder/tkg /home/imagebuilder/cis_ubuntu_2204",
Note
Custom Photon images are not supported for additional hardening via
ansible_user_vars. -
-
FIPS: To build a FIPS-enabled image, remove the following setting, if present:
"ansible_user_vars": "install_fips=no" -
Internet-Restricted: To build images for an internet-restricted environment that accesses the internet via HTTP proxy server, add the following:
"http_proxy": "http://proxy.acme.com:80", "https_proxy": "http://proxy.acme.com:80", "no_proxy": "localhost, 127.0.0.1, acme.com, 10.0.0.0/8" -
GPU-Enabled Clusters: To build an image for a GPU-enabled cluster add the following:
"vmx_version": "17"
You can add additional customizations to
tkg.jsonor put them in a separate filecustomizations.json. -
-
Collect the following parameter strings to plug into the
dockercommand in the next step. Many of these specifydocker run -vparameters that copy your current working directories into the/home/imagebuilderdirectory of the container used to build the image:AUTHENTICATION: Copies your local CLI directory. Use/PATH/TO/CREDENTIALS.json:/home/imagebuilder/vsphere.jsonSOURCES: Copies the repo’stkg.jsonfile, which lists download sources for versioned OS, Kubernetes, container network interface (CNI) images:- Use
/PATH/TO/tkg.json:/home/imagebuilder/tkg.json
- Use
ROLES: The repo’stkgdirectory, which contains Ansible roles required by Image Builder.- Use `/PATH/TO/tkg:/home/imagebuilder/tkg
TESTS: Copies agosstest directory designed for the image’s target infrastructure, OS, and Kubernetes verson:- Use the filename of a file in the repo’s
gossdirectory. - Example:
amazon-ubuntu-1.28.11+vmware.1-goss-spec.yaml
- Use the filename of a file in the repo’s
CUSTOMIZATIONS: Copies a customizations file in JSON format.- See Customization in the Image Builder documentation.
- Before making any modifications, consult with VMware Customer Reliability Engineering (CRE) for best practices and recommendations.
PACKER_VAR_FILES: A space-delimited list of the JSON files above that contain variables for Packer.COMMAND: Use a command likebuild-node-ova-vsphere-ubuntu-2204, based on the custom image OS.
-
Using the strings above, run the Image Builder in a Docker container pulled from the VMware registry
projects.registry.vmware.comexport ROLES="... the value for roles you created above" export SOURCES="... ..." docker run -it --rm \ -v $AUTHENTICATION \ -v $SOURCES \ -v $ROLES \ -v /PATH/TO/goss/TESTS.yaml:/home/imagebuilder/goss/goss.yaml \ -v /PATH/TO/metadata.json:/home/imagebuilder/metadata.json \ -v /PATH/TO/CUSTOMIZATIONS.json:/home/imagebuilder/CUSTOMIZATIONS.json \ --env PACKER_VAR_FILES="tkg.json CUSTOMIZATIONS.json" \ --env IB_OVFTOOL=1 \ projects.registry.vmware.com/tkg/image-builder:v0.1.14+vmware.2 \ COMMANDNote
This command may take several minutes to complete.
Examples
The
.ovafile is saved to the local filesystem of your workstation. Whatever folder you want those OVAs to be saved in should be mounted to/home/imagebuilder/outputwithin the container. Then, create the OVA using the container image:docker run -it --rm \ -v /PATH/TO/CREDENTIALS.json:/home/imagebuilder/vsphere.json \ -v $(pwd)/tkg.json:/home/imagebuilder/tkg.json \ -v $(pwd)/tkg:/home/imagebuilder/tkg \ -v $(pwd)/goss/vsphere-ubuntu-1.28.11+vmware.1-goss-spec.yaml:/home/imagebuilder/goss/goss.yaml \ -v $(pwd)/metadata.json:/home/imagebuilder/metadata.json \ -v /PATH/TO/OVA/DIR:/home/imagebuilder/output \ --env PACKER_VAR_FILES="tkg.json vsphere.json" \ --env OVF_CUSTOM_PROPERTIES=/home/imagebuilder/metadata.json \ --env IB_OVFTOOL=1 \ projects.registry.vmware.com/tkg/image-builder:v0.1.14+vmware.2 \ build-node-ova-vsphere-ubuntu-2204GPU-Enabled clusters: include the
customizations.jsonfile created in the steps above when running the command to create the OVA:docker run -it --rm \ -v /PATH/TO/CREDENTIALS.json:/home/imagebuilder/vsphere.json \ -v $(pwd)/tkg.json:/home/imagebuilder/tkg.json \ -v $(pwd)/tkg:/home/imagebuilder/tkg \ -v $(pwd)/goss/vsphere-ubuntu-1.28.11+vmware.1-goss-spec.yaml:/home/imagebuilder/goss/goss.yaml \ -v $(pwd)/metadata.json:/home/imagebuilder/metadata.json \ -v $(pwd)/customizations.json:/home/imagebuilder/customizations.json \ -v /PATH/TO/OVA/DIR:/home/imagebuilder/output \ --env PACKER_VAR_FILES="tkg.json vsphere.json customizations.json" \ --env OVF_CUSTOM_PROPERTIES=/home/imagebuilder/metadata.json \ --env IB_OVFTOOL=1 \ projects.registry.vmware.com/tkg/image-builder:v0.1.14+vmware.2 \ build-node-ova-vsphere-ubuntu-2204RHEL: to build a RHEL OVA you need to use a Linux machine, not macOS, because Docker on macOS does not support the
--network hostoption.
You must also register the OS as licensed with Red Hat and sign up for updates by adding the following to thedocker runcommand above:-v $(pwd)/isos/rhel-8.4-x86_64-dvd.iso:/rhel-8.4-x86_64-dvd.iso \ --network host \ --env RHSM_USER=USER --env RHSM_PASS=PASSWhere:
RHSM_USERandRHSM_PASSare the username and password for your Red Hat Subscription Manager account.- You map your local RHEL ISO path, in
$(pwd)/isos/rhel-8.4-x86-64-dvd.isoin the example above, as an additional volume.
-
Upload the image to vSphere. See Import the Base Image Template into vSphere in the Prepare to Deploy Management Clusters to vSphere.
If you uploaded the default Ubuntu OVA for your target Kubernetes version to vSphere, delete the default OVA before uploading your custom OVA.
Create a TKr for the Linux Image
To make your Linux image the default for future Kubernetes versions, create a TKr based on it. Otherwise, skip to Use a Linux Image for a Workload Cluster.
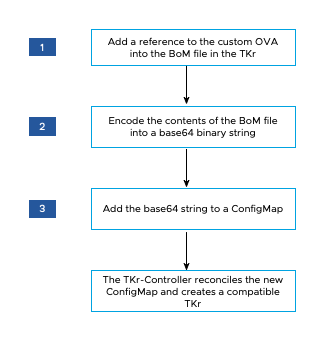
The diagram below provides a high-level overview of how to create a TKr for a custom Linux image on vSphere.
To create a TKr:
-
From your
~/.config/tanzu/tkg/bom/directory, open the TKr BoM corresponding to your custom image’s Kubernetes version. For example with a filename liketkr-bom-v1.28.11+vmware.1-tkg.1.yamlfor Kubernetes v1.28.11.If the directory lacks the TKr BoM file that you need, you can bring it in by deploying a cluster with the desired Kubernetes version, as described in Deploy a Cluster with a Non-Default Kubernetes Version.
-
In the BoM file, find the image definition blocks, which is
ovafor vSphere. The image definition block containsosinfo.name,osinfo.version, andosinfo.arch, where:osinfo.nameis the OS name. For example,ubuntu. To view the list of supported OSes, see Target Operating Systems.osinfo.versionis the OS version. For example,22.04. To view the list of supported versions, see Target Operating Systems.osinfo.archis the OS arch. Supported value isamd64.
-
To add a reference to your new OS image, add an image definition block under
ova.- Your image definition block must contain
osinfo.name,osinfo.version, andosinfo.arch, as described above. - For
name:use a unique name for your OVA that includes the OS version, for example,my-ova-ubuntu-2204. - For
version:use the uniqueVERSIONassigned inmetadata.jsonwhen you created the OVA, for example,v1.28.11+vmware.1-myorg.0.
Note
The
versionmust exactly match the sameVERSIONin themetadata.json. - Your image definition block must contain
-
In the
release.versionvalue, set a custom version by adding a suffix. Do not customize the version by adding a prefix. For example, changev1.28.11+vmware.1-tkg.1tov1.28.11+vmware.1-tkg.1-mycustomtkr. -
Save the BoM file with the same custom suffix as you specified for
release.versionin the previous step.If the filename includes a plus (
+) character, replace the+with a triple dash (---).For example, save the BOM file as
tkr-bom-v1.28.11---vmware.1-tkg.1-mycustomtkr.yaml.
-
-
base64-encode the file contents into a binary string, for example:cat tkr-bom-v1.28.11---vmware.1-tkg.1-mycustomtkr.yaml | base64 -w 0 -
Create a ConfigMap YAML file, for example named
configmap-v1.28.11---vmware.1-tkg.1-mycustomtkr.yaml, with values as shown:apiVersion: v1 kind: ConfigMap metadata: name: CUSTOM-TKG-BOM labels: tanzuKubernetesRelease: CUSTOM-TKR binaryData: bomContent: "BOM-BINARY-CONTENT"Where:
CUSTOM-TKG-BOMis the name of theConfigMap, which must include the TKrrelease.versionvalue that you specified in the BOM file, and replace any + symbols with a triple dash (—). For example, setv1.28.11---vmware.1-tkg.1-mycustomtkr.CUSTOM-TKRis a name for your TKr, which must match the value you specify forCUSTOM-TKG-BOM. For example,v1.28.11---vmware.1-tkg.1-mycustomtkr.BOM-BINARY-CONTENTis thebase64-encoded content of your customized BoM file, that you generated in the previous step.
For example:
apiVersion: v1 kind: ConfigMap metadata: name: v1.28.11---vmware.1-tkg.1-mycustomtkr labels: tanzuKubernetesRelease: v1.28.11---vmware.1-tkg.1-mycustomtkr binaryData: bomContent: "YXBpVmVyc2lvbjogcnVuLnRhbnp1...." -
Save the
ConfigMapfile, set thekubectlcontext to a management cluster you want to add TKr to, and apply the file to the cluster, for example:kubectl -n tkr-system apply -f configmap-v1.28.11---vmware.1-tkg.1-mycustomtkr.yamlThe TKr Controller reconciles the new
ConfigMapobject by creating aTanzuKubernetesRelease. The default reconciliation period is 600 seconds. You can avoid this delay by deleting the TKr Controller pod, which makes the pod restore and reconcile immediately:-
List pods in the
tkr-systemnamespace:kubectl get pod -n tkr-system -
Retrieve the name of the TKr Controller pod, which looks like
tkr-controller-manager-f7bbb4bd4-d5lfd -
Delete the pod:
kubectl delete pod -n tkr-system TKG-CONTROLLERWhere
TKG-CONTROLLERis the name of the TKr Controller pod.
-
-
To check that the custom TKr was added, run
tanzu kubernetes-release getorkubectl get tkror and look for theCUSTOM-TKRvalue set above in the output.
Once your custom TKr is listed by the kubectl and tanzu CLIs, you can use it to create management or workload clusters as described below.
Use a Linux Image for a Management Cluster
To create a management cluster that uses your custom image as the base OS for its nodes:
- When you run the installer interface, select the custom image in the OS Image pane, as described in Select the Base OS Image.
For more information, see How Base OS Image Choices are Generated.
Use a Linux Image for a Workload Cluster
The procedure for creating a workload cluster from your Linux image differs depending on whether you created a TKr in Create a TKr for the Linux Image above.
-
If you created a TKr, pass the TKr name as listed by
tanzu kubernetes-release getto the--tkroption oftanzu cluster create. -
If you did not create a TKr, follow these steps:
-
Copy your management cluster configuration file and save it with a new name by following the procedure in Configuration Files and Object Specs.
-
In the new configuration file, add or modify the following:
VSPHERE_TEMPLATE: LINUX-IMAGEWhere
LINUX-IMAGEis the name of the Linux image you created in Build a Linux Image.Remove
CLUSTER_NAMEand its setting, if it exists. -
Deploy a workload cluster as described in Create Workload Clusters.
-
