


Add an Amazon Web Services account to VMware Tanzu Platform hub
As a Tanzu Platform hub organization owner or administrator, you can use the AWS account workflow to create the roles and connections required for this account.
Before you begin
- To configure the account and collect data:
- Verify that you have the ID for any Amazon Web Services accounts that you plan to set up. The account must have sufficient permissions to create an IAM role, run connections script, and export access keys.
- Verify the account by accessing it using your AWS console.
- Install the AWS CLI or use AWS CloudShell. See the instructions in the AWS CLI documentation or AWS CloudShell documentation.
- If you are associating account with a Tanzu Platform hub project, verify that you created the project. For instructions, see Add projects.
-
To configure the event monitoring for accounts so that you receive real-time alerts for insights or finding information about misconfigurations and vulnerabilties rather than waiting for the next scan:
-
Set the following IAM policy so that you can export your AWS Access Key and the AWS Secret Access Key.
{ "Version": "2012-10-17", "Statement": [ { "Effect": "Allow", "Action": [ "sns:*", "cloudtrail:*", "cloudformation:*", "events:*", "iam:*", "ec2:DescribeRegions" ], "Resource": "*" } ] { -
Enable AWS CloudTrail.
- Install the AWS CLI. See the instructions in the AWS CLI documentation.
- Export the AWS Access Key and the AWS Secret Access Key. See the instructions in the AWS environment variables documentation. To export the keys, the user must have access to AWS CloudFormation, AWS Events Rule, AWS SNS Topic, and AWS SNS Topic Policy.
-
- Event streaming provides Tanzu Platform hub with real-time updates. When you configure event streaming, it is enabled for all your AWS regions. However, AWS charges you to manage the encryption keys. To manage your costs after you set up your AWS accounts in Tanzu Platform hub, you can continue the event streaming for your important regions and resources while deactivating the VMware event stream in the unused AWS regions.
Add a single AWS account
Use this workflow to add a single account. This process is useful if you do not have many AWS accounts that you want to manage. If you are new to Tanzu Platform hub, it is useful way to explore how Tanzu Platform hub can help you manage your resources.
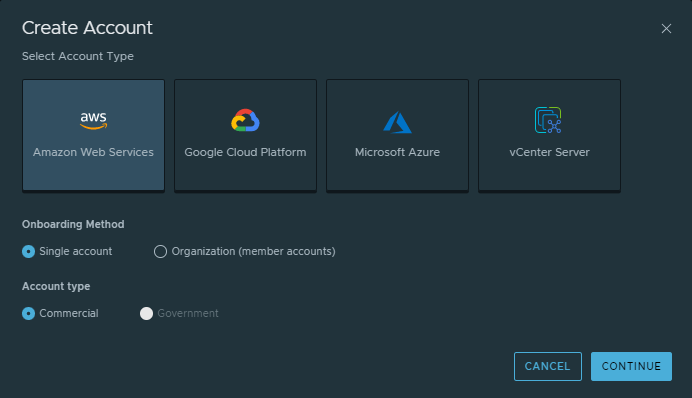
- In Tanzu Platform hub, select Setup & Configuration > Cloud Accounts and click New Accounts.
-
Click Amazon Web Services, select Single account, and click Continue.
-
In the Account Information section, enter useful account information.
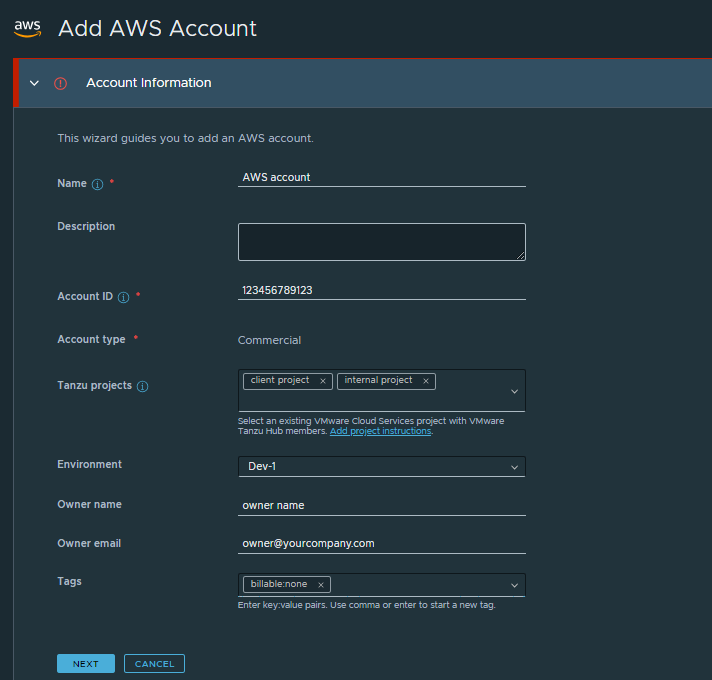
- Enter the name and your Account ID.
- If you work with projects, select one or more Tanzu Platform hub projects that you are associating with the AWS account.
-
You can use Environment to add descriptive metadata to accounts that are used by some features in Tanzu Platform hub.
For example, if you add and select environments such as prod, dev, and test, you can then apply governance policies to a particular environment. You can then search based on environment and even apply a policy to the resources in your production environment but not development or testing.
-
Enter the owner name and email address.
- Click Next
-
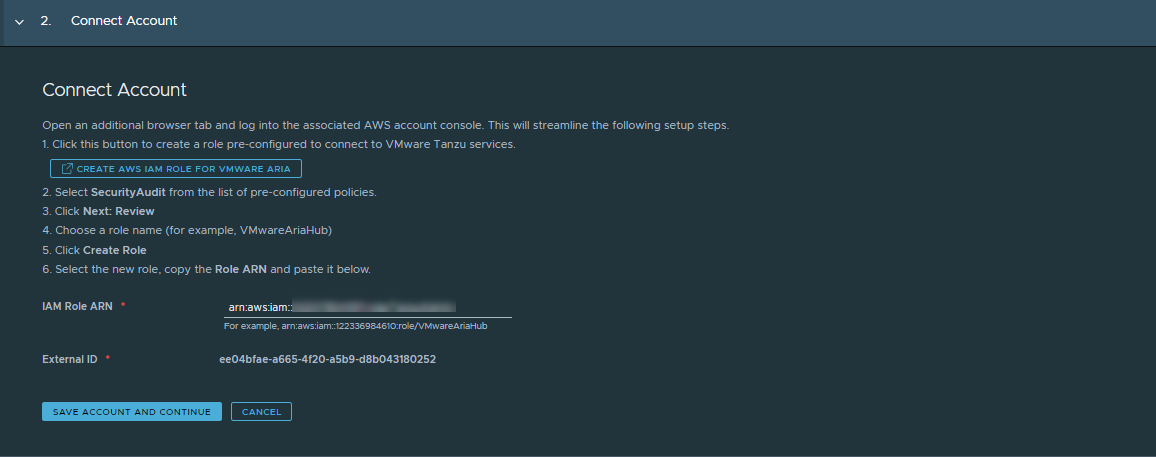
In the Connect Account section, follow the on-screen steps to configure the least privileged account in you AWS instance and update this page with the IAM Role ARN and the External ID.
The steps that are provided in the UI are repeated in this procedure for your convenience.
- Open a browser tab and log in with the account that you are creating the read-only role for.
-
In step 1, click Create AWS IAM Role.
The Another AWS account workflow begins in AWS.
In most cases, you do not need to change the values on the Specify accounts that can use this role page.
Click Next: Permissions.
-
Locate and select the SecurityAudit role.
Click Next: Tags.
-
Tags are optional. Click Next: Review.
- Review the Role name and ensure uniqueness.
- Click Create role.
- In the IAM Roles list, click the role name. For example, TanzuHub.
- On the role summary page, copy the ARN so that you can paste it in the IAM Role ARN in the Connect Account form in Tanzu Platform hub.
- In the Connect Account section, paste the ARN in the IAM Role ARN text box.
- Click Save Account and Continue.
-
In the Account Onboarding section, enable event monitoring.
To configure event stream, which provides updates about security findings for this cloud account, you must configure AWS so that you can run a connection script. See the prerequisites at the beginning of this procedure.
The connection script adds a policy with the following permissions and assigns the policy to the role you created in the previous section.
- cloudwatch:GetMetricData and cloudwatch:ListMetrics. These permissions are required to collect metrics.
- ce:GetCostAndUsage and ce:GetCostForecast. These permissions are required to collect cost information. In addition to the collection permissions, the SecurityAudit policy-based role permits AWS CloudTrail to send real-time update to Tanzu Platform hub.
The steps that are provided in the UI are repeated in this procedure for you convenience.
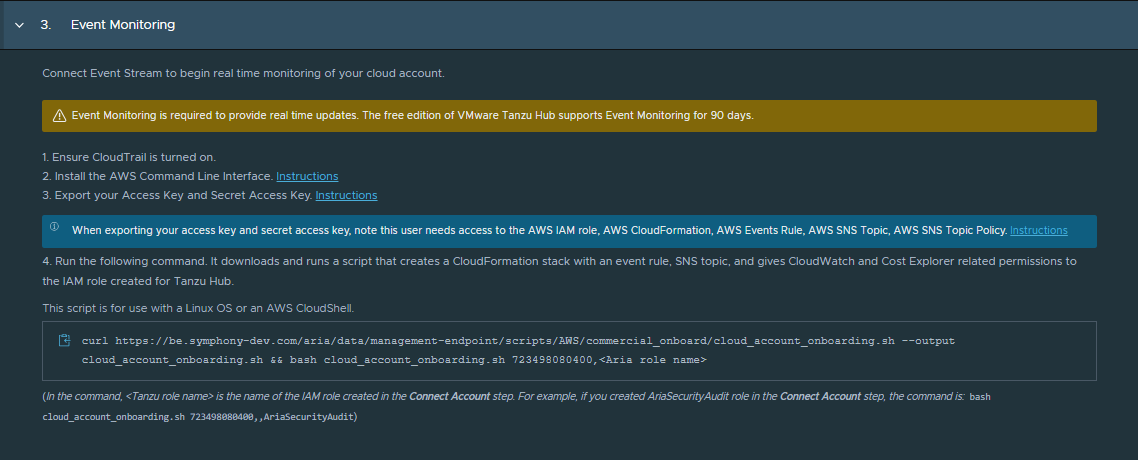
- In AWS, ensure that your AWS CloudTrail is turned on.
-
Install the AWS CLI.
Instructions are accessible with the link on the page or this link to AWS documentation.
-
Export the Access Key and the Secret Access Key.
Instructions are accessible with the link on the page or this link to AWS documentation.
-
Run the command to download and run the script that creates a CloudFormation stack with the required configurations.
- Launch AWS CloudShell and upload the script.
-
Enter the IAM role that you created for this connection.
For example, TanzuHub.
-
Run the script.
-
After the script runs successfully, return to Tanzu Platform hub and click Next.
As a free tier user, you can collect data from two accounts. Paying users can configure the full management capabilities for their AWS accounts.
-
On the Accounts page, verify that the data source is added, the Status is OK, and the Event Monitoring state is Connected.
The collection might take up to thirty minutes before you see data. To monitor the process, select Infrastructure > Search > Inventory.
Add an AWS GovCloud account
Use this workflow if you must add accounts handling sensitive data on AWS GovCloud. Adding an AWS GovCloud account has some differences from the commercial account workflow. Those differences are that event stream (near real-time updates) is not supported for AWS GovCloud, and credentials are provided through a programmatic access key rather than an IAM role.
-
In Tanzu Platform hub, select Setup & Configuration > Cloud Accounts and click New Account.
-
Click Amazon Web Services, select Single account and Government, then click Continue.
-
In the Account Information section, enter useful account information.
- Enter the name and your Account ID.
- If you work with projects, select one or more Tanzu Platform hub projects that you are associating with the AWS account.
-
You can use Environment to add descriptive metadata to accounts that are used by some features in Tanzu Platform hub.
For example, if you add and select environments such as prod, dev, and test, you can then apply governance policies to a particular environment. You can then search based on environment and even apply a policy to the resources in your production environment but not development or testing.
-
Enter the owner name and email address.
- Click Next
-
The next screen of the UI prompts you to enter an Access Key ID and Secret Access Key from your AWS GovCloud account. The steps provided in the UI are repeated here for your convenience.
-
Log in to your AWS GovCloud console.
-
Go to the IAM service.
-
Go to Users and click Create users.
-
Enter a user name and click Next.
-
Select Attach existing policies directly.
-
Search and select SecurityAudit from Amazon’s pre-configured policies and click Next.
-
(Optional) Add any tags you want the user to have and click Create user.
-
From IAM > Users, select the user you created.
-
In the user’s detail page, click Security Credentials.
-
Scroll down to Access keys and click Create access key.
-
Select Third-party service.
-
Select I understand the above recommendation and want to proceed to create an access key and click Next.
-
(Optional) Add a tag for the security key and click Create Access key.
-
Copy the Access Key and Secret access key.
Important
Be sure to copy the keys from the Retrieve access keys page. You will not be able to retrieve the Secret access key after you close the AWS window.
-
- Once you have the access key and secret, enter them where prompted in the UI and click Save and Finish.
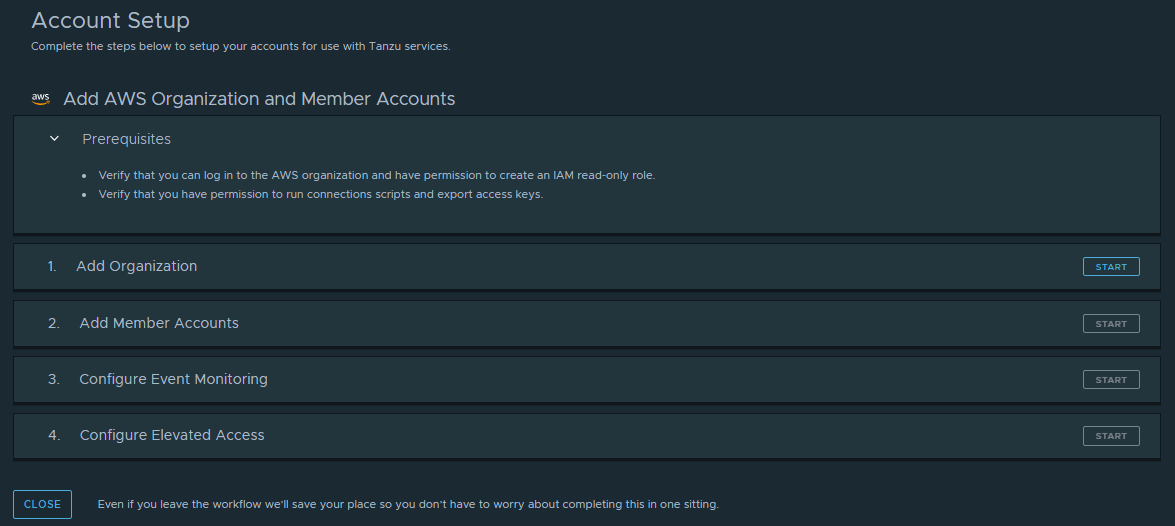
Add multiple AWS accounts
While you can continue to add cloud accounts one at a time with the single account method, it will become tedious in your enterprise environments.
Onboarding accounts using the organization method allows you to add multiple accounts with whatever level of management you want. However, you can only onboard 100 accounts at a time before you must run the organization onboarding for the next 100 accounts.
When using this procedure, you can refer to the images and more detailed information in the single account section. While the order is slightly different, the process is the same.
Be sure to use the scripts on the pages in this procedure. They are customized each time you onboard the resources. Do not reuse scripts from previous onboarding actions.
- In Tanzu Platform hub, select Setup & Configuration > Cloud Accounts and click New Accounts.
-
Click Amazon Web Services, select Organization (member accounts), and click Continue.
-
To add the organization root account, click Start in the Add organization step.
-
On the Add Account page, enter the root account ID for the member accounts that you are adding.
The root account is required here so that Tanzu Platform hub can collect the member accounts that you want to manage.
-
Complete the form and click Next.
If you have not added an account before, see the step in the previous single account section for this step and the others that follow for additional details.
-
On the Connect Account page, follow the on-screen instructions for adding the read-only collection IAM role for the root account and click Save Account and Continue.
When you click Save, Tanzu Platform hub uses the collection role to discover the member accounts so that you can choose the ones you want to manage.
-
On the Configure the Event Monitoring page, if you want to get real-time event reporting in Tanzu Platform hub for the root account, follow the on-screen instructions to enable event monitoring.
- Click Save and Finish.
-
-
To add the multiple member accounts associated with the root account, the next steps require you to select the accounts in each of the following sections.
The ability to select individual member accounts for each onboarding step allows you to be selective about how you want to use Tanzu Platform hub to manage various member accounts.
Step Procedure Add Member Accounts Select the accounts that you want to collect data from and configure the IAM read-only role on each as a bulk action. - Select the member accounts
- Configure the IAM read-only collection role.
- Edit account properties, including assigning accounts to one ore more projects.
Projects are used to manage access. - Onboard the accounts.
Configure Event Monitoring Select the accounts that you want to collect real-time event data from and configure the event monitor. - Select the member accounts.
- Configure the event monitoring.
-
Click Save and Finish.
- On the Accounts page, verify that the accounts that you added are included in the table as individual entries.
What to do next
- The collection might take up to thirty minutes before you see data. To monitor the process, select Infrastructure > Search and click the Inventory tab. See Reviewing your discovered inventory.
- If you need to make changes to an AWS account, select Setup & Configuration > Cloud Accounts, expand the details for the target account, and click Edit Account or edit the individual account properties.
Parent topic: Setting up data connections in VMware Tanzu Platform hub
