


Add a Microsoft Azure account to VMware Tanzu Platform hub
As a Tanzu Platform hub organization owner or administrator, you can run the Microsoft Azure account workflow to create the roles and connections required for this account
Before you begin
- To configure the account and collect data:
- Verify that you have the subscription ID for your Azure service.
- Verify the account by accessing it using your Azure console.
- If you are associating account with a Tanzu Platform hub project, verify that you created the project. For instructions, see Add projects.
-
To configure the event monitoring:
- Verify that you have the Azure Cloud Shell or install Azure CLI. See the instructions in the Microsoft Azure documentation for Cloud Shell and for Azure CLI.
- To run the commands from the Azure CLI, verify that you have privileges to create resource groups. See the instructions in the Microsoft Azure documentation.
-
Create a Tanzu Platform cloud services token.
- Open your User/Organization settings menu, in the top-right with your name and organization name, and click My Account.
- Click the API Tokens tab and click Generate a New API Token.
- Enter the Name, for example, Tanzu Platform hub.
- Set the Token TTL to never expires.
-
In the Define Scope section, select the following roles.
You must have the following roles assigned to you in your organization before you can configure the token.
- Navigate to Organization Roles > All Organization Roles and select the Organization Owner role.
- Search for Tanzu Hub and select the Tanzu Hub Admin role.
- Search for Secure State and select the Secure State Admin role.
- Click Generate.
- Copy and save the token for use as you configure the account.
Add a single Microsoft Azure account
Use this workflow to add a single account. If you are new to Tanzu Platform hub, it is useful way to explore how Tanzu Platform hub can help you manage your resources.
If you want to add multiple accounts, repeat the process for each account.
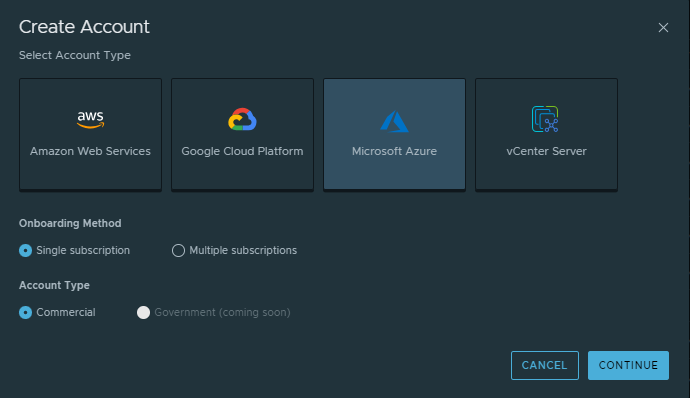
- In Tanzu Platform hub, select Setup & Configuration > Cloud Accounts and click New Account.
-
Click Microsoft Azure, select Single Subscription, and click Continue.
-
In the Account Information section, enter useful account information.
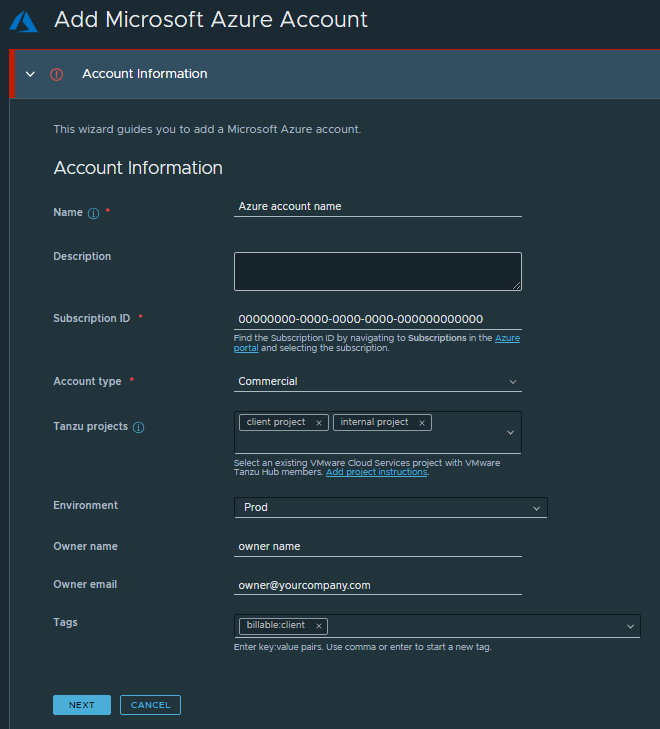
- In the Account Information section, enter a useful Name and your 36-digit Azure Subscription ID in the correct format.
- For the Account type, select Commercial.
- If you work with projects, select one or more the Tanzu Platform hub projects that you are associating with the Azure account.
-
You can use Environment to add descriptive metadata to subscriptions that are used by some features in Tanzu Platform hub.
For example, if you add and select environments such as prod, dev, and test, you can then apply governance policies to a particular environment. You can then search based on environment and even apply a policy to the resources in your production environment but not development or testing.
-
Enter the owner name and email address.
- Click Next.
-
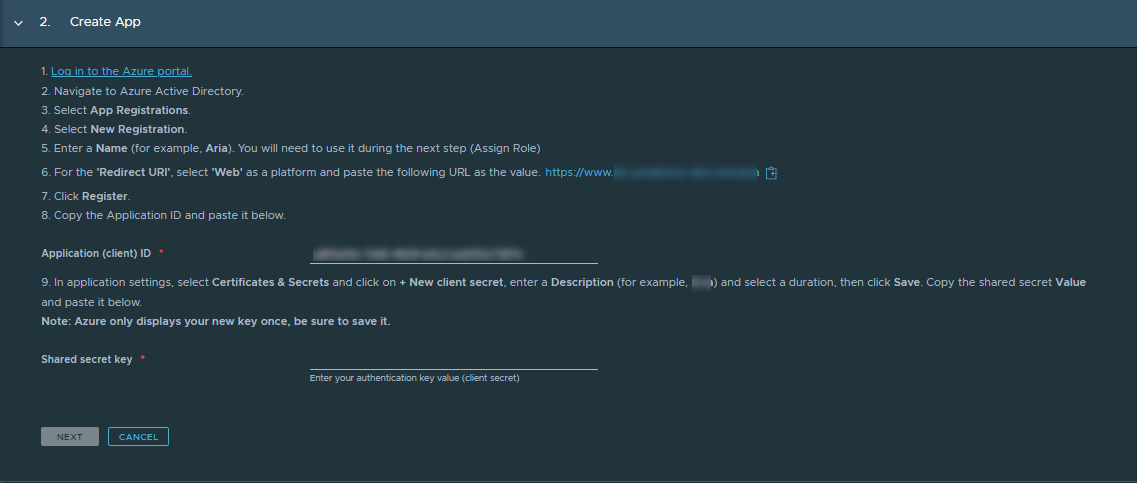
Register VMware Tanzu Platform hub as an application in the Azure portal and add the Application ID and Shared secret key to this Create App form in Tanzu Platform hub.
The steps that are provided in the UI are repeated in this procedure for you convenience.
-
Click Login to the Azure portal on the form.
The Microsoft Azure portal opens in a new tab.
-
In Microsoft Azure, open your Azure Active Directory.
- Click App registrations.
- Click New registration.
- On the Register an application page, enter Tanzu as the Name.
- For the Redirect URI, select Web as the platform type and enter the URL that you copied from the Redirect URI step in Tanzu Platform hub.
- Click Register.
- Copy the application ID and enter in the Application ID text box on the Tanzu Platform hub page.
- In Azure, click Certificates and secrets, click New client secret, provide a name, and copy the generated value.
- Enter the secret value in the Shared secret key text box in Tanzu Platform hub.
- Click Save Account and Continue.
-
-
In Azure Active Directory, configure the reader role to use with Tanzu Platform hub and enter the tenant ID.
The steps that are provided in the UI are repeated in this procedure for you convenience.
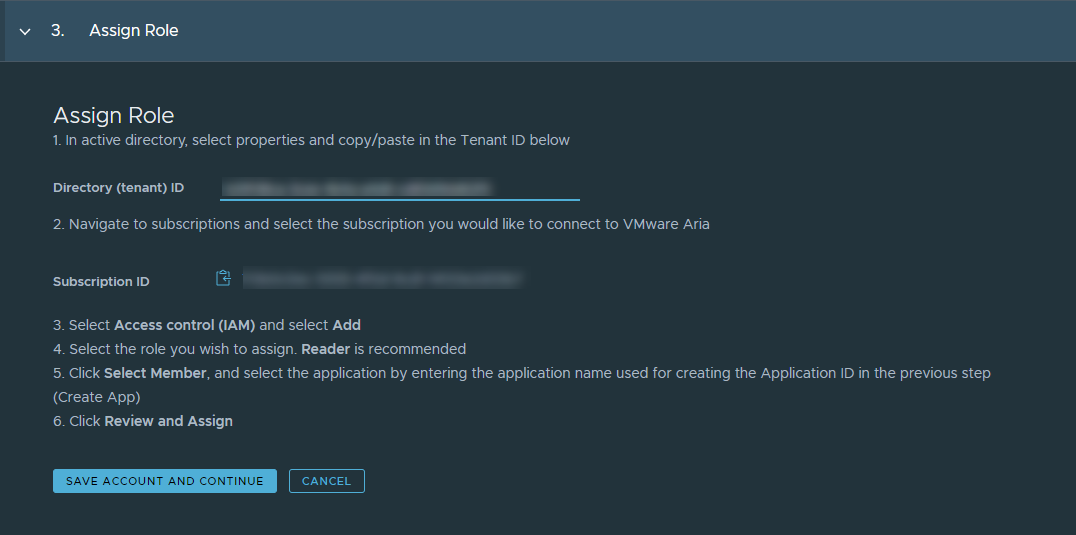
- In Azure, on the application overview page, copy the Directory (tenant) ID.
- In Tanzu Platform hub, enter the copied value in the Tenant ID text box.
- In Azure, go to the top level page and click Subscriptions.
- Click the subscription name.
- On the subscription details page, click Access control (IAM).
- Click Add and then click the Add role assignments tab.
- On the Roles tab, search for and select the Reader role.
- Click the Members tab, click Select members, and add the TanzuHub user as a member.
- Click Review and assign.
- Return to Tanzu Platform hub and click Save Account and Continue.
-
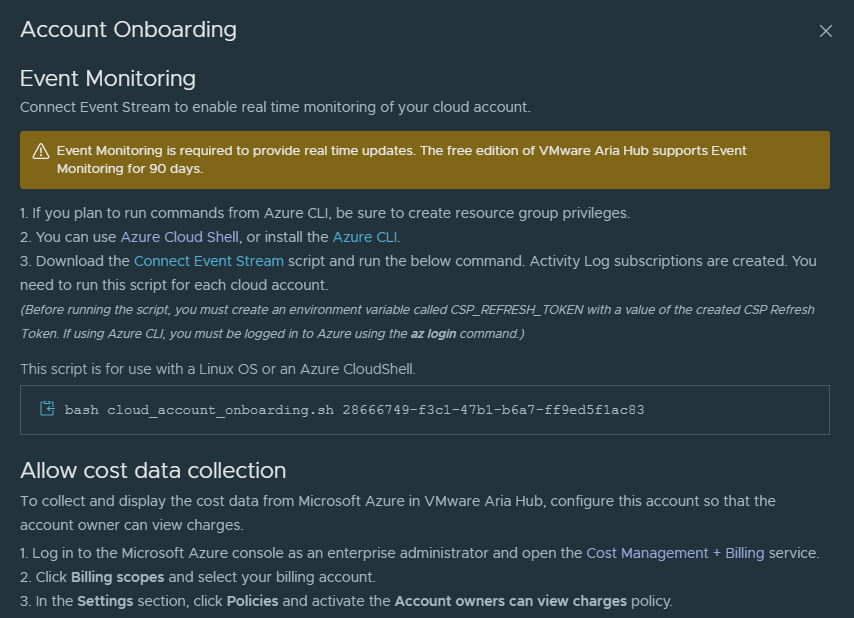
In the Account Onboarding section, enable event monitoring cost collection.
To configure event monitoring, which provides updates about security findings for this cloud account, you must configure Microsoft Azure so that you can run a connection script. See the prerequisites at the beginning of this procedure.
The steps that are provided in the UI are repeated in this procedure for you convenience.
-
Use either the Azure Cloud Shell or Azure CLI to run the script provided in the following step in the event monitoring configuration UI.
This procedure is based on Azure Cloud Shell.
-
To download the script, click Connect Event Stream.
-
In Cloud Shell, run
export CSP_REFRESH_TOKEN={CSP token}to set the token variable.The
{CSP token}is the Tanzu Platform cloud services token that you created as part of the prerequisites for this procedure. -
Copy and paste the bash command from Tanzu Platform hub into Cloud Shell and run it.
-
- To allow cost collection, log in to your Azure console.
- Open the Cost Management + Billing service.
- Click Billing scopes and select your account.
- In the Settings section, click Policies and activate the Account owners can view charges policy.
- In Tanzu Platform hub, click Next.
- Click Finish.
- On the Accounts page, verify that the data source is added, the Status is OK, and the Event Monitoring state is Connected.
Add multiple Microsoft Azure accounts
If you have multiple Microsoft Azure accounts to add, you can add them using the Multiple Subscriptions options rather than adding then one at a time.
You can onboard subscriptions in groups of 100 accounts at a time.
When using the following procedure, you can refer to the images and details in the single subscription procedure.
Be sure the use the scripts on the pages in this procedure. They are customized each time you onboard the resources. Do not reuse a script from previous onboarding actions.
- In Tanzu Platform hub, select Setup & Configuration > Accounts.
-
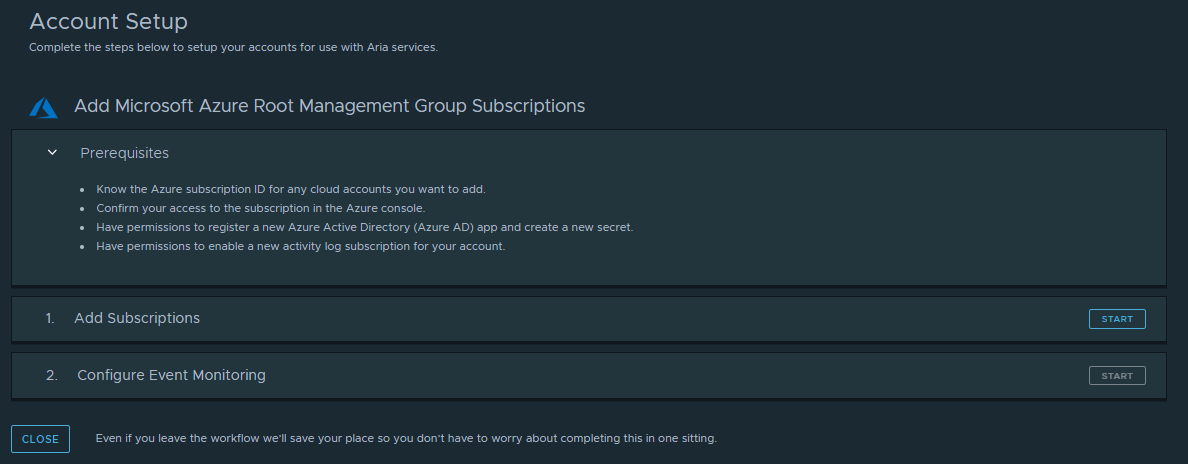
Click Microsoft Azure, select Multiple subscriptions, and click Continue.
-
To add subscriptions, click Start in the Add Subscriptions step.
-
On the General Information page, select the Account Type.
The other values are optional. Click Next.
-
On the Create App page, register Tanzu Platform hub as an application in the Azure portal and add the Application ID and Shared secret key to this Create App form in Tanzu Platform hub, and then click Next.
Details about this process are available in the single account instructions.
-
On the Assign Role page, configure the reader role to use with Tanzu Platform hub and enter the tenant ID, and then click Next.
Details about this process are available in the single account section.
-
On the Select Subscriptions page, select the subscriptions that you want to add to Tanzu Platform hub by click Add Subscriptions.
You can only onboard 100 subscription per process. To add additional subscriptions, you can repeat this workflow.
When the curated list is ready, click Next.
-
On the Edit Properties page, modify the properties for various subscriptions as needed.
The subscriptions inherit the values that you defined on General Information page. If you want to change the properties for various subscriptions, select them and then click Edit Settings.
When the settings are defined to you satisfaction, click Next.
-
On the Onboard Accounts page, click Onboard Accounts.
When the subscriptions are onboarded, click Close.
-
-
In the Configure Event Monitoring step, activate event monitoring cost collection.
- On the Select Subscriptions page, select the subscriptions that you want to onboard and click Continue.
-
On the Configure Event Monitoring page, follow the on-screen instructions.
Details about this process are available in the single account section.
-
Click Finish.
- Click Save and Finish.
- On the Accounts page, verify that the subscriptions that you added are included in the table as individual entries.
What to do next
- The collection might take up to thirty minutes before you see data. To monitor the process, select Infrastructure > Search and click the Inventory tab. See Reviewing your discovered inventory.
- If you need to make changes to an Azure account, select Setup & Configuration > Accounts, expand the details for the target account, and edit the individual account properties.
Parent topic:Setting up data connections in VMware Tanzu Platform hub
