


Remediate security posture findings in VMware Tanzu Platform hub
You can use the remediation worker in Tanzu Platform hub to set up remediation actions to resolve violation findings and streamline the governance finding resolution process. The actions can return the misconfigured resources to the state defined in the policies. You can either make the action available for your users to run, or configure the actions to auto-enforce the required state of your account.
What is remediation
Remediation is a corrective action that you take on the findings identified for your cloud accounts. With the remediation actions in Tanzu Platform hub, you can manually or automatically remediate various types of findings for your AWS cloud accounts and Azure subscriptions.
| Type of worker | What it is | How to remediate findings |
|---|---|---|
| Remediation worker | A Docker container image that contains remediation scripts. The remediation worker must be deployed to your environment. The container includes actions that can address violation type of findings and common misconfigurations. You can modify the actions or create your own. | To remediate findings from posture policies, you can run remediation actions by using the remediation worker. |
The credentials associated with the worker depend on whether you are running a remediation job or associating it with a GitHub or GitLab repository.
How to define and apply remediation actions by using a remediation worker
You deploy a remediation worker group in your cloud account. The worker group includes workers and remediation scripts that performs corrective action on your cloud resources. A single worker group can act on multiple cloud accounts. You can run multiple worker groups on your cloud accounts.
- The remediation job runs on the worker that you deploy to the Docker container image.
- The remediation actions configure the criteria for the remediation job. Actions can include tags, regions, and more.
Verify your permissions
Before you can create the remediation worker group and actions, you must have the correct permissions in your cloud account and in Tanzu Platform hub.
- In your cloud account, you must configure the correct permissions that authenticate the remediation worker when you deploy it, and allow it to perform remediation actions.
-
In Tanzu Platform hub, you must verify the permissions that you need.
Role Create or update remediation View remediation Trigger remediation Tanzu Hub Admin Yes Yes Yes Tanzu Hub Analyst No Yes Yes Tanzu Hub Viewer No Yes No -
For more information about roles and permissions in Tanzu Platform hub, refer to Setting up users and projects for VMware Tanzu Platform hub.
Configure a remediation worker group
Before you set up remediation by using the remediation worker groups:
- Verify that you have a login for Docker if you plan to pull VMware images from the public repository.
- Be aware that the remediation worker images are located in the VMware space in Docker at hub.docker.com/r/vmware/vss-remediation-worker.
To remediate violation findings, configure the remediation worker groups by following these steps.
-
Create the required roles in your AWS account or Azure subscription, and assign permissions to those roles as needed.
-
For AWS, in your AWS console:
-
Create an IAM role for each cloud account where you will run the remediation, and assign the minimum permissions required to run the remediation action. You can see the permissions required for each remediation by going to the remediation GitHub repository, choosing a remediation, and copying the minimum_policy.json file into the AWS policy editor. Here is an example using the permissions from the ec2_close_port_22 remediation.
{
    "Version": "2012-10-17",
    "Statement": [
        {
            "Sid": "EC2ClosePort22",
            "Effect": "Allow",
            "Action": [
                "ec2:DescribeInstances",
                "ec2:RevokeSecurityGroupIngress",
                "ec2:DescribeSecurityGroupRules"
            ],
            "Resource": "*"
        }
    ]
}
For more information about how to use the IAM role to delegate access to resources, refer to https://docs.aws.amazon.com/IAM/latest/UserGuide/tutorial_cross-account-with-roles.html.
-
Create an IAM policy with the following permissions, then create an IAM role for your worker and assign the policy to it. The worker needs the role and permissions to perform the remediation actions.
{
    "Version": "2012-10-17",
    "Statement": [
        {
            "Effect": "Allow",
            "Principal": {
                "Service": "ec2.amazonaws.com"
            },
            "Action": "sts:AssumeRole"
        }
    ]
}
For more information about creating an IAM role in your AWS EC2 instance and delegating access to it, refer to https://docs.aws.amazon.com/codedeploy/latest/userguide/getting-started-create-iam-instance-profile.html.
-
-
For Azure, in your Azure subscription:
-
Create an Entra ID application registration that authenticates the worker.
For more information, refer to https://learn.microsoft.com/en-us/azure/active-directory/develop/quickstart-register-app.
You can also follow the instructions to create an app when onboarding an Azure subscription to Tanzu Platform hub, as the process is identical.
-
In the Azure subscription that you intend to remediate, create a custom IAM role. As with AWS, use a minimum_policy.json file from the remediation GitHub repository to create the necessary permissions. The following is an example of a permissions file from the remediation job for closing the RDP port in network security groups:
{
"properties": {
    "roleName": "remediate_network_security_group",
    "description": "This role has required permission to make changes in the network security groups",
    "assignableScopes": [
    ],
    "permissions": [
        {
            "actions": [
            "Microsoft.Network/networkSecurityGroups/read",
            "Microsoft.Network/networkSecurityGroups/write"
            ],
            "notActions": [],
            "dataActions": [],
            "notDataActions": []
        }
        ]
    }
}
For more information, refer to https://learn.microsoft.com/en-us/azure/role-based-access-control/custom-roles-portal.
-
If you intend to remediate multiple subscriptions, you can select them when assigning scopes to the custom IAM role.
- At the subscription level, assign the role to the Azure AD application.
- Copy the application ID, directory ID, and client secret.
-
-
- For AWS: In your AWS console, copy the values for the Role ARN and External ID for each cloud account that you intend to remediate. You will enter these values when you create the remediation worker group in the following steps.
- Determine the accounts where you intend to deploy the worker group.
- In your AWS console, locate the Amazon Resource Name (ARN) and External ID for your cloud account. For more information, refer to https://docs.aws.amazon.com/managedservices/latest/userguide/find-arn.html.
- Create a remediation worker group and deploy it to a Docker container image in your AWS instance or Azure subscription.
- In Tanzu Platform hub, click Setup & Configuration > Worker Groups.
- On the Remediation Worker Groups tab, click New Remediation Worker Group.
- Provide a name and description for the remediation worker group, and click Next.
- Select one or more AWS cloud accounts and Azure subscriptions that the worker group will remediate, and click Next.
- Associate the AWS cloud accounts and Azure subscriptions that you selected with the worker group by providing the required information, and click Next.
- For each AWS cloud account, provide the Role ARN and the External ID.
- For Azure cloud accounts, you do not need to provide any information.
-
Deploy the remediation worker group.
On the Deploy page, the Group ID, Client ID, Client secret, and worker deployment script appear.
- Copy the client secret and save it.
- Copy the worker deployment script for AWS Docker or Azure Docker.
- To deploy the remediation worker group, click Finish.
- After the worker group gets deployed, you can locate the pertinent information about it.
- On the Properties tab, the group ID, client ID, and client secret appear. The deploy script that ran appears. If needed, you can also generate a new client secret.
- On the Associated Accounts tab, you can expand the arrows for an account and view the Account ID, Provider, Role ARN, and External ID for the account. You can add more associated accounts as needed.
-
To start the remediation worker, go to your Docker container, and run the script that you copied.
The script uses the Docker run command to perform the remediation.
- Verify that your Docker container is running.
- Open the command line.
- Paste the remediation worker deployment script that you copied into the command line.
- Replace the placeholder for the remediation worker group name with the actual remediation worker name.
-
Replace the other placeholder values with actual values.
For AWS, replace the following values:
- AWS Client ID: VSS_CLIENT_ID={ENTER CLIENT ID}
- AWS Client secret: VSS_CLIENT_SECRET={ENTER CLIENT SECRET}
For Azure, replace the following values:
- Azure Client ID: AZURE_CLIENT_ID={ENTER AZURE_CLIENT_ID}
- Azure Client secret: AZURE_CLIENT_SECRET={ENTER AZURE CLIENT SECRET}
- Azure tenant ID: AZURE_TENANT_ID={ENTER AZURE_TENANT_ID}
- Azure Git personal token: GIT_PERSONAL_TOKEN={ENTER GIT PERSONAL TOKEN}
-
Run the deployment script and verify that the worker started. Here is an example of a successful deployment:
time=2024-01-26T19:57:19.111456976Z caller=logger.go:185 level=info LEVEL=INFO message="Worker started and is waiting for work" workerID=07596c761288 workerGroupID=e98b41fc-3469-45a2-b5a8-13e54c4c78d0 -
In Tanzu Platform hub, select your worker group and click the Workers tab to verify your worker appears with a status of Online.
-
Under Properties, set the worker group to Enabled.
Your worker group is now configured and connected to your cloud accounts. See the next section to create remediations actions for your associated cloud accounts.
Configure remediation actions
Now that a remediation worker been configured and deployed, you can create remediation actions to run jobs on your cloud accounts.
-
In Tanzu Platform hub, click Security Posture > Remediations
-
On the Remediations tab, click New Remediation.
-
Enter a name, provider, and select a worker group for your remediation.
-
Choose a policy you want to remediate and one or more accounts the remediation job should run in. You can also select additional criteria to refine the scope of findings you want to remediate.
-
Select the remediation job to associate with your policy.
-
Review the remediation action and click Publish when you are ready to activate it. If you want remediations to run automatically when findings are detected, you can set Auto-remediation to Active.
-
To manually run remediation actions, select your configured remediation from the Security Posture > Remediations tab and view your detected findings.
-
Click the taskbox next to a finding, then click Remediate to run the remediation action.
-
You can check a remediation status by clicking Submitted.
Troubleshooting
Worker group fails to create in Tanzu Platform hub
Users may encounter an issue where, after clicking the New Remediation Worker Group button on the Setup & Configuration > Worker Groups page, they receive a generic error.
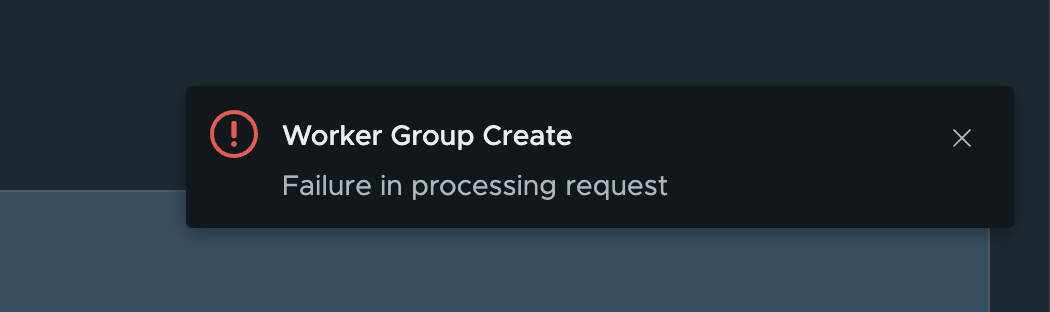
This problem may result from a large amount of permissions granted to the user, causing a token overflow error. Follow these steps to verify and resolve the error:
-
Open the URL in developer mode for your browser and fetch the authorization token in the request header.
-
Decode the the token in jwt.io and search for the
ovlandovcattributes.
If both attributes are present, the user’s token is overflowing. Evaluate the number of permissions assigned to the user and consider reducing them. Tanzu Hub Admin is the minimum permission a user needs to create worker groups. If the user is also assigned Tanzu Hub Analyst and Tanzu Hub Viewer roles, consider removing them.
How to create custom remediation jobs
Tanzu Platform hub provides a highly extensible remediation framework for improving cloud security by automating actions across your cloud environments. You can customize remediation actions by modifying creating new jobs, or modifying or deleting existing jobs. The framework can be extended for various use cases for security operations and administration, such as applying cloud tags to resources, creating JIRA tickets after taking a remediation action, sending an email after applying a hardened configuration, and so on.
You can add new remediation jobs or modify existing jobs by making changes to the worker container. It is a best practice to make modifications to jobs by first running the worker container locally, mounting the local directory on the container, and then making changes.
Find existing remediation jobs
All remediation jobs can be found in a designated directory on the remediation worker. Before performing these steps, ensure you disable the associated worker group. Run the worker in your preferred environment, then use the following commands:
-
Run
docker psto list all running containers and find the container ID for your worker. -
Connect to the remediation worker container with
docker exec -it {Container ID} /bin/sh. -
Run
cd opt/vss/job-code/to navigate to the directory with all the remediation jobs.
Remediation jobs are Python scripts that follow certain naming and design conventions. Each directory in the job-code folder represents a unique job, and each job contains a .py file with the directory name. The name of the job directory registers itself as the job name on the Tanzu Platform hub platform. The .py file is executed by the worker with certain arguments each time a remediation action is triggered.
Every job also includes a minimum_policy.json describing the minimum permissions needed for the job, along with a README file with details about what the job does.
By convention, all jobs are executed via the {Job Name}.py file with the following argument available as sys.args[1]:
{
  "cloudAccount": {
    "provider": string,
    "roleArn": string,
    "subscriptionId": string,
    "applicationId": string,
  },
  "notificationInfo": {
    "RuleID": string,
    "RuleName": string,
    "RuleDisplayName": string,
    "Level": string,
    "Service": string,
    "FindingInfo": {
      "FindingId": string,
      "ObjectId": string,
      "ObjectChain": string,
      "CloudTags": {
        "key1": "value1",
        "key2": "value2",
      },
      "RiskScore": integer,
      "Region": string,
      "Service": string
    }
  },
  "autoRemediate": boolean
}
Properties such as ObjectId and CloudAccountId can be used to identify the targeted resource. Other properties may be used for logging or building logic in custom jobs.
Creating a new job
Begin by navigating to the opt/vss/job-code/ directory. Create a new directory with the name of the desired job. Spaces are not allowed in the name. Next, create a Python script matching the job name i.e. {Job Name}.py file. Refer to one of the other jobs in the same directory for an example.
-
Navigate to the opt/vss/job-code/ directory.
-
Create a new directory with the name of the desired job, ensuring there are no spaces.
-
Write your Python script and name the file to match the job name like so: {Job Name}.py
The remediation job runs with the JSON string parameter (sys.args[1]) containing all the details of the finding, the object, and the remediation status. The schema of the argument is provided above. You can include other Python files, import other libraries, and so on as long as the running environment supports it. All standard out and standard error logs are sent back to Tanzu Platform hub and can be viewed in the Remediation Logs tab and the linked Worker Group Logs tab.
NoteThe remediation job directory name MUST match with the .py file for correct setup. In case of a name mismatch, the worker error logs will identify it. Remediation jobs utilize boto3 for making calls to the AWS APIs. Refer to the Boto3 documentation for supported services and APIs.
For iterative custom job development, mount your local drive to the worker container so that any changes made locally are automatically synced to the worker.
-
Copy the remediation jobs from the container to a local folder.
docker cp {Container ID}:/opt/vss/job-code {destination folder} -
Make updates to the folder here, following the guidelines for creating a new remediation job described preciously.
-
Mount the local folder on the worker container by running the container with the command provided in the platform and adding the volume mount parameter:
-v "$(pwd)":/opt/vss/job-code
The worker job code is registered with Tanzu Platform hub only during worker startup time, so you must restart the worker container after making changes. We recommend users to follow all development best practices when developing new remediation job code. Finally, deploy a worker with the new image. The worker will register the newly created remediation job with Tanzu Platform hub, and it will now be available for selection when you create a new remediation.
NoteTanzu Platform hub only supports one worker instance per worker group for custom jobs. While the system may seem to work as expected with multiple workers, differences in custom jobs can lead to mismatches in the job code versions, leading to unexpected outcomes when a remediation job is started. Multiple workers with custom job are planned to be supported in a future release
Modify an existing job
Similar to authoring a new job, you can modify any existing job listed in the opt/vss/job-code/ directory. Disable the remediation worker group before making any modifications. You can include other Python files, import other libraries, and so on as long as the running environment supports it. You can modify a job to explore new use cases such as applying a remediated tag on an object after taking an action on it, sending an email after a remediation completes, or even link multiple remediation actions in sequence.
For more ideas on possible custom jobs, refer to the remediation Github repositpory. All remediation jobs are open source, and you can contribute to the community by submitting your custom jobs.
Parent topic:Governing resources in VMware Tanzu Platform hub
