


Deploy Tanzu for Kubernetes Operations on AWS
This document outlines the steps for deploying VMware Tanzu for Kubernetes Operations on AWS. The deployment is based on the reference design provided in VMware Tanzu for Kubernetes Operations on AWS Reference Design.
Prerequisites
Before deploying VMware Tanzu for Kubernetes Operations on AWS, ensure that the following are set up.
-
AWS Account: An IAM user account with administrative privileges. Choose an AWS region where the Tanzu Kubernetes Grid (TKG) AMIs exist. See Supported AWS and Azure Regions for AWS regions.
-
AWS Resource Quotas: Sufficient quotas to support both the management cluster and the workload clusters in your deployment. Otherwise, the cluster deployments will fail. Depending on the number of workload clusters you plan to deploy, you may need to increase the AWS services quotas from their default values. You will need to increase the quota in every region in which you deploy Tanzu Kubernetes Grid. For more information on AWS services default quotas see AWS service quotas in the AWS documentation.
-
Bootstrap Machine with AWS CLI Installed: The bootstrap machine can be a local device such as a laptop, or a virtual machine running in, for example, VMware Workstation or Fusion. Install the AWS CLI on the bootstrap machine. You can get the AWS CLI through a package manager such as Homebrew, apt-get, or by downloading the CLI from AWS CLI. You will use the bootstrap machine to create the AWS VPC and jumpbox.
-
VMware Cloud: Access to VMware Cloud to download Tanzu CLI.
For additional information about preparing to deploy Tanzu Kubernetes Grid on AWS, see Prepare to Deploy Management Clusters to Amazon EC2.
Overview of the Deployment Steps
The following provides an overview of the major steps necessary to deploy Tanzu for Kubernetes Operations on AWS EC2. Each steps links to the section for detailed information.
- Set up AWS Infrastructure.
- Create and Set Up a Jumpbox.
- Prepare an External Identity Management.
- Install Tanzu Kubernetes Grid Management Cluster.
- Examine the Management Cluster Deployment.
- Deploy Workload Clusters.
- Install and Configure Packages into Workload Clusters.
- Configure SaaS Services.
Set up AWS Infrastructure
The following describes the steps to create your AWS environment and configure your network. The instructions use AWS CLI. Follow the steps in the order provided.
-
Create the AWS environment.
Be sure to select a region that has at least three availability zones.
export AWS_ACCESS_KEY_ID=xx export AWS_SECRET_ACCESS_KEY=xx # Should be a region with at least 3 available AZs export AWS_REGION=us-west-2 export AWS_PAGER="" -
Define and create a working directory.
WORKING_DIR="$(pwd)"/tkg-vpc mkdir -p $WORKING_DIR -
Create the VPC. This deployment uses a single VPC for all clusters.
Note: Beware that 172.17.0.0/16 is the default docker0 subnet.
aws ec2 create-vpc --cidr-block 172.16.0.0/16 --tag-specifications 'ResourceType=vpc, Tags=[{Key=Name,Value=TKGVPC}]' --output json > $WORKING_DIR/vpc # Create a second VPC like: aws ec2 create-vpc --cidr-block 172.18.0.0/16 --tag-specifications 'ResourceType=vpc, Tags=[{Key=Name,Value=TKGVPC-2}]' --output json > $WORKING_DIR/vpc2 export vpcId="$(jq -r .Vpc.VpcId $WORKING_DIR/vpc)" # Verify you have a valid VPC ID echo $vpcId -
For each VPC, create a public and private subnet in each AZ.
aws ec2 create-subnet --vpc-id $vpcId --cidr-block 172.16.0.0/24 --availability-zone ${AWS_REGION}a --tag-specifications 'ResourceType=subnet, Tags=[{Key=Name,Value=priv-a}]' --output json > $WORKING_DIR/subnet-priv-a aws ec2 create-subnet --vpc-id $vpcId --cidr-block 172.16.1.0/24 --availability-zone ${AWS_REGION}b --tag-specifications 'ResourceType=subnet, Tags=[{Key=Name,Value=priv-b}]' --output json > $WORKING_DIR/subnet-priv-b aws ec2 create-subnet --vpc-id $vpcId --cidr-block 172.16.2.0/24 --availability-zone ${AWS_REGION}c --tag-specifications 'ResourceType=subnet, Tags=[{Key=Name,Value=priv-c}]' --output json > $WORKING_DIR/subnet-priv-c aws ec2 create-subnet --vpc-id $vpcId --cidr-block 172.16.3.0/24 --availability-zone ${AWS_REGION}a --tag-specifications 'ResourceType=subnet, Tags=[{Key=Name,Value=pub-a}]' --output json > $WORKING_DIR/subnet-pub-a aws ec2 create-subnet --vpc-id $vpcId --cidr-block 172.16.4.0/24 --availability-zone ${AWS_REGION}b --tag-specifications 'ResourceType=subnet, Tags=[{Key=Name,Value=pub-b}]' --output json > $WORKING_DIR/subnet-pub-b aws ec2 create-subnet --vpc-id $vpcId --cidr-block 172.16.5.0/24 --availability-zone ${AWS_REGION}c --tag-specifications 'ResourceType=subnet, Tags=[{Key=Name,Value=pub-c}]' --output json > $WORKING_DIR/subnet-pub-c -
For each public subnet, set
map-public-ip-on-launch.# Set the public subnets to give them public IPs. for i in $WORKING_DIR/subnet-pub-*; do subnetId="$(jq -r .Subnet.SubnetId $i)" aws ec2 modify-subnet-attribute --subnet-id "$subnetId" --map-public-ip-on-launch done -
Create the Internet and NAT gateways and attach them to the relevant subnets.
aws ec2 create-internet-gateway --output json > $WORKING_DIR/inet-gw aws ec2 create-tags --resources "$(jq -r .InternetGateway.InternetGatewayId $WORKING_DIR/inet-gw)" --tags Key=Name,Value="tkg-inet-gw" aws ec2 attach-internet-gateway \ --internet-gateway-id "$(jq -r .InternetGateway.InternetGatewayId $WORKING_DIR/inet-gw)" \ --vpc-id "$vpcId" aws ec2 allocate-address > $WORKING_DIR/nat-eip aws ec2 create-nat-gateway --subnet $(jq -r .Subnet.SubnetId $WORKING_DIR/subnet-pub-a) --allocation-id $(jq -r .AllocationId $WORKING_DIR/nat-eip) --output json > $WORKING_DIR/nat-gw -
If you have an existing transit gateway, you can skip the
create-transit-gatewaycommand and just feed the transit gateway ID into thevpc-attachmentcommand. Otherwise, execute the following commands to create a new transit gateway.aws ec2 create-transit-gateway --description "For TKG Transit" > $WORKING_DIR/transit-gw aws ec2 create-transit-gateway-vpc-attachment --transit-gateway-id $(jq -r .TransitGateway.TransitGatewayId $WORKING_DIR/transit-gw) --vpc-id $vpcId --subnet-ids $(jq -r .Subnet.SubnetId $WORKING_DIR/subnet-priv-a) --subnet-ids $(jq -r .Subnet.SubnetId $WORKING_DIR/subnet-priv-b) --subnet-ids $(jq -r .Subnet.SubnetId $WORKING_DIR/subnet-priv-c) -- output json > $WORKING_DIR/attachment_transit_gw -
Create the routing tables.
aws ec2 create-route-table --vpc-id  $vpcId --output json > $WORKING_DIR/priv-rt
PRIV_RT_TABLE_ID="$(jq -r .RouteTable.RouteTableId $WORKING_DIR/priv-rt)"
aws ec2 create-tags --resources $PRIV_RT_TABLE_ID --tags 'Key=Name,Value=tkgvpc-priv-rt'

aws ec2 create-route \
--route-table-id "$PRIV_RT_TABLE_ID" \
--destination-cidr-block "0.0.0.0/0" \
--nat-gateway-id $(jq -r .NatGateway.NatGatewayId $WORKING_DIR/nat-gw)

# Route any corporate IPs through your transit gw
aws ec2 create-route \
--route-table-id "$PRIV_RT_TABLE_ID" \
--destination-cidr-block "172.16.0.0/12" \
--transit-gateway-id $(jq -r .TransitGateway.TransitGatewayId $WORKING_DIR/transit-gw)

for i in $WORKING_DIR/subnet-priv-*; do
subnetId="$(jq -r .Subnet.SubnetId $i)"
aws ec2 associate-route-table --subnet-id "$subnetId" --route-table-id $PRIV_RT_TABLE_ID --output json
done

aws ec2 create-route-table --vpc-id  $vpcId --output json > $WORKING_DIR/pub-rt
PUB_RT_TABLE_ID="$(jq -r .RouteTable.RouteTableId $WORKING_DIR/pub-rt)"

aws ec2 create-tags --resources $PUB_RT_TABLE_ID --tags 'Key=Name,Value=tkgvpc-pub-rt'

aws ec2 create-route \
--route-table-id "$PUB_RT_TABLE_ID" \
--destination-cidr-block "0.0.0.0/0" \
--gateway-id $(jq -r .InternetGateway.InternetGatewayId $WORKING_DIR/inet-gw)

# Route any corporate IPs through your transit gw
aws ec2 create-route \
--route-table-id "$PUB_RT_TABLE_ID" \
--destination-cidr-block "172.16.0.0/12" \
--transit-gateway-id $(jq -r .TransitGateway.TransitGatewayId $WORKING_DIR/transit-gw)

for i in $WORKING_DIR/subnet-pub-*; do
subnetId="$(jq -r .Subnet.SubnetId $i)"
aws ec2 associate-route-table --subnet-id "$subnetId" --route-table-id $PUB_RT_TABLE_ID --output json
done
Create and Set Up a Jumpbox
After doing the network configuration, complete the steps described in this section to set up your jumpbox. You will download the Tanzu CLI to the jumpbox, which you will use to deploy the management cluster and workload clusters from the jumpbox. You also keep the Tanzu and Kubernetes configuration files for your deployments on your jumpbox.
-
Create a jumpbox.
aws ec2 create-security-group --group-name "jumpbox-ssh" --description "To Jumpbox" --vpc-id "$vpcId" --output json > $WORKING_DIR/sg_jumpbox_ssh aws ec2 create-tags --resources $(jq -r .GroupId $WORKING_DIR/sg_jumpbox_ssh) --tags Key=Name,Value="jumpbox-ssh" # Allow ssh to jumpbox aws ec2 authorize-security-group-ingress --group-id $(jq -r .GroupId $WORKING_DIR/sg_jumpbox_ssh) --protocol tcp --port 22 --cidr "0.0.0.0/0" # Save this file or use some team keypair already created aws ec2 create-key-pair --key-name tkg-kp --query 'KeyMaterial' --output text > tkgkp.pem chmod 400 tkgkp.pem # Find an AMI for your region https://cloud-images.ubuntu.com/locator/ec2/ (20.04) aws ec2 run-instances --image-id ami-036d46416a34a611c --count 1 --instance-type t2.medium --key-name tkg-kp --security-group-ids $(jq -r .GroupId $WORKING_DIR/sg_jumpbox_ssh) --subnet-id $(jq -r .Subnet.SubnetId $WORKING_DIR/subnet-pub-a) --tag-specifications 'ResourceType=instance,Tags=[{Key=Name,Value=tkg-jumpbox}]' --block-device-mappings 'DeviceName=/dev/sda1,Ebs={VolumeSize=64}' > $WORKING_DIR/instance_jb_starting -
Wait a few minutes for the instance to start. After it restarts, SSH to the jumpbox.
aws ec2 describe-instances --instance-id $(jq -r '.Instances[0].InstanceId' $WORKING_DIR/instance_jb_starting) > $WORKING_DIR/instance_jb_started echo Public IP: $(jq -r '.Reservations[0].Instances[0].PublicIpAddress' $WORKING_DIR/instance_jb_started) ssh ubuntu@$(jq -r '.Reservations[0].Instances[0].PublicIpAddress' $WORKING_DIR/instance_jb_started) -i tkgkp.pem -
Log in to the jumpbox to install the necessary packages and configurations. Then reboot.
sudo apt update sudo apt install docker.io sudo apt install screen sudo adduser ubuntu docker sudo reboot -
Download the Tanzu CLI and other utilities for Linux from the Tanzu Kubernetes Grid Download Product site.
-
Copy the files and binaries to the jumpbox.
scp -i tkgkp.pem tanzu-cli-bundle-linux-amd64.tar kubectl-linux-v1.21.8+vmware.1-142.gz ubuntu@$(jq -r '.Reservations[0].Instances[0].PublicIpAddress' $WORKING_DIR/instance_jb_started):/home/ubuntu -
Connect to the jumpbox and start port forwarding
Note that the command shown below assumes that no process is currently listening on local port 8080. If it is in use then choose a different port and adjust the SSH command line accordingly.
ssh -L 8080:localhost:8080 ubuntu@$(jq -r '.Reservations[0].Instances[0].PublicIpAddress' $WORKING_DIR/instance_jb_started) -i tkgkp.pem -
Install the Tanzu CLI.
Run the session in
screenin case your SSH connection is terminated. If your connection is terminated, you can reattach to the screen session withscreen -ronce you have reconnected.screen tar -xvf tanzu-cli-bundle-linux-amd64.tar gunzip kubectl-linux-v1.21.8+vmware.1-142.gz sudo install kubectl-linux-v1.21.8+vmware.1-142 /usr/local/bin/kubectl cd cli/ sudo install core/v1.4.2/tanzu-core-linux_amd64 /usr/local/bin/tanzu gunzip *.gz sudo install imgpkg-linux-amd64-v0.10.0+vmware.1 /usr/local/bin/imgpkg sudo install kapp-linux-amd64-v0.37.0+vmware.1 /usr/local/bin/kapp sudo install kbld-linux-amd64-v0.30.0+vmware.1 /usr/local/bin/kbld sudo install vendir-linux-amd64-v0.21.1+vmware.1 /usr/local/bin/vendir sudo install ytt-linux-amd64-v0.34.0+vmware.1 /usr/local/bin/ytt cd .. tanzu plugin install --local cli all -
Create a custom file to place the Tanzu Kubernetes Grid management APIs on private load balancers:
tanzu config init
cat <<EOF > ~/.config/tanzu/tkg/providers/ytt/03_customizations/internal_lb.yaml
#@ load("@ytt:overlay", "overlay")
#@ load("@ytt:data", "data")

#@overlay/match by=overlay.subset({"kind":"AWSCluster"})
---
apiVersion: infrastructure.cluster.x-k8s.io/v1alpha3
kind: AWSCluster
spec:
#@overlay/match missing_ok=True
    controlPlaneLoadBalancer:
#@overlay/match missing_ok=True
       scheme: "internal"

EOF
Running the
tanzu config initcommand for the first time creates the~/.config/tanzu/tkgsubdirectory, which contains the Tanzu Kubernetes Grid configuration files.For more information about ytt cluster overlays, see ytt Overlays.
Prepare an External Identity Management
Tanzu Kubernetes Grid implements user authentication with Pinniped. Pinniped allows you to plug external OpenID Connect (OIDC) or LDAP identity providers (IDP) into Tanzu Kubernetes clusters, so that you can control user access to those clusters.
Pinniped is an open-source authentication service for Kubernetes clusters. If you use LDAP authentication, Pinniped uses Dex as the endpoint to connect to your upstream LDAP identity provider. If you use OIDC, Pinniped provides its own endpoint, so Dex is not required. Pinniped and Dex run automatically as in-cluster services in your management cluster.
You enable identity management during management cluster deployment. Therefore, ensure that you have an IDP/LDAP server setup before you do the Tanzu Kubernetes Grid management cluster installation.
If you don’t have identity management configured, see Configure Identity Management for a sample IDP setup. Also see Pinniped Docs for information on Pinniped integration into Tanzu Kubernetes Grid with various OIDC providers and LDAPs.
Deploy a Tanzu Kubernetes Grid Management Cluster
You can deploy a Tanzu Kubernetes Grid management cluster using one of the following methods:
- Run the Tanzu Kubernetes Grid installer, a wizard interface that guides you through the process of deploying a management cluster. See Deploy Management Cluster from the Tanzu Kubernetes Grid Installer.
OR
- Create and edit YAML configuration files, and use the configuration files to deploy a management cluster with the CLI commands. See Deploy Management Clusters from a Configuration File.
Deploy a Management Cluster from the Tanzu Kubernetes Grid Installer
To deploy a management cluster from the Tanzu Kubernetes Grid installer interface:
-
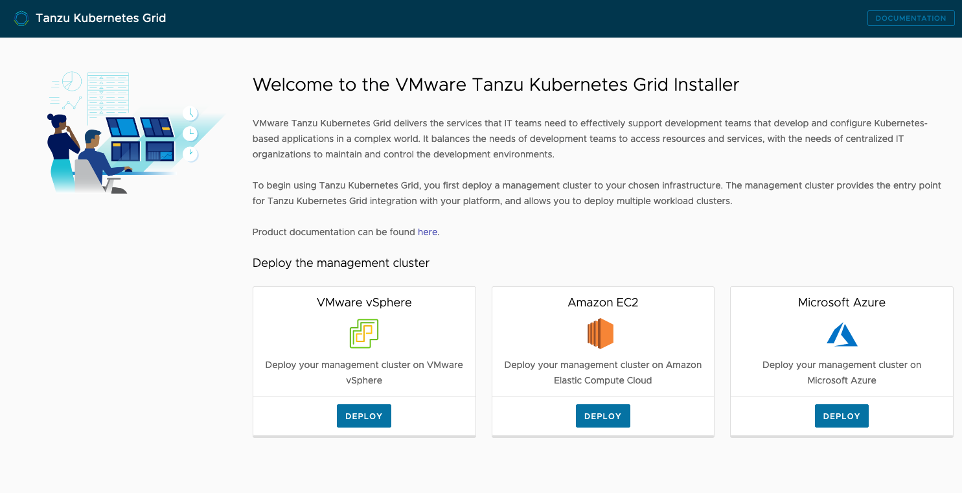
From the jumpbox, execute the following command to launch the installer interface.
tanzu management-cluster create --ui -
Open a web browser and launch
localhost:8080on the machine running the SSH session.The Tanzu Kubernetes Grid installer interface displays. Note that if you chose a different listening port when connecting to the jumpbox then the interface will be available on that port instead of port 8080.
Note: The screens are provided to help you navigate the installer interface. Enter the values that are specific to your AWS setup. The screens shown were taken from the current version at the time of writing and may differ slightly from other versions.
-
Click Deploy on the Amazon EC2 tile to start the management cluster setup on Amazon EC2.
-
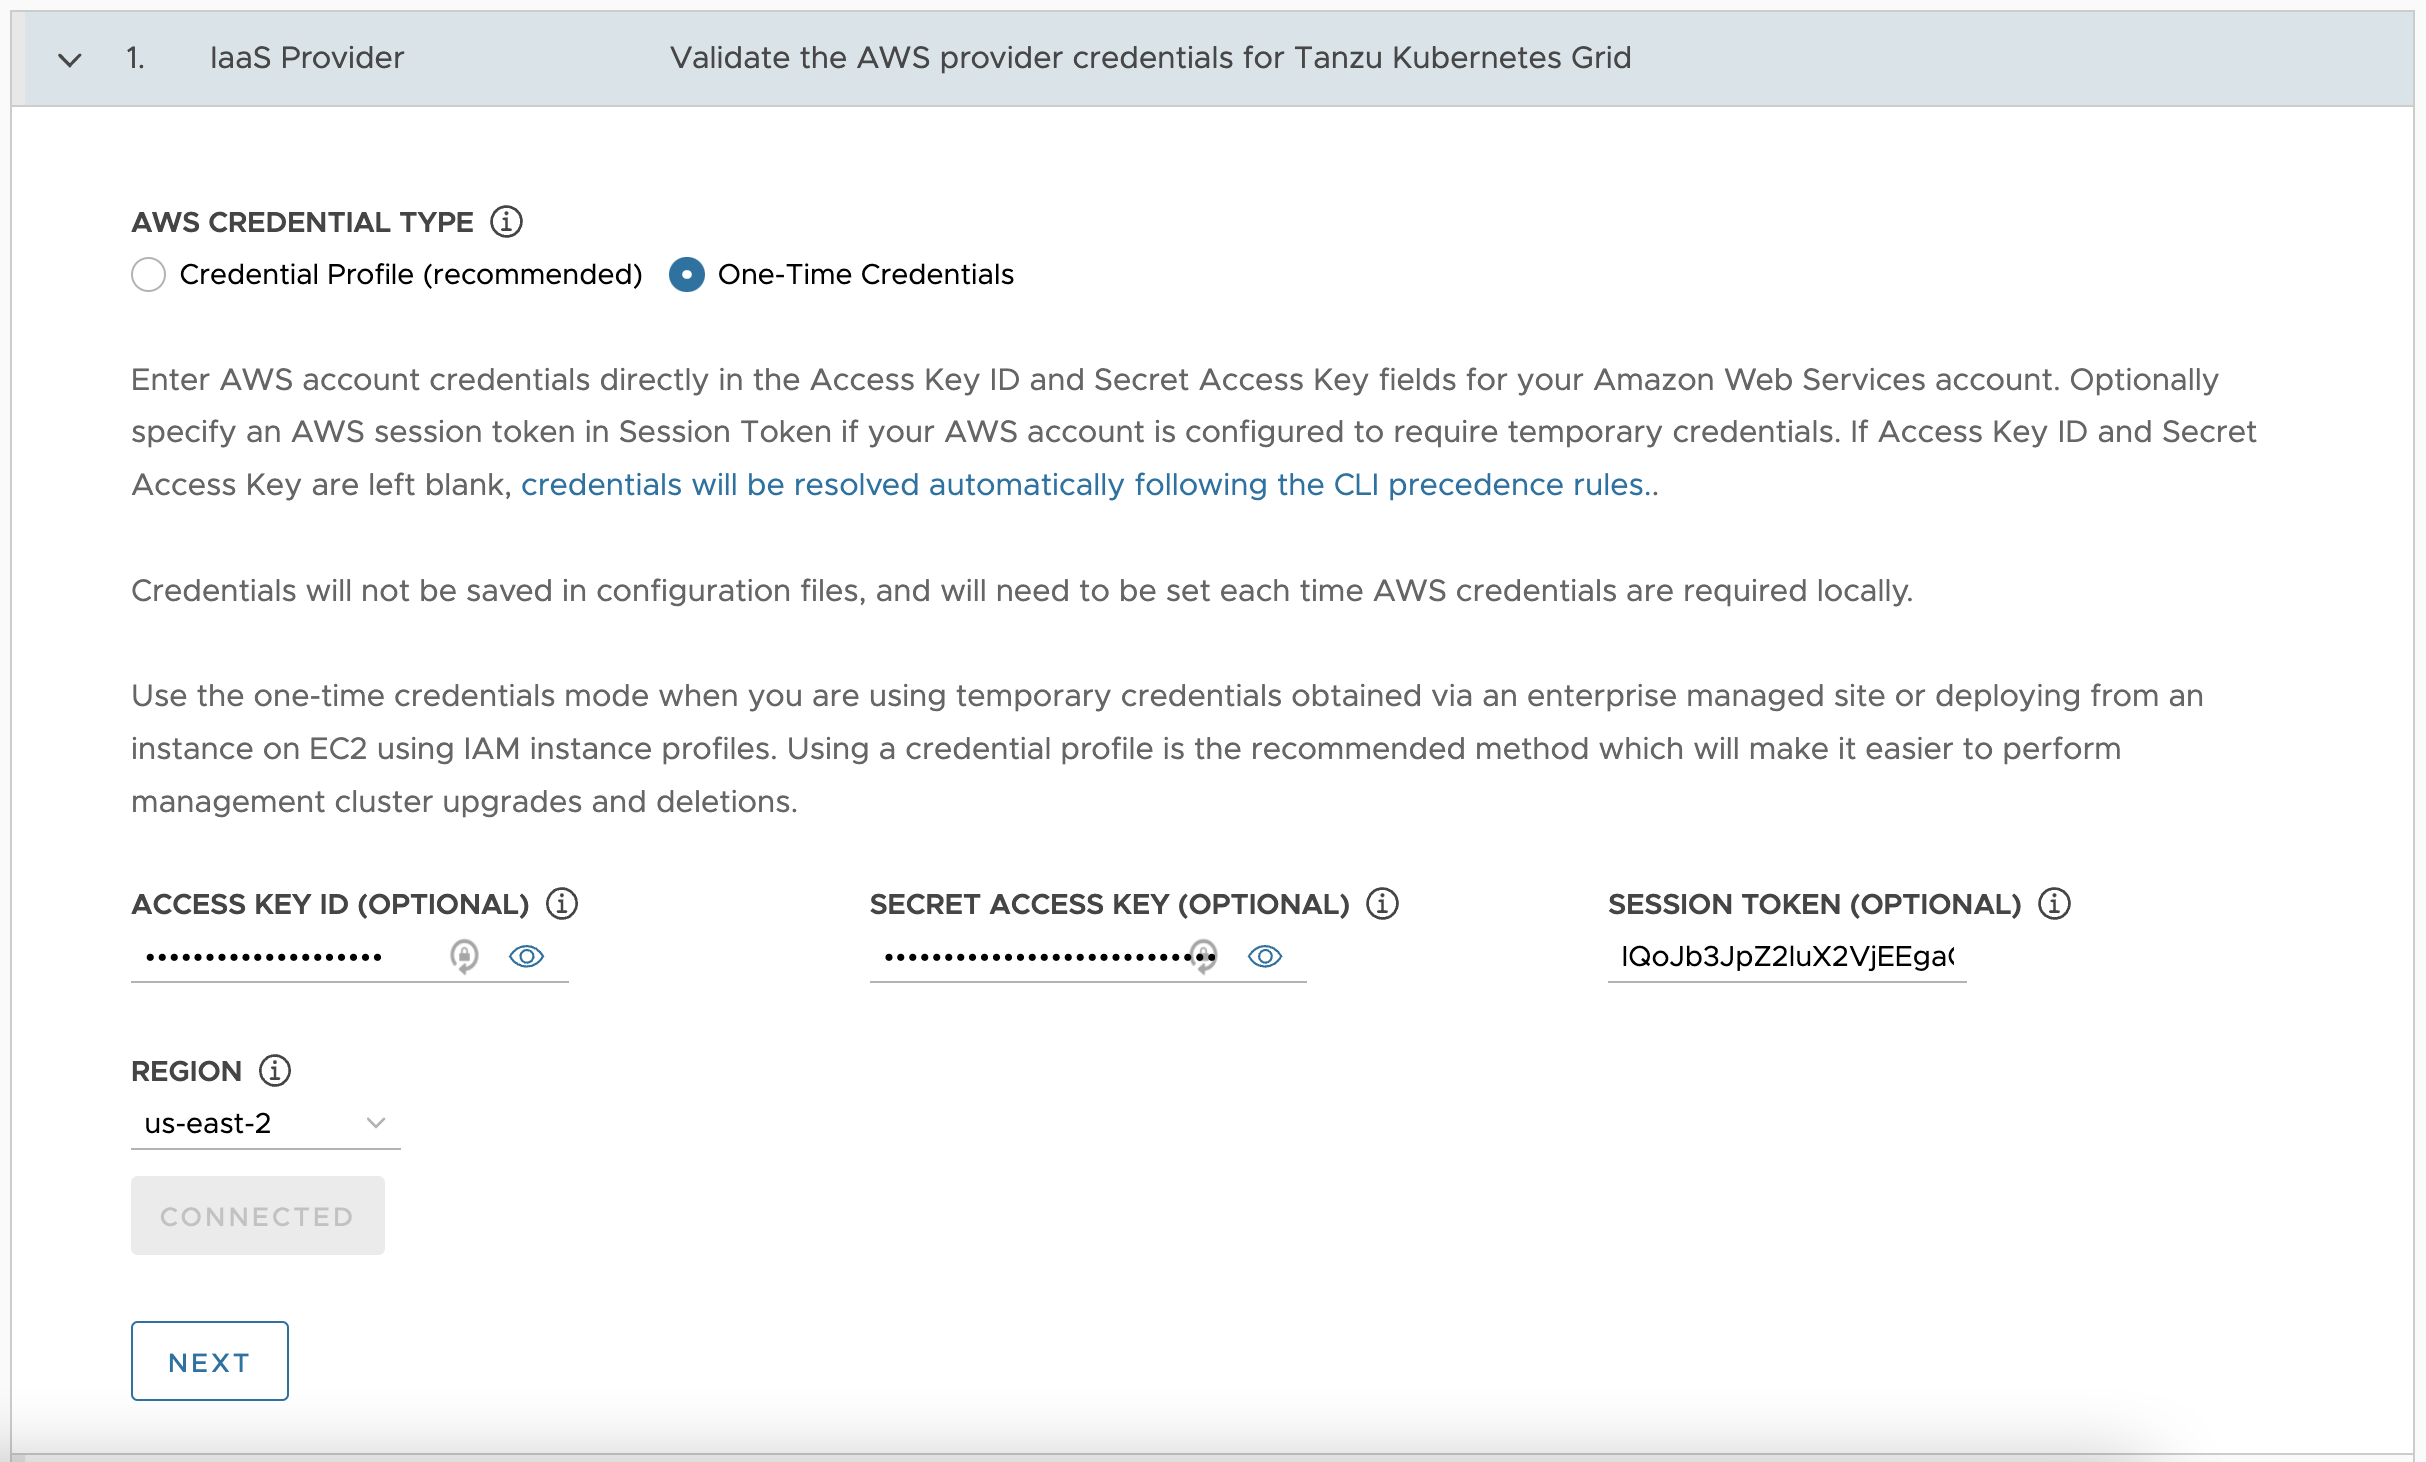
For IaaS Provider settings, enter your AWS Access Key ID, Secret Access Key, Session Token, and Region, then click Connect followed by Next. Select the region you selected in Set up AWS infrastructure.
-
For VPC for AWS settings, select the VPC ID you created in Set up AWS infrastructure and click Next.

-
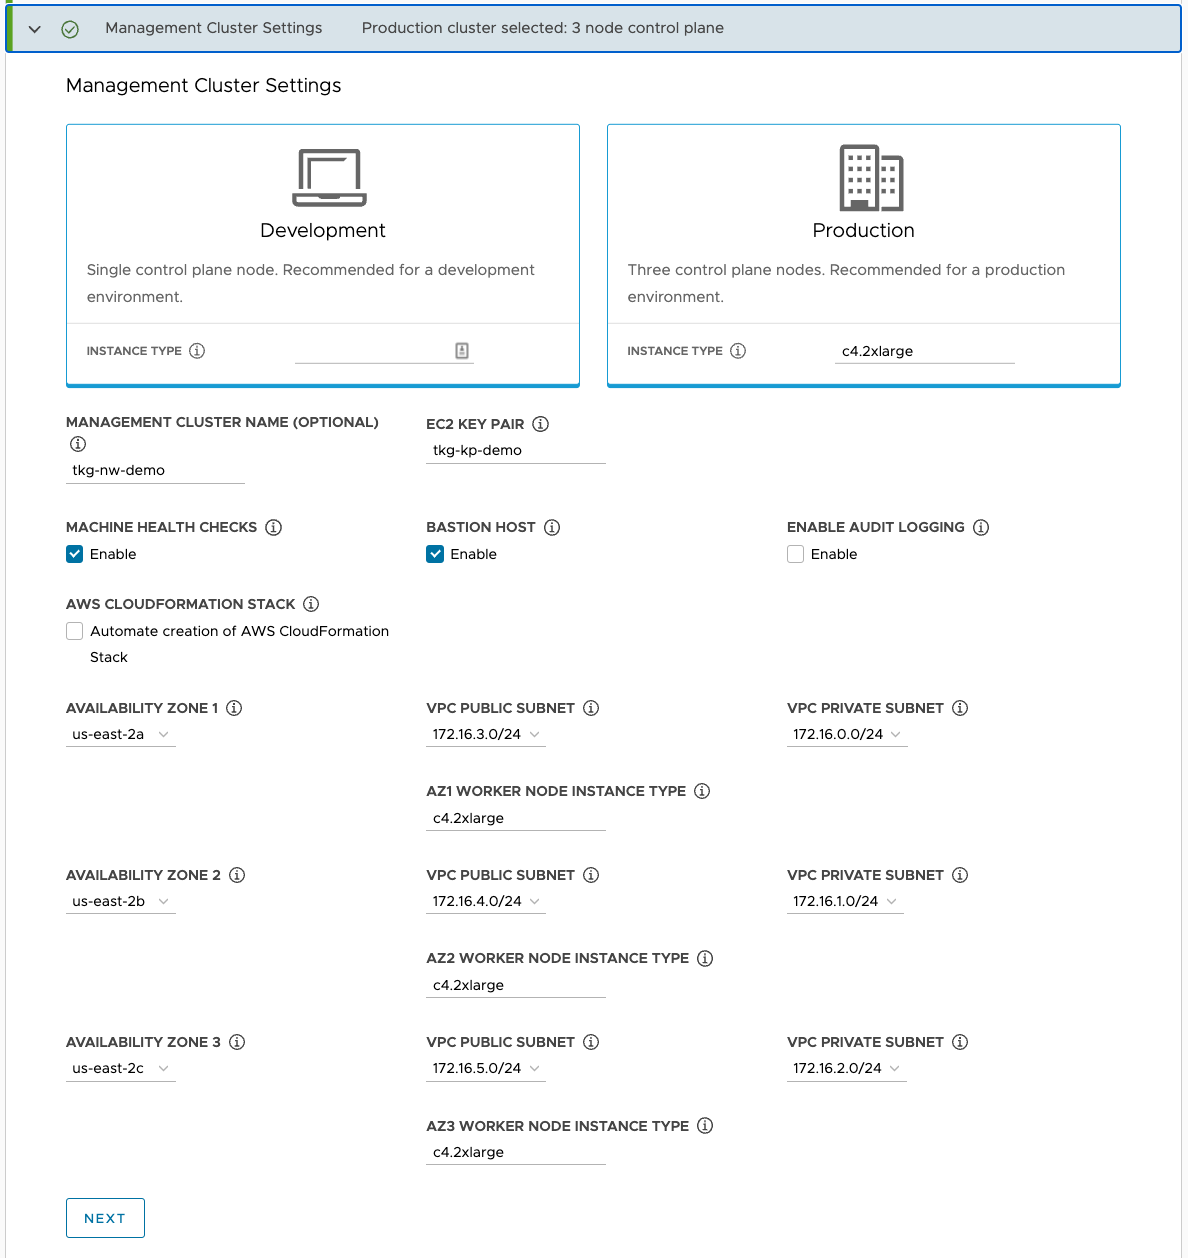
For Management Cluster Settings, select Production and the instance type for the control plane nodes.
-
Enter the following specifications for the management cluster and click Next.
- EC2 Key Pair: The name of an existing key pair, which you may have created in Create and Set Up a Jumpbox.
- Bastion Host: Select Enable.
- Machine Health Checks: Select Enable.
- AWS CloudFormation Stack: Select this if this is the first time that you are deploying a management cluster to this AWS account, see Permissions Set by Tanzu Kubernetes Grid for more details.
- Availability Zone: Select the three availability zones for your region.
- VPC Public and Private Subnets: Select the existing subnets on the VPC for each AZ.
- Worker Node Instance Type: Select the configuration for the worker node VMs.
-
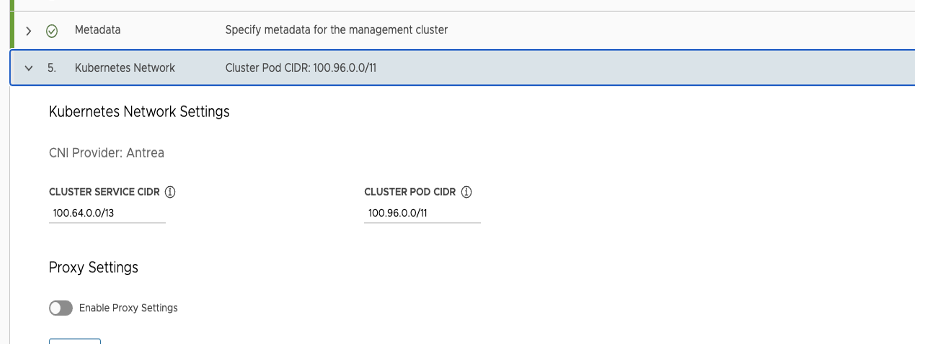
For Kubernetes Network, enter the Network CNI settings and click Next.
Optionally, if you already have a proxy server setup and want to send outgoing HTTP(S) traffic from the management cluster to a proxy, toggle Enable Proxy Settings. For more information on how to configure proxy settings, see Configure the Kubernetes Network and Proxies.
-
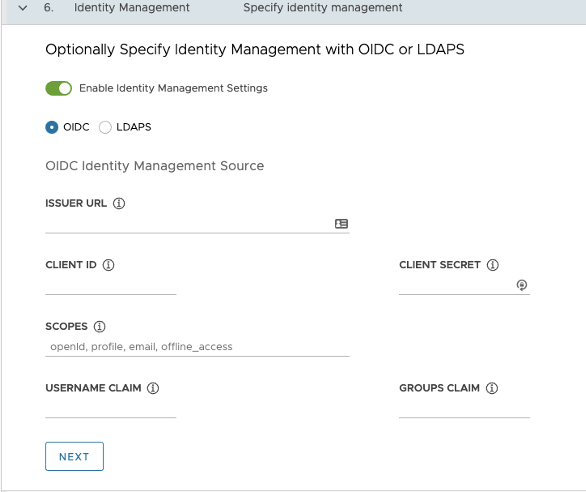
For Identity Management, toggle Enable Identity Management Settings to configure your IDP and click Next.
For more information about configuring the identity management settings, see Configure Identity Management.
-
For OS Image, use the drop-down menu to select the OS and Kubernetes version image template to use for deploying Tanzu Kubernetes Grid VM. Select Ubuntu OS image (amd64) and click Next.
-
For Register with Tanzu Mission Control, you can skip to enter Tanzu Mission Control url since Tanzu Kubernetes Grid 1.4 management cluster is currently not supported to be registered with Tanzu Mission Control. See Supported Environments for Registering Tanzu Kubernetes Clusters.
-
For CEIP Agreement, select the check box to opt in to the VMware Customer Experience Improvement Program (CEIP), and click Next.
A summary of the configuration displays.

-
Review the summary of the configuration.
-
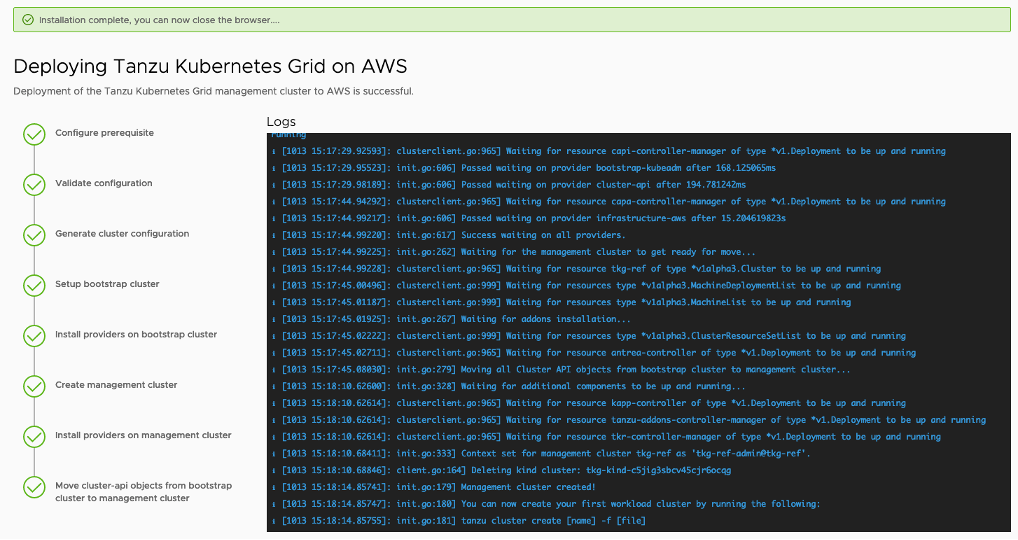
Click Deploy Management Cluster to complete the installation.
Deploy Management Clusters from a Configuration File
This section describes how to deploy a Tanzu Kubernetes Grid management cluster from a configuration file using Tanzu CLI. Skip this section if have already deployed a management cluster from the Tanzu Kubernetes Grid Installer UI.
Before creating a management cluster using the Tanzu CLI, define the base configuration for the cluster in a YAML file. You specify this file by using the --file option of the tanzu management-cluster create command.
To create a new Tanzu Kubernetes Grid management cluster, run the following command:
tanzu management-cluster create --file path/to/cluster-config-file.yaml
If you had previously deployed a management cluster, the ~/.config/tanzu/tkg/clusterconfigs directory contains the management cluster configuration file.
To use the configuration file from a previous deployment, make a copy of the configuration file with a new name, open it in a text editor, and update the configuration. We recommend using a dedicated configuration file for each management cluster, with the configuration settings specific to a single infrastructure.
For more information about deploying a management cluster from a configuration file, see Deploy Management Clusters from a Configuration File.
Examine the Management Cluster Deployment
During the deployment of the management cluster, either from the installer interface or from a configuration file using Tanzu CLI, Tanzu Kubernetes Grid creates a temporary management cluster using a Kubernetes in Docker, kind, cluster on the jumpbox.
Tanzu Kubernetes Grid uses the temporary management cluster to provision the final management cluster on AWS. For information about how to examine and verify your Tanzu Kubernetes Grid management cluster deployment, see Examine the Management Cluster Deployment.
Deploy Workload Clusters
After deploying the management cluster, you can create the workload clusters. The management cluster’s context is updated automatically, so you can begin interacting with the management cluster.
Run the following command to create a basic workload cluster:
tanzu cluster create <cluster_name> --plan=prod
Workload clusters can be highly customized through YAML manifests and applied to the management cluster for deployment and lifecycle management. To generate a YAML template to update and modify to your own needs use the --dry-run switch. Edit the manifests to meet your requirements and apply them to the cluster.
Example:
tanzu cluster create <workload_cluster> --plan=prod --worker-machine-count 3 --dry-run
After the workload cluster is created, the current context changes to the new workload cluster.
For more information on cluster lifecycle and management, see Manage Clusters.
Troubleshooting Tips for Tanzu Kubernetes Grid
For tips to help you to troubleshoot common problems that you might encounter when installing Tanzu Kubernetes Grid and deploying Tanzu Kubernetes clusters, see Troubleshooting Tips for Tanzu Kubernetes Grid.
Install and Configure Packages into Workload Clusters
A package in Tanzu Kubernetes Grid is a collection of related software that supports or extends the core functionality of the Kubernetes cluster in which the package is installed. Tanzu Kubernetes Grid includes two types of packages, core packages and user-managed packages. For more information about packages in Tanzu Kubernetes Grid, see Install and Configure Packages.
Core Packages
Tanzu Kubernetes Grid automatically installs the core packages during cluster creation. For more information about core packages, see Core Packages.
User-Managed Packages
A user-managed package is an optional component of a Kubernetes cluster that you can install and manage with the Tanzu CLI. These packages are installed after cluster creation. User-managed packages are grouped into package repositories in the Tanzu CLI. If a package repository that contains user-managed packages is available in the target cluster, you can use the Tanzu CLI to install and manage any of the packages from that repository.
Using the Tanzu CLI, you can install user-managed packages from the built-in tanzu-standard package repository or from package repositories that you add to your target cluster. From the tanzu-standard package repository, you can install the Cert Manager, Contour, External DNS, Fluent Bit, Grafana, Harbor, Multus CNI, and Prometheus packages. For more information about user-managed packages, see User-Managed Packages.
We recommend installing the following packages:
-
Deploying Harbor Registry as a Shared Service
If Harbor is required to take on a heavy load and store large images into the registry, you can install Harbor into a separate workload cluster.
Configure SaaS Services
The following VMware SaaS services provide additional Kubernetes lifecycle management, observability, and service mesh features.
- Tanzu Mission Control (TMC)
- Tanzu Observability (TO)
- Tanzu Service Mesh (TSM)
For configuration information, see Configure SaaS Services.
Delete Clusters
The procedures in this section are optional. They are provided in case you want to clean up your production or lab environment.
Delete a Workload Cluster
To delete a provisioned workload first set your context back to the management cluster.
kubectl config use-context [mgmt_cluster_name]-admin@[mgmt_cluster_name]
From the management cluster context run:
tanzu cluster delete <cluster_name>
Delete a Management Cluster
Use this procedure to delete the management cluster as well as all of the AWS objects Tanzu Kubernetes Grid created such as VPC, subnets and NAT Gateways.
Note: Be sure to wait until all the workload clusters have been reconciled before deleting the management cluster or infrastructure will need to be manually cleaned up.
Running the following command will delete the objects.
tanzu cluster delete <management-cluster-name>
Logs and Troubleshooting
For information about how to find the Tanzu Kubernetes Grid logs, how to troubleshoot frequently encountered Tanzu Kubernetes Grid issues, and how to use the Crash Recovery and Diagnostics tool, see Logs and Troubleshooting.
