Take the following actions when migrating VMware Identity Manager embedded-connector or external Linux-based connector configuration information during external Windows-based connector installation and configuration. See the corresponding version of the Installing and Configuring VMware Identity Manager Connector (Windows) guide.

The Installing and Configuring VMware Identity Manager Connector 2018.8.1.0 (Windows) guide describes how to install and configure the external Windows-based VMware Identity Manager 3.3.3 connector. Use the information that follows to supplement that guide. Taking these specific actions ensures the following.

  • The transfer of the connector-configuration information from the embedded-connector or from the external Linux-based connector to the external Windows-based connector.
  • The configuration of settings disconnected during the upgrade of VMware Identity Manager or not handled by the migration.

Prerequisites

  • Collect a cluster...enc file for each embedded-connector and external Linux-based connector instance that you plan to use to migrate connector-configuration information during the installation and configuration of the replacement external Windows-based connector instances.
  • Save each cluster...enc file to a corresponding Windows system that will host a replacement external Windows-based connector instance.

Procedure

  • When running the VMware Identity Manager Connector Installation Wizard, respond appropriately to the migration-related dialog boxes.
    1. When prompted for the configuration package file, select Are you migrating your Connector? and click Next.
    2. Respond as necessary for the system to locate the cluster...enc file that you saved to the host and click Next.
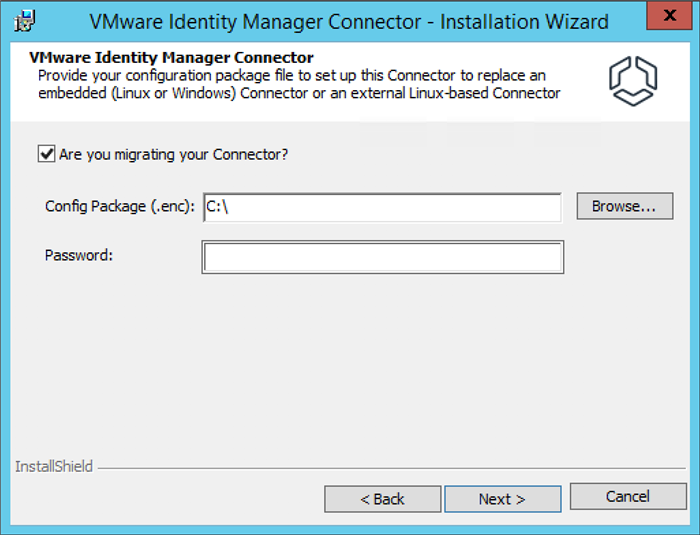
      Dialog Box Item Action
      Config Package (.enc) Enter or browse to the location of the cluster...enc file that you saved to the host.
      Password Enter the password you created for the cluster...enc file when you upgraded VMware Identity Manager.
    3. When prompted to launch the VMware Identity Manager connector setup wizard or not, click No to exit the installation.

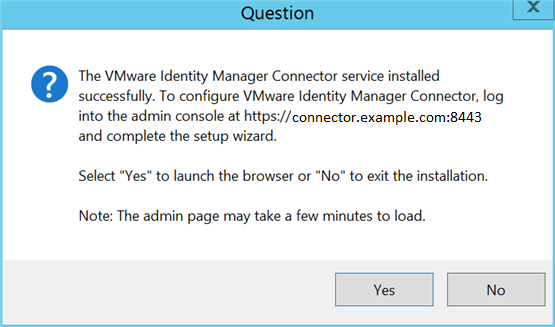
      In this situation, clicking No is appropriate because the migrated configuration information from the cluster...enc file completes the configuration for you. Clicking Yes is necessary when you must access the admin console to finish the connector setup configuration.

    4. Use the Windows Services manager to restart the VMware Identity Manager Connector service.
      Services is an administrative tool included with the Windows operating system.
      1. Open the Windows Services manager.
      2. Wait until the status of the VMware IDM Connector service appears as Running.
      3. Restart the VMware IDM Connector service.
  • Log in to the VMware Identity Manager admin console, select the Identity & Access Management > Setup, and verify and reconfigure the connector settings.
    1. Verify that the new external Windows-based connector instance is listed on the Connectors page.
      The existence of the new external Windows-based connector instance on the Connectors page confirms that it is paired with VMware Identity Manager.
    2. Delete the connector instance that the new external Windows-based connector instance is replacing, by clicking the Delete icon next to the connector instance you want to delete and clicking Confirm.
      The connector instance is removed from the VMware Identity Manager admin console.
      Caution: Delete all VMware Identity Manager connector instances that you are replacing. The existence of connector instances that are no longer in use can interfere with VMware Identity Manager processes, especially directory-related processes, such as sync and save.
  • To verify and reconfigure applicable directories as necessary, on the Identity & Access Management tab, click Manage and perform the appropriate directory-related steps.
    Caution: Before configuring directories, confirm that all connector instances that were migrated and are now unused are deleted. The existence of connector instances that are no longer in use can interfere with directory-related processes.
    1. Click Sync Now next to each directory that applies.
    2. Perform any necessary edits based on updates made to applicable directories and click Sync Directory.
  • On the Manage page, click Identity Providers, click the name of an affected identity provider instance, and update the IdP Hostname value.
    Because of unpredictable factors in determining the host used, for example because a load balancer is deployed, the migration process does not attempt to update the IdP Hostname value.

    Consider the following situations.

    • If you used a load balancer for your connector instances before the migration and continue to use that load balancer, the IdP Hostname value does not change. In such a case, do not update the IdP Hostname value. Instead you must adjust the load balancer to use the new Windows-based connector instances as the load-balancer members.
    • If you used the URL of a connector instance before the migration, therefore you did not use a load balancer, update the IdP Hostname value accordingly.

    For more information on configuring identity provider instances, see the VMware Identity Manager Administration guide.

    1. Click the name of an identity provider instance for which the IdP Hostname value must be updated.
    2. On the Identity Provider page, change the host name in the IdP Hostname text box and click Save.
  • Enable applicable authentication methods.

    When you ran the migration package on the embedded-connector or the external Linux-based-connector, all authentication methods, except for the Password authentication method, were disabled. Now you must reconfigure the authentication methods on the external Windows-based connector.

    See Installing and Configuring VMware Identity Manager Connector (Windows) guide for information about enabling authentication adapters for the connector.
  • If applicable, enable outbound mode for the new external Windows-based connector.
    Before the migration, if outbound mode was not enabled for the connector, for example outbound mode is not an embedded-connector option, you probably want to enable outbound mode for the new external Windows-based connector.

    The procedure involves adding the new external Windows-based connector to the Built-in identity provider and configuring policies for each authentication method enabled. See Installing and Configuring VMware Identity Manager Connector (Windows) guide for information about enabling outbound mode for the connector.

  • To ensure security, after you configure and test the new external Windows-based connector, delete the cluster-hostname-conn-timestamp.enc configuration file that you copied from the source embedded connector or external Linux connector. The file contains sensitive information.
    Also delete the file from the source VMware Identity Manager service virtual appliance or external Linux connector server. Additionally, delete the source external Linux connector deployment if you no longer need it.