


Add the required roles, features, and role services in the Integration Broker server.
Note: The steps in this procedure refer to the Windows Server 2012 R2 or Windows Server 2012 user interface. Where applicable, any differences for Windows Server 2008 R2 are noted.
To add roles and services on Windows Server 2016, see Add Windows Server Roles and Features (Windows Server 2016).
Prerequisites
- Verify that Windows Server 2008 R2, Windows Server 2012, or Windows Server 2012 R2 is installed with the latest updates. To check for updates, select .
- Create an application pool, if necessary. You can use the default application pool or create an application pool that is dedicated to Integration Broker.
Procedure
- Select the following roles, then click Next.
Roles - Application Server
- File and Storage Services
- Web Server (IIS)
Note: When you select Web Server (IIS), a dialog box appears prompting you to confirm features that are required for Web Server (IIS). Verify that Management Tools is included, then click Add Features.

- In the Features page, select the following features.
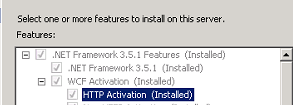
Features - .NET Framework 3.5 Features
- .NET Framework 3.5 (includes .NET 2.0 and 3.0)
- HTTP Activation
When you select HTTP Activation, a dialog box appears prompting you to confirm features that are required for HTTP Activation. Click Add Features.
Note: On Windows Server 2008 R2, you select these options:- .NET Framework 3.5 Features
- .NET Framework 3.5
- WCF Activation
- HTTP Activation
- IIS Hostable Web Core
- Windows Process Activation Service
- WinRM IIS Extension
For example:
Figure 1. Windows Server 2012 R2

- .NET Framework 3.5 Features
- In the Application Server Role Services page, select the following role services.
Application Server Role Services Application Server Role Services - .NET Framework 4.5 (do not change if preselected)
- Web Server (IIS) Support
Note: When you select Web Server (IIS), a dialog box appears prompting you to confirm features that are required for Web Server (IIS). Click Add Features.
- Windows Process Activation Service Support
- HTTP Activation
For example:

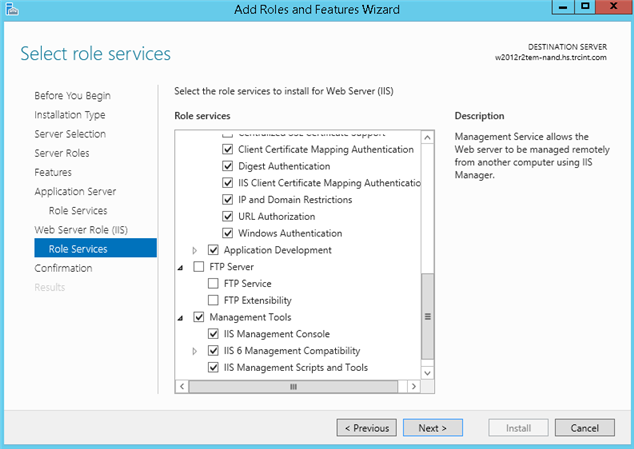
- In the Web Server Role (IIS) Role Services page, select the following role services.
Web Server Role (IIS) Role Services - Web Server
- Accept the default selections
- Enable the following option:
- Management Tools
- IIS Management Console
- IIS 6 Management Compatibility
- Management Tools
For example:
- Web Server
What to do next
Install Microsoft Visual J# 2.0 Redistributable Package, if necessary.
