


Smart groups are customizable groups within Workspace ONE UEM powered by AirWatch that determine which platforms, devices, and users receive an assigned application, book, compliance policy, device profile, or provision.
When you create organization groups, you typically base them on the internal corporate structure: geographical location, business unit, and department. For example, "Corporate Sales," "Asia" With smart groups, you can deliver content and settings by device platform, model, operating system, device tag, or user group. You can even deliver content to individual users across multiple organization groups.
You can create smart groups when you upload content and define settings. However, you can create them at any time and assign them later.
The main benefit of smart groups is their reusability. Making a new assignment each time you add content or define a profile or policy might be intuitive, however, if you instead define assignees to smart groups only once, you can include those smart groups in your definition of content.
Smart Group List View
View the entire list of smart groups by navigating to . Admin can only see groups which they can manage based on their permissions settings.
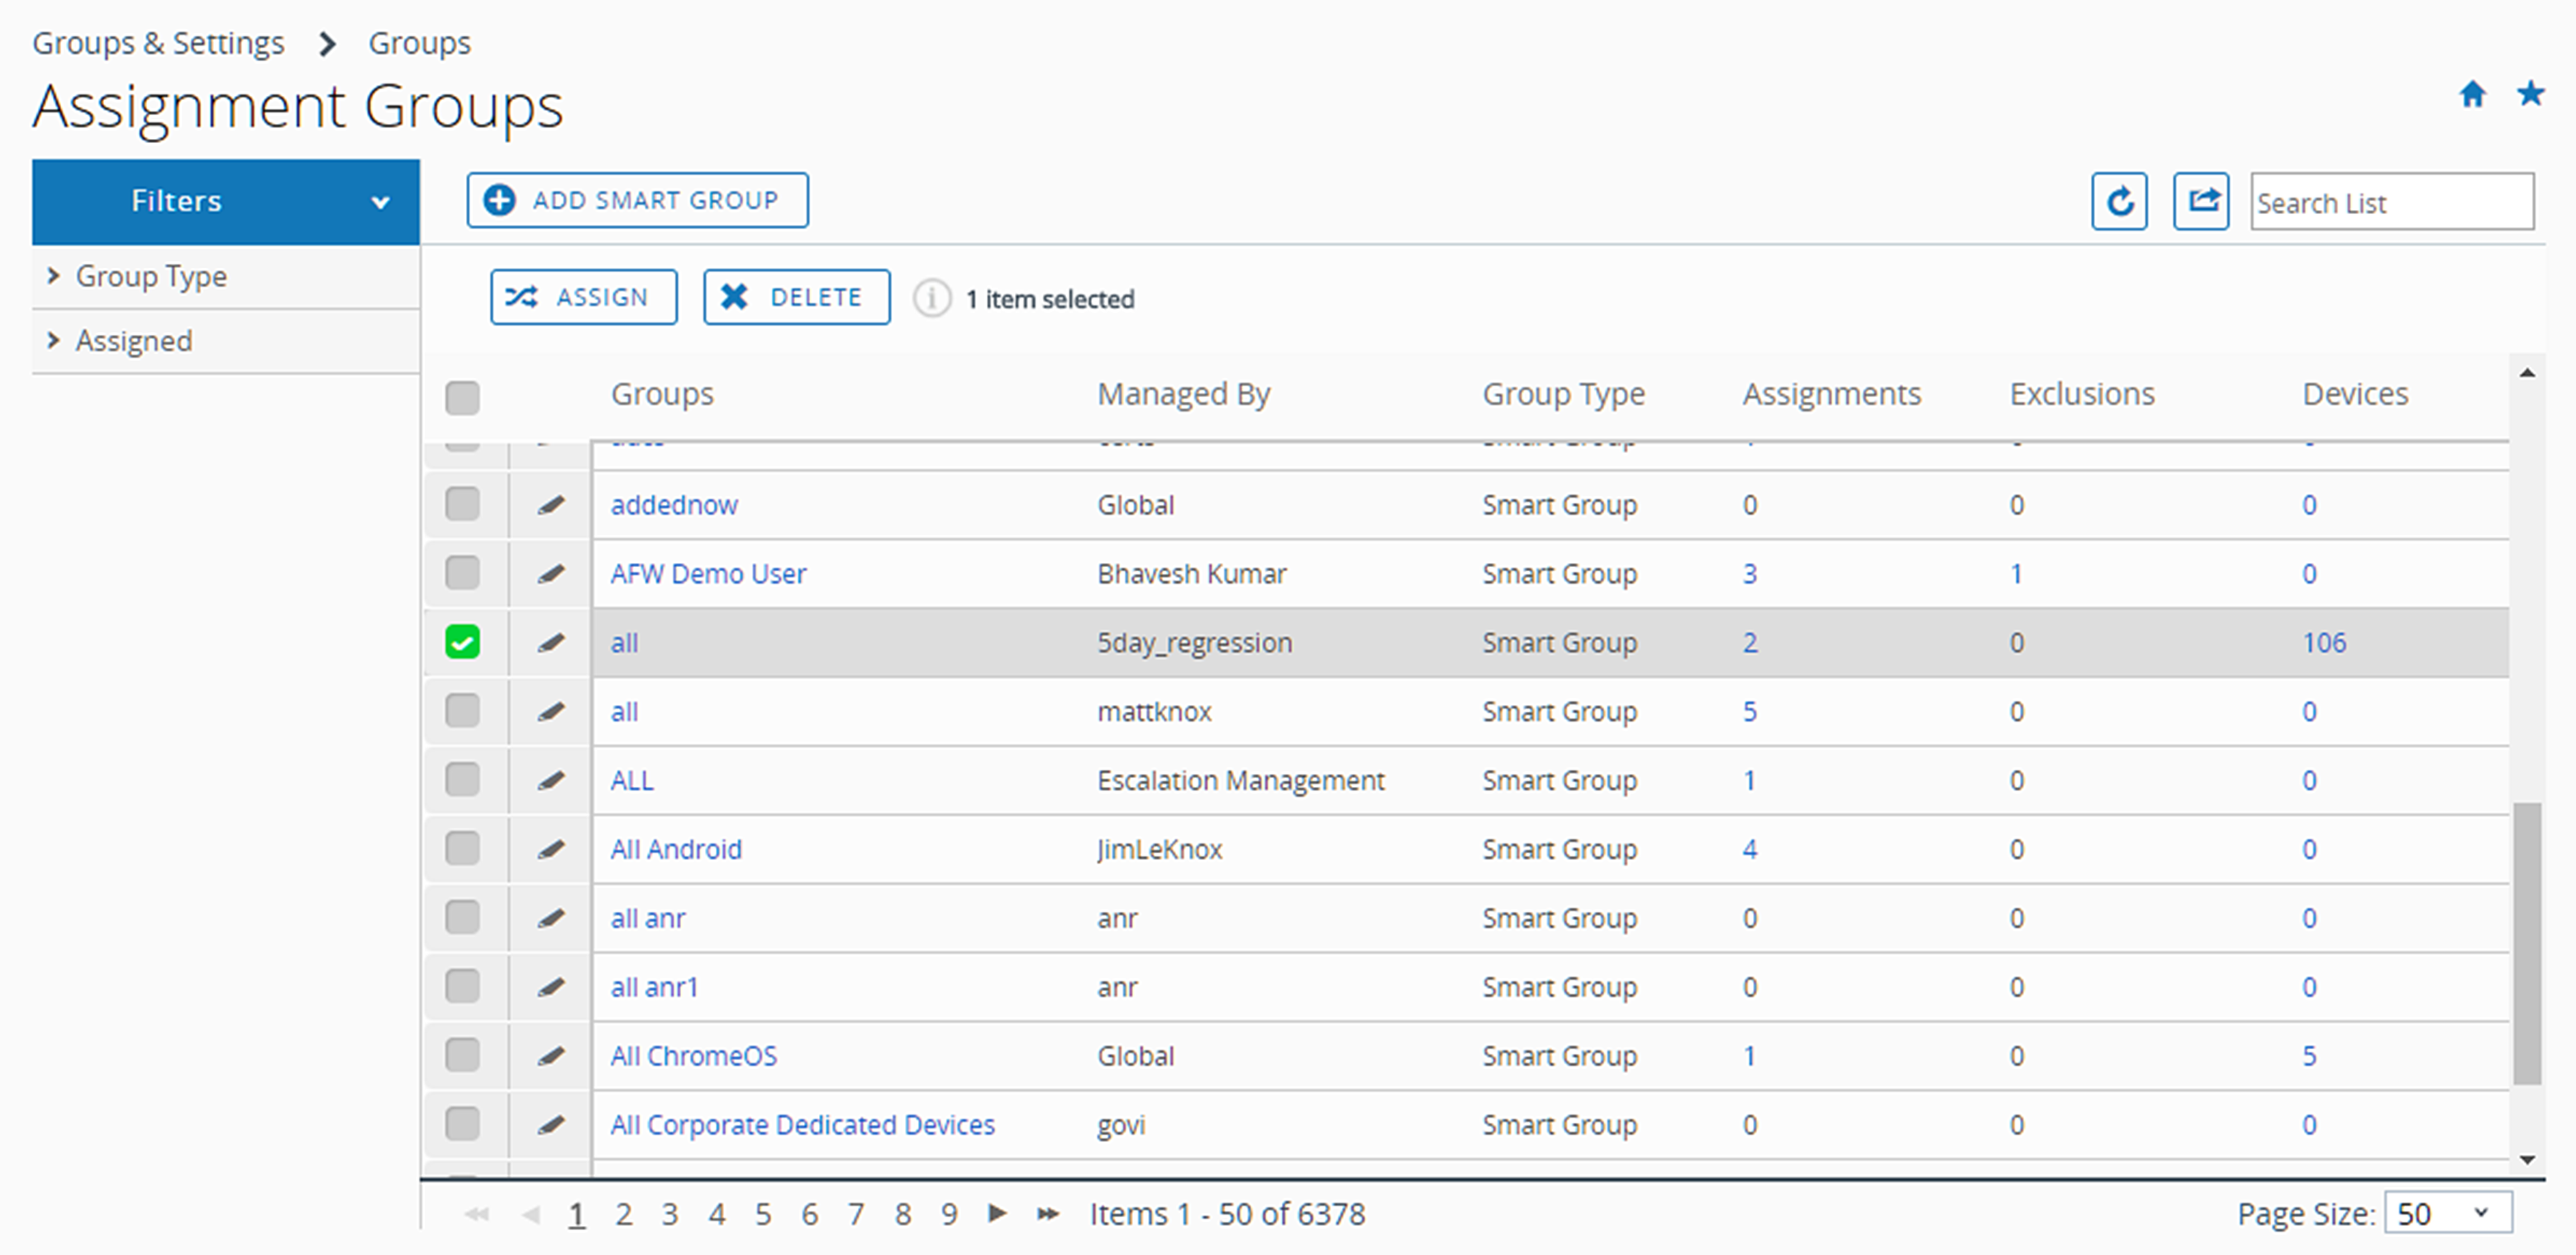
You can view detailed information by selecting the links within the columns Groups, Assignments, Exclusions, and Devices.
- Selecting links in the Assignments or Exclusions columns display the View Smart Group Assignments screen.
- Selecting a link in the Devices column displays the showing only those devices included in the smart group.
- You can Filter your collection of groups by Group Type (Smart, Organization, User, or all) or by Assigned status. Assigned status shows whether the group is assigned, is excluded, both, or neither.
- You can Assign a smart group directly from the listing.
Unassign a Smart Group
You can unassign a smart group from an application, book, policy, profile, or product. This action removes the associated content from all devices in the smart group.
- To unassign smart groups from applications, books, compliance policies, device profiles, or product provisions. Follow the navigation paths shown.
- Native Apps – Navigate to Resources > Apps > Native and select the Internal, Public, or Purchased tab.
- Books – Navigate to Resources > Books > List View and select the Internal, Public, or Purchased tab.
- Compliance Policy – Navigate to Devices > Compliance Policies > List View.
- Device Profile – Navigate to Resources > Profiles & Baselines > Profiles.
- Product Provision – Navigate to Devices > Provisioning > Product List View.
- Scripts – Navigate to Resources > Scripts.
- Sensors – Navigate to Resources > Sensors.
- Time Windows – Navigate to Resources > Time Windows.
- Locate the content or setting from the listing and select the Edit icon
 from the actions menu. Alternatively, you might select a check box or radio button to the left of the listing.
 - Select the Assignment tab or locate the Smart Groups text box.
- Select Delete (X) next to the smart group that you want to unassign. This action does not delete the smart group. It simply removes the smart group assignment from the saved setting.
- Follow the required steps to Save your changes.
Delete a Smart Group
When you have no further use for a smart group, you can delete it. You can only delete one smart group at a time. Selecting more than one smart group causes the Delete button to be unavailable.
Before you can delete a smart group, it cannot be assigned to any device product. If you are certain the smart group you want to delete is unassigned, then take the following steps.
- Navigate to and locate the smart group you want to delete from the listing.
- Select the check box to the left of the smart group you want to delete.
- Select Delete from the actions menu that displays.
Results: The unassigned smart group has been removed.
Edit a Smart Group
You can edit an established smart group. Any edits that you apply to a smart group affects all policies and profiles to which that smart group is assigned.
Here is an example of a typical need to edit a smart group. Assume a smart group for executives is assigned to a compliance policy, device profile, and two internal apps. If you want to exclude some of the executives from one or more of the assigned content items, then simply edit the smart group by specifying Exclusions. This action prevents not only the two internal apps from being installed on the excluded executives' devices but also the compliance policy and device profile.
- Navigate to .
- Select the Edit icon () located to the left of the listed smart group that you want to edit. You can also select the smart group name in the Group column. The Edit Smart Group page displays with its existing settings.
- In the Edit Smart Group page, alter Criteria or Devices and Users (depending upon which type the smart group was saved with) and then select Next.
- In the View Assignments page, you can review which profiles, apps, books, provisions, and policies can be added or removed from the devices as a result
- Select Publish to save your smart group edits. All profiles, apps, books, provisions, and policies tied to this smart group update their device assignments based on this edit.
Results: The Console Event logger tracks changes made to smart groups, including the author of changes, devices added, and devices removed.
Research Smart Group Events Using Console Event Logger
You can track the changes to smart groups, and when they are made and by whom, by using the Console Event logger. Such tracking can be useful when troubleshooting devices.
- Navigate to .
- Select Smart Groups from the Module drop-down filter at the top of the Console Event listing.
- Apply more filters as you might require including Date Range, Severity, and Category.
- Where applicable, select the hypertext link in the Event Data column which contains extra detail that can assist your research efforts.
Create a Smart Group
Before you can assign a smart group to an application, book, compliance policy, device profile, or product provision, you must create a smart group.
- You can follow along with the prescriptive task companion, How To Make A Smart Group Smartly, Companion Task to the Video, which you can review as you watch the video.
- Select the applicable Organization Group (OG) to which your new smart group applies and from which it can be managed. Selecting an OG is optional.
- Navigate to and then select Add Smart Group.
- Enter a Name for the smart group.
- Optionally, you can enable the Device Preview to see which devices are included in the smart group you have designed. This device preview is deactivated by default to improve performance.
- Configure the smart group type.
Choose from:
- Criteria – The Criteria option works best for groups with large numbers of devices (more than 500) that receive general updates. This method works best because the inherent details of these groups can reach all endpoints of your mobile fleet.
- Devices or Users – The Devices or Users option works best for groups with smaller numbers of devices (500 or fewer) that receive sporadic, although important, updates. This method works best because of the granular level at which you can select group members.
Note: Switching between Criteria and Devices or Users erases any entries and selections you might have made.
- In the Criteria type, select qualifying parameters to add in the smart group. If no selection is made in any setting, then that filtering is not applied toward the criteria.
Setting Description Organization Group This criteria option filters devices by organization groups selected. You can select more than one OG. You must select a Customer type OG or a child OG with a Customer type parent OG. Assigning the smart group to a non-customer type OG is not allowed. For more information, see Changing Organization Groups and Create Organization Groups.
User Group This criteria option filters devices by user groups selected. You can select more than one user group. Ownership This criteria option filters devices by ownership type selected. Tags This criteria option filters devices according to device tags. You can select more than one tag. Platform and Operating System This criteria option filters devices by platform and OS selected. You can select multiple combinations of each.
While Platform is a criterion within a smart group, the platform configured in the device profile or compliance policy always takes precedence over the smart group's platform. For instance, if you make an iOS device profile and assign it to a smart group, the profile is only assigned to iOS devices even if the smart group includes Android devices.
OEM & Model This criteria option applies only to Android and Windows Desktop platform selections made in Platform and Operating System.
You can select one or more original equipment manufacturers and multiple models per OEM.
New Android OEMs and models get added to the drop-down menu when devices are enrolled or synced.
Model (Legacy) This criteria option filters non Android and non Windows Desktop devices by model. Individual models displayed are based on the selections made in Platform and Operating System.
Select from the list of presented models to include in your smart group.
Enterprise OEM Version This criteria option filters devices by enterprise original equipment manufacturer version. You can select more than one Enterprise OEM version.
An Enterprise OEM version is a software-based classification applicable to OEM device models. For example, an Enterprise OEM version can be supplementary software support for devices such as Motorola's Mobility Extensions (MX) or Samsung SAFE. An Enterprise OEM version can also be an OEM's particular flavor of the Android operating system such as those offered by Honeywell, LG, and Sony among others.
Management Type Filter devices according to the way the device is managed. Enrollment Category Filter devices according to the way the device is enrolled. Additions This criteria option adds individual devices and users that are not included in the filtering criteria. You can select more than one device and more than one user. Exclusions This criteria option excludes individual devices, individual users, and user groups that are included in the filtering criteria. You can exclude more than one device, more than one user, and more than one user group. - Use the Devices or Users type to assign content and settings to special cases outside of the general enterprise mobility criteria. Enter the device friendly name in Devices and user name (first name or last name) in Users. You must Add at least one device or user or you cannot save the smart group.
Setting Description Devices Add a device to this Smart Group by entering the device friendly name. You can add more than one device using this method. Users Add users to this smart group by entering the user name, first name, or last name. You can add more than one user using this method.
- In the Criteria type, select qualifying parameters to add in the smart group. If no selection is made in any setting, then that filtering is not applied toward the criteria.
Create and Assign a Smart Group
You can create a smart group defined by platform, ownership, user group, OS version, model, device tag, enterprise OEM, and even individual devices by friendly name.
For example, you can make a smart group containing all employee-owned iPhone Touch devices with iOS version earlier than 9.0.2. Add to this same smart group all Android devices by HTC version 2.0 with OS version 4.1 or greater. Out of this group, you can exclude devices in the user group "full time." To this highly customized pool of *devices, you can assign 10 device profiles, 10 applications, or a compliance policy.
*Some restrictions might apply due to the multiplatform nature of this customized device pool. For example, there might be apps you want to assign that do not offer an Android version.
You can assign a smart group two ways.
Assign Smart Group While Creating Device Product
You can assign a smart group when you add or create an application, book, compliance policy, device profile, or product provision.
- Complete the Assigned Groups drop-down menu.
- Select a smart group from the drop-down menu. Smart groups available are managed only within the organization group (OG) to which the resource is being added, or to a child OG below it.
- If no smart group matches the desired assignment criteria, then select the Create a Smart Group option. You can assign more than one smart group per application, book, compliance policy, device profile, or product provision.
- Select Save to include the assignment.
Assign Smart Group While Managing the Smart Group
You can also assign a smart group during the process of managing the smart group itself.
- View the entire list of smart groups by navigating to .
- Select one or more smart groups you want to assign and select Assign. The Assign page displays. Select the Groups link at the top of the Assign page to display the Groups page. On this page, the organization groups that manage the smart groups are displayed. Return to the Assign page by selecting the Close button.
- On the Assign page, use the search box to view the list of eligible products and assign it to the selected smart groups.
- Select Next to display the View Device Assignment page and confirm the assignment status.
- Select Save & Publish.
Exclude Groups in Profiles and Policies
You can exclude groups from the assignment of device profiles and compliance policies with as much ease as assigning groups to these device products.
- While adding a device profile or compliance policy, select Yes next to the Exclusions setting to display the Excluded Groups option.
- In the Excluded Groups setting, select groups that you want to exclude from the assignment of this profile or policy.
- You can enter the first few letters of the group by name and the auto-search function shows you all the groups whose name corresponds to the string you entered.
- You can select one or more organization groups, user groups, or smart groups.
- You can make a new smart group by selecting the Create Smart Group button.
- Select Save and Publish (for device profiles) or Next (for compliance policies) and continue the process for those tasks.
If you select the same group in both the Assigned Groups and Excluded Groups settings, then the profile or policy fails to save.
Next Steps: Preview the affected devices by selecting View Device Assignment.
How To Make A Smart Group Smartly, Companion Task to the Video
This is a companion task to the video of the same name which appears toward the top of this page. In one tab of your browser, you can have the video play, pausing as necessary, and in another tab, scroll through this task which includes all the details left out of the video.
1. Move to the Organization Group You Want to Manage the Smart Group From
Content packages such as device profiles, compliance policies, apps, books, and so on, are created from and managed by a specific organization group (OG), same as devices. You are able to include these content packages in a smart group only if you create the smart group from the same OG the content packages were created from.
Use the OG selector to move to the child OG that contains the content packages (apps, books, device profiles, compliance policies, and so on) you want to include in the smart group. You can identify the managed OG for any content package. Select the content package from its List View and then review the selected Managed By option.
For example, if you want to assign a device profile to your smart group, navigate to Resources > Profiles & Baselines > Profiles, locate the name of the device profile you want to assign to your smart group from the listing and see the Managed By column for that profile. This is the OG you move to before you make your smart group.
Note that you still have access to content created in all parent OGs above the OG you have moved to. This means you can assign content to the smart group from the OG you are in and also from all parent OGs above.
2. Create the Smart Group
Once you are in the organization group that contains your targeted content packages, proceed with making the smart group.
- Navigate to Groups & Settings > Groups > Assignment Groups.
- Select the Add Smart Group button. The Create New Smart Group screen displays.
- Name the OG like a newspaper headline, a summary of its contents. Naming your smart group in a way that describes the devices themselves makes it possible to assign content to the same smart group any time in the future.
- Be warned that if you give a functional name to the smart group instead of a name that represents the devices themselves, you are more likely to create additional smart groups in the future representing the same set of devices for each new function. This is very wasteful and very taxing on the Workspace ONE UEM console.
- For example...
- ...if you maintain a single smart group for "Non-Exempt Staff" containing 2500 devices, you can simply assign and unassign content packages as needed throughout your fleet's lifetime. Those 2500 devices can all be served from the same smart group indefinitely.
- Compare this streamlined practice with having twelve functionally-named smart groups, each containing the same 2500 devices, each with different content assigned to it. Workspace ONE UEM console must spend an excessive amount of CPU cycles in order to keep up with all those smart groups, slowing everything else down.
- The time to create a new smart group is when you identify a subset of those 2500 devices that need to be treated differently than the others, for instance, different apps, differnet policies, different profiles. But even then, name that new smart group in a way that represents the devices themselves, not in a way that describes what you plan to do with them.
- Be warned that if you give a functional name to the smart group instead of a name that represents the devices themselves, you are more likely to create additional smart groups in the future representing the same set of devices for each new function. This is very wasteful and very taxing on the Workspace ONE UEM console.
- Select the right Type of Smart Group. Most of the time, the type you want is Criteria, which offers the greatest flexibility and customization. Only in specific scenarios, such as the training scenario cited in the video, does Devices and Users make more sense.
- Select the best Criteria. Hover the mouse pointer over the info badge of each criteria category and you can see a popup describing how the category filters your device fleet.
- Select Additions and Exclusions. As stated in the video, these two criteria categories offer the greatest freedom, even if the added or excluded device goes against every other category you just defined.
- For example, if you want only Apple iPhones in your smart group, even specifying a version number for iOS, you can defy this rule in the Additions category by adding iPad users and even macOS devices, provided the content assigned is compatible with both iOS and macOS.
- Another example, if you make a smart group that contains devices for all your managers, assigning all manager-only profiles, policies, and apps, you have the freedom to include a device used by a management trainee, for example, preparing them for their new role. Conversely, you can make an Exclusion of a device in the manager pool, making the manager profiles, policies, and apps unavailable to that device. The possibilities are numerous.
3. Assign the Smart Group
There are 2 different scenarios when to assign smart groups.
- Assign the smart group directly after making it.
- Navigate to Groups & Settings > Groups > Assignment Groups
- Locate and select the smart group you just made by inserting a check in the check box to the left of the listing.
- Select the Assign button. The Assign screen displays.
- Select profiles and policies from the available list, which is based on the organization group you are currently in. The only device profiles and compliance policies available to select are 1) those created in the organization group you are currently in and 2) those created in the same OG as the smart group you selected.
- Assign the smart group directly after making the content package. This includes not only device profiles and compliance policies but also apps, books, products, scripts, sensors, and time windows.
- Navigate to the list view for the content type to which you want to assign the smart group.
- Native Apps – Navigate to Resources > Apps > Native and select the Public, or Internal tab.
- Books – Navigate to Resources > Books > List View and select the Internal, Public, or Purchased tab.
- Compliance Policy – Navigate to Devices > Compliance Policies > List View.
- Device Profile – Navigate to Resources > Profiles & Baselines > Profiles.
- Product Provision – Navigate to Devices > Provisioning > Product List View.
- Scripts – Navigate to Resources > Scripts.
- Sensors – Navigate to Resources > Sensors.
- Time Windows – Navigate to Resources > Time Windows.
- Locate the content or setting from the listing and select the Edit icon from the actions menu. Alternatively, you might select a check box or radio button to the left of the listing.
- Select the Assign button or Assignment tab, depending upon the design of the screen. Locate and click the Smart Groups text box, then select the smart group from the drop down menu that displays.
- Navigate to the list view for the content type to which you want to assign the smart group.
