Windows Desktop Device Management
After your devices are enrolled and configured, manage the devices using the Workspace ONE ™ UEM console. The management tools and functions enable you to keep an eye on your devices and remotely perform administrative functions.
You can manage all your devices from the Workspace ONE UEM console. The Dashboard is a searchable, customizable view that you can use to filter and find specific devices. This feature makes it easier to perform administrative functions on a particular set of devices. The Device List View displays all the devices currently enrolled in your Workspace ONE UEM environment and their status. The Device Details page provides device-specific information such as profiles, apps, Workspace ONE Intelligent Hub version and which version of any applicable OEM service currently installed on the device. You can also perform remote actions on the device from the Device Details page that are platform-specific.
Device Dashboard
As devices are enrolled, you can manage them from the Device Dashboard in Workspace ONE UEM powered by AirWatch.
The Device Dashboard provides a high-level view of your entire fleet and allows you to act on individual devices quickly.
You can view graphical representations of relevant device information for your fleet, such as device ownership type, compliance statistics, and platform and OS breakdowns. You can access each set of devices in the presented categories by selecting any of the available data views from the Device Dashboard.
From the List View, you can take administrative action: send messages, lock devices, delete devices, and change groups associated with the device.
Security – View the top causes of security issues in your device fleet. Selecting any of the doughnut charts displays a filtered Device List view comprised of devices affected by the selected security issue. If supported by the platform, you can configure a compliance policy to act on these devices.
- Compromised – The number and percentage of compromised devices (jailbroken or rooted) in your deployment.
- No Passcode – The number and percentage of devices without a passcode configured for security.
- Not Encrypted – The number and percentage of devices that are not encrypted for security. This reported figure excludes Android SD Card encryption. Only those Android devices lacking disc encryption are reported in the donut graph. Ownership – View the total number of devices in each ownership category. Selecting any of the bar graph segments displays a filtered Device List view comprised of devices affected by the selected ownership type.
Last Seen Overview/Breakdown – View the number and percentage of devices that have recently communicated with the Workspace ONE UEM MDM server. For example, if several devices have not been seen in over 30 days, select the corresponding bar graph to display only those devices. You can then select all these filtered devices and send out a query command so that the devices can check in.
Platforms – View the total number of devices in each device platform category. Selecting any of the graphs displays a filtered Device List view comprised of devices under the selected platform.
Enrollment – View the total number of devices in each enrollment category. Selecting any of the graphs displays a filtered Device List view comprised of devices with the selected enrollment status.
Operating System Breakdown – View devices in your fleet based on operating system. There are separate charts for each supported OS. Selecting any of the graphs displays a filtered Device List view comprised of devices running the selected OS version.
Device List View
Use the Device List View in Workspace ONE UEM powered by AirWatch to see a full listing of devices in the currently selected organization group.
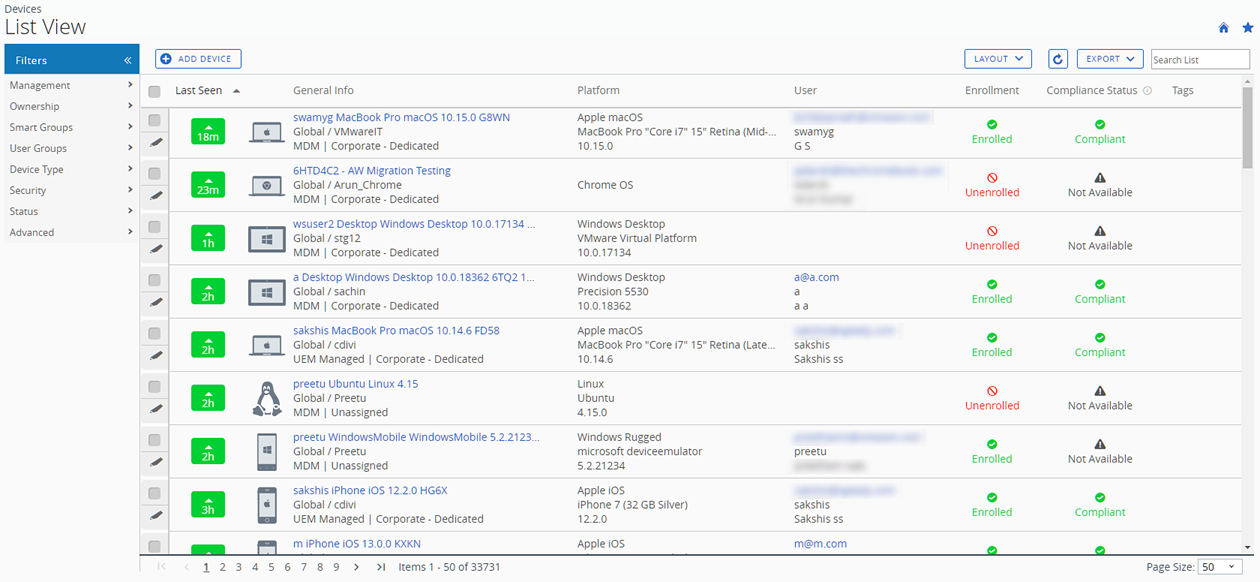
The Last Seen column displays an indicator showing the number of minutes elapsed since the device has checked-in. The indicator is red or green, depending on how long the device is inactive. The default value is 480 minutes (8 hours) but you can customize this value by navigating to Groups & Settings > All Settings > Devices & Users > General > Advanced and change the Device Inactivity Timeout (min) value.
Select a device-friendly name in the General Info column at any time to open the details page for that device. A Friendly Name is the label you assign to a device to help you differentiate devices of the same make and model.
Sort by columns and configure information filters to review activity based on specific information. For example, sort by the Compliance Status column to view only devices that are currently out-of-compliance and target only those devices. Search all devices for a friendly name or user name to isolate one device or user.
Customize Device List View Layout
Display the full listing of visible columns in the Device List view by selecting the Layout button and select the Custom option. This view enables you to display or hide Device List columns per your preferences.
There is also an option to apply your customized column view to all administrators at or below the current organization group (OG). For instance, you can hide 'Asset Number' from the Device List views of the current OG and of all the OGs underneath.
Once all your customizations are complete, select the Accept button to save your column preferences and apply this new column view. You can return to the Layout button settings at any time to tweak your column display preferences.
Some notable device list view custom layout columns include the following.
- Android Management
- SSID (Service Set Identifier or Wi-Fi network name)
- Wi-Fi MAC Address
- Wi-Fi IP Address
- Public IP Address
Exporting List View
Select the Export button to save an XLSX or CSV (comma-separated values) file of the entire Device List View that can be viewed and analyzed with MS Excel. If you have a filter applied to the Device List View, the exported listing reflects the filtered results.
Search in Device List View
You can search for a single device for quick access to its information and take remote action on the device.
To run a search, navigate to Devices > List View, select the Search List bar and enter a user name, device-friendly name, or other device-identifying element. This action initiates a search across all devices, using your search parameter, within the current organization group and all child groups.
Device List View Action Button Cluster

With one or more devices selected in the Device List View, you can perform common actions with the action button cluster including Query, Send [Message], Lock, and other actions accessed through the More Actions button.
Available Device Actions vary by platform, device manufacturer, model, enrollment status, and the specific configuration of your Workspace ONE UEM console.
Remote Assist
You can start a Remote Assist session on a single qualifying device allowing you to view the screen and control the device. This feature is ideal for troubleshooting and performing advanced configurations on devices in your fleet.
To use this feature, you must satisfy the following requirements.
- You must own a valid license for Workspace ONE Assist.
- You must be an administrator with a role assigned that includes the appropriate Assist permissions.
- The Assist app must be installed on the device.
- Supported device platforms:
- Android
- iOS
- macOS
- Windows Desktop
- Windows Mobile
Select the check box to the left of a qualifying device in the Device List View and the Remote Assist button displays. Select this button to initiate a Remote Assist session.
Windows Desktop Device Details Page
Use the Device Details page in Workspace ONE UEM powered by AirWatch to track detailed device information for Windows Desktop devices and quickly access user and device management actions.
You can access Device Details by selecting a Friendly Name from the Device List View, using one of the Dashboards, or with any of the search tools.
From the Device Details page, you can access specific device information broken into different menu tabs. Each menu tab contains related device information depending on your Workspace ONE UEM deployment.
Windows Notification Service Details
You can see the status of device communications with the Windows Notification Service(WNS) from the Network tab of the Device Details page. The WNS supports sending your devices notifications and it is not used for sensitive information. If a device is not currently online, the service caches the notifications until the device connects again. For more information on WNS, refer to Push notification support for device management.
The WNS statuses include the following:
- WNS Server Status - displays the state of your WNS server.
- Last WNS Renewal Request - The date and time of last attempt made to renew the Windows Notification Services (WNS) connection with the device. This connection allows Workspace ONE UEM to query and push policies to the device (Networking, Battery Sense, and Data Sense conditions permitting).
- Next WNS Get Request: - The date and time of the next scheduled attempt to renew the connection between WNS and the device.
- WNS Channel URI- The WNS communication endpoint that devices and Workspace ONE UEM use. This endpoint uses the following format:
https://*.notify.windows.com/?token=_{TOKEN}.
More Actions
The More Actions drop-down on the Device Details page enables you to perform remote actions over the air to the selected device.
The actions vary depending on factors, such as Workspace ONE UEM console settings or enrollment status.
Apps (Query) – Send an MDM query command to the device to return a list of installed applications.
The Apps (Query) action requires an active enrolled user login.
Baselines (Query) – Send an MDM query command to the device to return a list of samples.
Certificates (Query) – Send an MDM query command to the device to return a list of installed certificates.
The Certificates (Query) requires an active enrolled user login.
Change Organization Group – Change the device's home organization group to another existing OG. Includes an option to select a static or dynamic OG.
If you want to change the organization group for multiple devices at a time, you must select devices for the bulk action. Use the Block selection method (using the shift-key) instead of the Global check box (next to the Last Seen column heading in the device list view).
Change Passcode - Change the device password on a Windows Desktop device enrolled with a basic user. This menu item does not support directory services. When you select to use this option, Workspace ONE UEM generates a new password and displays it in the Workspace ONE UEM console. Use the new password to unlock the device.
Delete Device – Delete and unenroll a device from the console. Sends the enterprise wipe command to the device that gets wiped on the next check-in and marks the device as Delete In Progress on the console. If the wipe protection is turned off on the device, the issued command immediately performs an enterprise wipe and removes the device representation in the console.
Device Information (Query) – Send an MDM query command to the device to return information on the device such as friendly name, platform, model, organization group, operating system version, and ownership status.
Device Wipe – Send an MDM command to wipe a device clear of all data and operating system. This action cannot be undone.
Edit Device – Edit device information such as Friendly Name, Asset Number, Device Ownership, Device Group Device Category.
Enterprise Reset – Enterprise Reset a device to factory settings, keeping only the Workspace ONE UEM enrollment.
Enterprise Reset restores a device to a Ready to Work state when a device is corrupted or has malfunctioning applications. It reinstalls the Windows OS while preserving user data, user accounts, and managed applications. The device will resync auto-deployed enterprise settings, policies, and applications after resync while remaining managed by Workspace ONE.
Enterprise Wipe – Enterprise Wipe a device to unenroll and remove all managed enterprise resources including applications and profiles.
- This action cannot be undone and re-enrollment is required before Workspace ONE UEM can manage this device again.
- This device action includes options to prevent future re-enrollment and a Note Description text box for you to add information about the action.
- Use the Keep Apps On Device menu item in the Enterprise Wipe wizard when you want to keep managed apps on your Windows devices. This feature is helpful when you want to quickly enroll a device to a new user and you do not want to wait for large apps to install on the reassigned Windows device. You cannot access this feature unless your Windows devices and apps meet these requirements.
- The Windows machine must have the App Deployment agent installed on it.
- Workspace ONE UEM enables Software Distribution by default for SaaS and on-premises deployments. The Software Distribution feature automatically deploys the App Deployment agent to Windows devices managed in your Workspace ONE UEM environment. If you disabled this feature, you must re-enable it to ensure the latest App Deployment agent is deployed to devices.
- The console sends the latest App Deployment agent with every console update and devices receive the update automatically.
- The Keep Apps on Device column in the Enterprise Wipe wizard indicates whether your devices have met the requirements to use the feature.
- The apps you want to keep on devices after an enterprise wipe must be managed in Workspace ONE UEM. This feature does not work for unmanaged apps.
- The Windows machine must have the App Deployment agent installed on it.
Note: Enterprise Wipe is not supported for cloud domain-joined devices.
Force BIOS Password Reset – Force the device to reset the BIOS password to a new auto-generated password.
Lock Device – Send an MDM command to lock a selected device, rendering it unusable until it is unlocked.
Important: When locking a device, an enrolled user must be signed into the device for the command to process. The lock command locks the device and any user signed in must reauthenticate with Windows. If an enrolled user is signed-in to the device, a lock device command locks the device. If an enrolled user is not signed in, the lock device command is not processed.
Query All – Send a query command to the device to return a list of installed applications (including Workspace ONE Intelligent Hub, where applicable), books, certificates, device information, profiles, and security measures.
Reboot Device – Reboot a device remotely, reproducing the effect of powering it off and on again.
Remote Management – Take control of a supported device remotely using this action, which starts a console application that enables you to perform support and troubleshoot on the device.
Repair Hub - Repair the Workspace ONE Intelligent Hub on Windows devices to re-establish communication between the console and the device.
Certain events might impact the communication between the device and the console. Some examples are stopping key Workspace ONE UEM services, removing or the corruption of Workspace ONE Intelligent Hub related files, and the failing of upgrades of Workspace ONE Intelligent Hub components due to network interruptions.
The Repair Hub command takes steps to remediate these issues. After the Hub is successfully repaired, it checks for commands to recover HMAC. If there were HMAC errors, it automatically recovers HMAC. The Repair Hub also checks for a version upgrade. If an update is detected and is automatic, the updates to the Hub are enabled, and the Hub is upgraded.
Request Device Log – Request the debug log for the selected device, after which you can view the log by selecting the More tab and selecting Attachments > Documents. You cannot view the log within the Workspace ONE UEM console. The log is delivered as a ZIP file that can be used to troubleshoot and provide support.
When you request a log, you can select to receive the logs from the System or the Hub. System provides system-level logs. Hub provides logs from the multiple agents running on the device.
Security (Query) – Send an MDM query command to the device to return the list of active security measures (device manager, encryption, passcode, certificates, and so on).
Send Message – Send a message to the user of the selected device. Select between Email, Push Notification (through AirWatch Cloud Messaging), and SMS.
View BIOS Password – View the BIOS password for the device that the Workspace ONE UEM console auto-generated. You see the Last Password Applied and the Last Password Submitted.
Suspend BitLocker - You can now suspend and resume BitLocker encryption from the console. This feature is helpful for users who do not have permissions to manage BitLocker but need help with their device.
When you select to Suspend BitLocker for a device, the console displays several options and one of them is for Number of Reboots. Select the number of times you think the device restarts for the applicable scenario. For example, helping a user update their BIOS can require the system to reboot twice, so select 3. This value gives the system one extra reboot with encryption suspended to ensure that the BIOS updates properly before resuming BitLocker.
However, if you do not know how many reboots a task requires, select a larger value. You can use the More Actions > Resume BitLocker after you have completed the task.
Manage Your Microsoft HoloLens Devices
Workspace ONE UEM supports enrolling and managing Microsoft HoloLens devices. You must use the native enrollment and management functionality to manage your Windows HoloLens devices.
Before you can manage your HoloLens devices using Workspace ONE UEM, you must apply the Licensing XML file to the devices. If you are using HoloLens 1 devices, you must apply the file before enrolling. For more information on applying licensing, see Unlock Windows Holographic for Business features. This step is not required for HoloLens 2 devices.
Enroll Your HoloLens Devices
You can enroll your Microsoft HoloLens devices into Workspace ONE UEM using native management functionality. You must use native Windows enrollment methods as HoloLens devices do not support Workspace ONE Intelligent Hub functionality. Enroll with one of the native MDM enrollment procedures, with or without Windows Auto Discovery.
Manage Your HoloLens Devices
After enrolling, you can apply supported profiles to your HoloLens devices using Workspace ONE UEM. For a list of the supported CSP, see CSPs suported in HoloLens devices.
Product Provisioning
Product provisioning enables you to create, through Workspace ONE ™ UEM, products containing profiles, applications, files/actions, and event actions (depending on the platform you use). These products follow a set of rules, schedules, and dependencies as guidelines for ensuring your devices remain up to date with the content they need.
Product provisioning also encompasses the use of relay servers. These servers are FTP(S) servers designed to work as a go-between for devices and the Workspace ONE UEM console. Create these servers for each store or warehouse to store product content for distribution to your devices. More information can be found on Product Provisioning.
Device Updates
In the Workspace ONE UEM Console, under Devices a new section called Device Updates has been added to centralize Policies and Updates Management. Some improvements to the Windows, Policies include being able to use pre-configured policy templates as well as an update to the behavior menu that will allow for Target Release Versions and Target Product Versions for better planning abilities. A dashboard view into each Policy and Update has been added to allow visabliity of the key attributes specific to groups of devices. Some improvements to the Windows, Updates page include no longer needing to approve the updates and better ability to see and manage updates across devices. These added features are meant to help put everything the Administrator might need in one convient location.
Policies Dashboard
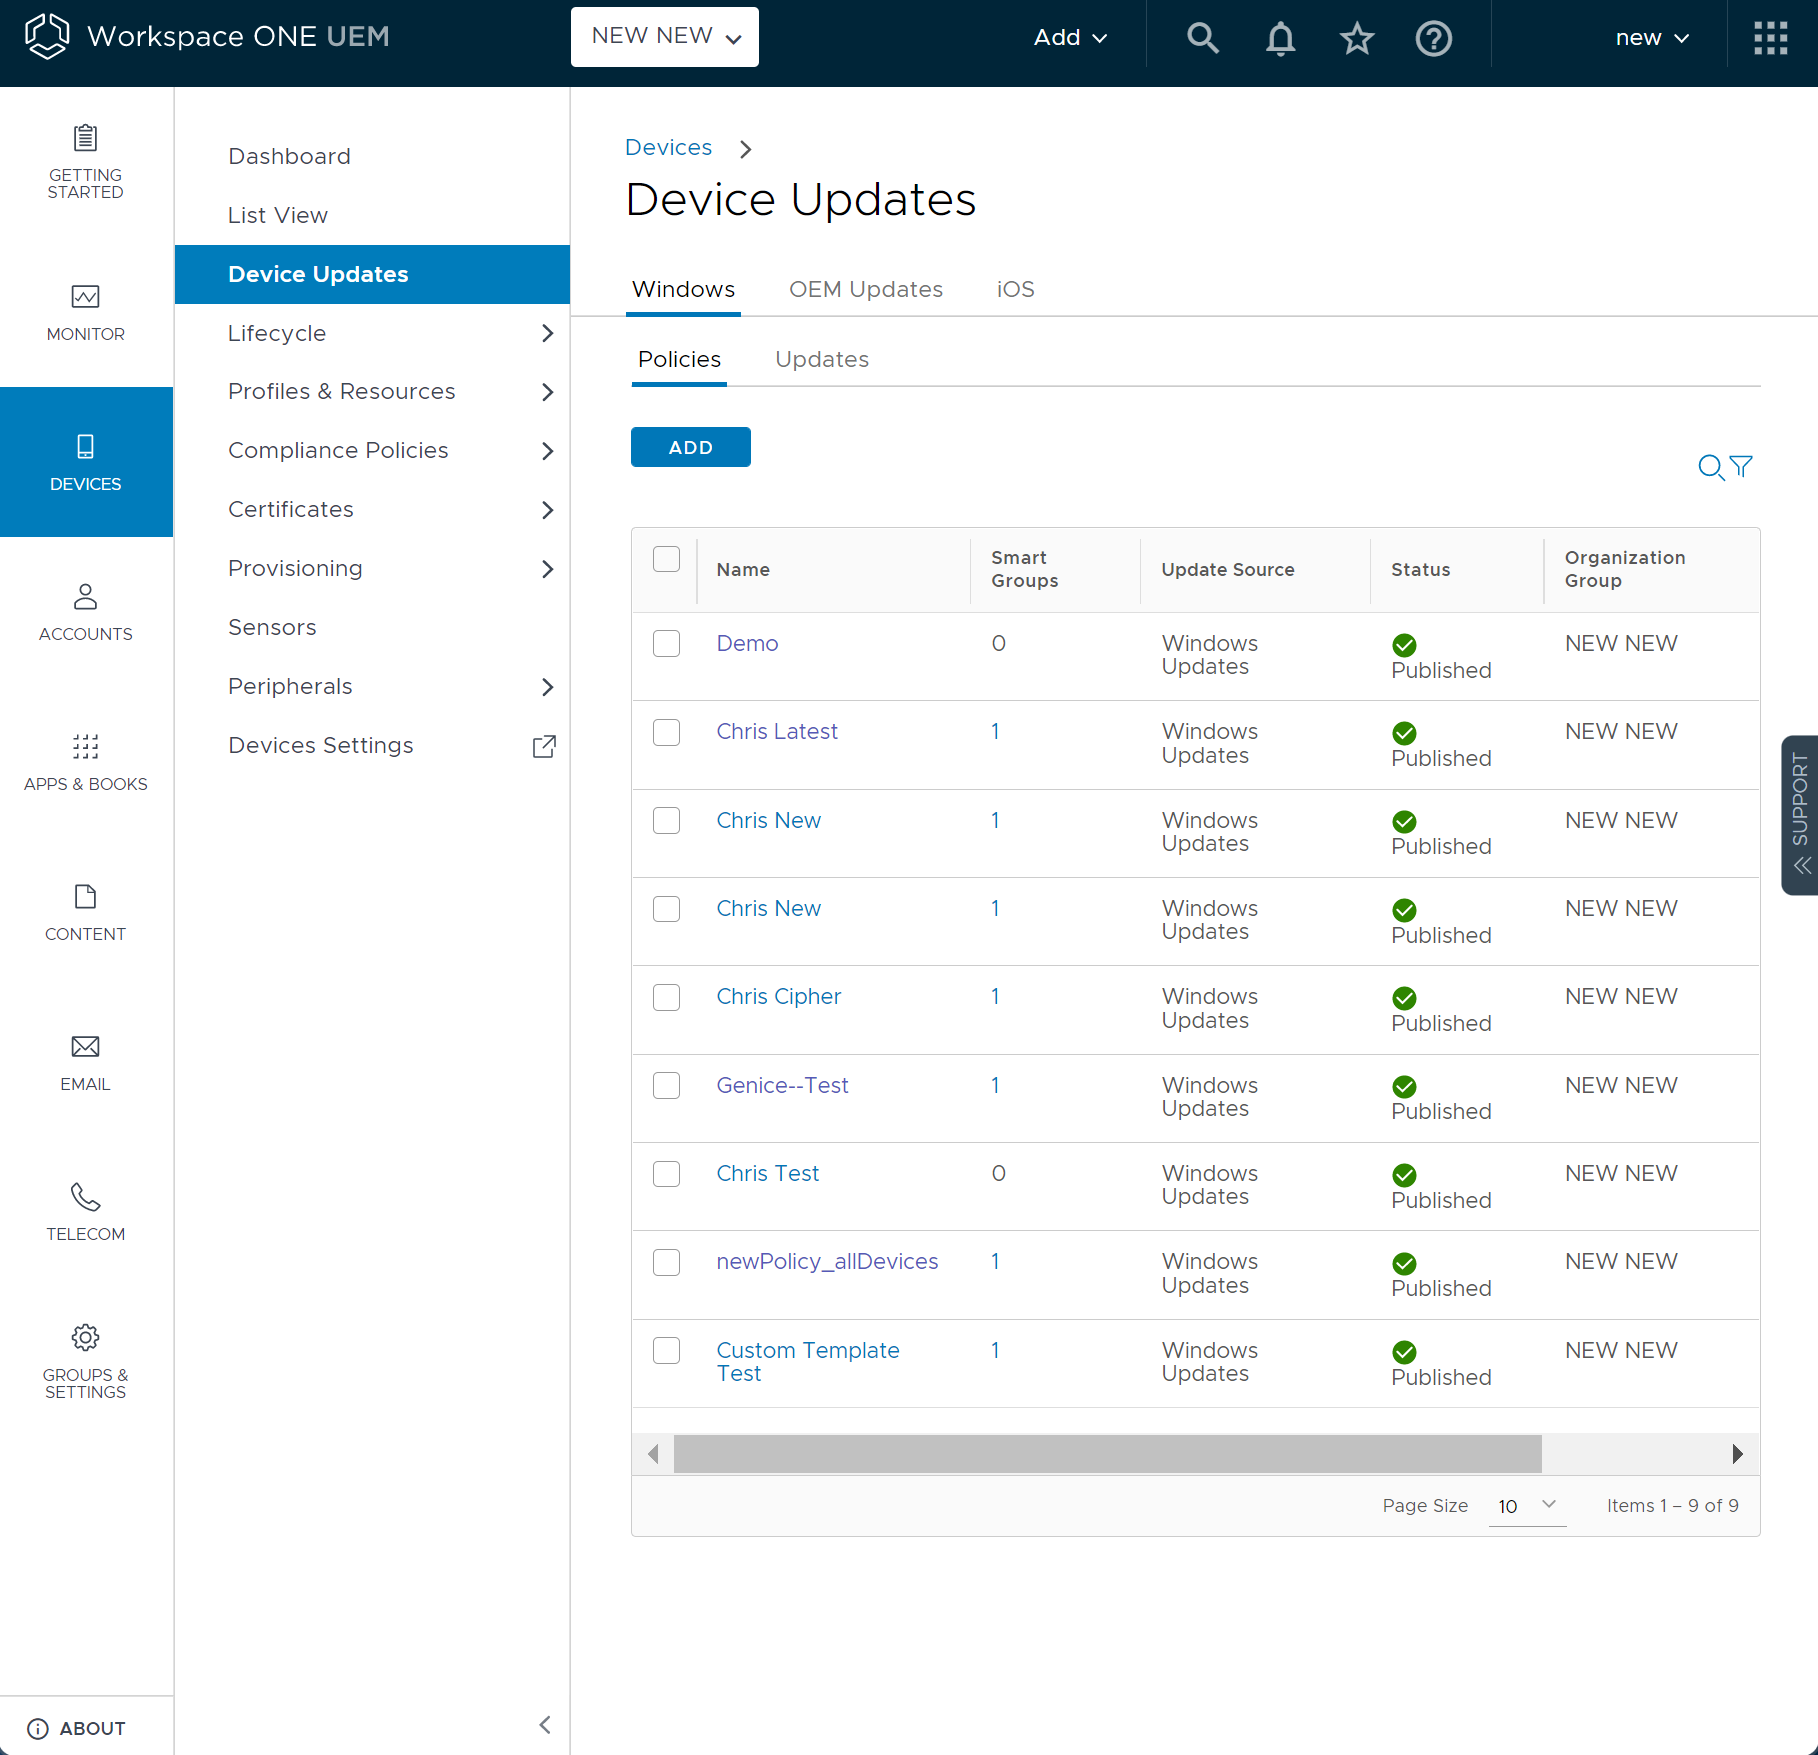
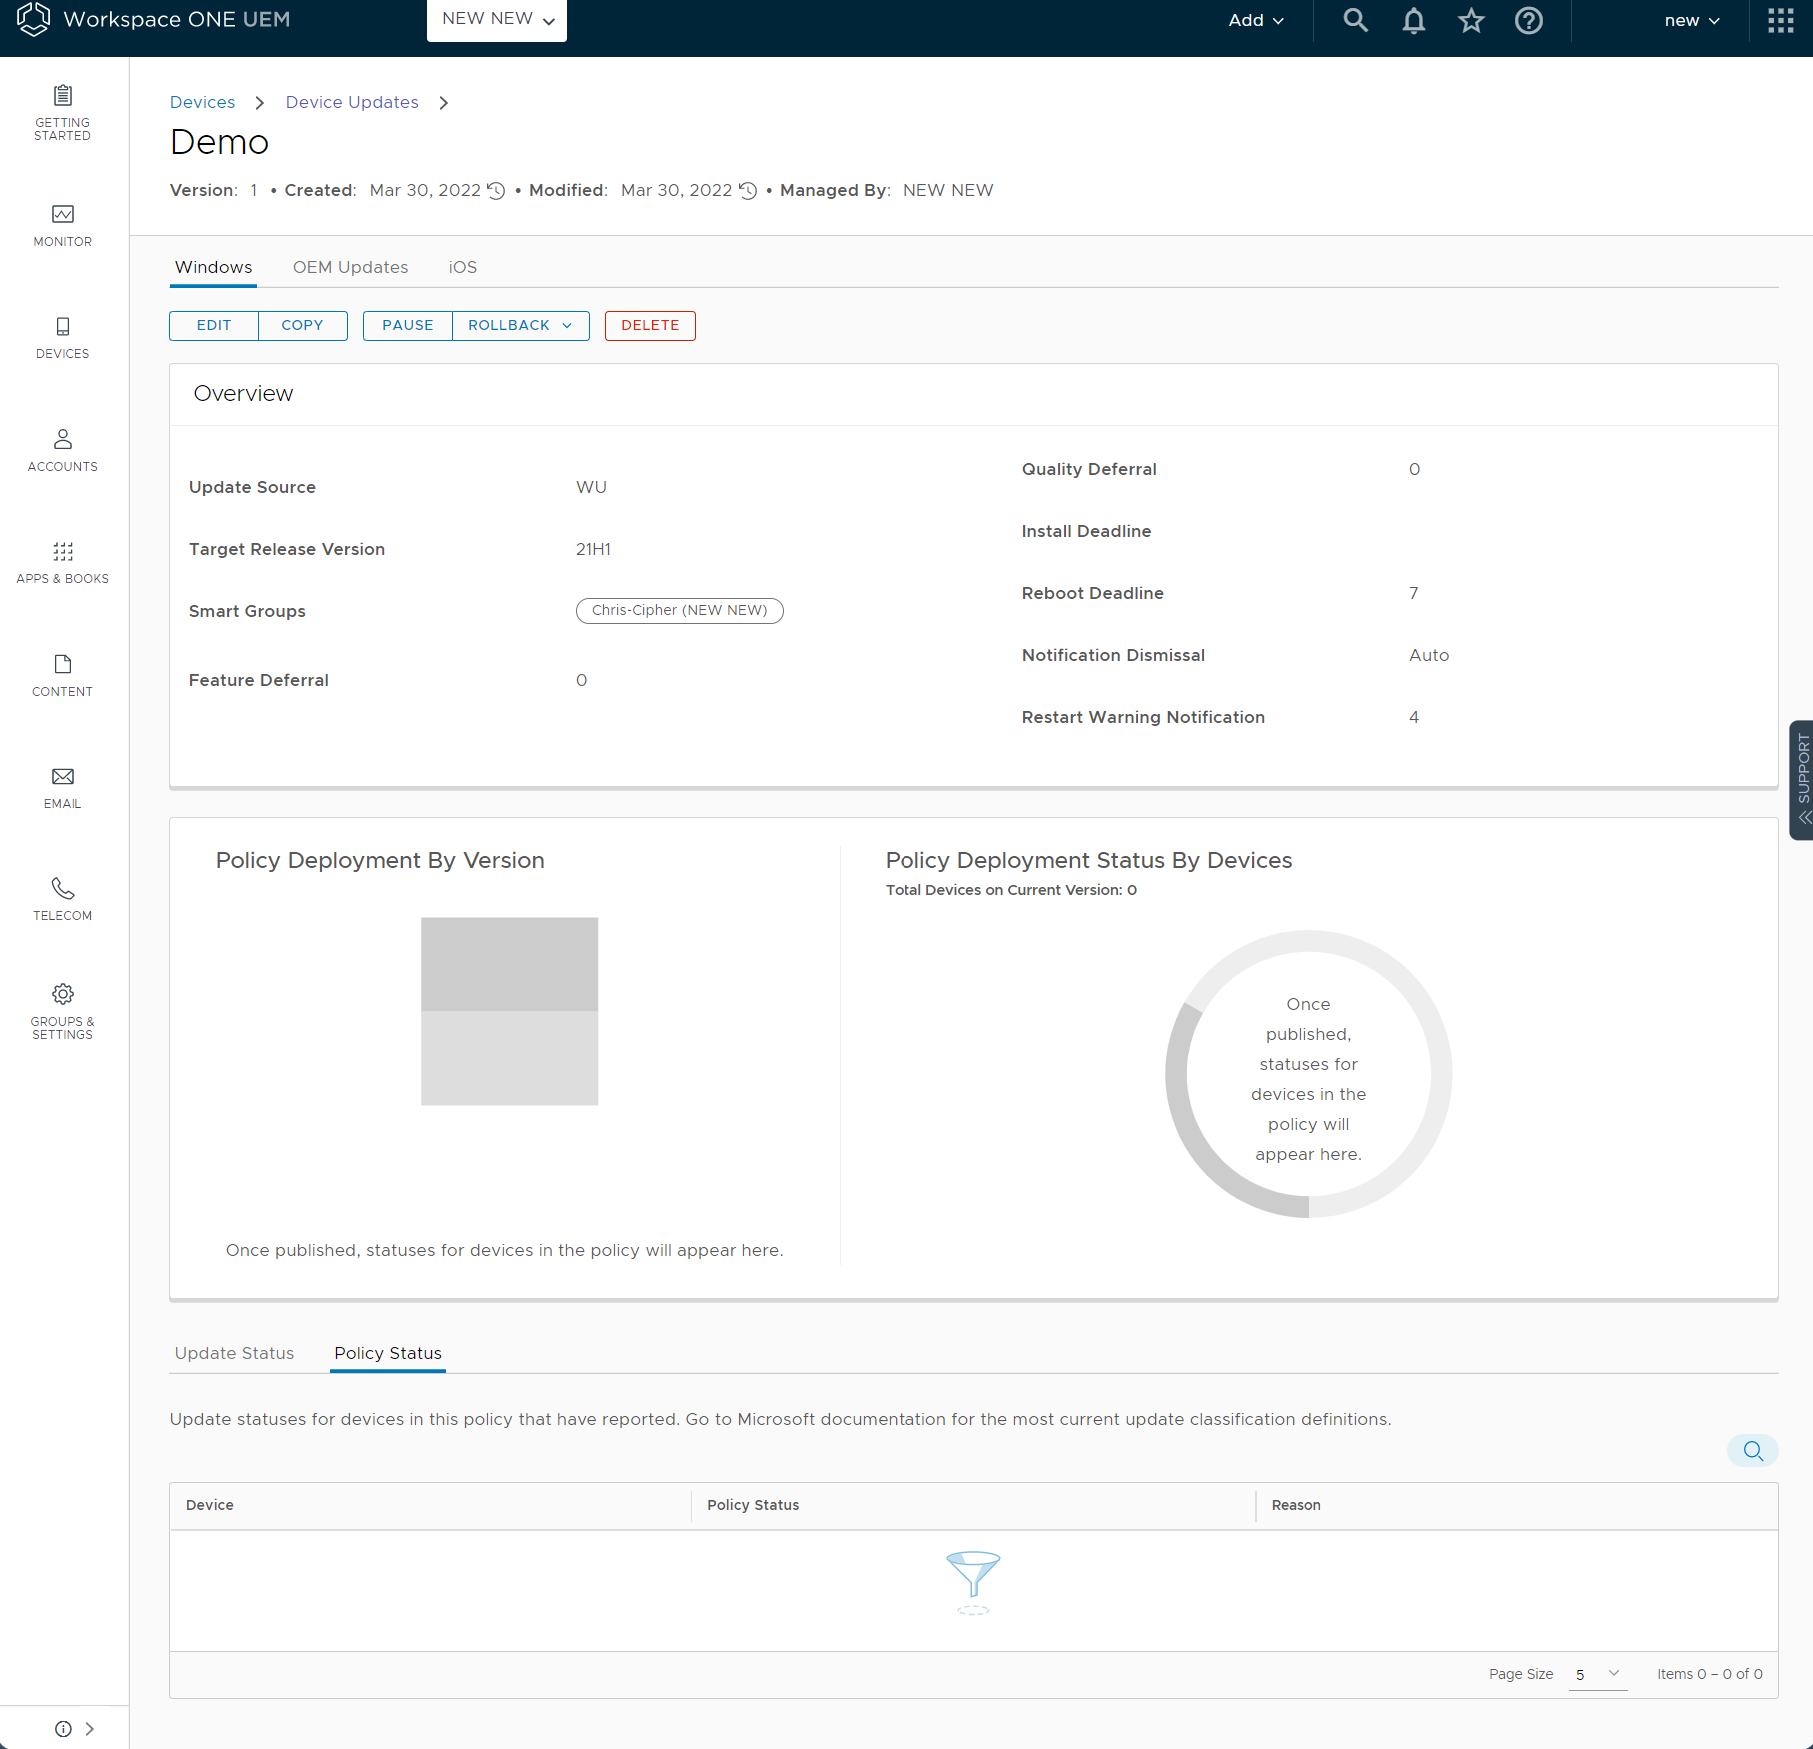
Under the Device Updates section, Admins can now click on Windows, Policies and then select an individual policy to view key attributes and statical data for that specific Policy. If needed, you can edit and customize the settings from here as well. In the middle of the page, you will be able to see information on the policy deployment by both version as well as by status per device. At the bottom of the page, a list of devices will be displayed along with their status. If something has failed it will show a reason why it failed.
Editing or Creating New Policies:
Any policy that has been created previously will be listed. To edit an existing policy, click on the Policy Name and then click EDIT.
To ADD a new Policy:
- Click the blue ADD button.
- Name the Policy.
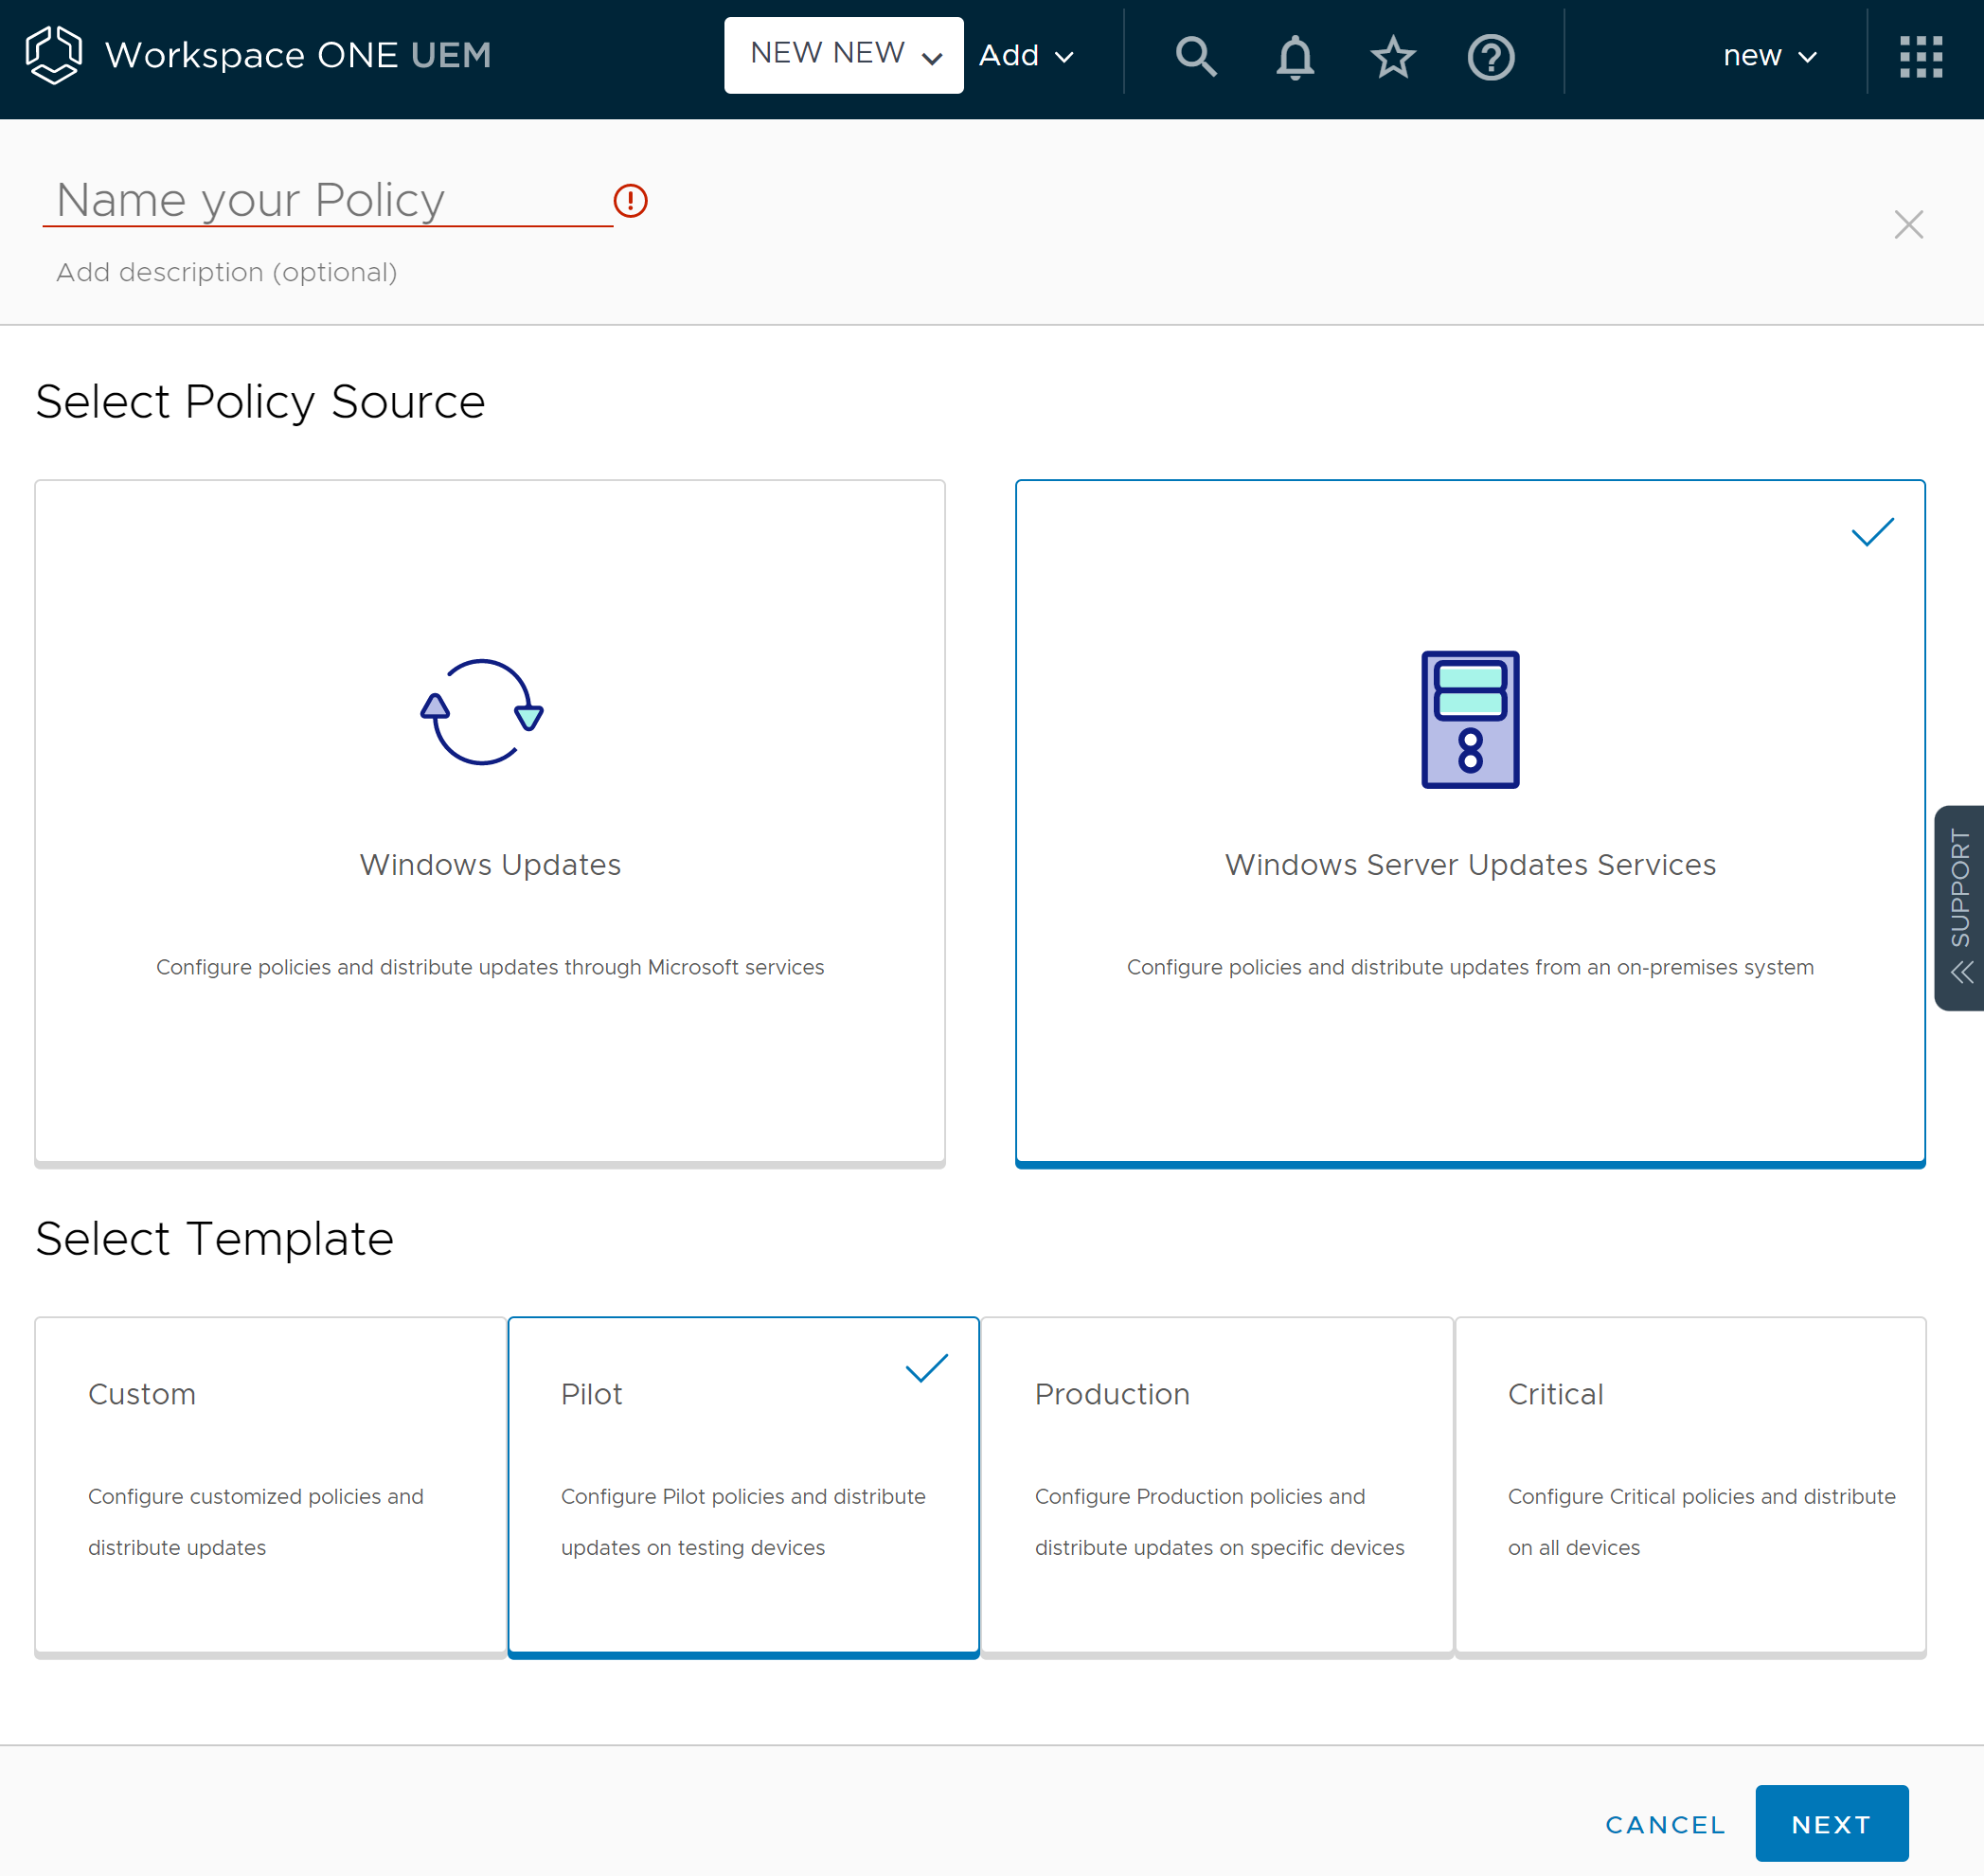
- Select the Policy Source. Window’s Updates will pull updates from Microsoft, while Window’s Server Updates Servers (WSUS) will pull from an On-Premises Server.
- Select a Template. You now have the option to select a pre-configured templates or customize your own.
- Custom- allows you to configure each setting to your preferred configuration
- Pilot- has pre-configured settings that allow for the quickest distribution of the newest (preview) updates on testing devices.
- Production- has pre-configured settings that allow for consistent distribution of reliable (GA) updates on production devices.
- Critical- has pre-configured settings that allow for the quickest distribution of the newest (non-preview) updates on production devices.
Note: Selecting a template will provide automatic recommended settings. However, you can select a template and then make changes to the pre-configured settings to specifically fit your needs. Make sure to save the policy when completed.
- Select Next
- Under Definition: Configure the settings as required.
- Under Device Behavior: Configure the settings as required.
- Under Device Scheduling: Configure the settings as required.
- Under Update Behavior: Configure the settings as required.
- Note: Two new fields have been added: Target Release Version and Target Product Version for your convenience.
- Under Delivery Optimization: Configure the settings as required.
- Select Publish or if you need more time, you can select Save and return to finish later.
Note: You can have multiple policies controlling multiple aspects, however the most recent policy configured (published) will be what is configured on the device. In the event of duplicate configurations, the latest policy values will overwrite any existing values on the device.
Updates Dashboard
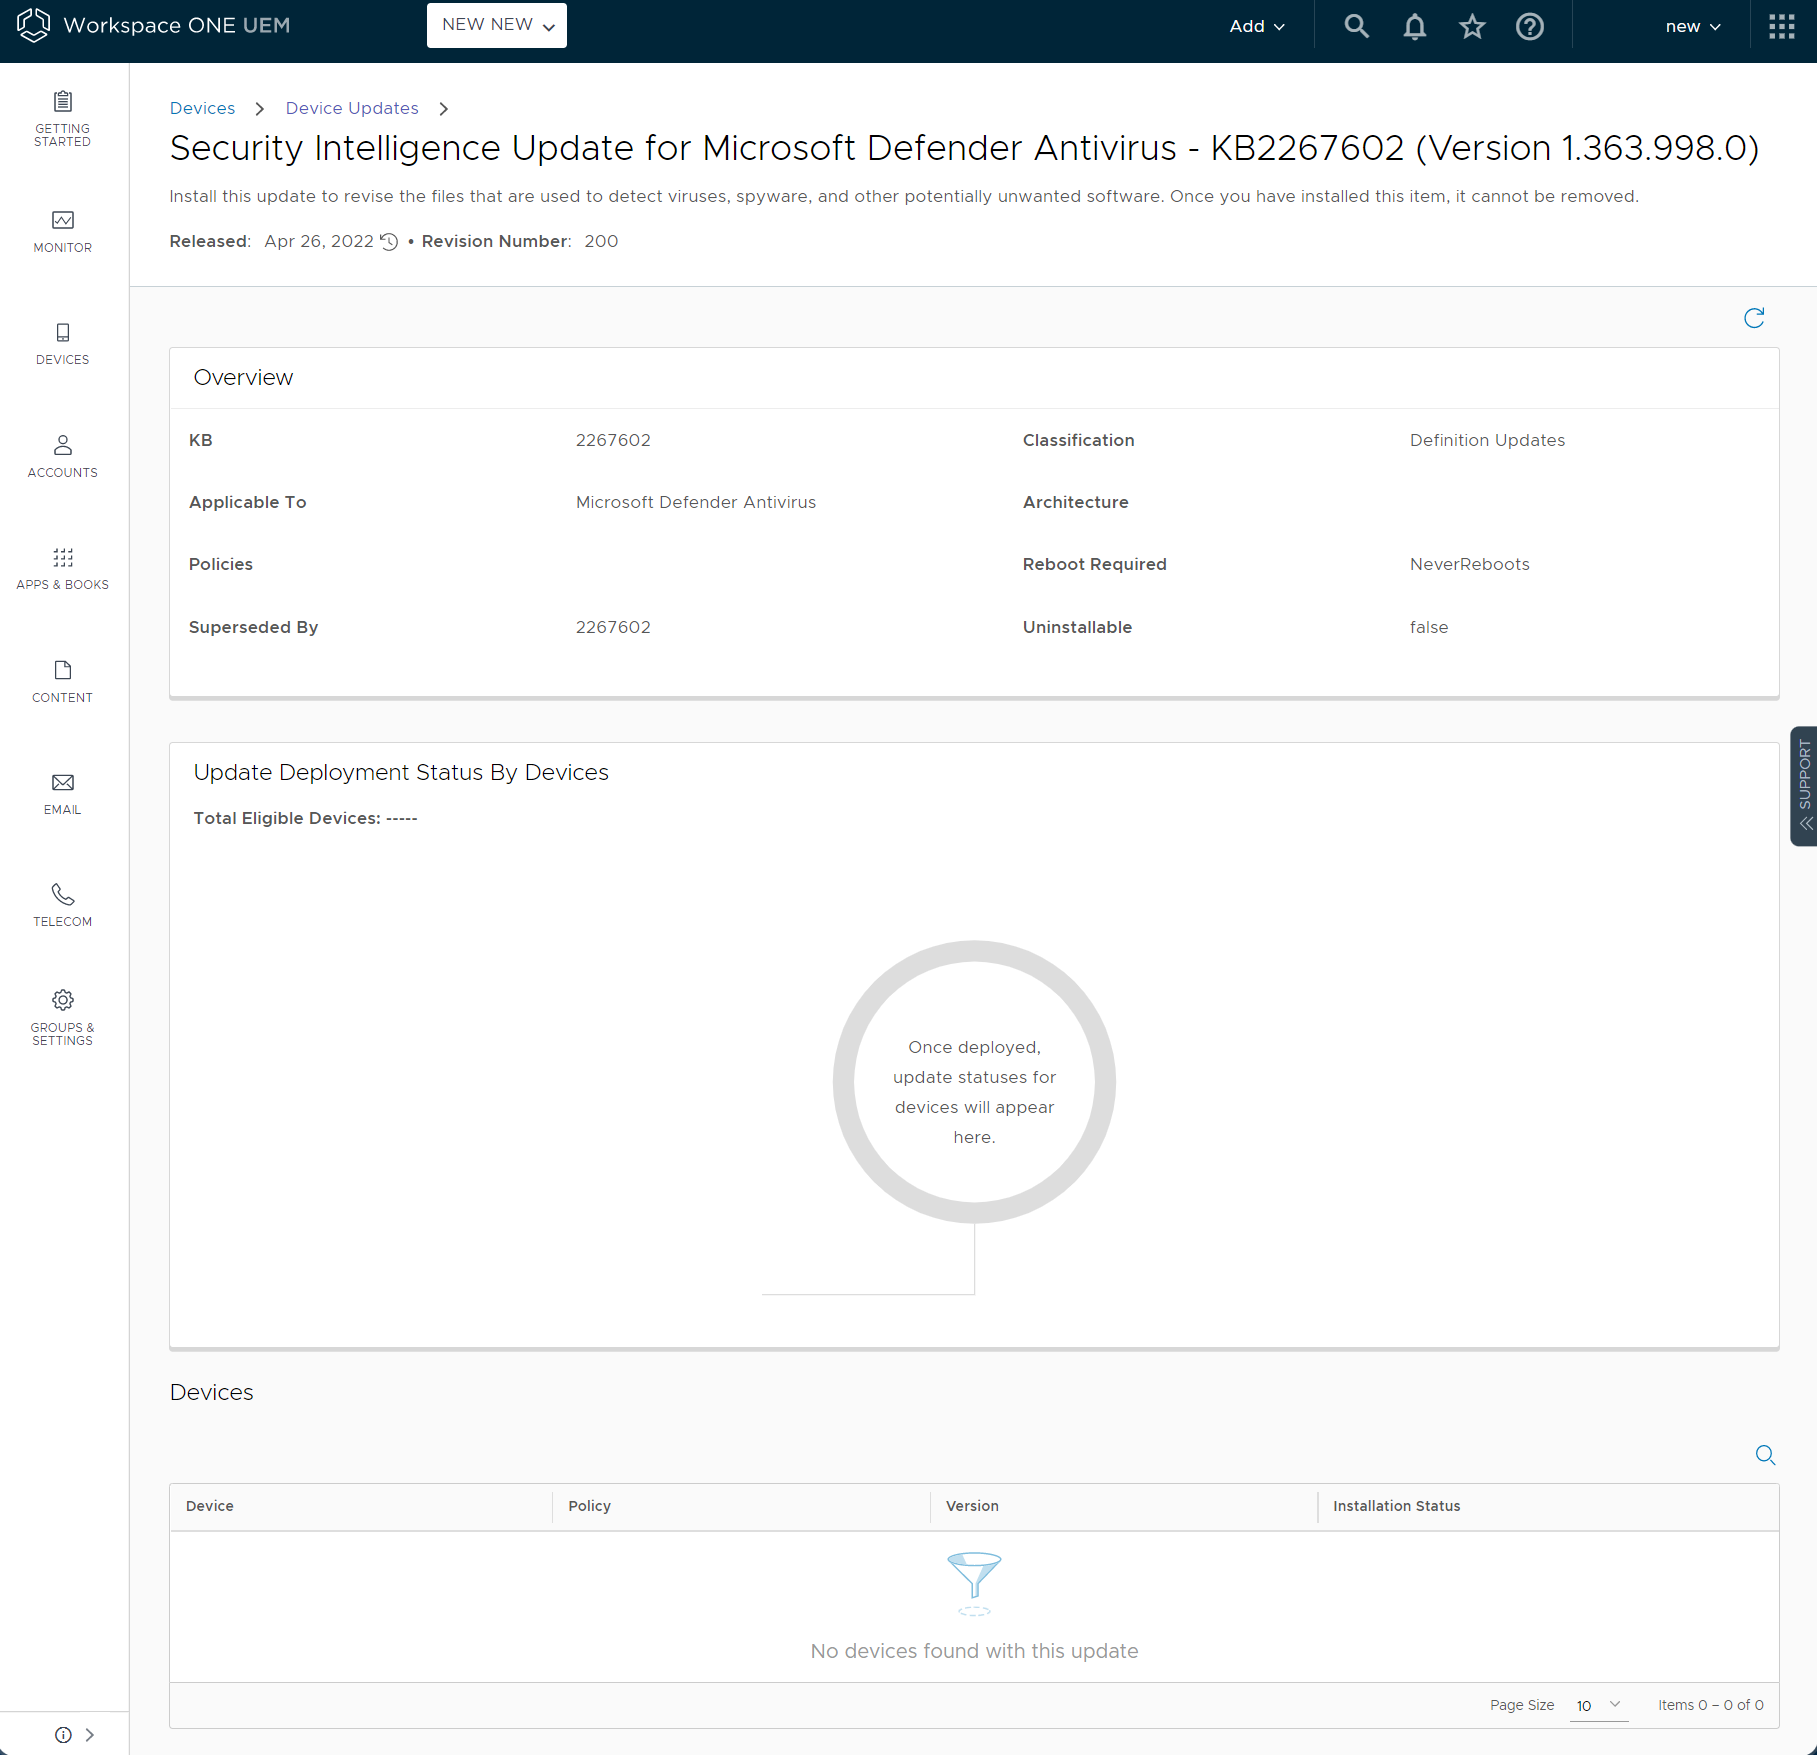
Under the Device Updates section, Admins can now click on Windows, Updates to see and manage updates. You no longer need to go into the Profile and look for the Windows updates settings and approving an update is no longer needed. Admins can now schedule when updates are installed from Microsoft based on each policy's configuration. 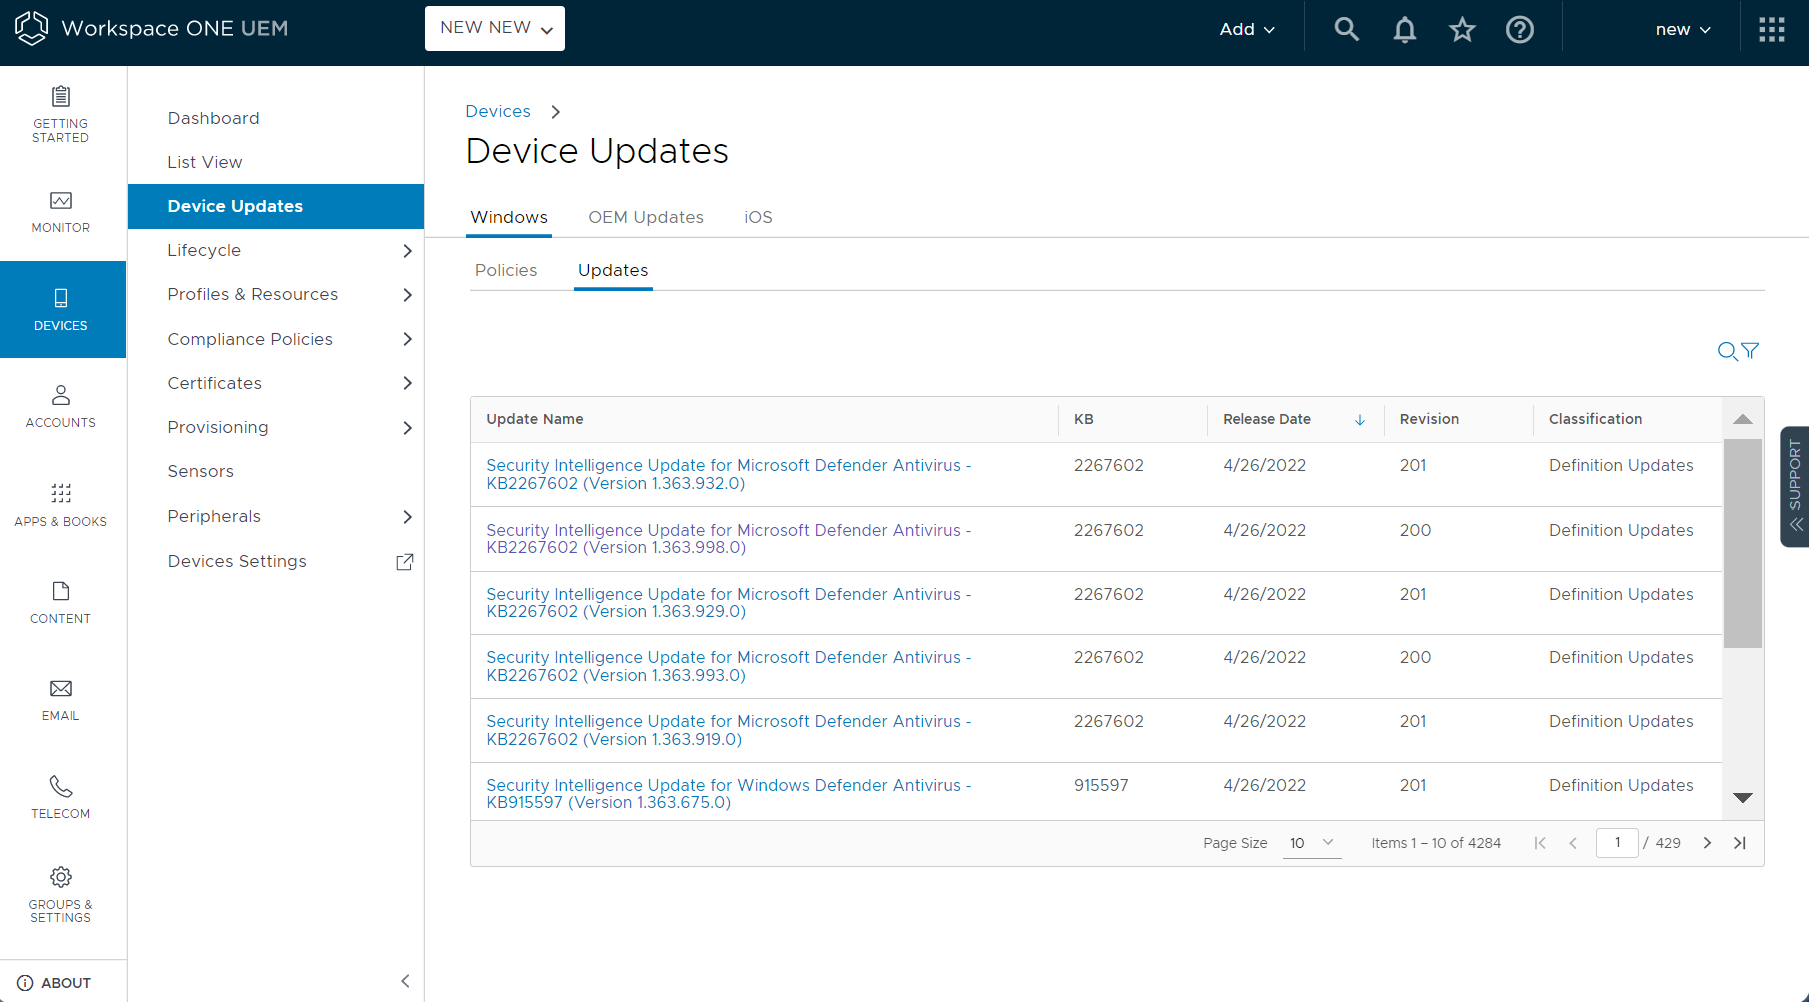
To see more information, click on the update name and a new page will open to show specific information for that update including the current status and history. If needed, you can edit and customize the settings from here as well.
