


When you first install tc Runtime, the server.xml file contains typical server configuration values that get you up and running immediately. However, as you use tc Runtime and go into production, you might require additional configuration. This chapter describes typical and additional configuration use cases.
Configuration Files and Templates
The tc Runtime configuration files are located in the CATALINA_BASE/conf directory, where CATALINA_BASE refers to the directory in which you have installed a tc Runtime instance. The main configuration files are:
server.xmlMain configuration file for a tc Runtime instance. It configures the behavior of the servlet/JSP container. By default, theserver.xmlfile for a tc Runtime instance uses variable substitution for configuration properties such as HTTP and JMX port numbers that must be unique across multiple server instances on the same computer. These variables take the form${var}. For example, the variable for the HTTP port on an NIO connector that the tc Runtime instance listens to is${nio.http.port}. The specific values for these variables for a particular server instance are stored in thecatalina.propertiesfile, in the same directory as theserver.xmlfile.catalina.properties. Properties file that contains the server instance-specific values for variables in theserver.xmlfile.
The conf directory also contains the following two files that configure common properties for all Web applications deployed to the tc Runtime instance:
web.xmlDefines default values for all Web applications.context.xmlThe contents of this file will be loaded for each Web application.
The tc Runtime installation also includes a set of configuration templates in the INSTALL-DIR/pivotal-tc-server-edition/templates directory, where edition refers to the edition of VMware tc Server that you are using, whether developer or standard. You can specify these templates when you create a new tc Runtime instance to automatically enable certain configuration features, such as SSL or clustering. Each template is a directory that contains new, modified, or fragments of files that the tcserver script uses to modify the default tc Runtime instance files. Many of the templates change the default server.xml file, so you can also look at the server-fragment.xml files in the various template directories for examples of configuring an existing tc Runtime instance. The server-fragment.xml files are fragments of the server.xml file that the tcserver script applies to the default tc Runtime configuration so as to enable a particular feature.
For details about the templates provided by tc Runtime, see "Creating a tc Runtime Instance Using a Template" in Getting Started with VMware tc Server.
Simple tc Runtime Configuration
The following sample server.xml file shows a basic out-of-the-box configuration for a default tc Runtime instance included in tc Runtime. This configuration file uses typical values for a standard set of XML elements. Sample server.xml files in later sections of this documentation build on this file.
This server.xml file uses variable substitution for configuration properties, such as HTTP and JMX port numbers, that must be unique across multiple server instances on one computer. These variables take the form ${var}. For example, the variable for the HTTP port on a NIO connector that the tc Runtime instance listens to is ${nio.http.port}. The specific values for these variables for a particular server instance are stored in the catalina.properties file, located in the same directory as the server.xml file. A snippet of the default catalina.properties file is shown after the sample server.xml file.
See Description of the Basic server.xml File for information about the elements and attributes in this sample configuration file in case you need to change them to suit your own environment.
<?xml version='1.0' encoding='utf-8'?>
<Server port="${shutdown.port}" shutdown="SHUTDOWN">

    <Listener className="org.apache.catalina.core.JreMemoryLeakPreventionListener"/>
    <Listener className="org.apache.catalina.mbeans.GlobalResourcesLifecycleListener"/>
    <Listener className="org.apache.catalina.core.ThreadLocalLeakPreventionListener"/>
    <Listener className="com.springsource.tcserver.serviceability.deploy.TcContainerDeployer"/>

    <Listener className="com.springsource.tcserver.serviceability.rmi.JmxSocketListener"
            port="${base.jmx.port}"
            address="127.0.0.1"
            useSSL="false"
            passwordFile="${catalina.base}/conf/jmxremote.password"
            accessFile="${catalina.base}/conf/jmxremote.access"
            authenticate="true"/>

  <GlobalNamingResources>
    <Resource name="UserDatabase" auth="Container"
              type="org.apache.catalina.UserDatabase"
              description="User database that can be updated and saved"
              factory="org.apache.catalina.users.MemoryUserDatabaseFactory"
              pathname="conf/tomcat-users.xml" />
  </GlobalNamingResources>


  <Service name="Catalina">

    <Executor name="tomcatThreadPool" namePrefix="tomcat-http--" maxThreads="300" minSpareThreads="50"/>

    <Connector
               executor="tomcatThreadPool"
               port="${nio.http.port}"
               protocol="HTTP/1.1"
               connectionTimeout="20000"
               redirectPort="${nio.https.port}"
               acceptCount="100"
               maxKeepAliveRequests="15"/>

    <Engine name="Catalina" defaultHost="localhost">

      <Realm className="org.apache.catalina.realm.UserDatabaseRealm"
             resourceName="UserDatabase"/>

      <Host name="localhost"  appBase="webapps"
            unpackWARs="true" autoDeploy="true" deployOnStartup="true" deployXML="true"
            xmlValidation="false" xmlNamespaceAware="false">
      </Host>
    </Engine>
  </Service>
</Server>
The following snippet of catalina.properties shows how to set values for the variables used in the preceding server.xml file.
base.shutdown.port=-1
base.jmx.port=6969
nio.http.port=8080
nio.https.port=8443
Description of the Basic server.xml File
Note the following components of the preceding sample server.xml:
<Server>. Root element of theserver.xmlfile. Its attributes represent the characteristics of the entire tc Runtime servlet container. Theshutdownattribute specifies the command string that the shutdown port number receives through a TCP/IP connection in order to shut down the tc Runtime instance. Theportattribute is the TCP/IP port number that listens for a shutdown message for this tc Runtime instance; note that in thisserver.xmlfile the variable is${shutdown.port}. By default, thecatalina.propertiesfile substitutes a value of-1, which disables the shutdown via TCP connection. Thus the only way to stop the tc Runtime instance is to issue akillcommand on the process ID (PID) of the tc Runtime instance. This is what thetcservercommand does when you use it to stop a running tc Runtime instance.<Listener>. List of lifecycle listeners that monitor and manage the tc Runtime instance. Each listener listens to a specific component of the tc Runtime instance and has been programmed to do something at certain lifecycle events of the component, such as before starting up, after stopping, and so on.The first four
<Listener>elements configure standard Tomcat lifecycle listeners.You can insert a
com.springsource.tcserver.properties.SystemPropertieslistener before these standard listeners to set properties from external properties files. See Adding a System Properties Listener.The listener implemented by the
com.springsource.tcserver.serviceability.rmi.JmxSocketListenerclass is specific to tc Server. This listener enables JMX management of tc Runtime. Theportattribute specifies the port of the JMX server that monitoring products. The variable${jmx.port}is set to6969in the defaultcatalina.propertiesfile. Theaddressattribute specifies the host of the JMX server; by default, this attribute is set to the localhost (127.0.0.1).Warning: The value of the
addressattribute ofJmxSocketListeneroverrides the value of thejava.rmi.server.hostnameJava system property. This directly affects how names are bound in the RMI registries; by default, the names will be bound to localhost (127.0.0.1). This means that RMI clients running on a different host from the one hosting the tc Runtime instance will be unable to access the RMI objects because, from their perspective, the host name is incorrect. This is because the host should be the name or IP address of the tc Runtime computer rather thanlocalhost. When the tc Runtime instance starts, if it finds that the value of theaddressattribute is different from or incompatible with thejava.rmi.server.hostnameJava system property, the instance will log a warning but will startup anyway and override the system property as described. If this causes problems in your particular environment, then you should change the value of theaddressattribute to specify the actual hostname on which the tc Runtime runs.The monitoring application that connects to the tc Runtime instance via JMX must specify a user and password to actually gain access. You configure these in the files pointed to by the
accessFileandpasswordFileattributes of the Listener. By default, the JMX user isadminwith password that is generated. You can also configure the tc Runtime instance to use LDAP to look up its JMX credentials; see Configuring a tc Runtime Instance to Obtain Its JMX Credentials from LDAP for details.<GlobalNamingResources>. Groups the global JNDI resources for this server instance that Web applications deployed to the server can use. In the preceding example, the<Resource>element defines the database used to load the users and roles from theCATALINA_BASE/conf/tomcat-users.xmlfile into an in-memory data structure. This resource is later referenced by the<Engine>XML element so that Web applications deployed to tc Runtime instances can query the database for the list of users and the roles to which the users are mapped, as well as update the file.<Service>. Groups one or more connectors, one or more executors, and a single engine. Connectors define a transport mechanism, such as HTTP, that clients use to send and receive messages to and from the associated service. A client can use many transports, which is why a<Service>element can have many<Connector>elements. The executors define thread pools that can be shared between components, such as connectors. The engine then defines how these requests and responses that the connector receives and sends are in turn handled by the tc Runtime instance; you can define only a single<Engine>element for any given<Service>element.The sample
server.xmlfile above includes a single<Connector>for the HTTP transport, a single<Executor>that configures the thread pool used by the connector, and a single<Engine>as required.tomcatThreadPool. As defined by the<Executor>XML element, allows a maximum of 300 active threads. The minimum number of threads that are always kept alive is 50.<Connector>. Listens for HTTP requests at the 8080 TCP/IP port (as set by the${bio.http.port}variable incatalina.properties). The connector uses the thread pool defined by thetomcatThreadPoolexecutor and ignores all other thread attributes. After accepting a connection from a client, the connector waits a maximum of 20000 milliseconds for a request URI, after which it times out. If this connector receives a request from the client that requires the SSL transport, the tc Runtime instance automatically redirects the request to port 8443. If the tc Runtime instance receives a connection request at a moment in time when all possible request processing threads are in use, the server puts the request on a queue; theacceptCountattribute specifies the maximum length of this queue (100) after which the server refuses all connection requests. Finally, the maximum number of HTTP requests that can be pipelined until the connection is closed by the server is 15, as specified by themaxKeepAliveRequestsattribute.Catalina. Logical name of the engine. This name appears in all log and error messages so you can easily identify problems. The value of thedefaultHostattribute is the name of a<Host>child element of<Engine>; this host processes requests directed to host names on this server.The
<Realm>child element of<Engine>represents a database of users, passwords, and mapped roles used for authentication in this service. In the preceding sample, the realm simply references theUserDatabaseresource, defined by the<Resource>child element of<GlobalNamingResources>.The
<Host>child element represents a virtual host, which is an association of a network name for a server (such aswww.mycompany.com) with the particular server on which Catalina is running. tc Runtime automatically deploys Web applications that are copied to theCATALINA_BASE/webappsdirectory while the tc Runtime instance is running and automatically deploys them when the server starts. The tc Runtime instance unpacks the Web applications into a directory hierarchy if they are deployed as WAR files. tc Runtime parses anycontext.xmlfile contained in theMETA-INFdirectory of deployed applications. ThexmlValidationattribute specifies that the tc Runtime instance does not validate XML files when parsing them, or in other words, it accepts invalid XML. ThexmlNamespaceAwareattribute specifies that tc Runtime does not take namespaces into account when reading XML files.
The preceding sample server.xml file contains typical elements and attribute values for a simple out-of-the-box tc Runtime configuration. However, you can configure many more elements and attributes in this file. For complete elements documentation about the tc Runtime server.xml file, see Apache Tomcat Configuration Reference.
Adding a System Properties Listener
tc Server includes a useful feature that allows you to configure tc Server and Java system properties through external properties files. Properties that you set using this method can be use to as replacement values in server.xml. The external properties files are also useful for setting application properties, instead of modifying the setenv.sh script to set them on the java command line with the -D flag. The properties are available to applications through java.lang.System.getProperties().
The listener should be the first child of the Server element in the server.xml file, since XML is processed in the order it appears and properties must be set before they are referenced.
The following example specifies four properties files to be processed in sequence.
<Listener className="com.springsource.tcserver.properties.SystemProperties"
    file.1="${catalina.base}/conf/base.properties"
    file.3="${catalina.base}/conf/qa.properties"
    file.2="${catalina.base}/conf/dev.properties"
    file.4="${catalina.base}/conf/prod.properties"
    immutable="false"
    trigger="now"/>
There can be up to one hundred files, and they are processed in sequence by the numeric extension, not in the order they appear. In the example above, the dev.properties file is processed before the qa.properties file, even though they are not listed in that order.
The immutable attribute, false by default, determines if properties can be overridden. When false, the property value is set each time the key is encountered. If immutable is true, once a value is associated with a key it cannot be changed; later occurrences of the property are ignored. Whether immutable is set to true or false, a debug message is logged when an existing property is encountered.
If you specify a properties file that does not exist, a message is logged, but processing continues. This allows you to set up system.xml for different runtime environments by supplying only the appropriate properties files. In the example above, for example, if the prod.properties file is missing, the properties in the base.properties, dev.properties, and qa.properties files are processed, with any properties overridden in qa.properties taking precedence.
The presence of the trigger attribute causes the properties to be applied before parsing the remainder of the server.xml file. The value of the trigger attribute is ignored.
Setting Up the AJP Connector
This section is applicable to VMware tc Server version 3.2.20.RELEASE and newer and tc Runtime versions since 7.0.100.A.RELEASE and 8.5.51.A.RELEASE.
VMware tc Server includes a ajp template intended to add the needed configuration to an instance for using the AJP Connector.
The following table shows the default property values for the ajp template.
| Attribute | AJP Template Default Value | AJP Template Property Name |
|---|---|---|
| secretRequired | false | ajp.secret.required |
| secret | null | ajp.secret |
To change the default value of the properties the -p option may be used with the apply-template or create commands
tcruntime-instance.sh apply-template instance -t ajp -p ajp.ajp.secretRequired=true -p ajp.ajp.secret=mygreatsecret
Full documentation for the AJP Connector may be found at the following URLS.
- https://tomcat.apache.org/tomcat-7.0-doc/config/ajp.html
- https://tomcat.apache.org/tomcat-8.5-doc/config/ajp.html
For untrusted network the value of secretRequired should be true with secret= set to a secret value. The address attribute will also need to be added and set to address of the untrusted network interface.
Setting Up a High-Concurrency JDBC Datasource
A datasource defines a pool of JDBC connections for a specific database using a URL, username, and so on. JDBC datasources make it easy for an application to access data in a database server.
Comparing the DBCP Datasource and the tc Runtime Datasource
In a tc Runtime instance, you can create the following two types of JDBC datasources:
- Database connection pool (DBCP) datasource
- Tomcat JDBC datasource
The DBCP datasource is the standard datasource provided by tc Runtime; it uses the org.apache.commons.dbcp package. Although this datasource is adequate for simple applications, it is single-threaded, which means that in order to be thread-safe, the tc Runtime instance must lock the entire pool, even during query validation. Thus it is not suitable for highly concurrent environments. Additionally, it can be slow, which in turn can negatively affect the performance of Web applications.
The Tomcat JDBC datasource includes all the functionality of the DBCP datasource, but adds additional features to support highly-concurrent environments and multiple core/cpu systems. The tc Runtime datasource typically performs much better than the DBCP datasource. Additional features include:
- Dynamic implementation of the interfaces, which means that the datasource supports the
java.sqlandjavax.sqlinterfaces for your runtime environment (as long as your JDBC driver supports it), even when compiled with a lower version of the JDK. - Validation intervals so that tc Runtime doesn't have to validate every single time the application uses the connection, which improves performance.
- Run-Once query, which is a configurable query that tc Runtime runs only once when the connection to the database is established. This is very useful to set up session settings that you want to exist during the entire time the connection is established.
- Ability to configure custom interceptors to enhance the functionality of the datasource. You can use interceptors to gather query stats, cache session states, reconnect the connection upon failures, retry queries, cache query results, and so on. The interceptors are dynamic and not tied to a JDK version of a
java.sql/javax.sqlinterface. - Asynchronous connection retrieval - you can queue your request for a connection and receive a Future<Connection> back.
Configuring the tc Runtime High-Concurrency JDBC Datasource
As with any tc Runtime resource, you configure the high-concurrency datasource (that is, the tc Runtime datasource) using a <Resource> child element of <GlobalNamingResource>. Most attributes are common to the standard DBCP and the tc Runtime datasources; however, the following new attributes apply only to the new tc Runtime datasource.
- initSQL
- jdbcInterceptors
- validationInterval
- jmxEnabled
- fairQueue
- useEquals
Use the factory attribute of the <Resource> element to specify the type of datasource:
- Set the
factoryattribute toorg.apache.tomcat.jdbc.pool.DataSourceFactoryto use the Tomcat JDBC high-concurrency datasource. This is also the default value of thefactoryattribute for tc Runtime, so you will automatically use the high-concurrency datasource if you do not specify this attribute at all. - Set the
factoryattribute toorg.apache.tomcat.dbcp.dbcp.BasicDataSourceFactoryto use the standard DBCP datasource.
IBM JVM USERS ONLY: If you are using an IBM JVM, see useEquals for important information.
The following table lists the attributes for configuring either the high-concurrency datasource or the standard DBCP datasource. Most attributes are valid for both of the datasources, but some are only valid for one datasource. These exceptions are noted in the table. The default values shown are for the high-concurrency datasource, which is the default datasource for tc Server. Default values for the DBCP datasource may be different. See the Apache DBCP documentation for details.
| Attribute | Default | Description |
|---|---|---|
| username (required) | The username to pass to the JDBC driver to establish a connection with the database. | |
| password (required) | The password to pass to the JDBC driver to establish a connection with the database. | |
| url (required) | The connection URL to pass to the JDBC driver to establish a connection. | |
| driverClassName (required) | The fully qualified Java class name of the JDBC driver to use. The driver must be accessible from the same classloader as tomcat-jdbc.jar |
|
| connectionProperties | Connection properties to send to the JDBC driver when establishing a new database connection. The syntax for this string is [propertyName=value;]* The "user" and "password" properties are passed explicitly, so do not include them here. |
|
| defaultAutoCommit | true |
The default auto-commit state of connections created by this pool. If it is not set, the JDBC driver's default setting is active. |
| defaultReadOnly | driver default | The default read-only state of connections created by this pool. If not set, the setReadOnly method will not be called. (Some drivers do not support read only mode, for example Informix.) |
| defaultTransactionIsolation | driver default | The default TransactionIsolation state of connections created by this pool. One of the following:
|
| defaultCatalog | The default catalog of connections created by this pool. | |
| initialSize | 10 |
The initial number of connections to create when the pool is started. |
| maxActive | 100 |
The maximum number of active connections that can be allocated from this pool at the same time, or negative for no limit. |
| maxIdle | maxActive (100) |
The maximum number of connections that should be kept in the pool at all times. Idle connections are checked periodically (if enabled) and connections that have been idle for longer than minEvictableIdleTimeMillis are released. See also testWhileIdle. |
| minIdle | 10 |
The minimum number of established connections that should be kept in the pool at all times. The connection pool can shrink below this number if validation queries fail. The default value is derived from initialSize. |
| maxWait | 30000 |
The maximum milliseconds a pool with no available connections will wait for a connection to be returned before throwing an exception, or -1 to wait indefinitely. |
| validationQuery | The SQL query to use to validate connections from this pool before returning them to the caller. If specified, the query must be an SQL SELECT statement that returns at least one row. | |
| testOnBorrow | false |
Indicates whether objects are validated before borrowed from the pool. If the object fails to validate, it is dropped from the pool, and an attempt is made to borrow another. A |
| testOnReturn | false |
Indicates if objects are validated before they are returned to the pool. A true value has no effect unless the |
| testWhileIdle | false |
Indicates whether objects are validated by the idle object evictor (if any). If an object fails to validate, it is dropped from the pool. A |
| timeBetweenEvictionRunsMillis | 5000 |
The number of milliseconds to sleep between runs of the idle object evictor thread. The thread checks for idle, abandoned connections and validates idle connections. The value should not be set below 1 second (1000). |
| numTestsPerEvictionRun | |
Not used by the Tomcat JDBC pool. The number of objects to examine during each run of the idle object evictor thread, if any. |
| minEvictableIdleTimeMillis | 60000 |
The minimum amount of time an object may sit idle in the pool before it is eligible for eviction by the idle object evictor, if any. |
| connectionInitSqls | null |
A Collection of SQL statements used to initialize physical connections when they are first created. These statements are executed only once, when the connection factory creates the connection. DBCP Versions 1.3 and 1.4 of incorrectly use " |
| poolPreparedStatements | false |
This property is not used. |
| maxOpenPreparedStatements | This property is not used. | |
| accessToUnderlyingConnectionAllowed | Not used. Access can be achieved by calling unwrap on the pooled connection. See javax.sql.DataSource interface, or call getConnection through reflection, or cast the object as javax.sql.PooledConnection. |
|
| removeAbandoned | false |
Set to true to remove abandoned connections if they exceed the removeAbandonedTimeout. Setting this to true can recover database connections from poorly written applications that fail to close a connection. A connection is considered abandoned and eligible for removal if it has been idle longer than the removeAbandonedTimeout. |
| removeAbandonedTimeout | 60 |
Timeout in seconds before an abandoned connection can be removed. The value should be set to the longest running query your applications might have. |
| logAbandoned | false |
Set to true to log stack traces for application code that abandons a Connection. Logging an abandoned Connection adds overhead for every Connection open because a stack trace has to be generated. |
| initSQL (high concurrency JDBC datasource only) | Initial SQL statement that is run only when a connection is first created. Use this feature to set up session settings that should exist during the entire time the connection is established. | |
| jdbcInterceptors (high concurrency JDBC datasource only) | null |
Semicolon-separated list of classnames extending org.apache.tomcat.jdbc.pool.JdbcInterceptor. tc Runtime inserts interceptors in the chain of operations on the java.sql.Connection object. Warning: Be sure you do not include any white space (such as spaces or tabs) in the value of this attribute, or the classes will not be found. Predefined interceptors:
|
| validationInterval (high concurrency JDBC datasource only) | 30000 (30 seconds) |
Number of milliseconds tc Runtime waits before running a validation check to ensure that the JDBC connection is still valid. A connection that has been validated within this interval is not revalidated. Running validation checks too frequently can slow performance. |
| jmxEnabled (high concurrency JDBC datasource only) | true |
Specifies whether the connection pool is registered with the JMX server. |
| fairQueue (high concurrency JDBC datasource only) | true |
Specifies whether calls to getConnection() should be treated fairly in a true FIFO (first in, first out) fashion. This ensures that threads receive connections in the order they arrive. It uses the org.apache.tomcat.jdbc.pool. FairBlockingQueue implementation to manage the list of idle connections. This feature must be enabled (that is, set the attribute to true) to use the asynchronous connection retrieval feature, which is the ability to queue your connection request. Note: When |
| abandonWhenPercentageFull | 0 |
Connections that have been abandoned (timed out) are not closed and reported up unless the number of connections in use is above the percentage defined by this parameter. The value should be between 0 and 100. The default value is 0, which implies that connections are eligible for closure as soon as removeAbandonedTimeout has been reached. |
| maxAge | 0 |
Time in milliseconds to keep this connection. When a connection is returned to the pool, the pool checks to see if the now -time-when-connected > maxAge has been reached, and if so, it closes the connection rather than returning it to the pool. The default value is 0, which implies that connections are left open and no age check is done upon returning the connection to the pool. |
| useEquals (high concurrency JDBC datasource only) | false |
Specifies whether the ProxyConnection class should use String.equals() instead of "==" when comparing method names. Does not apply to added interceptors as those are configured individually. NOTE FOR IBM JVM USERS: If you are running tc Runtime on a platform that uses the IBM JVM (such as AIX), always set the |
| suspectTimeout | 0 |
Timeout value in seconds. Similar to removeAbandonedTimeout but instead of treating the connection as abandoned and potentially closing the connection, this simply logs the warning if logAbandoned is set to true. If this value is equal or less than 0, no suspect checking will be performed. Suspect checking only takes place if the timeout value is larger than 0 and the connection was not abandoned or if abandon check is disabled. If a connection is suspect a WARN message is logged and a JMX notification is sent once. |
| alternateUsernameAllowed | false |
For performance reasons, by default the JDBC pool ignores the DataSource.getConnection(username, password) call and returns a previously pooled connection established using the globally configured properties username and password. The pool can, however, be used with different credentials each time a connection is used. If you request a connection with the credentials user1/password1 and the connection was previously connected using user2/password2, the connection is closed, and reopened with the requested credentials. This way, the pool size is still managed on a global level, and not on a per schema level. To enable the functionality described in DataSource.getConnection(username,password), set the property alternateUsernameAllowed to true. |
The following server.xml snippet shows how to configure the high-concurrency JDBC datasource for your tc Runtime instance. You can add this datasource to a tc Server Runtime instance by including the diagnostics template in the tcserver create command line. For an explanation of the following example, see Description of the High Concurrency JDBC Datasource.
<?xml version='1.0' encoding='utf-8'?>
<Server port="-1" shutdown="SHUTDOWN">

 ...

  <GlobalNamingResources>

    <Resource name="jdbc/TestDB"
              auth="Container"
              type="javax.sql.DataSource"
              username="root"
              password="password"
              driverClassName="com.mysql.jdbc.Driver"
              url="jdbc:mysql://localhost:3306/mysql?autoReconnect=true"

              testWhileIdle="true"
              testOnBorrow="true"
              testOnReturn="false"
              validationQuery="SELECT 1"
              validationInterval="30000"
              timeBetweenEvictionRunsMillis="5000"
              maxActive="100"
              minIdle="10"
              maxWait="10000"
              initialSize="10"
              removeAbandonedTimeout="60"
              removeAbandoned="true"
              logAbandoned="true"
              minEvictableIdleTimeMillis="30000"
              jmxEnabled="true"
              jdbcInterceptors="org.apache.tomcat.jdbc.pool.interceptor.ConnectionState;
                 org.apache.tomcat.jdbc.pool.interceptor.StatementFinalizer;
                 org.apache.tomcat.jdbc.pool.interceptor.SlowQueryReportJmx(threshold=10000)"/>

  </GlobalNamingResources>
  ...
  <Service name="Catalina">
  ...
  </Service>
</Server>
Description of the Tomcat High Concurrency JDBC Datasource
In the preceding sample server.xml, the <Resource> element does not include a factory attribute, which means that the resource is using the default value, org.apache.tomcat.jdbc.pool.DataSourceFactory, the tc Runtime high-concurrency datasource. The <Resource> element attributes in the example function as follows:
name. JNDI name of this JDBC resource isjdbc/TestDB.auth. The container signs on to the resource manager on behalf of the application.type. This resource is a JDBC datasource.username,password. Name and password of the database user who connects to the database.driverClassName. tc Runtime should use thecom.mysql.jdbc.DriverJDBC driver to connect to the database, in this case a MySQL database.url. URL that the JDBC driver uses to connect to a MySQL database. The format of this URL is specified by JDBC.testXXXattributes. tc Runtime validates objects before it borrows them from the connection pool and those objects are validated by the idle object evictor, but that tc Runtime does not validate objects when it returns them to the pool.validationQuery. tc Runtime runs the very simple SQL querySELECT 1when it validates connections from the pool before returning a connection to a user upon request. Because this query should always return a value, if it returns an exception then tc Runtime knows there is a problem with the connection.validationInterval. tc Runtime waits at least 30 seconds before running a validation query.timeBetweenEvictionRunsMillis. tc Runtime sleeps 5000 milliseconds between runs of the idle connection validation/cleaner thread.maxActive. tc Runtime allocates a maximum of 100 active connections from this pool at the same timeminIdle. tc Runtime keeps a minimum of 10 established connections in the pool at all times.maxWait. Where no connections are available, tc Runtime waits a maximum of 10,000 milliseconds for a connection to be returned before throwing an exception.initialSize. tc Runtime creates 10 connections when it initially starts the connection pool.removeAbandonedTimeout. tc Runtime waits 60 seconds before it removes an abandoned, but still in use, connection.removeAbandoned. tc Runtime removes abandoned connections after they have been idle for theremoveAbandonedTimeoutamount of time.logAbandoned. tc Runtime flags to log stack traces for application code that abandoned a Connection.minEvictableIdleTimeMillis. Minimum amount of time an object may sit idle in the pool before it is eligible for eviction on this tc Runtime is 30,000 milliseconds.jmxEnabled. This tc Runtime can be monitored using JMX.jdbcInterceptors. List of interceptor classes associated with this datasource.
For complete documentation about the tc Runtime server.xml file and all the possible XML elements you can include, see Apache Tomcat Configuration Reference.
Configuring SSL
When you configure SSL (secure socket layer) for tc Runtime, use one of the following frameworks:
- The SSL framework provided by Java SE Security (JSSE), which is included in the JDK and available to you by default.
- OpenSSL, which is what tc Runtime uses when you use the Apache Portable Runtime (APR) library. APR libraries provide a predictable and consistent interface to underlying platform-specific implementations. Use of APR provides superior scalability, performance, and better integration with native server technologies. The APR libraries are usually installed by default on Unix versions of tc Runtime; you must download the libraries for other platforms.
tc Server includes templates that make it simple to configure a tc Runtime instance with SSL when you create the instance. Choose one of the SSL templates—apr-ssl, bio-ssl, or nio-ssl—based on the type of I/O you want to use. You can also use the jmx-ssl template to configure SSL for the JMX connector. See "Creating a Runtime Instance with a Template" in Getting Started with VMware tc Server for help using the templates.
The following snippet of a sample server.xml file is equivalent to using the bio-ssl template to create an instance. It builds on the simple out-of-the-box configuration file by adding SSL capabilities to tc Runtime so that users can make a secure connection to deployed applications over HTTPS. Add SSL to tc Runtime by adding a <Connector> child XML element to the <Service> element, alongside the existing connector that configures the non-SSL-enabled HTTP port. This new connector is configured for a different TCP/IP port than the regular non-SSL port; users who specify the SSL port enable SSL handshake, encryption, and decryption during their connection.
See Description of the SSL Connector for detailed information about this new <Connector> element. This XML snippet uses the SSL framework provided by JSSE; for an example of a connector that uses APR, see Using an APR Connector to Configure SSL.
<Connector
        executor="tomcatThreadPool"
        port="8443"
        protocol="HTTP/1.1"
        connectionTimeout="20000"
        redirectPort="8443"
        acceptCount="100"
        maxKeepAliveRequests="15"
        keystoreFile="${catalina.base}/conf/tcserver.keystore"
        keystorePass="changeme"
        keyAlias="tcserver"
        SSLEnabled="true"
        scheme="https"
        secure="true"/>
Description of the SSL Connector
The preceding snippet of server.xml describes a new SSL-enabled <Connector> that uses the JSSE libraries included in the JDK. The attribute values in the example function as follows:
executor,protocol,connectionTimeout,maxKeepAliveRequests,acceptCount. Same attributes as those of the basic HTTP connector. Although this connector is used for HTTPS connections, you still set protocol toHTTP/1.1; other attributes specify an SSL-enabled connection.port. The TCP/IP port that users specify as the secure connection port is 8443. Set the value of theredirectPortattribute of your non-SSL connectors to this value to ensure that users who require a secure connection are redirected to the secure port, even if they initially start at the non-secure port.SSLEnabled. Specifies that SSL is enabled for this connector.secure. If set totrue, ensures that a call torequest.isSecure()from the connecting client always returnstrue. Default isfalse.scheme. If set tohttps, ensures that a call torequest.getScheme()from the connecting client returnshttpswhen clients use this connector. The default value of this attribute ishttp.keystoreFile. Name of the file that contains the server's private key and public certificate used in the SSL handshake, encryption, and decryption. You use an alias and password to access this information. In the example, this file is calledtcserver.keystoreand is located in the same directory as the standard tc Runtime configuration files:CATALINA_BASE/conf.See Creating a Simple Keystore File for information about creating the keystore file.
keyAliasandkeystorePass. Alias and password to access the keystore specified by thekeystoreFileattribute. In the example, the alias istcserverand the password ischangeme.
For complete documentation about configuring SSL for tc Runtime servers, see SSL Configuration HOW-TO.
For general documentation about the tc Runtime server.xml file and all the possible XML elements you can include, see Apache Tomcat Configuration Reference.
Using an APR Connector to Configure SSL
When you use an APR connector to specify a secure tc Runtime port, tc Runtime uses the OpenSSL framework, meaning that you will be using an SSL engine native to your platform rather than the one included in JSSE. Use the apr-ssl template with tcserver script to create a tc Runtime instance configured to use OpenSSL. This section describes configuration changes that are made for you when you use the apr-ssl template.
Before configuring the connector, add the APR listener to your server.xml file in the <Listener> element:
<Listener className="org.apache.catalina.core.AprLifecycleListener" SSLEngine="on" />
The preceding element initializes the native SSL engine. The <Connector> element enables the use of this engine in the connector with the SSLEnabled attribute, as shown in the following sample:
<Connector
           executor="tomcatThreadPool"
           port="8443"
           protocol="org.apache.coyote.http11.Http11AprProtocol"
           connectionTimeout="20000"
           redirectPort="8443"
           acceptCount="100"
           maxKeepAliveRequests="15"
           SSLCertificateFile="${catalina.base}/conf/tcserver.crt"
           SSLCertificateKeyFile="${catalina.base}/conf/tcserver.key"
           SSLPassword="changeme"
           SSLEnabled="true"
           scheme="https"
           secure="true"/>
This connector configuration is similar to the one that uses the JSSE SSL libraries, as described in Description of the SSL Connector, but with the following differences, mostly having to do with the configuration of OpenSSL:
- The value of the
protocolattribute isorg.apache.coyote.http11.Http11AprProtocol, rather thanHTTP/1.1, to indicate that the connector is using the APR libraries. - The
SSLCertificateFileattribute specifies the name of the file that contains the server certificate. The format is PEM-encoded. In the example, this file is calledtcserver.crt, and is located in the conf directory under theCATALINA_BASEdirectory in which your tc Runtime instance is installed. - The
SSLCertificateKeyFileattribute specifies the name of the file that contains the server private key. The format is PEM-encoded. In the example, the file is calledtcserver.keyand is located in the same directory as the certificate file. - The
SSLPasswordattribute specifies the password for the encrypted private key in the file pointed to by theSSLCertificateKeyFileattribute. - The preceding attributes are used instead of the
keystoreFile,keystorePass, andkeyAliasattributes of the JSSE secure connector.
See Apache Portable Runtime (APR) based native library for Tomcat for additional information about APR and how to configure an APR HTTPS connector.
Creating a Simple Keystore File For Both SSL and OpenSSL
Configuring SSL or OpenSSL for tc Runtime requires a keystore that contains certificates and public keys. The certificate identifies the company or organization and verifies the public key. Clients that connect to tc Runtime use the public key to encrypt and decrypt data transferred over the wire.
If, when you originally created your tc Runtime instance, you used the -t option of the tcserver script to specify one of the SSL templates (such as bio-ssl or nio-ssl), then the script generated a keystore for you and configured its properties in the server.xml file. The certificate in the keystore contains default information. If you used the --interactive option of tcserver, then you also customized the certificate with information about your organization.
Additionally, the keystores generated by the tcserver script use self-signed certificates that, although they do not guarantee authenticity, can be used by both the clients and server to encrypt and decrypt data.
If, however, you want to generate a new keystore, use the keytool JDK tool, as shown below. It will also create a keystore that contains self-signed certificates. If you require an authentic, verified certificate, purchase one from a well-known Certificate Authority such as VeriSign. Then use the keytool tool to import the certificate into your keystore.
For complete documentation about creating keystores, in particular how to import a fully authentic certificate into an existing keystore, see SSL Configuration HOW-TO.
To use the keytool tool to create a keystore that contains self-signed certificates:
$JAVA_HOME/bin/keytool -genkey -alias alias -keyalg RSA -keystore keystore
Be sure that the value of the -alias option matches the value of the keyAlias attribute of the secure Connector you configured in the server.xml file, as described in the preceding section. Similarly, the value of the -keystore option should match the value of the keystoreFile attribute. For example:
$JAVA_HOME/bin/keytool -genkey -alias tcserver -keyalg RSA -keystore \
    /var/opt/pivotal-tc-server/standard/myinstance/conf/tcserver.keystore
In the example, CATALINA_BASE is assumed to be /var/opt/pivotal-tc-server/standard/myinstance.
A message asks for a keystore password; this password must match the keystorePass attribute of the <Connector> element that configures the secure port, as described in the preceding section. After prompts for information about your company, a message requests the password for the keystore alias; set this to the same value as the keystore password.
Using the Apache Portable Runtime (APR)
The Apache Portable Runtime (APR) is a set of libraries and APIs that map directly to your underlying operating system. tc Runtime can use APR to provide additional scalability and performance because of high-quality integration with native server technologies. APR provides access to advanced IO functionality (such as sendfile, epoll and OpenSSL), OS level functionality (random number generation, system status, etc.), and native process handling (shared memory, NT pipes and Unix sockets).
The APR libraries are automatically installed in most Unix platforms, although you need to compile the Java Native Interface (JNI) wrappers. For other platforms, such as Windows, you must download and install the libraries. See Apache Portable Runtime (APR) Native Library for Tomcat.
Add the APR libraries to the LD_LIBRARY_PATH (Unix) or PATH (Windows) environment variable used by the tc Runtime process so that tc Runtime can access the libraries when it runs.
The following sample server.xml file shows how to configure tc Runtime to use APR. The file builds on the simple out-of-the-box configuration described in Simple tc Runtime Configuration.
See Comparing the APR-Enabled server.xml File with Out-of-the-Box server.xml for information about how the two files differ.
<?xml version='1.0' encoding='utf-8'?>
<Server port="-1" shutdown="SHUTDOWN">

  <Listener className="org.apache.catalina.core.AprLifecycleListener" SSLEngine="on" />
  <Listener className="org.apache.catalina.core.JasperListener" />
  <Listener className="org.apache.catalina.mbeans.ServerLifecycleListener" />
  <Listener className="org.apache.catalina.mbeans.GlobalResourcesLifecycleListener" />

  <GlobalNamingResources>
    <Resource name="UserDatabase" auth="Container"
              type="org.apache.catalina.UserDatabase"
              description="User database that can be updated and saved"
              factory="org.apache.catalina.users.MemoryUserDatabaseFactory"
              pathname="conf/tomcat-users.xml" />
  </GlobalNamingResources>

  <Service name="Catalina">

    <Executor name="tomcatThreadPool" namePrefix="tomcat-http--" maxThreads="300" minSpareThreads="50"/>

    <Connector
               executor="tomcatThreadPool"
               port="8080"
               protocol="org.apache.coyote.http11.Http11AprProtocol"
               connectionTimeout="20000"
               redirectPort="8443"
               acceptCount="100"
               maxKeepAliveRequests="15"/>

    <Connector
               executor="tomcatThreadPool"
               port="8443"
               protocol="org.apache.coyote.http11.Http11AprProtocol"
               connectionTimeout="20000"
               redirectPort="8443"
               acceptCount="100"
               maxKeepAliveRequests="15"
               SSLCertificateFile="${catalina.base}/conf/tcserver.crt"
               SSLCertificateKeyFile="${catalina.base}/conf/tcserver.key"
               SSLPassword="changeme"
               SSLEnabled="true"
               scheme="https"
               secure="true"/>


    <Engine name="Catalina" defaultHost="localhost">

      <Realm className="org.apache.catalina.realm.UserDatabaseRealm"
             resourceName="UserDatabase"/>

      <Host name="localhost"  appBase="webapps"
            unpackWARs="true" autoDeploy="true" deployOnStartup="true" deployXML="true"
            xmlValidation="false" xmlNamespaceAware="false">
      </Host>
    </Engine>
  </Service>
</Server>
Comparing the APR-Enabled server.xml File with Out-of-the-Box server.xml
In the preceding sample server.xml, most of the configuration is the same as the non-APR enabled server.xml file except for the following:
- The preceding
server.xmlfile includes an additional APR-specific listener, implemented by theorg.apache.catalina.core.AprLifecycleListenerclass. TheSSLEngine="on"attribute enables the native SSL engine, rather than the JSEE engine provided by the JDK. - The
protocol="org.apache.coyote.http11.Http11AprProtocol"attribute of the<Connector>elements specify that the two HTTP connectors (with and without SSL enabled) both use the native HTTP protocol implementation.
See Configuring SSL for details about configuring the native SSL connector.
For complete documentation about the tc Runtime server.xml file and all the possible XML elements you can include, see Apache Tomcat Configuration Reference.
Configuring FIPS-140 Mode For a tc Runtime Instance
You can configure a tc Runtime instance to run with a FIPS-140 compliant Java Secure Socket Extension (JSSE) provider, as described in this section.
Important: Completing these procedures do not result in a tc Runtime instance that is FIPS-140 compliant, only that the instance is using a FIPS-140 compliant JSSE provider.
FIPS-140 refers to the Federal Information Processing Standardization 140, which is a standard that specifies security requirements for cryptographic modules used by the U.S. Government. FIPS 140-2 accreditation (the most current level) is required for any cryptography product sold by a private sector company to the U.S. Government.
The instructions differ depending on whether you want to configure a BIO or NIO Connector or APR Connector for your tc Runtime instance.
Configuring FIPS-140 Mode for BIO and NIO Connectors
To configure FIPS-140 mode for tc Runtime instances that use the BIO or NIO Connectors, you must first install a Java Cryptography Extension (JCE) API provider, such as RSA BSAFE® Crypto-J. This section uses the RSA JCE provider only as an example; you can use any compliant provider you want.
Procedure
Install the JCE API implementation, such as RSA BSAFE Crypto-J, on the same computer on which you have installed VMware tc Server. Follow the installation instructions of the JCE provider.
In this procedure, it is assumed you installed RSA BSAFE Crypto-J in the
$CRYPTOJ_HOMEdirectory.From the computer on which you installed VMware tc Server, open a terminal window as the user who will create and run tc Runtime instances (such as
tcserver).Statically register the Cyrpto-J JCE provider by copying the
$CRYPTOJ_HOME/cryptoj/lib/cryptojFIPS.jarJAR file to the$JAVA_HOME/jre/lib/extdirectory. For example:cp $CRYPTOJ_HOME/cryptoj/lib/cryptojFIPS.jar $JAVA_HOME/jre/lib/extEdit the
$JAVA_HOME/lib/security/java.securityfile as follows:Configure the Crypto-J JCE provider to be the default provider by adding the following line:
security.provider.1=com.rsa.jsafe.provider.JsafeJCEIf other security providers are already configured with this property, change their identifying numbers so that they are unique, as shown in the following example:
security.provider.1=com.rsa.jsafe.provider.JsafeJCE
security.provider.2=sun.security.provider.Sun
Add the following properties as required specifically by the Crypto-J JCE provider:
com.rsa.cryptoj.fips140initialmode=FIPS140_MODE
com.rsa.cryptoj.kat.strategy=on.load
If you are using the evaluation mode of the RSA BSAFE Crypto-J module, install the RSA evaluation license as shown:
cp $CRYPTOJ_HOME/cryptoj/lib/rsamisc.jar $JAVA_HOME/jre/lib/extCreate an SSL-enabled tc Runtime instance that uses either the BIO or NIO Connector by specifying either the
bio-sslornio-ssltemplate when running thetcrutnime-instance.shscript. For example, if you installed tc Server in/opt/pivotal/pivotal-tc-server/standardand your instances are located in/var/opt/pivotal/pivotal-tc-server/standard:d /opt/pivotal/pivotal-tc-server/standard tcserver create ssl-instance -t nio-ssl ```Start the instance:
tcserver start ssl-instanceCheck the
logs/catalina-date.logfile to ensure that the instance started correctly; you should see messages similar to the following:26-Jan-2012 10:11:14.477 INFO [main] org.apache.coyote.AbstractProtocol.init Initializing ProtocolHandler ["http-bio-8443"] 26-Jan-2012 10:11:15.603 INFO [main] org.apache.coyote.AbstractProtocol.start Starting ProtocolHandler ["http-bio-8443"]
Configuring Logging for tc Runtime
As with standard Apache Tomcat, tc Runtime uses Commons Logging throughout its internal code. This allows you to choose a logging configuration that suits your needs, such as java.util.logging (configured by default) or log4j. Commons Logging provides tc Runtime with the ability to log hierarchically across various log levels without needing to rely on a particular logging implementation.
The sections that follow summarize the basic information in the standard Apache Tomcat logging documentation (see Logging in Tomcat). These sections also describe the additional logging features of tc Runtime as compared to the default logging in Apache Tomcat, such as asynchronous logging.
- Configuring the JULI Implementation of java.util.logging
- Logging Levels for java.util.logging
- Configuring Asynchronous Logging
- Configuring log4j
- Updating Logging Parameters Dynamically
Configuring the JULI Implementation of java.util.logging
tc Runtime provides its own implementation of java.util.logging called JULI that addresses a major limitation of the JDK implementation: the inability to configure per-Web application logging. The JULI implementation is the default logging framework in tc Runtime.
Note: It is assumed that you are already familiar with the basic java.util.logging facility provided by the JDK. If you are not, see:
With the JULI implementation, you can configure logging at a variety of levels:
- Globally for the entire JVM used by tc Runtime by updating the standard
logging.propertiesfile of the JDK, typically located in theJAVA_HOME/jre/libdirectory. - Per-tc Runtime instance by updating the
logging.propertiesfile located in theCATALINA_BASE/confdirectory of the tc Runtime instance. - Per-Web application by adding a
logging.propertiesfile in theWEB-INF/classesdirectory of the Web application deployed to the tc Runtime instance.
At each level you use a logging.properties file to configure logging; the level that the file configures is based on the location of the file. You can also configure logging programmatically, although this document does not discuss this method. The logging.properties files for the tc Runtime instance or Web application, however, support extended constructs that allow more freedom to define handlers and assign them to loggers. The differences are described later in this section.
The default tc Runtime logging.properties file, located in CATALINA_BASE/conf of your server instance, specifies two types of handlers: ConsoleHandler for routing logging to stdout and FileHandler for writing long messages to a file. You can set the log level of each handler to standard java.util.logging levels, such as SEVERE or WARNING; see Logging Levels for java.util.logging for the full list.
The default log level setting in the JDK logging.properties file is set to INFO. You can also target specific packages from which to collect logging and specify the level of logging you want. For example, to set debugging from the entire tc Runtime instance, add the following to the CATALINA_BASE/conf/logging.properties file:
org.apache.catalina.level=FINEST
If you set the preceding log level, also set the ConsoleHandler level to collect this threshold, or in other words, be at a level higher than the overall tc Runtime level.
When you configure the logging.properties file for the tc Runtime instance or Web application, you use a similar configuration as that of the JDK logging.properties file. You can also specify additional extensions to allow better flexibility in assigning loggers. Use the following guidelines:
- As in Java 6, declare the list of handlers using
handlers. - As in Java 6, loggers define a list of handlers using the
loggerName.handlersproperty. - You define the set of handlers for the root logger using the
.handlersproperty; note that there is no logger name. - By default, loggers do not delegate to their parent if they have associated handlers. You can change this behavior for a particular logger using the
loggerName.useParentHandlersproperty, which accepts a boolean value (trueorfalse). - As in Java 6, use the
handlerName.levelproperty to specify the level of logging you want for a given handler. See Logging Levels for java.util.logging for all the available log levels. - You can add a prefix to handler names by specifying the
handlerName.prefixproperty. In this case, tc Runtime can instantiate multiple handlers from a single class. A prefix is a String that starts with a digit and ends with '.'. For example,22foobar.is a valid prefix. The default prefix, if you do not specify one for a particular handler, isjuli.. - Similarly, you can also add a suffix to handler names with the
handlerName.suffixproperty. The default suffix, if you do not specify one for a particular handler, is.log. - Specify the directory to which a file handler writes its log files using the
handlerName.directoryproperty; the default value islogs. You can use the${catalina.base}variable to point to aCATALINA_BASEdirectory of your tc Runtime instance. - A tc Runtime instance buffers logging using a default buffer size of 8192 bytes. If you want to reduce the disk access frequency and write larger chunks of data to a log each time, increase the buffer size of a handler by using the
handlerName.bufferSizeproperty. - System property replacement for property values expressed using the format
${systemPropertyName}.
The following example shows a CATALINA_BASE/conf/logging.properties file for a tc Runtime instance. It shows how to use the level, prefix, directory, and bufferSize properties for a variety of FileHandlers:
handlers = 1catalina.org.apache.juli.FileHandler, \
           2localhost.org.apache.juli.FileHandler, \
           3manager.org.apache.juli.FileHandler, \
           4admin.org.apache.juli.FileHandler, \
           java.util.logging.ConsoleHandler

.handlers = 1catalina.org.apache.juli.FileHandler, java.util.logging.ConsoleHandler

############################################################
# Handler specific properties.
# Describes specific configuration info for Handlers.
############################################################

1catalina.org.apache.juli.FileHandler.level = FINE
1catalina.org.apache.juli.FileHandler.directory = ${catalina.base}/logs
1catalina.org.apache.juli.FileHandler.prefix = catalina.

2localhost.org.apache.juli.FileHandler.level = FINE
2localhost.org.apache.juli.FileHandler.directory = ${catalina.base}/logs
2localhost.org.apache.juli.FileHandler.prefix = localhost.

3manager.org.apache.juli.FileHandler.level = FINE
3manager.org.apache.juli.FileHandler.directory = ${catalina.base}/logs
3manager.org.apache.juli.FileHandler.prefix = manager.

4admin.org.apache.juli.FileHandler.level = FINE
4admin.org.apache.juli.FileHandler.directory = ${catalina.base}/logs
4admin.org.apache.juli.FileHandler.prefix = admin.
4admin.org.apache.juli.FileHandler.bufferSize = 16384

java.util.logging.ConsoleHandler.level = FINE
java.util.logging.ConsoleHandler.formatter = java.util.logging.SimpleFormatter


############################################################
# Facility specific properties.
# Provides extra control for each logger.
############################################################

org.apache.catalina.core.ContainerBase.[Catalina].[localhost].level = INFO
org.apache.catalina.core.ContainerBase.[Catalina].[localhost].handlers = \
   2localhost.org.apache.juli.FileHandler

org.apache.catalina.core.ContainerBase.[Catalina].[localhost].[/manager].level = INFO
org.apache.catalina.core.ContainerBase.[Catalina].[localhost].[/manager].handlers = \
   3manager.org.apache.juli.FileHandler

org.apache.catalina.core.ContainerBase.[Catalina].[localhost].[/admin].level = INFO
org.apache.catalina.core.ContainerBase.[Catalina].[localhost].[/admin].handlers = \
   4admin.org.apache.juli.FileHandler
The following example shows a WEB-INF/classes/logging.properties file for a specific Web application. The properties file configures a ConsoleHandler to route messages to stdout. It also configures a FileHandler that prints log messages at the FINE level to the CATALINA_BASE/logs/servlet-examples.log file:
handlers = org.apache.juli.FileHandler, java.util.logging.ConsoleHandler

############################################################
# Handler specific properties.
# Describes specific configuration info for Handlers.
############################################################

org.apache.juli.FileHandler.level = FINE
org.apache.juli.FileHandler.directory = ${catalina.base}/logs
org.apache.juli.FileHandler.prefix = servlet-examples.

java.util.logging.ConsoleHandler.level = FINE
java.util.logging.ConsoleHandler.formatter = java.util.logging.SimpleFormatter
Logging Levels for java.util.logging
The following table lists the standard log levels that you can set in the various logging.properties files, with the highest level listed first down to the lowest level (OFF). Enabling logging at a given level also enables logging at all higher levels. In general, the lower level of logging you enable, the more data that tc Runtime writes to the log files, so be careful when setting the logging level very low.
| Level | Description |
|---|---|
| ALL | Logs all messages. |
| SEVERE | Logs messages indicating a serious failure. SEVERE messages describe events that prevent normal program execution. They should be completely intelligible to end users and to system administrators. |
| WARNING | Logs message indicating a potential problem. WARNING messages describe events that interest end users or system managers, or that indicate potential problems. |
| INFO | Logs informational messages. Typically, INFO messages are written to the console or its equivalent, which means that the INFO level should only be used for reasonably significant messages that will make sense to end users and system administrators. |
| CONFIG | Logs static configuration messages. CONFIG messages provide a variety of static configuration information, to assist in debugging problems that may be associated with particular configurations; for example, the CPU type, the graphics depth, the GUI look-and-feel, and so on. |
| FINE | Logs relatively detailed tracing. FINE messages might include things like minor (recoverable) failures. Issues indicating potential performance problems are also worth logging as FINE. In general the FINE level should be used for information that will be broadly interesting to developers who do not have a specialized interest in the specific subsystem. The exact meaning of the three levels vary among subsystems, but in general, use FINEST for the most voluminous detailed output, FINER for somewhat less detailed output, and FINE for the lowest volume and most important messages. |
| FINER | See FINE for FINE, FINER, and FINEST descriptions. FINER indicates a fairly detailed tracing message. By default logging calls for entering, returning, or throwing an exception are traced at this level. |
| FINEST | See FINE for FINE, FINER, and FINEST descriptions. FINEST indicates a highly detailed tracing message. |
| OFF | Turns off logging. |
Configuring Asynchronous Logging
By default, the tc Runtime thread that handles incoming Web requests is the same thread that writes to the log file, such as catalina.out. Thus if a resource issue causes the thread writing to the log file to block, the incoming Web request is also blocked until the thread is able to finish writing to the log file. Depending on your environment, this problem can affect the performance of incoming Web requests.
Asynchronous logging addresses this potential performance problem with a separate thread to write to the log file. The Web request thread does not have to wait for the write to the log file to complete, and incoming request from users (or Web services) are not affected by internal resource issues.
Another advantage of asynchronous logging is that you can configure a more verbose log level without affecting the performance of the incoming requests, because even though a lot of information is being written to the log file, it is being written by a different thread from the one handling the incoming requests.
Note: Asynchronous logging is available only if your tc Runtime instance uses version 1.6 of the JDK/JRE. Also, asynchronous logging is available only with the java.util.logging logging configuration, and not with log4j.
To configure asynchronous logging for a tc Runtime instance:
If you are creating a new tc Runtime instance, you can use the
async-loggertemplate to automatically configure asynchronous logging. For example:tcserver create myserver --template async-loggerThis template updates the
CATALINA_BASE/conf/logging.propertiesappropriately, such as changing the defaultFileHandlertoAsyncFileHandler.If you have already created the instance, you must manually edit the
CATALINA_BASE/conf/logging.propertiesfile, whereCATALINA_BASErefers to the root directory of your tc Runtime instance, such as/var/opt/pivotal/pivotal-tc-server/standard/myserver. Change every instance ofFileHandlerin the file toAsyncFileHandler.The following snippet shows how the first few non-commented lines of the file will look after the substitution:
handlers = 1catalina.org.apache.juli.AsyncFileHandler, \
           2localhost.org.apache.juli.AsyncFileHandler, \
           3manager.org.apache.juli.AsyncFileHandler, \
           4host-manager.org.apache.juli.AsyncFileHandler, \
           java.util.logging.ConsoleHandler

.handlers = 1catalina.org.apache.juli.AsyncFileHandler

############################################################
# Handler specific properties.
# Describes specific configuration info for Handlers.
############################################################

1catalina.org.apache.juli.AsyncFileHandler.level = FINE
1catalina.org.apache.juli.AsyncFileHandler.directory = ${catalina.base}/logs
1catalina.org.apache.juli.AsyncFileHandler.prefix = catalina.

2localhost.org.apache.juli.AsyncFileHandler.level = FINE
2localhost.org.apache.juli.AsyncFileHandler.directory = ${catalina.base}/logs
2localhost.org.apache.juli.AsyncFileHandler.prefix = localhost.
...
Optionally configure how asynchronous logging behaves by setting one or more of the system properties listed in the properties table. Each property has a default value so you only need to set them if their default values are not adequate.
Set the properties in the
CATALINA_BASE/bin/setenv.sh(Unix) orCATALINA_BASE/bin/setenv.bat(Windows) file by updating theAPPLICATION_OPTSvariable. Use the standard-Doption for each system property you set. The following example shows how to set two of the properties on Unix:APPLICATION_OPTS=-Dorg.apache.juli.AsyncOverflowDropType=1 -Dorg.apache.juli.AsyncMaxRecordCount=10000Restart your tc Runtime instance for the changes to take effect.
Asynchronous Logging System Properties
The following table lists the system properties you can set to configure the asynchronous logging feature of tc Runtime.
| Property Name | Description | Default Value |
|---|---|---|
| org.apache.juli.AsyncOverflowDropType | Specifies the action taken by tc Runtime when the memory limit of records has been reached. You can set this property to one of the following values:
|
1 |
| org.apache.juli.AsyncMaxRecordCount | Max number of log records that the asynchronous logger keeps in memory. When this limit is reached and a new record is being logged by the JULI framework, the system takes an action based on the value of the org.apache.juli.AsyncOverflowDropType property. This number represents the global number of records, not on a per handler basis. |
10000 |
| org.apache.juli.AsyncLoggerPollInterval | Poll interval (in milliseconds) of the asynchronous logger thread. If the log queue is empty, the asynchronous logging thread issues a poll(poll_interval) call in order to not wake up to often. |
1000 |
Configuring log4j
Note: As of tc Runtime (Apache Tomcat) 8.5.x, Tomcat JULI jars are no longer shipped or needed. No additional Tomcat code is required if switching Tomcat's internal logging to log via log4j 2.x.
Instructions for using log4j 2.x with tc Runtime (Apache Tomcat) 8.5.x+
- Add the following log4j 2.x jar files to your CLASSPATH environment variable in
CATALINA_BASE/bin/setenv.sh:- log4j-api-2.x.jar
- log4j-core-2.x.jar
- log4j-jul-2.x.jar
- Create and put your log4j configuration file in a directory that is also in your CLASSPATH environment variable.
- Add to
CATALINA_BASE/bin/setenv.shthe system property-Djava.util.logging.manager=org.apache.logging.log4j.jul.LogManagerto JAVA_OPTS environment variable.
Here is some more information on log4j 2.x usage with tc Runtime or Apache Tomcat:
Instructions for tc Runtime (Apache Tomcat) 7.0.x only:
The following steps describe how to configure basic log4j, rather than java.util.logging, as the logging implementation for a given tc Runtime instance. The text after the basic procedure describes how to further customize the log4j configuration.
Under the
CATALINA_BASEdirectory, create the following directories if they do not already exist:CATALINA_BASE/libCATALINA_BASE/bin
Create a file called
log4j.propertiesin theCATALINA_BASE/libdirectory of your tc Runtime instance.Add the following properties to the
log4j.propertiesfile:log4j.rootLogger=INFO, R log4j.appender.R=org.apache.log4j.RollingFileAppender log4j.appender.R.File=${catalina.base}/logs/tomcat.log log4j.appender.R.MaxFileSize=10MB log4j.appender.R.MaxBackupIndex=10 log4j.appender.R.layout=org.apache.log4j.PatternLayout log4j.appender.R.layout.ConversionPattern=%p %t %c - %m%nDownload log4j (version 1.2 or later) and place the
log4j.jarfile in theCATALINA_BASE/libdirectory of your tc Runtime instance.Copy the
CATALINA_HOME/bin/extras/tomcat-juli.jarfile provided with tc Server to theCATALINA_BASE/bindirectory of your tc Runtime instance.Copy the
CATALINA_HOME/bin/extras/tomcat-juli-adpaters.jarfile provided with tc Server to theCATALINA_BASE/libdirectory of your tc Runtime instance.Delete the
CATALINA_BASE/conf/logging.propertiesfile to preventjava.util.propertiesfrom generating zero-length log files.
Specifying Included Packages With log4j Logging
VMware recommends that you configure the specific packages that you want to include in the logging. Because tc Runtime defines loggers by Engine and Host names, use these names in the log4j.properties file.
For example, if you want a more detailed Catalina localhost log, add the following lines to the end of the log4j.properties you created:
log4j.logger.org.apache.catalina.core.ContainerBase.[Catalina].[localhost]=DEBUG
log4j.logger.org.apache.catalina.core=DEBUG
log4j.logger.org.apache.catalina.session=DEBUG
Warning: A level of DEBUG produces megabytes of logging and will consequently slow the startup of tc Runtime. Be sure that you use this level sparingly, typically only when you need to debug internal tc Runtime operations.
For the full list of logging levels you can specify when configuring log4j, see Log Levels.
Configuring a Web Application with log4j Logging
You can configure your Web applications to use log4j for their own logging, which is in addition to the tc Runtime logging configuration described in the preceding sections.
The basic steps are as follows:
Create a
log4j.propertiesfile that is similar to the one described in Configuring log4j.Update the
log4j.propertiesfile with logging information specific to your application. For example, if you want to specify that theloggerin packagemy.packagebe at level DEBUG, add the following:log4j.logger.my.package=DEBUGPut the
log4j-version.jarfile in theWEB-INF/libdirectory of your Web application, whereversionrefers to the version of the JAR file, such aslog4j-1.2.15.jar.
See the log4j documentation for detailed information.
Updating Logging Parameters Dynamically
You can use JMX to modify logging levels and other logging parameters while tc Runtime is executing. The modifications you make using JMX are not persisted; when the server restarts, any changes you made are lost. You could use this feature to enable debugging messages to help troubleshoot an application problem while the problem is occurring. This is useful for problems that take time to develop after a reboot or are otherwise difficult to reproduce.
The JULI implementation of java.util.logging allows you to create separate loggers for each Web application by adding logging.properties files to your Web applications. This allows you to control logging at a very fine level.
Using JMX, you can list loggers, change the logging level for any single logger by name, and set a new handler (log file) for a logger. You can specify the logger you want to manage using a logger string defined in the logging.properties file, prefixed with "jmx:", for example jmx:com.springsource.tcserver.
Following is code for a JSP you can use to try out using JMX to manage loggers dynamically. It reports whether different logging levels are enabled and also displays the class loader and logger names. Add the JSP to a web application, deploy it, and call it before and after changing the logging level as described in the first example below.
<\%@page import="org.apache.juli.logging.*"%>
<\%
  Log log = LogFactory.getLog(this.getClass());
  String dmessage = "log.jsp log message[DEBUG] "+System.currentTimeMillis();
  String imessage = "log.jsp log message[INFO] "+System.currentTimeMillis();
  String wmessage = "log.jsp log message[WARN] "+System.currentTimeMillis();
  String emessage = "log.jsp log message[ERROR] "+System.currentTimeMillis();
  log.debug(dmessage);
  log.info(imessage);
  log.warn(wmessage);
  log.error(emessage);
%>
  Debug Enabled: <\%=log.isDebugEnabled()%> <br/>
  Info  Enabled: <\%=log.isInfoEnabled()%> <br/>
  Warn  Enabled: <\%=log.isWarnEnabled()%> <br/>
  Error Enabled: <\%=log.isErrorEnabled()%> <br/>

Class Loader: <\%=this.getClass().getClassLoader().getParent().
    getClass().getName()%>#<\%=System.identityHashCode(this.getClass().
    getClassLoader().getParent())%> <br/>
LoggerName: <\%=this.getClass().getName()%>#<\%=this.getClass().
    getClassLoader().getParent().getClass().
    getName()%>#<\%=System.identityHashCode(this.getClass().
    getClassLoader().getParent())%> <br/>
The following examples use JConsole, the Java Monitoring and Management Console included with the JDK, to manage loggers. There is a jconsole executable in the JDK bin directory that you can execute from a shell or Command Prompt. JConsole connects to a tc Runtime instance at the JMX port, 6969 by default. To verify your JMX port, check the base.jmx.port property in the CATALINA_HOME/conf/catalina.properties file.
Setting a New Logging Level for a Logger
This example shows how to use JMX to change the logging level for a logger without restarting the tc Runtime instance. A logger string from the CATALINA_HOME/conf/logging.properties file identifies the logger.
Start JConsole and connect to the tc Runtime instance.
In the New Connection window Remote Process field, enter the host name or IP and JMX port for the tc Server, separated by a colon. Enter the user name and password (the defaults are admin/springsource) and click Connect.

Click the MBeans tab.
In the tree at the left, expand java.util.logging > Logging > Operations, and click the setLoggerLevel operation.
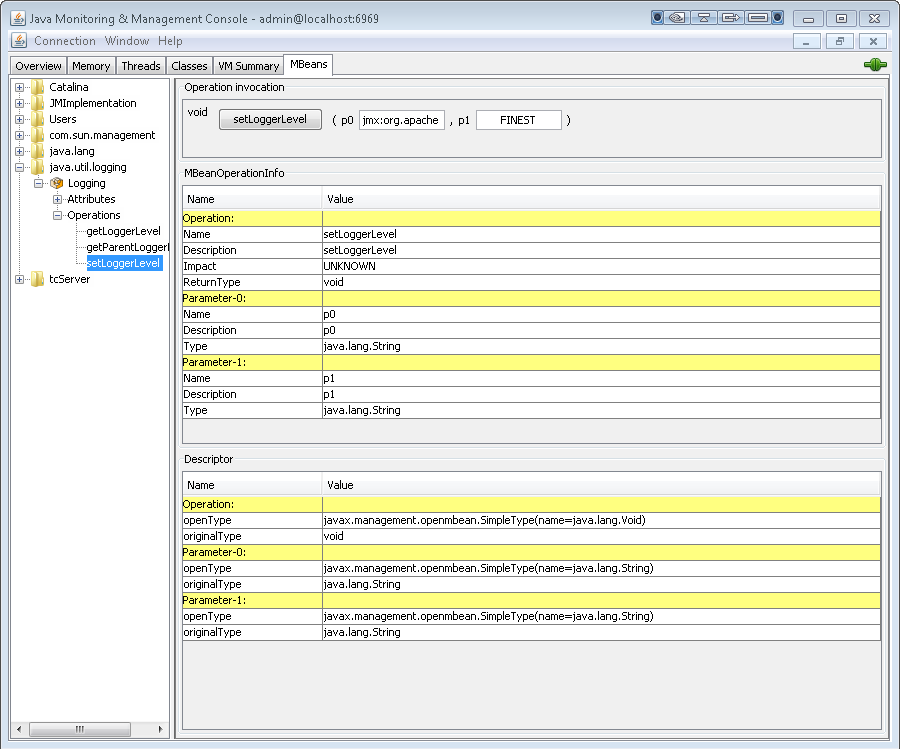
In the Operation invocation section, enter the logger name in the p0 field and the new logging level in the p1 field. Then click setLoggerLevel.
The logger name, p0, can be one of the following:
- Logger strings defined in
CATALINA_HOME/conf/logging.propertiesprefixed with "jmx:". For examplejmx:com.springsource.tcserver,jmx:org.apache.catalina, orjmx:org.apache.tomcat. - A fully qualified logger name, as described in the preceding section.
If you are using the JSP code presented above to test this feature, copy the logger name from the page's output in your browser and paste it into the p0 field. Be careful not to copy any trailing spaces into the field.
The logging level, p1, is one of the logging levels described in Logging Levels for java.util.logging: SEVERE, WARNING, INFO, CONFIG, FINE, FINER, FINEST, OFF, or ALL.
- Logger strings defined in
After you click SetLoggerLevel, the new logging level takes effect. If you are using the sample JSP code, reloading the page logs messages and updates the status of the logging levels.
Example - Create a New Log File and Redirect Debug Output To It
The following example creates a log handler (a log file), associates it with a logger, and sets the logging level for the logger. The result is a newly created log file with messages redirected into it.
Start JConsole and connect to the tc Server instance. (See previous example.)
Click the MBeans tab and then, in the tree at left, navigate to tcServer > Serviceability > LoggingManager > Operations.
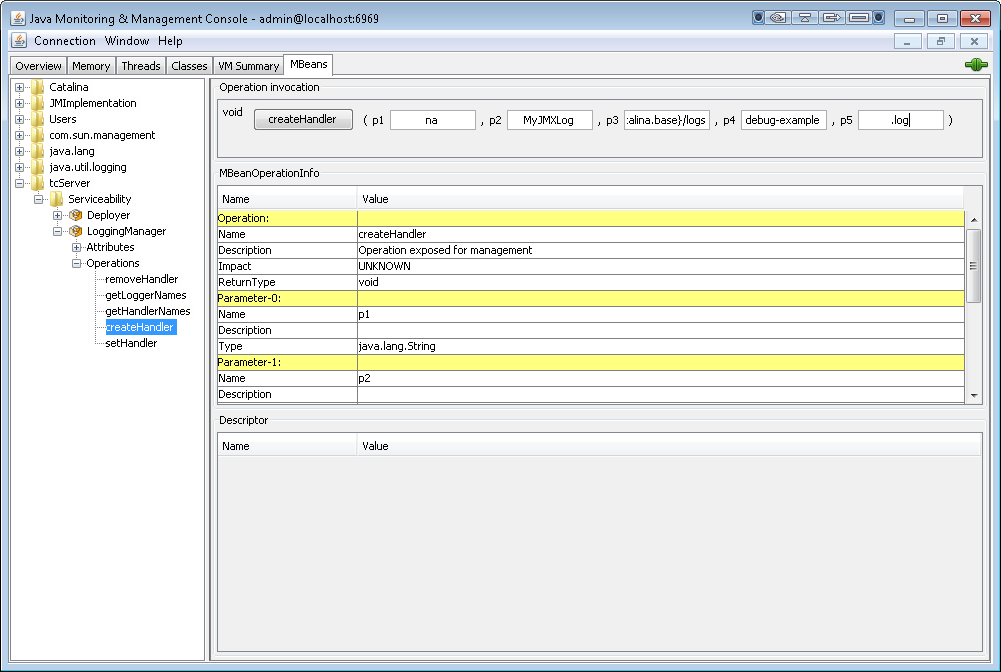
Click the createHandler operation. You use this operation to create a log file. Complete the parameters as follows:
- p0: empty. This parameter is ignored.
- p1: The name of your handler, for example
MyJMXLog. - p2: The location of the log file, for example
${catalina.base}/logs. - p3: The prefix of the log file name, for example
debug-example. - p4: The suffix for the log file name, for example
.log.
Parameters p2, p3, and p4 establish the location and name of the new log file. The file name is constructed from the prefix, a day timestamp, and the suffix, for example
debug-example.2011-11-11.log. The p2 parameter specifies the directory where the file is created, in this exampleCATALINA_HOME/logs.Click createHandler.
Now you can verify that the new log file has been created in the
CATALINA_HOME/logsdirectory.Click the setHandler operation. You use this operation to associate the log file you created with a logger. Complete the parameters as follows:
- p0: empty.
- p1: The name of your handler, for example
MyJMXLog. - p2: The name of the logger, for example
jmx:org.apache.
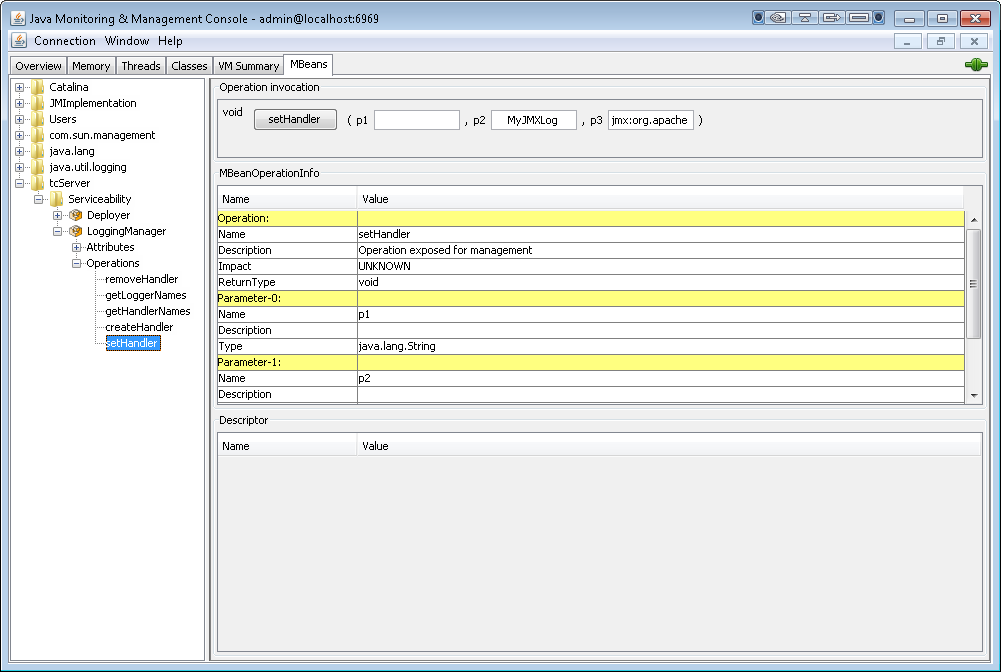
Navigate to java.util.logging > Logging > Operations and click the setLoggerLevel operation. Complete the parameters as follows:
- p0:
jmx.org.apache - p1:
ALL
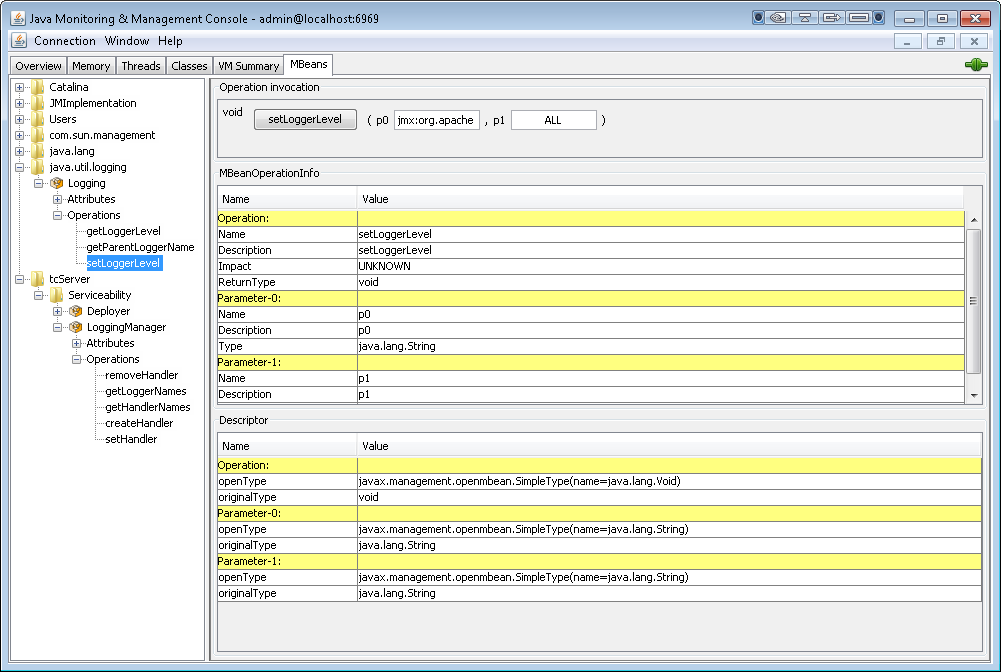
- p0:
Click setLoggerLevel.
Messages are now written to the new log file.
Remember that changes you make with JMX are lost when the server is rebooted. The changes are not written to the tc Server configuration files.
General Security Best Practices
The preceding sections provide specific information about obfuscating and encrypting passwords in tc Runtime configuration files using a variety of methods. This section provides general best practices for securing your tc Runtime instances.
For additional security, VMware recommends that:
- On the computer on which you have installed tc Server, create an operating system user whose only purpose is to run the tc Runtime process. In other words, this user would be the only user who starts/stops the tc Runtime instance, and this user would do nothing else but start/stop the tc Runtime process.
- Make it impossible for anyone to log on to the computer directly as this dedicated tc Server user.
- Set the permissions for all tc Runtime configuration files so that they are readable only by this dedicated tc Server user.
If you set up the preceding scenario, the only users who will be able read the passwords in the tc Runtime configuration files (whether they are in cleartext, are obfuscated, or encrypted) are users with root privileges.
To implement this scenario on Windows, you can use the install --username option of tcserver to install the tc Runtime instance as a Windows service and specify that it should run as the dedicated tc Server user. See "tcserver Command Reference" in Getting Started with VMware tc Server for details.
Configuring an Oracle DataSource With Proxied Usernames
When you configure a global shared JDBC datasource for a particular tc Runtime instance, by default all deployed applications that use the datasource connect to the configured database using the same username and password. This user is called a proxy, because the proxy user performs a database task on behalf of the user using the application deployed to tc Runtime. When an application user connects anonymously through a proxy, however, it is impossible to customize security for individual users or get a meaningful audit trail of the users that actually used the database.
For this reason it can be useful to configure the tc Runtime instance so that, while many applications share a particular global datasource, each application connects to the database using a different username and password via the proxy user, rather than directly through the proxy user that is configured for the datasource itself. tc Runtime has implemented this feature using the Oracle proxy connection authentication.
NOTE: This feature applies only to Oracle datasources.
The following procedure describes how to configure tc Runtime, and your applications, to use a shared global Oracle datasource with the proxy connection authentication.
Configure a standard shared global Oracle datasource for your tc Runtime instance by adding a
<Resource>child element of the<GlobalNamingResource>element in theserver.xmlfile. The actual configuration depends on your Oracle database environment, but the following snippet provides an example (relevant sections shown in bold):<?xml version='1.0' encoding='utf-8'?> <Server port="-1" shutdown="SHUTDOWN"> ... <GlobalNamingResources> <Resource name="jdbc/TestDB" auth="Container" type="oracle.jdbc.pool.OracleDataSource" description="Oracle Datasource" factory="oracle.jdbc.pool.OracleDataSourceFactory" url="jdbc:oracle:thin:@//localhost:1521/orcl" user="default_user" password="password" connectionCachingEnabled="true" connectionCacheName="CXCACHE" connectionCacheProperties="{MaxStatementsLimit=5, MinLimit=1, MaxLimit=1, ValidateConnection=true}"/> </GlobalNamingResources> ... <Service name="Catalina"> ... </Service> </Server>In the preceding
server.xmlsnippet, by default thejdbc/TestDBdatasource connects to the database as the userdefault_userwith passwordpassword; this is the proxy user.For each application that uses the datasource and for which you want to configure a specific proxied-user, update the application's
META-INF/context.xmlfile by adding a<ResourceLink>element that links the global Oracle datasource to thecom.springsource.tcserver.oracle.OracleProxyDataSourceFactoryfactory. Use theusernameandpasswordattributes of<ResourceLink>to configure the specific user you want this particular application to connect to the database as, via the proxy user. For example (relevant section shown in bold):<?xml version='1.0' encoding='utf-8'?> <Context> <WatchedResource>WEB-INF/web.xml</WatchedResource> <ResourceLink global="jdbc/TestDB" name="jdbc/TestDB" username="proxieduser" password="proxypassword" factory="com.springsource.tcserver.oracle.OracleProxyDataSourceFactory"/> type="oracle.jdbc.pool.OracleDataSource" </Context>When the application described by this
context.xmlfile uses thejdbc/TestDBdatasource, it will connect to the database first as the proxy user (default_user) and then open a proxy connection as theproxieduseruser, with passwordproxypassword.Note: For this feature to work correctly, you must update the
context.xmlfiles for each relevant application, not the globalcontext.xmlfile located in theCATALINA_BASE/confdirectory.Use the
jdbc/TestDBdatasource in your servlet and JSPs as usual.The following snippet shows an example of using it in a JSP to get a connection to the database:
<\%@ page import="java.sql.Connection,java.sql.ResultSet,java.sql.Statement,javax.naming.*,javax.sql.*"%>

    Context initContext = new InitialContext();
    Context envContext  = (Context)initContext.lookup("java:/comp/env");
    DataSource datasource = (DataSource)envContext.lookup("jdbc/TestDB");
    Connection con = datasource.getConnection();
    ...
For the changes to take effect, restart your tc Runtime instance, which in turn redeploys all relevant applications.
If you have not already done so, create all required Oracle database users that match the usernames you configured in the
context.xmlandserver.xmlfiles. For example:create user default_user identified by password; create user proxieduser identified by proxypassword; grant dba to default_user; grant dba to proxieduser; ALTER USER proxieduser GRANT CONNECT THROUGH default_user AUTHENTICATED USING password;The preceding SQL statements show how the
proxieduserconnects to the Oracle database throughdefault_user. These SQL statements are just examples; for complete descriptions of these statements, see your Oracle database documentation.
Reporting Status for a Deployed Application, Host, or Engine
By default, the error or status page that tc Runtime displays when it encounters a particular HTTP status or error code (such as 404 when tc Runtime does not find a requested resource) is hard-coded. However, you might want or need to change the displayed error, for simple customization reasons or because of your organization's security requirements that dictate how error pages should work and what they should look like. This section describes how to customize what tc Runtime displays when it encounters a particular HTTP status code.
The HTTP 1.1 specification defines the HTTP status codes. The following list describes some common codes:
403 Forbidden: The server understood the request, but is refusing to fulfill it.404 Not Found: The server has not found anything matching the Request-URI.500 Internal Server Error: The server encountered an unexpected condition which prevented it from fulfilling the request.
To customize the way tc Runtime responds when it encounters one of these codes, you add a Valve element to the server.xml configuration file whose className attribute is com.springsource.tcserver.security.StatusReportValve. The StatusReportValve has a number of other attributes that describe its behavior, as described in Attributes of the StatusReportValve.
You can specify the StatusReportValve as a direct child element of either the Host or Engine element in the server.xml file, depending on the associated Catalina container for which you want to configure the Valve. If you specify that the StatusReportValve is a direct child element of Engine, then you must explicitly disable the Valve at the Host level, using the Host attribute errorReportValveClass="".
You define how tc Runtime handles a particular HTTP status code by adding an attribute to the StatusReportValve whose name is error.XXX, where XXX is the numerical status code, such as error.404. Then set the value of this attribute in one of the following ways:
error.XXX=file://valid/file/path/URI: Specifies that when tc Runtime encounters the XXX status code, it should display the specified URI. If the URI is not valid, the file doesn't exist, or it is not readable, tc Runtime ignores the status code.error.XXX=/path/to/file. Specifies that when tc Runtime encounters the XXX status code, it should display the specified file. If the path does not point to a file node, tc Runtime interprets the path as a message string. If the file node is a directory or not readable, tc Runtime ignores the status code.error.XXX=message string: Specifies that when tc Runtime encounters the XXX status code, it should display the specified message as the body of the status response.error.XXX=http://<myserver>/404error.html: Specifies that when tc Runtime encounters the XXX status code, it retrieves the specified URL and returns it to the client. If the URI is not valid, the file doesn't exist, or it is not readable, then tc Runtime ignores the status code.
If tc Runtime encounters a status code that you have not defined in StatusReportValve using an error.XXX attribute, then tc Runtime does not act upon the status code. Additionally, if your application has already responded to the status code, then the StatusReportValve does not act upon the status code.
Once you configure your tc Runtime instance with the StatusReportValve and you start the instance, you can dynamically change the attributes of the Valve using JMX.
The following server.xml snippet shows an example of configuring a StatusReportValve for the Catalina Engine; only relevant parts of server.xml are shown (in bold):
<?xml version='1.0' encoding='utf-8'?>
<Server port="${shutdown.port}" shutdown="SHUTDOWN">

   ...
   <Service name="Catalina">
   ...

      <Engine name="Catalina" defaultHost="localhost">

        <Valve className="com.springsource.tcserver.security.StatusReportValve"
               fileEncoding="utf-8"
               contentType="text/html"
               characterEncoding="utf-8"
               zeroLengthContent="false"
               commitOnReport="true"
               cacheFiles="true"
               removeException="true"
               error.500="${catalina.base}/conf/500.html"
               error.404="${catalina.base}/conf/404.html"
               error.403="I am sorry, you do not have access"
      />

      ...
      <Host name="localhost"  appBase="webapps"
            unpackWARs="true" autoDeploy="true" deployOnStartup="true"
            deployXML="true" xmlValidation="false" xmlNamespaceAware="false"
            errorReportValveClass="" >
      </Host>
     </Engine>
   </Service>
</Server>
In the preceding example, the StatusReportValve can act upon three HTTP status codes: 404, 500, and 403. When tc Runtime encounters the 404 status code, it displays the contents of the file CATALINA_BASE/conf/404.html. Similarly for status code 500, although in this case it displays the file CATALINA_BASE/conf/500.html. If tc Runtime encounters the status code 500, it displays the literal message I am sorry, you do not have access.
Note that, because the StatusReportValve is configured at the Engine level, the child Host element explicitly disables the Valve using the attribute errorReportValveClass="".
The following table describes all the attributes of the StatusReportValve.
Table 4. Attributes of the StatusReportValve
| Attribute | Description |
|---|---|
className |
Specify the com.springsource.tcserver. security.StatusReportValve class, or a class that extends the StatusReportValve class. |
fileEncoding |
Specifies the encoding of the displayed static files. If you do not specify this attribute, tc Runtime uses the default platform encoding. |
contentType |
Specifies the Content-Type header for the HTTP response. Default value is text/html. See MIME Media Types for the full list. |
characterEncoding |
Specifies the charset parameter of the Content-Type header for the HTTP response. Default value is utf-8. See Character Sets for the full set. |
zeroLengthContent |
If you have set this attribute to true and the response is not committed, the Valve returns with a 0 length body. Useful for mod_jk and reverse proxy where the Web server only overrides the body if it is of 0 length (effectively, it has no body.) |
commitOnReport |
If you have set this attribute to true, the StatusReportValve always tries to commit the response even with a 0 length body. If you set it to false, then Valves further up the chain may change the response. |
cacheFiles |
If you set this attribute to true, the Valve caches the content of the static pages as java.lang.ref.WeakReference<String>. Once cached, tc Runtime makes no attempt to read the file system unless the garbage collector clears the weak references. |
removeException |
If you set this attribute to true, the Valve removes the Globals.EXCEPTION_ATTR from the request attribute. Valves further up in the chain will no longer have access to the exception that caused the error. |
error.XXX |
Specifies that tc Runtime should act upon the XXX status code by displaying either the specified URI, file, or message string. See the previous discussion for details. |
Note: Due to the nature of setting properties on StatusReportValve a WARNING may appear in the catalina log similar to the following:
16-Mar-2018 14:08:58.232 WARNING [main] org.apache.tomcat.util.digester.SetPropertiesRule.begin [SetPropertiesRule]{Server/Service/Engine/Host/Valve} Setting property 'error.403' to 'http://localhost:8080/error/message.txt' did not find a matching property.
This is expected behavior and the WARNING may safely be ignored.
Enabling Thread Diagnostics
ThreadDiagnosticsValve collects diagnostic information from tc Runtime request threads. If the thread has JDBC activity on a DataSource, the collected diagnostics can include the JDBC query, depending on how you configure ThreadDiagnosticsValve. The collected information is exposed through JMX MBeans.
The diagnostics collected for a thread include the following:
- The URI of the request
- The query portion of the request string
- Time the request began
- Time the request completed
- Total duration of the request
- The number of garbage collections that occurred during the request
- The time spent in garbage collection
- Number of successful connection requests
- Number of failed connection requests
- Time spent waiting for connections
- Text of each query executed
- Execution time for each query
- Status of each query
- Execution time for all queries
- Stack traces for failed queries
Setting Up ThreadDiagnosticsValve
Set up ThreadDiagnosticsValve by adding a Valve child element to the Engine or Host element in conf/server.xml and configuring a DataSource, if you want JDBC diagnostics.
If you include the diagnostics template in the tcserver create command, the configuration is done for you, including creating a DataSource whose activity will be included in the diagnostics. For example:
tcserver create -t diagnostics myInstance
When you create a tc Runtime instance using the diagnostics template, the following Valve element is inserted as a child of the Engine element in the conf/server.xml file of the new instance.
<Valve className="com.springsource.tcserver.serviceability.request.ThreadDiagnosticsValve"
       loggingInterval="10000"
       notificationInterval="60000"
       hreshold="10000"/>
You can, of course, add the Valve element manually. The following table describes the attributes you can set on the Valve element for ThreadDiagnosticsValve.
Table 5. Properties of ThreadDiagnosticsValve
| Attribute | Description |
|---|---|
className |
The managed class: com.springsource.tcserver.serviceability.request.ThreadDiagnosticsValve. Required. |
threshold |
The minimum time (milliseconds) a request must last to be reported. A request must exceed this time to qualify. The default is 500. |
history |
The number of qualified requests to keep in the history. The default is 1000. |
loggingInterval |
The minimum number of milliseconds between logging requests, to prevent flooding. The default is 5000. |
notificationInterval |
The minimum number of milliseconds between JMX notifications, to avoid flooding. The default is 5000. |
logExtendedData |
If true, a detailed message is logged for the thread, including the thread name, priority, id, and stack traces. Default: false. |
Configuring JDBC Diagnostics
The ThreadDiagnosticsValve monitors a DataSource if it is configured with the ThreadQueryReport jdbcInterceptor. Furthermore, the ThreadQueryReport interceptor is automatically added when the DataSource is created with com.springsource.tcserver.serviceability.request.DataSourceFactory. Therefore, if you do not want JDBC diagnostics, set the DataSource factory attribute to org.apache.tomcat.jdbc.pool.DataSourceFactory instead. Another option is to use org.apache.tomcat.jdbc.pool.DataSourceFactory and explicitly add com.springsource.tcserver.serviceability.request.ThreadQueryReport to the DataSource's jdbcInterceptors attribute in server.xml, which enables JDBC diagnostics.
The following example is the DataSource added to server.xml when you use the diagnostics template to create a tc Runtime instance:
<Resource auth="Container"
          driverClassName="com.mysql.jdbc.Driver"
           factory="com.springsource.tcserver.serviceability.request.DataSourceFactory"
           initialSize="10"
           jdbcInterceptors="ConnectionState;StatementFinalizer;SlowQueryReportJmx(threshold=10000)"
           jmxEnabled="true"
           logAbandoned="true"
           maxActive="100"
           maxWait="10000"
           minEvictableIdleTimeMillis="30000"
           minIdle="10"
           name="jdbc/TestDB"
           password="password"
           removeAbandoned="true"
           removeAbandonedTimeout="60"
           testOnBorrow="true"
           testOnReturn="false"
           testWhileIdle="true"
           timeBetweenEvictionRunsMillis="5000"
           type="javax.sql.DataSource"
           url="jdbc:mysql://localhost:3306/mysql?autoReconnect=true"
           username="root"
           validationInterval="30000"
           validationQuery="SELECT 1"/>
Even though the jdbcInterceptors attribute does not include ThreadQueryReport, diagnostics will be produced for this DataSource because it uses the com.springsource.tcserver.serviceability.request.DataSourceFactory.
Configuring a tc Runtime Instance to Obtain Its JMX Credentials from LDAP
By default, the user configured to access a tc Runtime instance via JMX is configured in the jmxremote.access and jmxremote.password files in the INSTANCE-DIR/conf directory. Monitoring applications must in turn specify this user so that the application is able to monitor and manage the tc Runtime instance using JMX. Sometimes, however, it is preferable for the tc Runtime instance to use LDAP to store and obtain the JMX user credentials. The tasks required to configure this use case is described in this section.
Prerequisites
Create, or get the location of, the appropriate LDAP configuration file. The format of the file should reflect the LdapLoginModule class.
The following example shows a snippet from an LDAP configuration file which will be later referenced in the tc Runtime instance configuration:
CorporateLDAP {
    com.sun.security.auth.module.LdapLoginModule REQUIRED
        userProvider="ldap://ldap.corporate.com/CN=Users,DC=corporate,DC=com"
        authIdentity="{USERNAME}"
        userFilter="(&samAccountName={USERNAME})(userPrincipalName={USERNAME})(cn={USERNAME}))(objectClass=user))"
        authzIdentity="admin"
        useSSL=false;
};
Procedure
Modify the environment file of the tc Runtime instance (
INSTANCE-DIR/bin/setenv.shon Unix orINSTANCE-DIR\bin\setenv.baton Windows) by adding the-Djava.security.auth.login.config=ldap-config-fileoption to theJAVA_OPTSenvironment variable, whereldap-config-fileis the name of the LDAP configuration file.For example, on Unix the variable might look like the following:
JAVA_OPTS="$JVM_OPTS $AGENT_PATHS $JAVA_AGENTS $JAVA_LIBRARY_PATH -Djava.security.auth.login.config=ldap.config"In the example, the LDAP configuration file is called
ldap.configand it is location in the same directory as the tc Runtime'ssetenv.shfile. Use an absolute filename if the configuration file is in a different location.Modify the
INSTANCE-DIR/config/server.xmlconfiguration file of the tc Runtime instance by adding theldapConfigEntryattribute to thecom.springsource.tcserver.serviceability.rmi.JmxSocketListenerListener, specifying the appropriate entry in the LDAP configuration file.For example, assume you want to use the
CorporateLDAPLDAP configuration entry shown in the Prerequisites; the correspondingserver.xmlfile would look like the following:<Listener className="com.springsource.tcserver.serviceability.rmi.JmxSocketListener" ldapConfigEntry="CorporateLDAP" port="${base.jmx.port}" bind="127.0.0.1" useSSL="false" passwordFile="${catalina.base}/conf/jmxremote.password" accessFile="${catalina.base}/conf/jmxremote.access" authenticate="true"/>Important: The
ldapConfigEntryoption, if set correctly, overrides thepasswordFileoption.However, if the tc Runtime instance is unable to find the LDAP configuration file that you specified in the
setenv.sh|batfile, or you do not specify an LDAP entry for theJmxSocketListeneras shown above or it does not exist in the LDAP configuration file, the tc Runtime instance logs a warning and tries to use thepasswordFileoption instead.Restart the tc Runtime instance for your changes to take effect.
JMXSocketListener Configuration Properties
tc Server includes a JMX Listener. This listener is configured by default (via base-template) and listens on port 6969 when configured by the base-template. By applying the jmx-ssl template this listener will use SSL instead of plain text.
| Property Name | Default Value | Definition |
|---|---|---|
| address | localhost | The bind address |
| port | -1 | The port for which to bind |
| useSSL | false | Whether to require SSL |
| authenticate | false | Whether to authenticate |
| passwordFile | empty | Equivalent to defining "jmx.remote.x.password.file" as a system property. |
| accessFile | empty | Equivalent to defining "jmx.remote.x.access.file" as a system property. |
| cipherSuites | empty | The cipher suites to use when useSSL is true |
| protocols | empty | The protocols to use when useSSL is true |
| keystoreFile | empty | The keystore file storing the SSL certificate |
| keystorePass | empty | The password to |
| keystoreType | empty | The type of the keystore |
| truststoreFile | empty | The trust store file |
| truststorePass | empty | Password to access the trust store |
| useJdkClientFactory | false | Whether to use the provided JDK SSL Client Factory or the include tc Server SSL Client Factory |
Using setenv.sh
tc Server on UNIX uses the same setenv.sh as Tomcat. However, there are a couple of differences in the usage.
Environment variables which tc Server needs to read are not fully expanded for other variables. In the majority of instances this will not cause any issue or even be noticed. The following is not supported:
JAVA_HOME=$MYEXTERNALVARIABLE/foo/bintc Server will not be able to expand $MYEXTERNALVARIABLE to understand the JAVA_HOME as defined in the
setenv.shfile. There are two exceptions which are CATALINA_HOME and CATALINA_BASE. These are expanded by tc Server and should be the same as used by Tomcat.CATATINA_PID=$CATALINA_BASE/pids/instance.pidIn the above example $CATALINA_PID will be properly resolved to the actual catalina base +
/pids/instance.pidTemplates do not define a
setenv.shdirectly instead they use abin/setenv.propertiesfile containing properties which are translated into varable assignments in the instance'ssetenv.shExample of a template's
bin\setenv.propertiescatalina.pid.0=$CATALINA_BASE/run/pidfile
