


You can upgrade SaltStack Config to the latest stable version from a previous version.
Best practices when upgrading
Follow these guidelines while planning your upgrade:
- Do not upgrade using the installer or manual installation instructions.If you are upgrading your SaltStack Config installation, refer to the following upgrade instructions.
- For best results, increment from one major release to the next. As a best practice, always upgrade from the latest major version of SaltStack Config to the new release. If you are on an older release, upgrade incrementally from one release to the next.
- Back up your data. In order to prevent data loss, back up your data.
- Perform upgrades during hours of slow network activity. Database upgrades require re-indexing data. Depending on the complexity of your data, a database upgrade could potentially take several hours. To prevent service disruptions, consider upgrading the database during slower business hours or trimming your database prior to an upgrade.
- Check the database for any old commands being stored. In some cases, the PostgreSQL database stores old commands that haven’t run. These commands might run during the upgrade process, when you restart the Master Plugin. To prevent this from happening, check whether any old commands are stored in the database, and enable skipping jobs that are older than a defined time.
- Test the upgrade before deploying. If possible, you could try running a dress rehearsal in a test environment to get a sense of how long the upgrade could take.
- Read through the whole guide first. Consider also reading through this entire guide one time before you implement an upgrade so that you have a good sense of the tasks that are required and whether they require planning from your team or if stakeholders must be notified of pending changes.
Upgrading from older versions
As a best practice, always upgrade from the latest major version of SaltStack Config to the new release. If you are upgrading from a version earlier than the latest release, you might see the best results if you upgrade in increments from one major release to the next.
For instructions on upgrading to earlier SaltStack Config versions, see the specific upgrade instructions for the releases you are upgrading from. The upgrade instructions for previous releases are included in the installation guide PDF for the subsequent release. For example, if you need to upgrade from 5.5 to 6.0, see the upgrade instructions in the 6.0 installation PDF.
For SaltStack Config versions 8.4 and later, use the version selector at the top of this page to select the correct upgrade guide for your product version. For versions 8.3 and older, use the PDF guides in the following table:
| Version | Installation and upgrade guide (PDF) |
|---|---|
| 8.3 | 8.3 Installation and upgrade guide |
| 6.4 | 6.4 Installation and upgrade guide |
| 6.3 | 6.3 Installation and upgrade guide |
| 6.2 | 6.2 Installation and upgrade guide |
| 6.1 | 6.1 Installation and upgrade guide |
| 6.0.1 | 6.0.1 Installation and upgrade guide |
| 6.0 | 6.0 Installation and upgrade guide |
How to upgrade SaltStack Config
- Back up your data, including certain files and directories that are crucial to your specific installation of SaltStack Config
- Upgrade PostgreSQL (optional, but recommended)
- Upgrade your Salt infrastructure (optional, but recommended)
- Download the upgrade files
- Upgrade the RaaS node
- Upgrade any Salt masters using the Master Plugin
For more information on upgrading SSC via Lifecyle Manager, see Upgrade vRealize Automation SaltStack Config in the LCM documentation.
Back up SaltStack Config files and directories
The following files and directories contain your custom SaltStack Config configurations and need to be backed up before upgrading:
- On the RaaS node, back up these entire directories:
/etc/raas/raas/etc/raas/raas.secconf/var/log/raas/etc/raas/pki/
Note:The
pkidirectory contains hidden files, so ensure you back up the entire directory.Backing up the log files in the/var/log/raasdirectory is optional. During the upgrade process, you’ll clear the log files to provide a clean log file if troubleshooting is necessary. - On each Salt master, back up the
/etc/salt/master.d/raas.confand/etc/salt/master.d/eAPIMasterPaths.conffiles.Note:Depending on how you initially installed SaltStack Config, the eAPI Salt master paths could instead be in the
/etc/salt/master.d/raas.conffile instead.
Back up your database schema
When upgrading your RaaS node, the database schema is updated. For that reason, ensure you create a backup of your database before the upgrade.
To back up your database you need to first look up your PostgreSQL database name and then copy the contents:
- On the PostgreSQL server, back up these files:
postgresql.confpg_hba.conf
- Log in as the
postgresuser using the following command:sudo su - postgres
- Get your database name, using the following commands to enter PostgreSQL and then list the databases:
psql
\l
- To exit PostgreSQL and log out as the
postgresuser, press Ctrl+D and then run the following command:exit
- Copy database contents to a file. The following command gives an example:
pg_dump -U salteapi raas_db_name > postgres_raas_backup_$(date +%Y-%m-%d).sql
Upgrade PostgreSQL database
SaltStack Config requires a PostgreSQL 9.6 database, but PostgreSQL 13.7 is recommended. The recommended version of PostgreSQL is included with the SaltStack Config installer.
Upgrading to the latest version of PostgreSQL is not required. However, upgrading PostgreSQL can possibly improve performance. For instructions on upgrading to the latest version of PostgreSQL, see PostgreSQL upgrade.
Upgrade Redis database
SaltStack Config requires a Redis 5.x database, but Redis 6.2.7 is recommended. The recommended version of Redis is included with the SaltStack Config installer.
Upgrading to the latest version of Redis 5.x is not required. However, upgrading Redis can possibly improve performance. For instructions on upgrading Redis, see Redis Administration.
Upgrade Salt
When upgrading Salt, you must upgrade the masters first. Running minions with versions of Salt newer than their masters might not function as expected since the minion may include changes not yet available in the master. Also, whenever possible, backward compatibility between new masters and old minions is preserved. Generally, the only exception to this policy is in case of a security vulnerability.
For best performance, ensure that all the Salt components in your infrastructure are running on the latest major version of Salt.
For instructions on upgrading the Salt Crystal package, see How to Upgrade Salt Crystal.
Upgrade the RaaS node
After upgrading to the latest version of PostgreSQL, Redis, and Salt, you can then upgrade the RaaS node from the previous version to the latest version.
Before upgrading your RaaS node, you must back up your system data to avoid data loss. To preserve your setup, save any changes you made to the default file system, pillar data, and jobs as new files or jobs. Additionally, you should record or make a copy of any existing pillar target assignments, as these are removed during the upgrade process.
To upgrade the RaaS node:
- Download the upgrade files from Customer Connect.
- Stop the RaaS service using the following command:
sudo systemctl stop raas
- Remove the log file(s) in the
/var/log/raasdirectory. Clearing the log files provides a clean log file if troubleshooting is necessary. - Remove the currently installed version of the API (RaaS) with the following command:
sudo yum remove raas
- Upgrade the RaaS node by installing the latest RPM. Use the following example command, replacing the exact file name of the RPM:
sudo yum install raas-rpm-file-name.rpm
- IMPORTANT: Restore the backup of the following files:
/etc/raas/raas/etc/raas/raas.secconf/etc/raas/pki/
- Update permissions for the
raasuser with the following command:sudo chown -R raas:raas /etc/pki/raas/certs
- OPTIONAL: If you have a SaltStack SecOps license and want to add the compliance library, add the following new section to the
/etc/raas/raasfile:sec: ingest_override: true locke_dir: locke post_ingest_cleanup: true username: 'secops' content_url: 'https://enterprise.saltstack.com/secops_downloads' download_enabled: true download_frequency: 86400 stats_snapshot_interval: 3600 compile_stats_interval: 10 ingest_on_boot: True content_lock_timeout: 60 content_lock_block_timeout: 120
Note:This step is optional and only applies to organizations that have a valid SaltStack SecOps license. This add-on module is available for SaltStack Config versions 6.0 and later. The previous configuration options in the
/etc/raas/raasconfiguration file are specific to these add-on modules. - OPTIONAL: If you have a SaltStack SecOps license and want to add the vulnerability library, add a new section to the
/etc/raas/raasfile:vman: vman_dir: vman download_enabled: true download_frequency: 86400 username: vman content_url: 'https://enterprise.saltstack.com/vman_downloads' ingest_on_boot: true compile_stats_interval: 60 stats_snapshot_interval: 3600 old_policy_file_lifespan: 2 delete_old_policy_files_interval: 86400 tenable_asset_import_enabled: True tenable_asset_import_grains: ['fqdn', 'ipv4', 'ipv6', 'hostname', 'mac_address', 'netbios_name', 'bios_uuid', 'manufacturer_tpm_id', 'ssh_fingerprint', 'mcafee_epo_guid', 'mcafee_epo_agent_guid', 'symantec_ep_hardware_key', 'qualys_asset_id', 'qualys_host_id', 'servicenow_sys_id', 'gcp_project_id', 'gcp_zone', 'gcp_instance_id', 'azure_vm_id', 'azure_resource_id', 'aws_availability_zone', 'aws_ec2_instance_ami_id', 'aws_ec2_instance_group_name', 'aws_ec2_instance_state_name', 'aws_ec2_instance_type', 'aws_ec2_name', 'aws_ec2_product_code', 'aws_owner_id', 'aws_region', 'aws_subnet_id', 'aws_vpc_id', 'installed_software', 'bigfix_asset_id' ]Note:This step is optional and only applies to organizations that have a valid SaltStack SecOps license. This add-on module is available for SaltStack Config versions 6.0 and later. The previous configuration options in the
/etc/raas/raasconfiguration file are specific to these add-on modules. - The RaaS currently has a known issue related to stale jobs. When upgrading, some users might notice a queue of stale jobs that are stuck in a pending state. Upgrading the RaaS node can cause these jobs to run unless they are first cleared out.
To prevent this from happening, first check whether any old commands are stored in the database. On your PostgreSQL node, check for any pending jobs using the following command:
select count(1) from commands where state='new';
The result is the number of pending jobs. If the number of jobs is
0, proceed with the rest of the upgrade process. - Upgrade the RaaS service database using the following command:
sudo su - raas
raas upgrade
Note:Depending on the size of your database, the upgrade can take anywhere from several minutes to over an hour. If you encounter errors, check the
/var/log/raas/raaslog file for more information. - After the upgrade, exit the session for the
raasuser with the following command:exit
- Start the RaaS service using the following command:
sudo systemctl enable raas
sudo systemctl start raas
Upgrade the Master Plugin Using the SaltStack Config User Interface
SaltStack Config automatically upgrades the master plugin to the latest version without any actions required by the user.
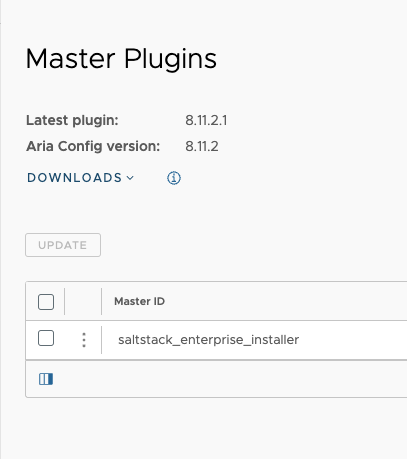
However, you can also upgrade the master plugin from the SaltStack Config user interface. To upgrade the master plugin, from SaltStack Config, select Administration and then click Master Plugins. The Master Plugin tab shows you which version of the plugin and SaltStack Config environment you are on, along with a list of your Master Plugin IDs. From the Master Plugins tab, you can select the master plugins you want to update and then click Update.
Upgrade the Master Plugin Using the CLI
After you have successfully upgraded the RaaS node, you can then upgrade any Salt masters that use the Master Plugin to connect to SaltStack Config.
Before you upgrade the Salt master(s), ensure that the pip3 application is installed on the Salt masters. If you are upgrading from the latest version of the Master Plugin, then this application is already installed.
To upgrade the Master Plugin on a Salt master:
- Stop the
salt-masterservice using the following command:sudo systemctl stop salt-master
- Check which version of Python is running on the Salt master. If it is running Python 3.6 or higher, no changes are needed. Otherwise, delete the prior version of the SSEAPE module. (The SSEAPE is the SaltStack Config plugin for the Salt master). For example:
RHEL/CentOS
sudo rm -rf /usr/lib/python3.6/site-packages/SSEAPE*
Ubuntu
sudo rm /usr/lib/python3.6/dist-packages/SSEAPE*
- Upgrade the Master Plugin by manually installing the updated Python wheel. Use the following example commands, replacing the exact name of the wheel file:
RHEL/CentOS
sudo pip3 install SSEAPE-file-name.whl --prefix /usr
Ubuntu
sudo pip3 install SSEAPE-file-name.whl
Note:Some users might need to alter the syntax to
pip3.6orpip36for their operating systems. - Update the API (RaaS) module paths by editing the
/etc/salt/master.d/eAPIMasterPaths.conffile to reference the paths to the various modules. For example, you might change allpython2.7references in this file topython3.6.Note:Depending on how you initially installed SaltStack Config, the eAPI Salt master paths could instead be in the
/etc/salt/master.d/raas.conffile instead. - Check the
enginessection in/etc/salt/master.d/raas.confto confirm that it matches the following:engines: - sseapi: {} - eventqueue: {} - rpcqueue: {} - jobcompletion: {} - keyauth: {}Note:If a problem occurred, you may need to restore your backups of the
/etc/salt/master.d/raas.confand/etc/salt/master.d/eAPIMasterPaths.conffiles. - If you are using the salt-master key authentication (recommended), make sure that the
sseapi_pubkey_pathis configured and thatsseapi_usernameandsseapi_passwordare commented out in/etc/salt/master.d/raas.conf.sseapi_pubkey_path: /etc/salt/pki/master/sseapi_key.pub #sseapi_username: #sseapi_password:
- Check that the
master_job_cacheandevent_returnentries are set tosseapi. Thepgjsonbreturner is no longer available. - Start the
salt-masterservice with the following command:sudo systemctl start salt-master
The upgrade process is now complete. If you encounter any other errors, refer to Troubleshooting.
