When you upgrade a vCenter Server instance with an embedded Platform Services Controller on Windows, you upgrade the entire deployment at the same time.
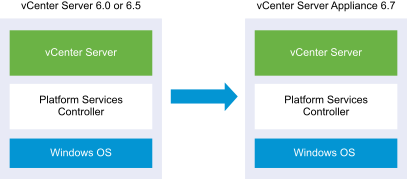
Figure 1. vCenter Server 6.0 or 6.5 with Embedded
Platform Services Controller Deployment Before and After Upgrade
vCenter Server 6.0 and 6.5 ports that are in use by vCenter Server and Platform Services Controller are preserved. You cannot change ports during the upgrade. For information on required ports, see Required Ports for vCenter Server and Platform Services Controller.
Verify that you have made a backup of your vCenter Server configuration and database.
To verify that the VMware Directory Service is in a stable state and can stop, manually restart it. The VMware Directory service must be stopped for the vCenter Server upgrade software to uninstall vCenter Single Sign-On during the upgrade process.
Download the vCenter Server for Windows ISO file. Extract the ISO file locally, or mount the ISO file as a drive.
In the software installer, double-click the autorun.exe file to start the upgrade.
Select vCenter Server for Windows and click Install.
The installer runs checks in the background to discover your existing
vCenter Single Sign-On settings and notify you of any problems that can affect your upgrade process.
The
vCenter Server installer opens to the Welcome page.
Review the Welcome page and accept the license agreement.
Enter your credentials.
Enter your vCenter Server administrator credentials.
Enter the [email protected] user credential and the vCenter Single Sign-On credential. The user must be administrator@your_domain_name.
Click Next.
The installer runs checks in the background to detect any issues that can cause the upgrade to fail. You might receive a warning if the old certificates do not meet current VMware security standards.
Configure the ports and click Next.
The ports in use by vCenter Server and Platform Services Controller are preserved during upgrade.
Configure install, data, and export data directories and click Next.
The installer runs disk space and permission checks for the selected directories, and displays an error message if the selected directories do not meet the requirements.
Review the VMware Customer Experience Improvement Program (CEIP) page and choose if you want to join the program.
For information about the CEIP, see the Configuring Customer Experience Improvement Program section in
vCenter Server and Host Management.
Review the Summary page to verify that the settings are correct. Select the checkbox to verify that you have made a backup of the vCenter Server machine and the vCenter Server database and click Upgrade.
The installer starts the upgrade process and displays a progress indicator.
Before clicking Finish, take note of the post upgrade steps.
Click Finish to complete the upgrade.
Results
Your vCenter Server for Windows upgrade is complete.