


You can use the Velero Plugin for vSphere to backup and restore workloads running on vSphere Pods by installing the Velero Plugin for vSphere on the Supervisor Cluster.
Overview
The Velero Plugin for vSphere provides a solution for backing up and restoring vSphere with Tanzu workloads. The solution requires the installation and configuration of several components. Once you have the Velero Plugin for vSphere installed and configured on the Supervisor Cluster, you can backup and restore vSphere Pods. For persistent workloads, the Velero Plugin for vSphere lets you take snapshots of the persistent volumes.
Prerequisites
- Workload Management is enabled with NSX-T Data Center networking. See Enable Workload Management with NSX Networking
- Supervisor Cluster is version 1.21.1 or later.
- vSphere Namespace is created and configured.
- You must be a member of the vSphere Administrator role, or have following vSphere privileges:
- SupervisorServices.Manage
- Namespaces.Manage
- Namespaces.Configure
- NSX-T networking is used to support the deployment of vSphere Pods
- A Data Manager VM is deployed
- The Velero Operator is enabled and running in the
velero-vsphere-domain-cXXnamespace - A namespace called
velerois configured - The Velero Plugin for vSphere is running as a vSphere Pod in the
veleronamespace

Upgrades
These instruction assume that you are running vSphere 7 U3. If you previously installed the Velero Plugin for vSphere on a vSphere 7 U2 P3 environment, on upgrade the Data Manager VM and Velero vSphere Operator are migrated to the new framework. The Velero vSphere Operator is converted to the new vSphere Services format. No action is required.
Create a Dedicated Network for Backup and Restore Traffic (Optional)
- Tag the ESXi hosts to support network file copy (NFC)
- Configure the backup and restore network using NSX-T Data Center
To configure vSphere 7.x ESXi hosts to support a dedicated network block device (NBD) transport, you add a VMkernel NIC on each ESXi host in the vCenter Server cluster where Workload Management is enabled and set the vSphereBackupNFC on that NIC. When the tag vSphereBackupNFC is applied to the NIC type for a VMkernel adapter, backup and restore traffic goes through the chosen virtual NIC.
vSphereBackupNFC is not enabled on the VMkernel NIC, the backup and restore traffic will be not be sent on the backup and restore network, even if you configure one. If
vSphereBackupNFC is not enabled, the traffic will travel on the vSphere management network.
vSphereBackupNFC tag is enabled, configure the backup and restore network using NSX-T by updating the existing vSphere Distributed Switch (vDS) for the cluster as follows:
- In the vSphere Client, select .
- Select the existing vDS for the cluster.
- Right-click the vDS and select .
- Create a new Distributed Port Group named BackupRestoreNetwork.
- Add a VMkernel adapter to the BackupRestoreNetwork Distributed Port Group.
- Attach all the ESXi hosts in the vCenter cluster where Workload Management is enabled to the BackupRestoreNetwork Distributed Port Group.
- Enable the
vSphereBackupNFCtag.
For guidance on creating an NSX-T network on the existing vDS, see Install and Configure NSX for vSphere with Tanzu.
Create an S3-Compatible Object Store
For backup and restore of persistent volumes, you need to provide an S3-compatible object store. Velero supports a number of object store providers.
To install the Velero Plugin for vSphere, you will need to provide the following information about your S3-compatible object store:
| Data Item | Example Value |
|---|---|
| s3Url | http://my-s3-store.example.com |
| aws_access_key_id | ACCESS-KEY-ID-STRING |
| aws_secret_access_key | SECRET-ACCESS-KEY-STRING |
s3-credentials with the following information. You will reference this file when you install the
Velero Plugin for vSphere.
[default]
aws_access_key_id = ACCESS-KEY-ID-STRING
aws_secret_access_key = SECRET-ACCESS-KEY-STRING
MinIO is an S3-compatible object store that is easy to install and use. vSphere with Tanzu ships with a MinIO Supervisor Service that you can enable. For more information, see Enable Stateful Services in vSphere with Tanzu.
Alternatively, you can manually install a MinIO server on a Linux VM. For instructions, see Install and Configure Standalone Velero and Restic on a Tanzu Kubernetes Cluster.
Install and Configure Data Manager
To facilitate backup and restore using the Velero Plugin for vSphere, you deploy one or more Data Manager VMs to move persistent volume backup data into and out of S3-compatible object storage. The Data Manager moves the volume snapshot data from the vSphere volume to the remote durable S3-compatible storage on backup, and from remote S3-compatible storage to a vSphere volume during restore.
- Download the Data Manager OVA:
- Using the vSphere Client, right-click the Datacenter where Workload Management is enabled and select Deploy OVF Template.
- Select the Data Manager OVA file that you downloaded and upload it to the vCenter Server.
- Name the virtual machine DataManager, for example.
- Select the compute resource which is the vCenter cluster where the Supervisor Cluster is configured.
- Review the VM deployment details and click Next.
- Accept the license agreements and click Next.
- Select the storage and click Next.
- Select the destination network for the Data Manager VM.
- Select the BackupRestoreNetwork if you configured a dedicated backup and restore network. See Create a Dedicated Network for Backup and Restore Traffic (Optional).
- Select the Management Network if you did not configure a dedicated backup and restore network.
- Confirm the selections and click Finish to complete the process.
- Use the Recent Tasks panel to monitor the progress of the deployment.
Note: If you receive an error that the "OVF descriptor is not available," use Chrome browser.
- Once the Data Manager VM is deployed, configure the input parameters for the VM.
- Right-click the VM and select .
- In the Virtual Hardware tab, for CD/DVD Drive, change from Host Device to Client Device.
Note: If you do not do this, you cannot save the required advanced configuration settings.
- In the tab, select .
- Configure the input parameters for each of the following settings:
Parameter Value guestinfo.cnsdp.vcUserOner the vCenter Server user name with sufficient privileges to deploy VMs. guestinfo.cnsdp.vcAddressEnter the vCenter Server IP address or FQDN. guestinfo.cnsdp.vcPasswdEnter the vCenter Server user password. guestinfo.cnsdp.vcPortThe default is 443. Do not change this value. guestinfo.cnsdp.wcpControlPlaneIPEnter the Supervisor Cluster IP address. Get this value by navigating to the vCenter cluster where Workload Management is enabled and selecting
guestinfo.cnsdp.updateKubectlThe default is false. Do not change this value. guestinfo.cnsdp.veleroNamespaceThe default is velero and you should leave it as such unless you have a compelling reason to change it. Later in the process you will create a vSphere Namespace on the Supervisor Cluster with the name velero. These names must match.guestinfo.cnsdp.datamgrImageIf not configured (unset), the system by default will pull the container image from Docker Hub at vsphereveleroplugin/data-manager-for-plugin:1.1.0 - Click OK to save the configuration and OK again to save the VM settings.
Note: If you did not change the CD/DVD Drive from Host Device to Client Device, you cannot save the settings. If this is the case, cancel the operation, change the drive and repeat the advanced configuration settings.
- Do not power on the Data Manager VM until after you enable the Velero vSphere Operator (next section).
Install the Velero vSphere Operator Service on the Supervisor Cluster
vSphere with Tanzu provides the Velero vSphere Operator as a Supervisor Service. The Velero vSphere Operator service works with the Velero Plugin for vSphere to support backup and restore of Kubernetes workloads, including snapshotting persistent volumes. For more information about Supervisor Services, see Managing Supervisor Services with vSphere with Tanzu.
- Refer to the Compatability Chart to determine which version of the Velero vSphere Operator is appropriate for the version of vCenter Server.
- Download the YAML for the Velero vSphere Operator from the following location:
- From the vSphere Client home menu, select Workload Management.
- Select the Services tab.
- Select the target vCenter Server from the drop-down menu at the top.
- Drag and drop the service specification file that you downloaded to the Add New Service card.
Alternatively you can click Add and browse to and select the service specification file.
- Click Next and accept the licence agreement.
- Click Finish.
The Velero vSphere Operator is registered with vCenter Server. Verify that the service is in an Active state. You cannot install the service if it is Deactivated.
- Locate the Velero vSphere Operator specification in the Services tab.
- Click .
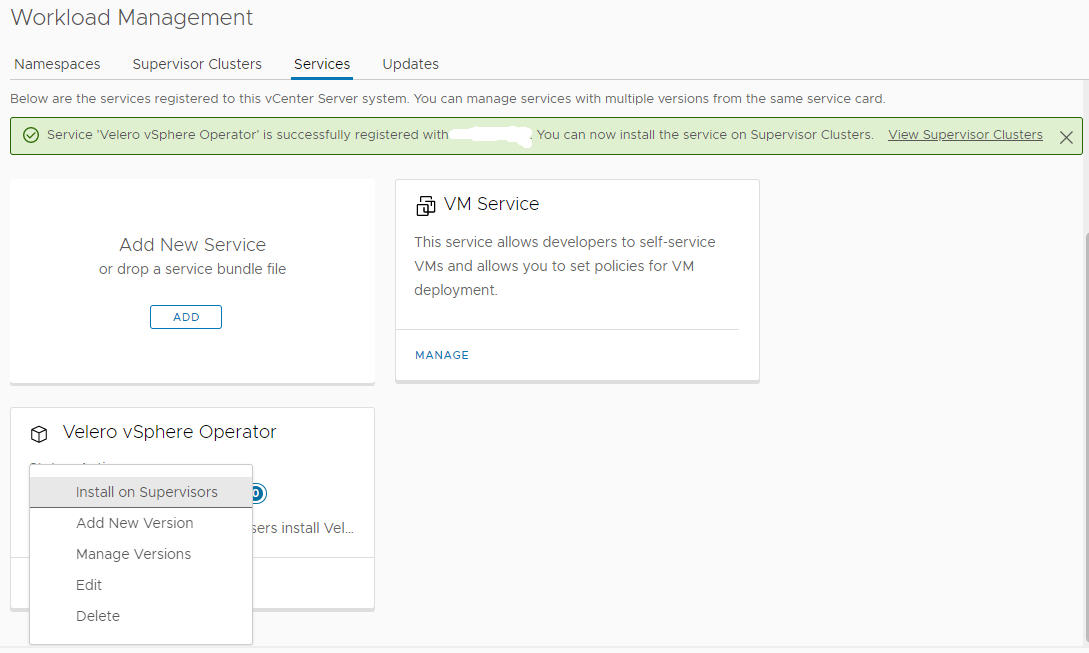
- Select the target Supervisor Cluster where you want to install the service.
Note: If you do not see your Supervisor Cluster, verify that you are using NSX-T networking.
- Configure the Velero vSphere Operator service installation as follows:
- Select the version from the drop-down: 1.1.0.
- Do not specify a Repository endpoint.
- Do not enter a username or password.
- Click Next.
- Click Finish to complete the installation of the service.
Verify the Velero vSphere Operator service on the Supervisor Cluster and start the Data Manager VM.
- From the vSphere Client home menu, select Inventory.
- Select the vCenter cluster where Workload Management is enabled.
- Select .
- Verify that you see the Velero vSphere Operator installed and its status is Configured.
- In the Namespaces resource pool, verify that you see a new namespace named
svc-velero-vsphere-domain-xxx, wherexxxis a unique alphanumeric token. This is the namespace created by the system for the Velero vSphere Operator.Note: You do not need to configure this namespace and you should not edit it. - In the Hosts and Clusters view, select the Data Manager VM.
- Right-click the Data Manager VM and power it on.
Create a vSphere Namespace for the Velero Plugin for vSphere
- Name the namespace velero.
- Select the velero namespace and configure it.
- Specify the Storage for the velero namespace.
- Grant a user with appropriate privileges the Edit permission on the velero namespace.
Install the Velero Plugin for vSphere
kubectl-vsphere and
kubectl CLIs.
- Refer to the Compatability Chart to determine which version of the Velero Plugin for vSphere is appropriate your environment.
- Download the Velero Plugin for vSphere CLI from the following location:
https://github.com/vmware-tanzu/velero-plugin-for-vsphere/releases
- Create a Linux VM where you can run the CLI. Or use an existing Linux jump host where you access the Supervisor Cluster.
- Securely copy the CLI to the Linux jump host. For example:
pscp -P 22 C:\temp\velero-vsphere-x.y.z-linux-amd64.tar.gz [email protected]:/home/ubuntu/tanzu
- Extract the
velero-vsphereCLI and make it writable.tar -xf velero-vsphere-x.y.z-linux-amd64.tar.gz chmod +x velero-vsphere
- Create the
s3-credentialsfile with the following contents.aws_access_key_id = ACCESS-KEY-ID-STRING aws_secret_access_key = SECRET-ACCESS-KEY-STRING
- Obtain the region, URL, and bucket name for your S3-compatible object store.
- Log in to the Supervisor Cluster using the vSphere Plugin for kubectl.
- Switch context to the Supervisor Cluster.
kubectl config use-context SUPERVISOR-CLUSTER-IP-ADDRESS
- In the velero namespace that you created, install a config map file that specifies SUPERVISOR as the flavor of the cluster where the Velero Plugin for vSphere will be installed.
% cat <<EOF | kubectl -n velero apply -f -
apiVersion: v1
kind: ConfigMap
metadata:
  name: velero-vsphere-plugin-config
data:
  cluster_flavor: SUPERVISOR
EOF
- Run the following
velero-vsphereCLI command to install the Velero Plugin for vSphere into the velero namespace.Replace the placeholder values for the BUCKET-NAME, REGION (two instances), and s3Url fields with the appropriate values. If you deviated from any of the preceding instructions, adjust those values as well, such as the name or location of the secrets file, the name of the manually created
veleronamespace, and so on../velero-vsphere install \ --namespace velero \ --image velero/velero:vX.Y.Z \ --provider aws \ --plugins velero/velero-plugin-for-aws:vX.Y.Z,vsphereveleroplugin/velero-plugin-for-vsphere:X.Y.Z \ --bucket BUCKET-NAME \ --secret-file s3-credentials \ --snapshot-location-config region=REGION \ --backup-location-config region=REGION,s3ForcePathStyle="true",s3Url=http://my-s3-store.example.comNote: Refer to the Compatability Chart to determine which version of the Velero Plugin for vSphere is appropriate your environment. - Verify successful installation of the Velero Plugin for vSphere.
On successful installation, you see the following message:
Send the request to the operator about installing Velero in namespace velero
Run the following command to further verify that you see "Completed" and the version.kubectl -n velero get veleroservice default -o json | jq '.status'
Expected result:{ "enabled": true, "installphase": "Completed", "version": "vX.Y.Z" }Note: The above command assumes you have thejqutility installed, which formats JSON output sent to the terminal. If you do not havejqinstalled, either install it or remove that part of the command (everything afterjson). - Troubleshoot as necessary.
If the installation is not successful, remove the installation and try again. To remove the installation, complete the steps in the next section in the order listed.
Install the Velero Plug-in in an Air-gapped Environment
If you plan to install the Velero Plugin for vSphere in an air-gapped environment, you must install it with customized images. You must make sure that the matching images of backup-driver and data-manager-for-plugin of the customized images are available in the expected private registry and are accessible from the Kubernetes cluster.
In an air-gapped environment, customized images from private registry are expected since the released images in docker hub are not accessible. You can use the embedded Harbor Registry to serve as the private container registry for the customized images. For more information, see Use the Embedded Harbor Registry with Tanzu Kubernetes Clusters.
- Download the released images of
velero-plugin-for-vsphere,backup-driver, anddata-manager-for-plugin. - Rename the images, that is, tag them with matching
<Registry endpoint and path>and<Version tag>and upload them in customized repositories. - You can deploy the Velero Plugin for vSphere with images in the following scenarios:
- When images are from the same private registry. To deploy the Velero Plugin for vSphere with images from a private registry, verify that you have provided the credentials of the registry while enabling the Velero vSphere Operator. You must also specify the
--use-private-registryoption in the install command. Install the plug-in using thevelero-plugin-for-vsphereimage you customized.For example, you can use the following velero-vsphere install command:BUCKET=velero-vX.Y.Z-backups REGION=minio NAMESPACE=velero S3URL=http://csm-minio.eng.vmware.com VSPHERE_PLUGIN_IMAGE=harbor-stg-repo.vmware.com/velerovsphereoperator/velero-plugin-for-vsphere:vX.Y.Z AWS_PLUGIN_IMAGE=harbor-stg-repo.vmware.com/velerovsphereoperator/velero-plugin-for-aws:vX.Y.Z VELERO_IMAGE=harbor-stg-repo.vmware.com/velerovsphereoperator/velero:vX.Y.Z # install velero in air-gapped environment velero-vsphere install \ --namespace $NAMESPACE \ --image $VELERO_IMAGE \ --provider aws \ --plugins $AWS_PLUGIN_IMAGE,$VSPHERE_PLUGIN_IMAGE \ --bucket $BUCKET \ --secret-file ~/.minio/credentials \ --snapshot-location-config region=$REGION \ --backup-location-config region=$REGION,s3ForcePathStyle="true",s3Url=$S3URL \ --use-private-registry # <====== Key Option to deploy Velero with images from private registryNote: Deploying the plug-in from a different private registry or not using the--use-private-registryin the install command results in a ImagePullBackOff error. - When images are in any public registry. You can deploy the Velero Plugin for vSphere instance with images from any other public registry, even if the Velero vSphere Operator is deployed with images from a private registry. Install the plug-in using the
velero-plugin-for-vsphereimage you customized.For example, you can use the following velero-vsphere install command:BUCKET=velero-vX.Y.Z-backups REGION=minio NAMESPACE=velero S3URL=http://csm-minio.eng.vmware.com VSPHERE_PLUGIN_IMAGE=harbor-repo.vmware.com/velero/velero-plugin-for-vsphere:vX.Y.Z AWS_PLUGIN_IMAGE=harbor-repo.vmware.com/velero/velero-plugin-for-aws:vX.Y.Z VELERO_IMAGE=harbor-repo.vmware.com/velero/velero:vX.Y.Z # install velero in air-gapped environment velero-vsphere install \ --namespace $NAMESPACE \ --image $VELERO_IMAGE \ --provider aws \ --plugins $AWS_PLUGIN_IMAGE,$VSPHERE_PLUGIN_IMAGE \ --bucket $BUCKET \ --secret-file ~/.minio/credentials \ --snapshot-location-config region=$REGION \ --backup-location-config region=$REGION,s3ForcePathStyle="true",s3Url=$S3URL
- When images are from the same private registry. To deploy the Velero Plugin for vSphere with images from a private registry, verify that you have provided the credentials of the registry while enabling the Velero vSphere Operator. You must also specify the
- When you install Velero Plugin for vSphere in a vanilla cluster, it deploys two additional components, that is, a
backup-driverdeployment and adata-manager-for-pluginDaemonSet in the background. In the Supervisor Cluster and Tanzu Kubernetes clusters, only abackup-driverdeployment is deployed.When you provide the container image of
velero-plugin-for-vsphere, the matchingbackup-driveranddata-manager-for-pluginimages are parsed using an image parsing mechanism.Container images are formalized into the following pattern:<Registry endpoint and path>/<Container name>:<Version tag>
When you provide the
velero-plugin-for-vspherecontainer image, the corresponding images ofbackup-driveranddata-manager-for-pluginwith matching<Registry endpoint and path>and<Version tag>are parsed.For example, consider the followingvelero-plugin-for-vspherecontainer image:abc.io:8989/x/y/.../z/velero-plugin-for-vsphere:vX.Y.Z
The following matching images ofbackup-driveranddata-manager-for-pluginare expected to be pulled:abc.io:8989/x/y/.../z/backup-driver:vX.Y.Z abc.io:8989/x/y/.../z/data-manager-for-plugin:vX.Y.Z
- Troubleshoot the installation.
If there are any issues or errors in parsing the matching images of
backup-driveranddata-manager-for-plugin, the installation falls back to corresponding images from the officialvelerovspherepluginrepositories in Docker hub. The following issues trigger the fall-back mechanism:- An unexpected container name is used in the customized
velero-plugin-for-vsphereimage in the user input.For example,
x/y/velero-velero-plugin-for-vsphere:vX.Y.Zis used. - The Velero deployment name is customized to anything other than
velero. For example, an issue is triggered if the Velero deployment name is updated tovelero-serverin the Veleromanifestsfile before deploying Velero.The existing image parsing mechanism in
velero-plugin-for-vspherecan only recognize the Velero deployment with the fixed name,velero.
- An unexpected container name is used in the customized
Uninstall the Velero Plugin for vSphere
- Run the
velero-vsphereCLI to uninstall the Velero Plugin for vSphere../velero-vsphere uninstall -n velero
- Verify that the vSphere Pod named
velerois removed.kubectl get pods -n velero
If you see that the pod is "Terminating," wait for it to be removed before proceeding.
- Using the vSphere Client, delete the vSphere Namespace named
velerothat you manually created.Note: Do not proceed with the next step until the namespace deletion is complete. You can use kubectl to verify that theveleronamespace is removed (but do not use kubectl to remove theveleronamespace). - Using the vSphere Client, uninstall the Velero vSphere Operator from the Supervisor Cluster.
- Select the vCenter cluster where Workload Management is enabled.
- Select .
- Select the Velero vSphere Operator.
- Click Uninstall.
This action uninstalls the Velero vSphere Operator from the Supervisor Cluster. The operator remains available for re-installation at the page. To remove the service entirely, select .
