


To provision a Tanzu Kubernetes cluster in an internet restricted ("air-gapped") environment, create a local content library and manually import each Tanzu Kubernetes release.
Prerequisites
Review About Tanzu Kubernetes release Distributions.
The following privileges are required to create a subscribed content library:
- or on the vCenter Server instance where you want to create the library.
- on the destination datastore.
Procedure
- Download the OVA files for each Tanzu Kubernetes release you want import to the local content library.
- Using a browser, navigate to the following URL:
- Click the directory for the image you want. Typically this directory is the latest or most recent version of the Kubernetes distribution.
For example:
ob-18186591-photon-3-k8s-v1.20.7---vmware.1-tkg.1.7fb9067
Note: The distribution name is needed to import the files to the local content library, so you might want to copy it to a file or keep the browser open until you complete the procedure. - For each of the following files, right-click and select Save link as.
photon-ova-disk1.vmdkphoton-ova.certphoton-ova.mfphoton-ova.ovf

- Verify that each file successfully downloads to your local file system.
Note: If the certificate and manifest file are not available in the source directory during the import process, the imported library item will not be usable. This means that for a local content library configured with a security policy, all four required files must be in the local directory from where the ovf and vmdk are imported. In addition to the ovf and vmdk files, you also need to download the cert and manifest files and put all four files in the same source directory. - Import the OVA files to the local content library.
- Select .
- From the list of Content Libraries, click the link for the name of the local content library you created.
- Click Actions.
- Select Import Item.
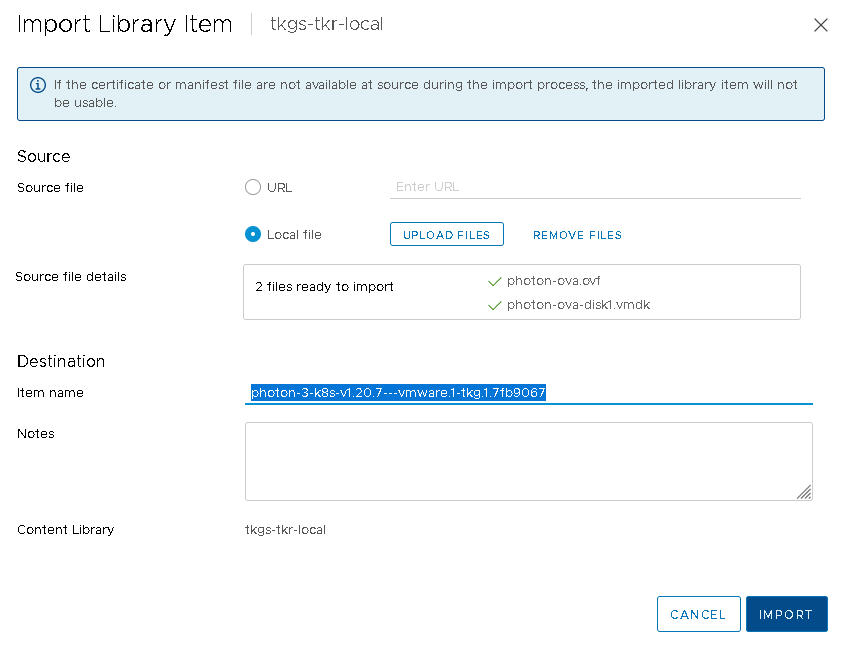
- In the Import Library Item window, select Local File.
- Click Upload Files.
- Select both files
photon-ova.ovfandphoton-ova-disk1.vmdk.You see the message2 files ready to import. Each file is listed with a green check mark beside its name. - Change the Destination Item name to be the Photon image version plus the Kubernetes version from the directory where you downloaded the files.
For example:
photon-3-k8s-v1.20.7---vmware.1-tkg.1.7fb9067
- Click Import.
- Verify that the local content library is populated with the Tanzu Kubernetes release.
- Reveal the Recent Tasks pane at the bottom of the page.
- Monitor the task Fetch Content of a Library Item and verify that it is successfully Completed.
- In the local content library, select .
- Verify that the Tanzu Kubernetes release metadata is listed and its content is stored locally.

What to do next
Configure each vSphere Namespace where you will provision Tanzu Kubernetes clusters by associating the content library and virtual machine classes with the namespace. See Configure a vSphere Namespace for Tanzu Kubernetes releases.
