


Scenario to set up and configure a working vSphere Auto Deploy environment by using PowerCLI.
In this scenario, you are going to set up and configure a working vSphere Auto Deploy environment that includes four hosts. You will create rules and provision two of the hosts with an image profile and the other two with the same image profile and a host profile that is set up to prompt for user input. This scenario can provide you with the basis for a production environment. The task descriptions assume that you are using a flat network with no VLAN tagging between the physical hosts and the rest of your environment.
- Experience with vSphere (vCenter Server and ESXi).
- Basic knowledge of Microsoft PowerShell and PowerCLI.
- Administrator rights to a Windows system and a vCenter Server system.
Follow the tasks in the order presented in this scenario. Some steps can be performed in a different order, but the order used here limits repeated manipulation of some components. For details on the preinstallation checklist and other prerequisites to configure vSphere Auto Deploy, see Install and Configure vSphere Auto Deploy.

vSphere Auto Deploy takes advantage of the iPXE infrastructure and PXE booting with legacy BIOS firmware is possible only over IPv4. If the hosts that you want to provision with vSphere Auto Deploy are with legacy BIOS, the vSphere Auto Deploy server must have an IPv4 address. PXE booting with UEFI firmware is possible with either IPv4 or IPv6.
Install the TFTP Server
To set up a vSphere Auto Deploy infrastructure, you must install a TFTP server in your environment. vSphere Auto Deploy relies on a TFTP server for sending a boot image to the hosts that it provisions.
This task only installs the TFTP server. You later download a configuration file to the server. See Configure the vSphere Auto Deploy and TFTP Environment in the vSphere Client.
Procedure
- Download your preferred TFTP server to a location that has network access to your vCenter Server and install the server.
- Configure the TFTP root directory, for example D:\TFTP_Root\.
What to do next
Install PowerCLI, to manage vSphere Auto Deploy with PowerCLI cmdlets.
Install PowerCLI
Before you can manage vSphere Auto Deploy with rules that you create with PowerCLI cmdlets, you must install PowerCLI.
Procedure
- ♦ Use the VMware PowerCLI User's Guide to learn about PowerShell basics, PowerCLI concepts, and how to install and configure PowerCLI.
What to do next
Configure the settings of your target hosts to prepare them for provisioning with vSphere Auto Deploy.
Prepare the vSphere Auto Deploy Target Hosts
You must configure the BIOS settings of the four hosts and reconfirm the MAC address of the primary network device to prepare the target hosts for provisioning with vSphere Auto Deploy.
Prerequisites
Hosts that you want to provision with vSphere Auto Deploy must meet the requirements for ESXi.
Procedure
- Change the BIOS settings of each of the four physical hosts to force the hosts to boot from the primary network device.
- Reconfirm the MAC address of the primary network device.
What to do next
Set up the DHCP server to serve each target host with an iPXE binary.
Prepare the DHCP Server for vSphere Auto Deploy Provisioning
When you prepare the vSphere Auto Deploy target hosts, you must set up the DHCP server in this scenario to serve each target host with an iPXE binary.
The environment in this scenario uses Active Directory with DNS and DHCP. The DHCP server is included in the vSphere supported Windows Server versions.
Procedure
- Log in to your DHCP Server with administrator privileges.
- Create a DHCP scope for your IP address range.
- Click Start > Settings > Control Panel > Administrative Tools and click DHCP.
- Navigate to .
- Right-click IPv4 and select New Scope.
- On the Welcome screen, click Next, and specify a name and description for the scope.
- Specify an IP address range and click Next.
- Click Next until you reach the Configure DHCP Options screen and select No, I will configure this option later.
- Create a DHCP reservation for each target ESXi host.
- In the DHCP window, navigate to .
- Right-click Reservations and select New Reservation.
- In the New Reservation window, specify a name, IP address, and the MAC address for one of the hosts. Do not include the colon (:) in the MAC address.

- Repeat the process for each of the other hosts.
- Set up the DHCP Server to point the hosts to the TFTP Server.
- In the DHCP window, navigate to .
- Right click Scope Options and choose Configure Options.
- In the Scope Options window, click the General tab.
- Click 066 Boot Server Host Name and enter the address of the TFTP server that you installed in the String value field below the Available Options.
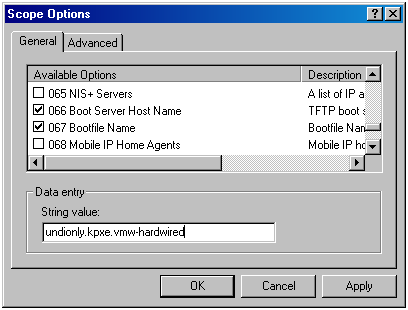
- Click 067 Bootfile Name and enter undionly.kpxe.vmw-hardwired.
The undionly.kpxe.vmw-hardwired iPXE binary will be used to boot the ESXi hosts.
- Click Apply and click OK to close the window.
- In the DHCP window, right-click and click Activate.
- Do not log out from the DHCP Server if you are using Active Directory for DHCP and DNS, or log out otherwise.
What to do next
start the vCenter Server service of vSphere Auto Deploy and configure the TFTP server.
Configure the vSphere Auto Deploy and TFTP Environment in the vSphere Client
After you prepare the DHCP server, you must start the vSphere Auto Deploy vCenter Server service and configure the TFTP server. You must download a TFTP ZIP file from your vSphere Auto Deploy server. The customized FTP server serves the boot images that vSphere Auto Deploy provides.
Procedure
- Use the vSphere Client to connect to the vCenter Server system that manages the vSphere Auto Deploy server.
- Start the vSphere Auto Deploy service.
- Navigate to .
- On the Auto Deploy page, select your vCenter Server from the drop-down menu at the top.
- Click Enable Auto Deploy and Image Builder to activate the service.
If the Image Builder service is already active, select the Configure tab and click Enable Auto Deploy Service.
- In the Auto Deploy inventory, click the Configure tab.
- Click the Download TFTP Zip File.
- Save the file deploy-tftp.zip to the TFTP_Root directory that you created when you installed the TFTP Server, and unzip the file.
What to do next
Add a software depot to your inventory and use an image profile from the depot to create a rule for host provisioning.
Prepare the ESXi Software Depot and Write a Rule
After you configure the vSphere Auto Deploy infrastructure, you must add an ESXi software depot, specify an image profile, write a rule, and add it to the active rule set.
vSphere Auto Deploy provisions hosts with image profiles that define the set of VIBs that an ESXi installation process uses. Image profiles are stored in software depots. You must make sure that the correct image profile is available before you start provisioning hosts. When you add a software depot to a PowerCLI session, it is available only during the current session. It does not persist across sessions.
The steps in this task instruct you to run PowerCLI cmdlets. For additional information about the vSphere Auto Deploy cmdlets that you can run in a PowerCLI session, see vSphere Auto Deploy PowerCLI Cmdlet Overview.
Prerequisites
Verify that you can access the ESXi hosts that you want to provision from the system on which you run PowerCLI.
Procedure
What to do next
Provision your first host with vSphere Auto Deploy and verify its image provisioning.
Provision the First Host with vSphere Auto Deploy
After creating a rule and adding it to the active rule set, you can provision the first host and check its vCenter Server location to complete verification of the image provisioning of your setup.
Procedure
What to do next
Extract a host profile from the host and configure it to require user input.
Extract and Configure a Host Profile from the Reference Host
After provisioning the first host, you can extract and configure a host profile that can be used to apply the same configuration to other target hosts. Configuration that differs for different hosts, such as a static IP address, can be managed through the host customization mechanism.
vSphere Auto Deploy can provision each host with the same host profile. vSphere Auto Deploy can also use host customization that allows you to specify different information for different hosts. For example, if you set up a VMkernel port for vMotion or for storage, you can specify a static IP address for the port by using the host customization mechanism.
Procedure
- Use the vSphere Client to connect to the vCenter Server system that manages the vSphere Auto Deploy server.
- Click Policies and Profiles and select Host Profiles.
- Click Extract Host Profile.
- On the Select host page of the wizard, select the reference host that you configured earlier and click Next.
- On the Name and Description page of the wizard, enter a name and description for the new profile and click Finish.
- Select the host profile that you want to edit and click the Configure tab.
- Click Edit Host Profile.
- Select .
- From the Password drop-down menu, select User Input Password Configuration.
- Click Save to configure the host profile settings.
What to do next
Create a vSphere Auto Deploy rule to apply the host profile to other ESXi hosts.
Create a Rule that Provisions Hosts from a Specific IP Range
After creating a host profile from a reference host, you can create a rule that applies the previously verified image profile and the host profile that you extracted to target hosts from a specific IP range.
Procedure
What to do next
Provision the hosts and set up the host customizations.
Provision Hosts and Set Up Host Customizations
With the rule in place that provisions hosts using an image profile and a host profile, you can provision specific target hosts. If any host profile items are set to prompt the user for input, the host comes up in maintenance mode. You apply the host profile or check host compliance to be prompted for the information. The system associates the host customization with the host.
