


A resource pool is a logical abstraction for flexible management of resources. Resource pools can be grouped into hierarchies and used to hierarchically partition available CPU and memory resources.
Each standalone host and each DRS cluster has an (invisible) root resource pool that groups the resources of that host or cluster. The root resource pool does not appear because the resources of the host (or cluster) and the root resource pool are always the same.
Users can create child resource pools of the root resource pool or of any user-created child resource pool. Each child resource pool owns some of the parent’s resources and can, in turn, have a hierarchy of child resource pools to represent successively smaller units of computational capability.
A resource pool can contain child resource pools, virtual machines, or both. You can create a hierarchy of shared resources. The resource pools at a higher level are called parent resource pools. Resource pools and virtual machines that are at the same level are called siblings. The cluster itself represents the root resource pool. If you do not create child resource pools, only the root resource pools exist.
In the following example, RP-QA is the parent resource pool for RP-QA-UI. RP-Marketing and RP-QA are siblings. The three virtual machines immediately below RP-Marketing are also siblings.

For each resource pool, you specify reservation, limit, shares, and whether the reservation should be expandable. The resource pool resources are then available to child resource pools and virtual machines.
Why Use Resource Pools?
Resource pools allow you to delegate control over resources of a host (or a cluster), but the benefits are evident when you use resource pools to compartmentalize all resources in a cluster. Create multiple resource pools as direct children of the host or cluster and configure them. You can then delegate control over the resource pools to other individuals or organizations.
Using resource pools can result in the following benefits.
- Flexible hierarchical organization—Add, remove, or reorganize resource pools or change resource allocations as needed.
- Isolation between pools, sharing within pools—Top-level administrators can make a pool of resources available to a department-level administrator. Allocation changes that are internal to one departmental resource pool do not unfairly affect other unrelated resource pools.
- Access control and delegation—When a top-level administrator makes a resource pool available to a department-level administrator, that administrator can then perform all virtual machine creation and management within the boundaries of the resources to which the resource pool is entitled by the current shares, reservation, and limit settings. Delegation is usually done in conjunction with permissions settings.
- Separation of resources from hardware—If you are using clusters enabled for DRS, the resources of all hosts are always assigned to the cluster. That means administrators can perform resource management independently of the actual hosts that contribute to the resources. If you replace three 2GB hosts with two 3GB hosts, you do not need to make changes to your resource allocations.
This separation allows administrators to think more about aggregate computing capacity and less about individual hosts.
- Management of sets of virtual machines running a multitier service— Group virtual machines for a multitier service in a resource pool. You do not need to set resources on each virtual machine. Instead, you can control the aggregate allocation of resources to the set of virtual machines by changing settings on their enclosing resource pool.
For example, assume a host has a number of virtual machines. The marketing department uses three of the virtual machines and the QA department uses two virtual machines. Because the QA department needs larger amounts of CPU and memory, the administrator creates one resource pool for each group. The administrator sets CPU Shares to High for the QA department pool and to Normal for the Marketing department pool so that the QA department users can run automated tests. The second resource pool with fewer CPU and memory resources is sufficient for the lighter load of the marketing staff. Whenever the QA department is not fully using its allocation, the marketing department can use the available resources.
The numbers in the following figure show the effective allocations to the resource pools.

Create a Resource Pool
You can create a child resource pool of any ESXi host, resource pool, or DRS cluster.
Prerequisites
The vSphere Client is connected to the vCenter Server system.
Procedure
Results
Example: Creating Resource Pools
Assume that you have a host that provides 6GHz of CPU and 3GB of memory that must be shared between your marketing and QA departments. You also want to share the resources unevenly, giving one department (QA) a higher priority. This can be accomplished by creating a resource pool for each department and using the Shares attribute to prioritize the allocation of resources.
The example shows how to create a resource pool with the ESXi host as the parent resource.
- In the New Resource Pool dialog box, type a name for the QA department’s resource pool (for example, RP-QA).
- Specify Shares of High for the CPU and memory resources of RP-QA.
- Create a second resource pool, RP-Marketing.
Leave Shares at Normal for CPU and memory.
- Click OK.
If there is resource contention, RP-QA receives 4GHz and 2GB of memory, and RP-Marketing 2GHz and 1GB. Otherwise, they can receive more than this allotment. Those resources are then available to the virtual machines in the respective resource pools.
Edit a Resource Pool
After you create the resource pool, you can edit its CPU and memory resource settings.
Procedure
- Browse to the resource pool in the vSphere Client.
- Select Edit Resource Settings from the Actions drop-down menu.
- (Optional) You can change all attributes of the selected resource pool as described in Create a Resource Pool.
- Select the checkbox if you want to enable sclalable shares.
Note: Shares are scaled at the parent level. All descendant resource pools created from a parent with scalable shares have scalable shares by default.
- Under CPU, select CPU resource settings.
- Under Memory, select memory resource settings.
- Select the checkbox if you want to enable sclalable shares.
- Click OK to save your changes.
Add a Virtual Machine to a Resource Pool
When you create a virtual machine, you can specify a resource pool location as part of the creation process. You can also add an existing virtual machine to a resource pool.
- The virtual machine’s reservation and limit do not change.
- If the virtual machine’s shares are high, medium, or low, %Shares adjusts to reflect the total number of shares in use in the new resource pool.
- If the virtual machine has custom shares assigned, the share value is maintained.
Note: Because share allocations are relative to a resource pool, you might have to manually change a virtual machine’s shares when you move it into a resource pool so that the virtual machine’s shares are consistent with the relative values in the new resource pool. A warning appears if a virtual machine would receive a very large (or very small) percentage of total shares.
- Under Monitor, the information displayed in the Resource Reservation tab about the resource pool’s reserved and unreserved CPU and memory resources changes to reflect the reservations associated with the virtual machine (if any).
Note: If a virtual machine has been powered off or suspended, it can be moved but overall available resources (such as reserved and unreserved CPU and memory) for the resource pool are not affected.
Procedure
- Browse to the virtual machine in the vSphere Client.
- To find a virtual machine, select a data center, folder, cluster, resource pool, or host.
- Click the VMs tab.
- Right-click the virtual machine and click Migrate.
- You can move the virtual machine to another host.
- You can move the virtual machine's storage to another datastore.
- You can move the virtual machine to another host and move its storage to another datastore.
- Select a resource pool in which to run the virtual machine.
- Review your selections and click Finish.
Results
If a virtual machine is powered on, and the destination resource pool does not have enough CPU or memory to guarantee the virtual machine’s reservation, the move fails because admission control does not allow it. An error dialog box displays available and requested resources, so you can consider whether an adjustment might resolve the issue.
Remove a Virtual Machine from a Resource Pool
You can remove a virtual machine from a resource pool either by moving the virtual machine to another resource pool or deleting it.
When you remove a virtual machine from a resource pool, the total number of shares associated with the resource pool decreases, so that each remaining share represents more resources. For example, assume you have a pool that is entitled to 6GHz, containing three virtual machines with shares set to Normal. Assuming the virtual machines are CPU-bound, each gets an equal allocation of 2GHz. If one of the virtual machines is moved to a different resource pool, the two remaining virtual machines each receive an equal allocation of 3GHz.
Procedure
- Browse to the resource pool in the vSphere Client.
- Choose one of the following methods to remove the virtual machine from a resource pool.
- Right-click the virtual machine and select Move To... to move the virtual machine to another resource pool.
You do not need to power off the virtual machine before you move it.
- Right-click the virtual machine and select Delete from Disk.
You must power off the virtual machine before you can completely remove it.
- Right-click the virtual machine and select Move To... to move the virtual machine to another resource pool.
Remove a Resource Pool
You can remove a resource pool from the inventory.
Procedure
Resource Pool Admission Control
When you power on a virtual machine in a resource pool, or try to create a child resource pool, the system performs additional admission control to ensure the resource pool’s restrictions are not violated.
Before you power on a virtual machine or create a resource pool, ensure that sufficient resources are available using the Resource Reservation tab in the vSphere Client. The Available Reservation value for CPU and memory displays resources that are unreserved.
How available CPU and memory resources are computed and whether actions are performed depends on the Reservation Type.
| Reservation Type | Description |
|---|---|
| Fixed | The system checks whether the selected resource pool has sufficient unreserved resources. If it does, the action can be performed. If it does not, a message appears and the action cannot be performed. |
| Expandable (default) |
The system considers the resources available in the selected resource pool and its direct parent resource pool. If the parent resource pool also has the Expandable Reservation option selected, it can borrow resources from its parent resource pool. Borrowing resources occurs recursively from the ancestors of the current resource pool as long as the Expandable Reservation option is selected. Leaving this option selected offers more flexibility, but, at the same time provides less protection. A child resource pool owner might reserve more resources than you anticipate. |
The system does not allow you to violate preconfigured Reservation or Limit settings. Each time you reconfigure a resource pool or power on a virtual machine, the system validates all parameters so all service-level guarantees can still be met.
Expandable Reservations Example 1
This example shows you how a resource pool with expandable reservations works.
Assume an administrator manages pool P, and defines two child resource pools, S1 and S2, for two different users (or groups).
The administrator knows that users want to power on virtual machines with reservations, but does not know how much each user will need to reserve. Making the reservations for S1 and S2 expandable allows the administrator to more flexibly share and inherit the common reservation for pool P.
Without expandable reservations, the administrator needs to explicitly allocate S1 and S2 a specific amount. Such specific allocations can be inflexible, especially in deep resource pool hierarchies and can complicate setting reservations in the resource pool hierarchy.
Expandable reservations cause a loss of strict isolation. S1 can start using all of P's reservation, so that no memory or CPU is directly available to S2.
Expandable Reservations Example 2
This example shows how a resource pool with expandable reservations works.
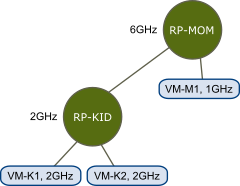
Assume the following scenario, as shown in the figure.
- Parent pool RP-MOM has a reservation of 6GHz and one running virtual machine VM-M1 that reserves 1GHz.
- You create a child resource pool RP-KID with a reservation of 2GHz and with Expandable Reservation selected.
- You add two virtual machines, VM-K1 and VM-K2, with reservations of 2GHz each to the child resource pool and try to power them on.
- VM-K1 can reserve the resources directly from RP-KID (which has 2GHz).
- No local resources are available for VM-K2, so it borrows resources from the parent resource pool, RP-MOM. RP-MOM has 6GHz minus 1GHz (reserved by the virtual machine) minus 2GHz (reserved by RP-KID), which leaves 3GHz unreserved. With 3GHz available, you can power on the 2GHz virtual machine.
Figure 3. Admission Control with Expandable Resource Pools: Successful Power-On
Now, consider another scenario with VM-M1 and VM-M2.
- Power on two virtual machines in RP-MOM with a total reservation of 3GHz.
- You can still power on VM-K1 in RP-KID because 2GHz are available locally.
- When you try to power on VM-K2, RP-KID has no unreserved CPU capacity so it checks its parent. RP-MOM has only 1GHz of unreserved capacity available (5GHz of RP-MOM are already in use—3GHz reserved by the local virtual machines and 2GHz reserved by RP-KID). As a result, you cannot power on VM-K2, which requires a 2GHz reservation.
Figure 4. Admission Control with Expandable Resource Pools: Power-On Prevented

