


You can move a vCenter Server from one vSphere domain to another vSphere domain. Services such as tagging and licensing are retained and migrated to the new domain.
- You can migrate a vCenter Server from an existing domain to an another existing domain with or without replication. The migrated vCenter Server moves from its current Single Sign-On domain and joins the other existing domain as another vCenter Server connected via enhanced linked mode.
- See Repoint a Single vCenter Server Node to an Existing Domain without a Replication Partner for instructions on repointing a single embedded node from one domain to an existing domain without a replication partner.
- See Repoint a vCenter Server Node to an Existing Domain with a Replication Partner for instructions on repointing an embedded node from one domain to an existing domain using replication.
- You can migrate a vCenter Server from an existing domain to a newly created domain (where the migrated vCenter Server is the first instance). See Repoint a vCenter Server Node to a New Domain for instructions of this type of repointing. In this case, there is no replication partner.
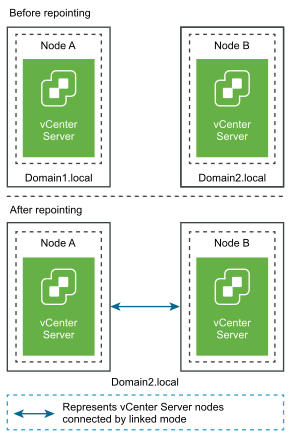
Repoint a Single vCenter Server Node to an Existing Domain without a Replication Partner
You can repoint a single vCenter Server from one Single Sign-On domain to an existing Single Sign-On domain without a replication partner. Each Single Sign-On domain contains a single vCenter Server.
Prerequisites
- Repointing is only supported with vCenter Server 6.7 Update 1 and later.
- You must repoint to a vCenter Server that is of the same version and nodes that are of the same version and build number.
- To ensure no loss of data, take a file-based backup of each node before proceeding with repointing the vCenter Server.
Procedure
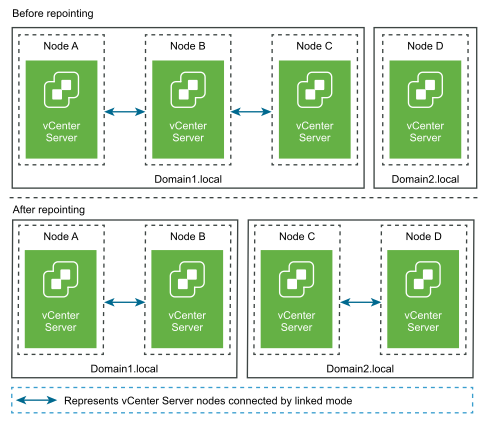
Repoint a vCenter Server Node to an Existing Domain with a Replication Partner
You can repoint a vCenter Server from one Single Sign-On domain to an existing domain using a replication partner.
Prerequisites
- Repointing is only supported with vCenter Server 6.7 Update 1 and later.
- You must repoint to a vCenter Server that is of the same version and nodes that are of the same version and build number.
- To ensure no loss of data, take a file-based backup of each node before proceeding with repointing the vCenter Server.
Procedure
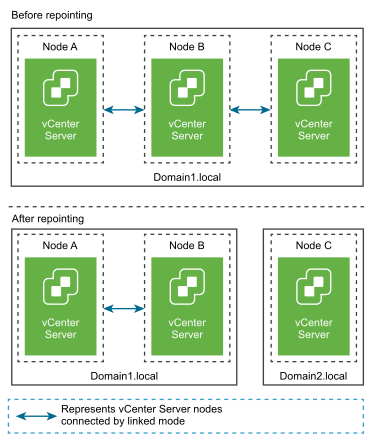
Repoint a vCenter Server Node to a New Domain
You can repoint a vCenter Server from an existing domain to a newly created domain.
Prerequisites
- Repointing is only supported with vCenter Server 6.7 Update 1 and later.
- You must repoint to a vCenter Server that is of the same version and nodes that are of the same version and build number.
- To ensure no loss of data, take a file-based backup and a snapshot in powered-off state of each node before proceeding with repointing the vCenter Server.
Procedure
Syntax of the Domain Repoint Command
You can use command arguments to set the execution parameters of the domain-repoint command.
The cmsso-util domain-repoint CLI repoints vCenter Server from one domain to another.
You can add a space-separated list of arguments to the CLI repoint command
cmsso-util domain-repoint -m execute --src-emb-admin Administrator --replication-partner-fqdn FQDN _of_destination_node --replication-partner-admin destination_node_PSC_Admin_user_name --dest-domain-name destination_PSC_domain
| Argument | Description |
|---|---|
| -m, --mode | mode can be pre-check or execute. The pre-check argument runs the command in pre-check mode. The execute argument runs the command in execute mode. |
| -spa, --src-psc-admin | SSO administrator user name for the source vCenter Server. Do not append the @domain. |
| -dpf, --dest-psc-fqdn | The FQDN of the vCenter Server to repoint. |
| -dpa, --dest-psc-admin | SSO administrator user name for the destination vCenter Server. Do not append @domain. |
| -ddn, --dest-domain-name | SSO domain name of the destination vCenter Server. |
| -dpr, --dest-psc-rhttps | (Optional) HTTPS port for the destination vCenter Server. If not set, the default 443 is used. |
| -dvf, --dest-vc-fqdn | The FQDN of the vCenter Server pointing to a destination vCenter Server. The vCenter Server is used to check for component data conflicts in the pre-check mode. If not provided, conflict checks are skipped and the default resolution (COPY) is applied for any conflicts found during the import process.
Note: This argument is optional only if the destination domain does not have a
vCenter Server. If a
vCenter Server exists in the destination domain, this argument is mandatory.
|
| -sea, --src-emb-admin | Administrator for the vCenter Server with embedded vCenter Server. Do not append @domain to the administrator id. |
| -rpf, --replication-partner-fqdn | (Optional) The FQDN of the replication partner node to which the vCenter Server is replicated. |
| -rpr, --replication-partner-rhttps | (Optional) The HTTPS port for the replication node. If not set, the default is 443. |
| -rpa, --replication-partner-admin | (Optional) SSO administrator user name of the replication partner vCenter Server. |
| -dvr, --dest-vc-rhttps | (Optional) The HTTPS port for the vCenter Server pointing to the destination vCenter Server. If not set, the default 443 is used. |
| --ignore-snapshot | (Optional) Ignore snapshot warnings. |
| --no-check-certs | (Optional) Ignore certification validations. |
| --debug | (Optional) Retrieves command execution detail. |
| -h, --help | (Optional) Displays the help message for the cmsso-util domain repoint command. |
Understanding Tagging and Authorization Conflicts
When you run the domain repoint command in pre-check mode, data from the vCenter Server is exported, examined, and conflicts are written to a file.
The following data is exported to the /storage/domain-data/ or ProgramData/VMWare/vCenterServerdata/domain-data folder:
- All_Privileges.json
- All_Roles.json
- All_TagCategories.json
- All_Tags.json
These files contain the all the data (Authorization and Tagging) from the vCenter Server on which this command was run.
If a secondary vCenter Server is provided using the -dvf or --dest-vc-fqdn option, any conflicts are also exported to the same folder:
- Conflicts_Roles.json
- Conflicts_TagCategories.json
- Conflicts_Tags.json
The following is a sample conflicts file:
<---- Sample Conflict file code block --->
	 {
  "global" : {
    "resolution" : "MERGE|SKIP|COPY",
    "description" : "Default resolution option used to resolve Role Conflicts is COPY. The
conflicts list describes the differences between Role entities on source and target vCenter Server. If
the source information represents an empty JSON array, it simply means that all the entity
attributes from source and target are identical. If the source lists few entries, it means
that only these entity attributes are missing from the target. If the target lists few entries,
it means that only these entity attributes are missing from the source. Though a global resolution
can be set, it can also be overridden at each conflict level by providing individual resolution
mode."
  },
  "conflicts-count" : 1,
  "conflicts-list" : {
    "NoCryptoAdmin" : {
      "source" : {
        "privileges" : "[]"
      },
      "target" : {
        "privileges" : "[Group-1.SamplePriv-1, Group-1.SamplePriv-4, Group-2.SamplePriv-10,
Group-2.SamplePriv-3, Group-2.SamplePriv-7, Group-3.SamplePriv-2, Group-3.SamplePriv-9]"
      },
      "resolution" : ""
    }
}
<----- End of code block --->
The parts of the sample conflict files are:
description. Provides the details on how the respective conflicts file is read and understood.sourceandtarget. JSON objects that list only the differences between the source and target vCenter Server objects.resolution. User supplies one valid resolution. Valid resolutions areMERGE,COPY, andSKIP.
To specify the resolution for handling conflicts, you can provide a default resolution option all conflicts in the "global": "resolution" = "MERGE|SKIP|COPY" section. If you do not provide a valid global resolution type for resolution or leave it unedited, the system uses COPY as the default resolution option.
You can also provide a valid resolution option for each of the conflicts by editing the resolution property at each conflict level which overrides the global resolution option.
The types of conflicts listed in Conflict Types.
| Conflict | Properties used to compare Category Objects | Conflict Types | Conflicting Properties | Conflict Resolution Options |
|---|---|---|---|---|
| Role conflict |
|
|
Properties that can be conflicting for RoleName conflict type can be Privileges. |
|
| Tag Category conflict: A category name must be unique in a vCenter Server. |
|
Only one type of conflict can be seen while importing Tag Categories, CategoryName conflict. This conflict indicates that a category with the same name exists in the target vCenter Server but with different properties (cardinality or associableEntityType). |
Properties that can be conflicting for conflict type CategoryName can be at least one of two types: Cardinality or AssociableTypes. |
|
Tags Conflict: A tag object always belongs to a category Object. A tag Name must be unique only inside a category. |
|
Only one type of conflict can be seen while importing tags: TagName conflict. This conflict indicates that a Tag with the same name exists under the same category and in the target vCenter Server but with different properties. |
Properties that can be conflicting for a conflict of type: TagName can be Description. |
|
vCenter Server Domain Repoint License Considerations
Domain repointing copies license keys to a new domain. Copying the license keys ensures that valid licensing of all assets is maintained after repointing.
vCenter Server tracks license usage on a per domain basis. If a key is used in more than one domain, you must ensure that the aggregate use of the key does not exceed its capacity. To simplify your license management, remove each license copied to a second domain and assign a new license to assets.
- License keys that are no longer in use (that is, assigned to assets) in the original domain post repointing.
- License keys that are in use (that is, assigned to assets) in multiple domains.
License Keys Not in Use in a Domain
If after completing repointing, a license key appears in more than one domain, but is not in use in some of those domains, you can remove the license key from any domain in which it is not in use. See "Remove Licenses" in vCenter Server and Host Management for instructions on how to remove the licenses in vCenter Server.
License Keys in Use in Multiple Domains
- If you have other license keys available with sufficient unused capacity, you might use these other keys in place of a license key to be removed. See "Assign a License to Multiple Assets" in vCenter Server and Host Management to assign licenses in vCenter Server.
- You might divide the license keys used in more than one domain into separate license keys, one for each domain. To divide the license keys, see the VMware knowledge base article at http://kb.vmware.com/kb/2006972. To determine the capacity to be included in each of the license keys into which the original is divided, see "Viewing Licensing Information" in vCenter Server and Host Management to view the usage of the license key in vCenter Server for each of the domains.
Each of the resulting license keys can then be added to a different domain and assigned in vCenter Server to assets previously licensed with the original license key. See "Create New Licenses" in vCenter Server and Host Management to create licenses and "Assign a License to Multiple Assets" in vCenter Server and Host Management to assign a license to multiple assets.
After different licenses are assigned to all assets, the original license key, which is no longer valid, can be removed from all the domains using vCenter Server. See "Remove Licenses" vCenter Server and Host Management.
