


To use vSGA you must configure the ESXi host and setup the VM.
Configure the ESXi host
To enable vSGA feature, configure the ESXi host by performing the following high-level steps.
Prerequisites
Verify that the ESXi host is compatible with ESXi 8.0 Update 2 or later.
Procedure
- Install the graphics card on the ESXi host.
- Place the host in maintenance mode. For more information, see Place a Host in Maintenance Mode.
- Install the associated GPU graphics card VIB files on the host. For example, run the following ESXCLI command.
esxcli software vib install -v $PWD/VendorName-vsga-driver_x.y.z-1OEM.a.b.c.vib - In the vSphere Client, verify that the GPU graphics card is in Shared mode.
- Select the host and navigate to .
- Click the Graphics Device tab and check the Configured Type column.
- To change the vGPU Mode, select the graphics card and click Edit.
The Edit Graphics Device Settings window appears.
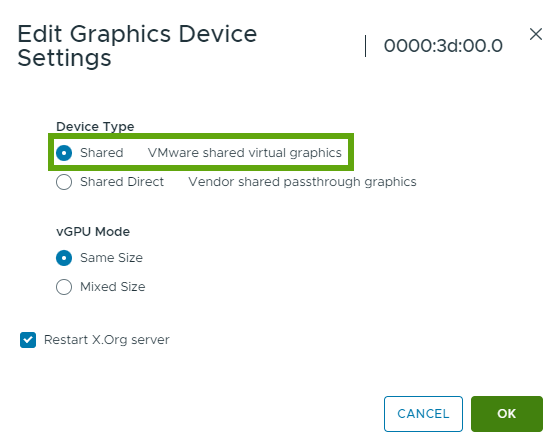
- Select Shared and click OK.
- Reboot the host and exit the maintenance mode.
- To verify that at least one driver VM starts, from the SSH terminal, run the
crx-cli listcommand.
Setup the Virtual Machine General Settings
After you configure the ESXi host, you must setup the VM general settings.
Prerequisites
- Verify that the VM is powered off.
- Verify that the VM is not suspended.
Procedure
- Right-click a VM in the inventory and select Edit Settings.
| Setting | Description |
|---|---|
| Hardware Version | Make sure that the VM is of the latest hardware version that all hosts support.
|
| CPU | The required number of CPUs depend on the usage and is determined by the actual workload. To obtain optimal performance, allocate 2 virtual CPUs to the VM. |
| Memory | The virtual hardware memory size depends on the usage and the number of applications that are running inside the VM. Set the memory size of the VM to
|
| Network Adapter | Select the VMXNET 3 adapter type. |
| SCSI Controller | Select the LSI Logic SAS controller type. For the highest workloads using local flash-based storage, use VMware Paravirtual. |
| Other Devices | Remove all devices that are not used, such as COM, LTP, DVD, or floppy. |
Configure a VM for Enabling vSGA
To enable vSGA, configure the VM by performing the following high-level steps.
Procedure
- To enable 3D graphics, select the Enable 3D Support check box. For more information, see How do I Configure 3D Graphics.
- Set 3D Renderer to Automatic or Hardware.
- Select the size of the graphics 3D Memory.
- 512 MB if the VM runs basic productivity applications.
- 2048 MB if the VM runs 3D applications. For maximum consolidation, set the 3D Memory size to the minimum required by the guest OS applications. Guest operating systems typically cannot use more graphics memory than half of the available system memory. Therefore, to run larger graphics workloads, you must increase the Guest OS memory.
Configure a Windows VM for vSGA
After you configure the general settings for a VM, download and install the corresponding VMware Tools version in the VM.
Procedure
- Install VMware Tools. For more information, see Installing VMware Tools.
- Restart the VM and run dxdiag.exe.
- Click the Display tab. You should see the following parameters.
Table 2. Device panel and Driver panel parameters Device Panel Drivers Panel - Name: VMware SVGA 3D
- Device Type: Full Display Device
- Direct3D DDI: 11.1
- Feature levels: 11_0, 10_1, 10_0, 9_3, 9_2, 9_1
- Driver Model: WDDM 1.2
| VMware Tools Version | Max WDDM Version | Max DirectX Version | Max OpenGL Version |
|---|---|---|---|
| VMware Tools 10.0 | WDDM 1.0 | DirectX 10.0 | OpenGL 3.3 |
| VMware Tools 10.3.2 | WDDM 1.0 | DirectX 10.1 | OpenGL 3.3 |
| VMware Tools 11.1.5 | WDDM 1.1 | DirectX 11.0 | OpenGL 4.1 |
| VMware Tools 12.0 | WDDM 1.2 | DirectX 11.0 | OpenGL 4.3 |
Configure a Linux VM for vSGA
After you configure the general settings for a VM, install Open VM Tools (open-vm-tools) in the Linux VM.
Procedure
- Install Open VM Tools. For more information, see Install Open VM Tools.
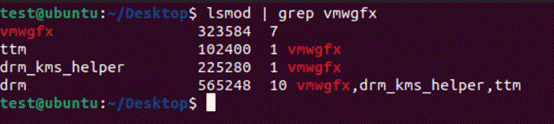
- Verify that the VMware graphics driver is installed.
- To make sure that OpenGL applications work in the VM, install Mesa in the VM and verify that the OpenGL version is 3.3 or later.
For example, run the following command
glxinfo | grep "OpenGL version". - Verify the vmwgfx drm (direct rendering manager) driver version by using the drm_info tool.
For example, run the following script.
drm_info | head -n 2
Node: /dev/dri/card0
───Driver: vmwgfx (Linux drm driver for VMware graphics devices) version 2.20.0 (20211206)
Table 4. Linux DRM, Mesa, and OpenGL versions Linux DRM Version Mesa Version OpenGL Version DRM 2.9 Mesa 11.1.0 OpenGL 3.3 DRM 2.18 Mesa 20.2.0 OpenGL 4.1 DRM 2.20 Mesa 22.0.0 OpenGL 4.3
