


This topic tells you how to integrate Microsoft Entra ID as an identity provider for a Single Sign‑On for VMware Tanzu Application Service plan, by configuring OpenID Connect (OIDC) in both Single Sign‑On and Microsoft Entra ID.
Overview
Microsoft Entra ID is Microsoft’s multi-tenant cloud-based directory and identity management service. It is one of several identity providers you can use in a Single Sign‑On service plan.
To set up the integration:
- Set up a Relying Party in Microsoft Entra ID
- Locate the OIDC Metadata
- Set up the OIDC Identity Provider in Single Sign‑On
Prerequisites
Before you can set up a relying party in Microsoft Entra ID, you must:
- Meet the prerequisites listed in the Microsoft Entra ID OIDC Integration Guide Overview.
- Create a Service Plan in Single Sign‑On. This is required to have the values for
AUTH-DOMAINandORIGIN-KEYthat are used to construct the Redirect URI necessary for the Azure Relying Party configuration.
Set up a relying party in Microsoft Entra ID
Here are some helpful Azure guides that can assist with any questions. Note that Azure functionality, UI, and documentation can change frequently. The text and screenshots below are included for reference only. If there is a discrepancy or issue in the guidance below, raise an issue on GitHub using the link at the bottom of the page.
- OAuth 2.0 and OpenID Connect protocols on Microsoft identity platform
- Quickstart: Register an application with the Microsoft identity platform
Azure Active Directory (Microsoft Entra ID) v1 and v2 have slightly different integration instructions. This guide is written for v2. Notes such as this one will call out when v1 is different than v2.
Follow the procedures below to set up a relying party in Microsoft Entra ID:
Register a New App
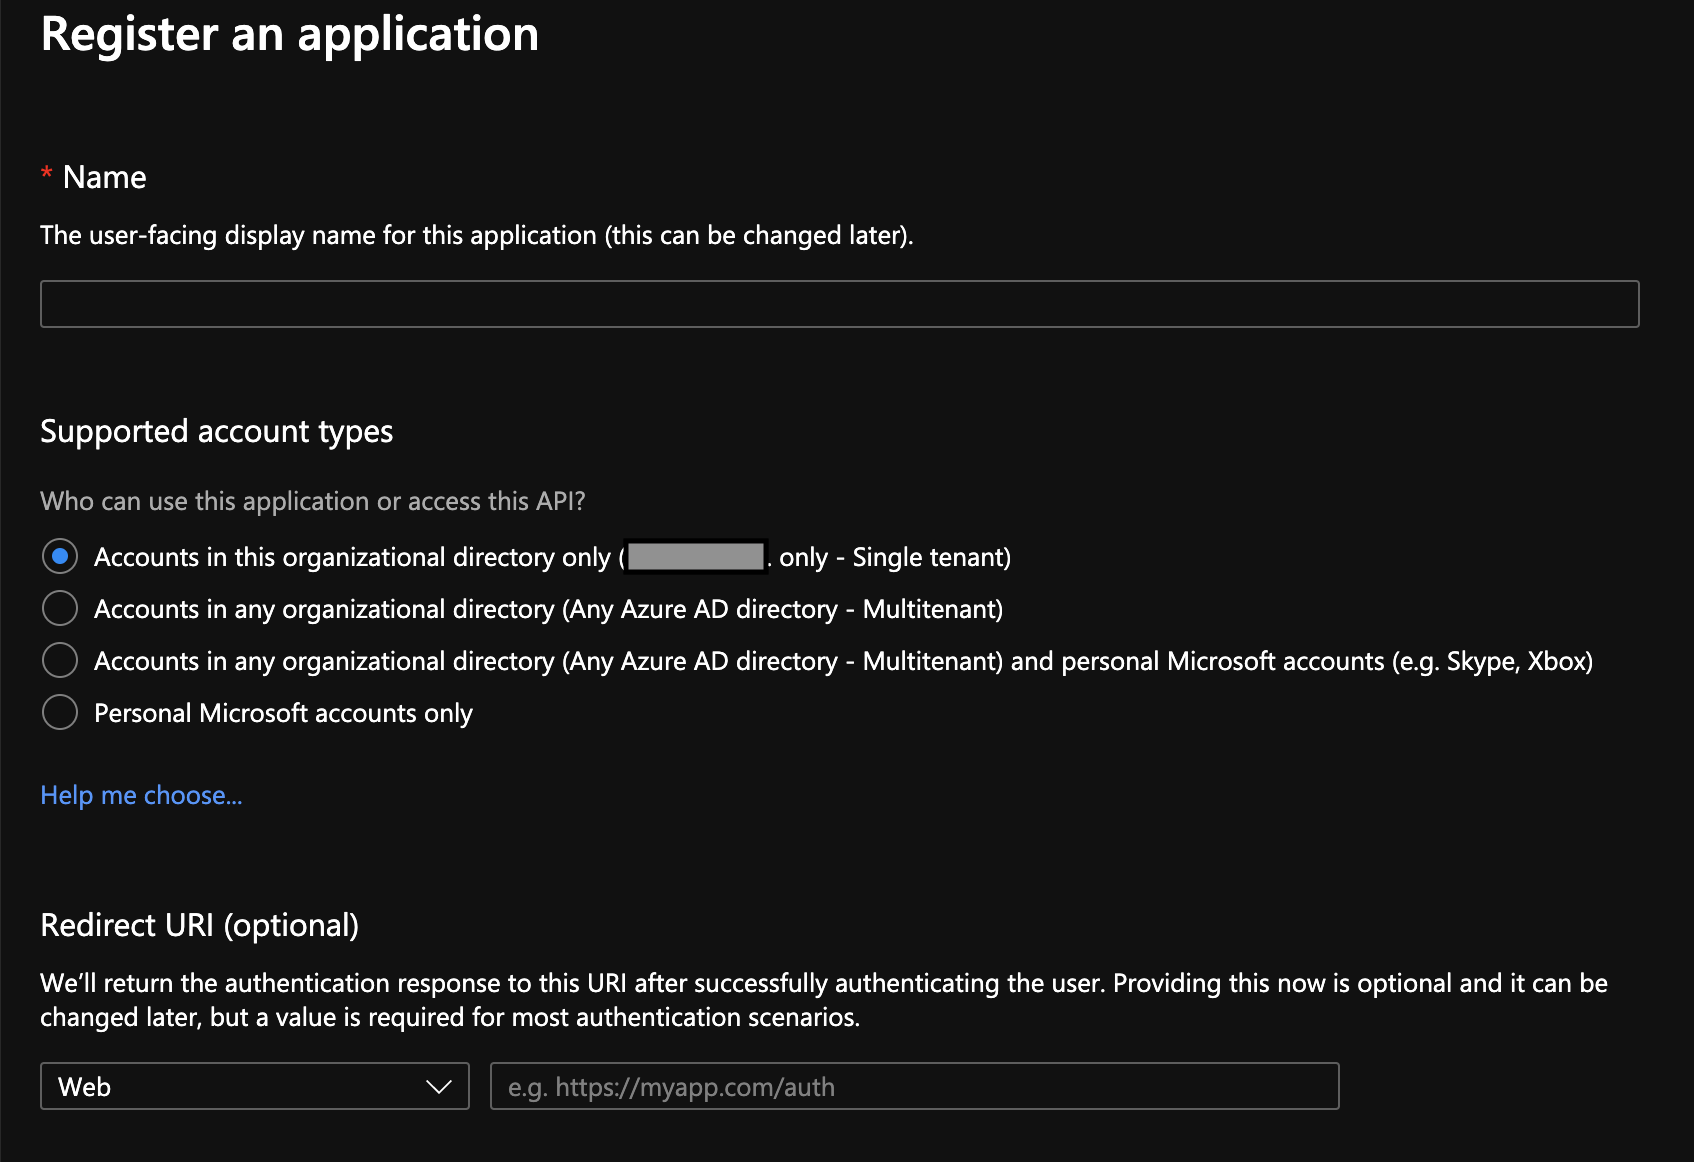
To register a new app:
-
Log in to your Azure account and navigate to Microsoft Entra ID > App registrations.
-
Select + New registration to create a New application registration.
-
Enter a name of your choice in the Name field.
-
Select an option for Supported account types. To make an appropriate selection, consult your security organization and the Azure documentation. Record this choice because your OIDC Discovery Metadata URL depends on this choice.
-
Leave Redirect URI (optional) blank. You provide this later.
-
Click Register. This redirects you to the app configuration page.
-
Copy the Application (client) ID from the app configuration page. This is the Relying Party OAuth Client ID that you will enter into the SSO Operator Dashboard in a later step.
Generate a Relying Party OAuth Client Secret
To generate a relying party OAuth client secret:
-
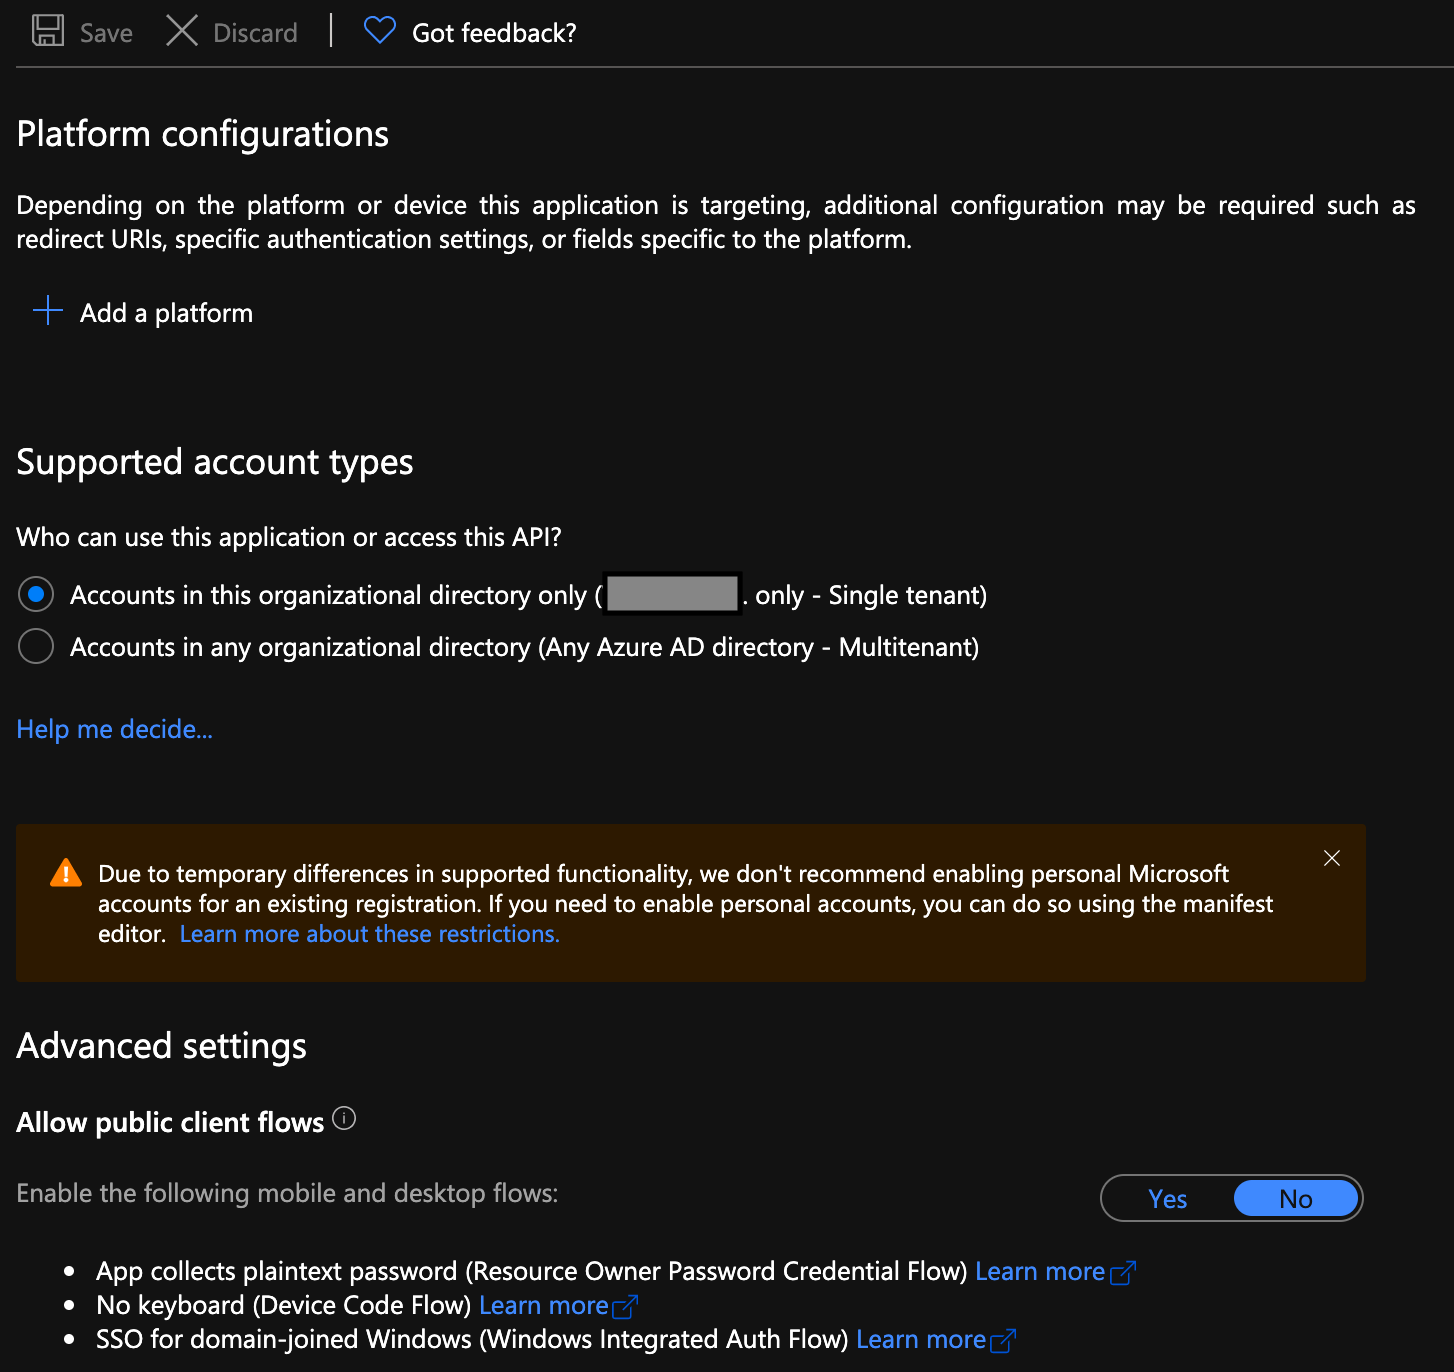
Navigate to the app’s configuration page. If you just completed the previous step, you should already be on this page. Otherwise, search for your app name in the App registrations list.
-
Select Certificates & secrets.
-
Select + New client secret. Provide a description and an expiration length that follows your security organization’s guidelines. Then click Add.
-
Copy the Value corresponding to the newly-created client secret. This is the Relying Party OAuth Client Secret that you will enter into the SSO Operator Dashboard in a later step.
Configure Redirect URIs
To configure redirect URIs:
-
Navigate to the app’s configuration page. If you just completed the previous step, you should already be on this page. Otherwise, search for your application name in the App registrations list.
-
Select Authentication.
-
Under Platform configuration select + Add a platform.
-
Under Web Applications, choose Web.
-
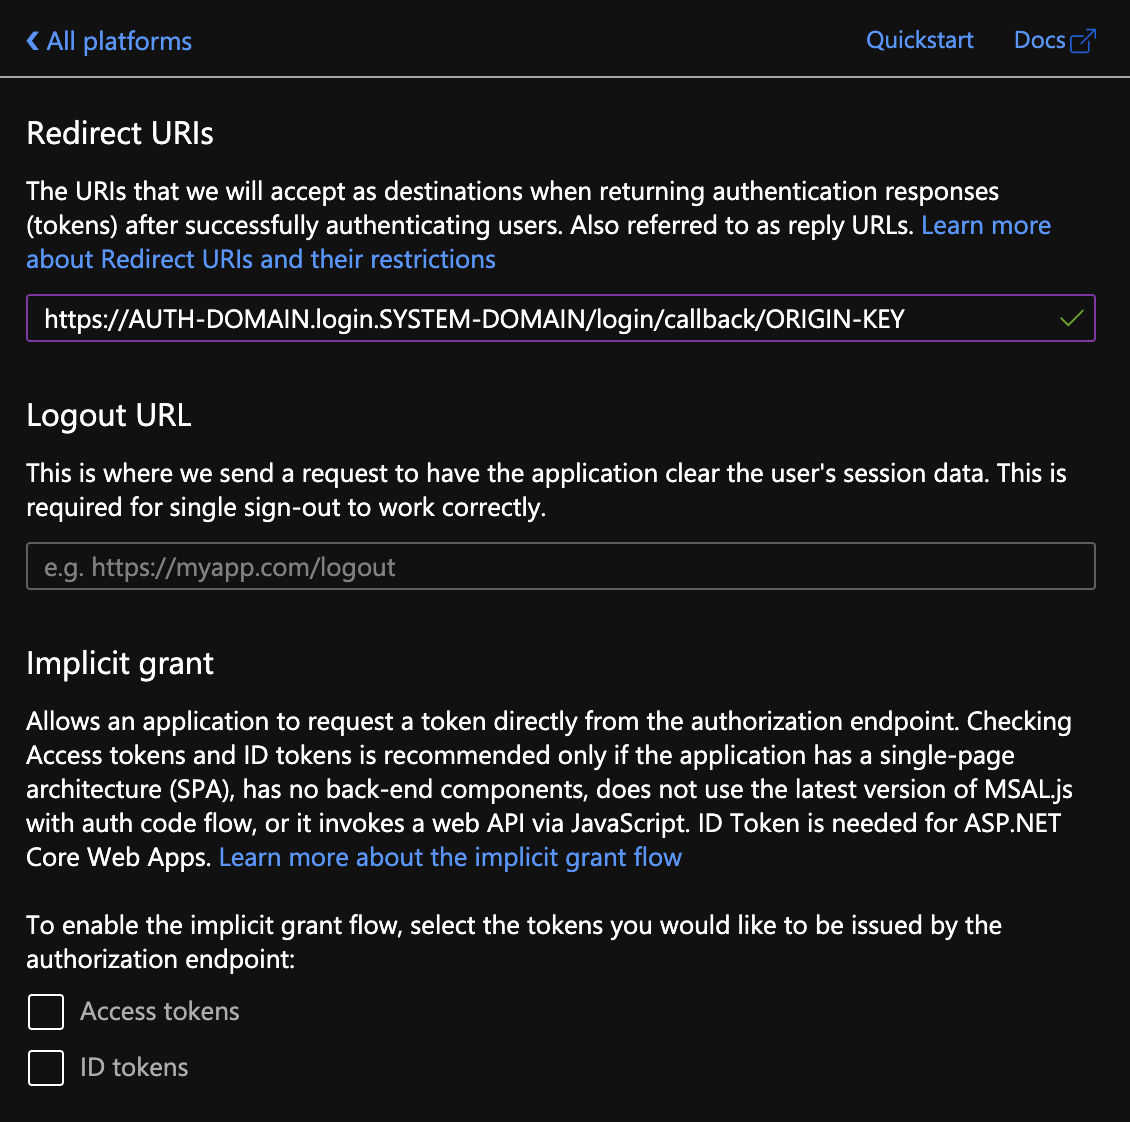
Under Redirect URIs, specify a URL using the following pattern:
https://AUTH-DOMAIN.login.SYSTEM-DOMAIN/login/callback/ORIGIN-KEYWhere:
AUTH-DOMAINis the Auth Domain you entered in Create or Edit Service Plans.SYSTEM-DOMAINis the domain for system-level components you chose when installing the TAS for VMs tile.ORIGIN-KEYis based on the Identity Provider Name you set in the SSO Operator Dashboard in Set Up the OIDC Identity Provider in Single Sign‑On below. Do not use spaces or uppercase letters in this value.
The origin key does not change after it is assigned, even if the Identity Provider Name is modified.
-
Leave Logout URL and Implicit grant empty, and click Configure.
Locate the OIDC Metadata
The Azure Active Directory (Microsoft Entra ID) v2 metadata URL takes the form of https://login.microsoftonline.com/TENANT/v2.0/.well-known/openid-configuration.
Azure Active Directory (Microsoft Entra ID) v1 metadata URLs take the form of https://login.microsoftonline.com/TENANT/.well-known/openid-configuration
To locate your OIDC metadata:
-
Determine the value of
TENANTfor your app.The value depends on the Supported account type that you selected in Register a New App above. For more information, see the Microsoft Documentation.
-
If the
TENANTvalue is the domain name or the GUID, then find those values as follows:-
Navigate to Azure Active Directory (Microsoft Entra ID).
-
Record the Tenant ID or the Primary domain shown.
-
Use either value as
TENANTin the metadata URL.
-
Set Up the OIDC Identity Provider in Single Sign‑On
Take the following steps to set up an OIDC provider for Single Sign‑On:
-
Follow steps in Add an OIDC Provider, using the option DISCOVER OIDC CONFIGURATION.
Azure Active Directory (Microsoft Entra ID) v1 might require the option MANUALLY ENTER OIDC CONFIGURATION.
-
When selecting supported scopes, select at least
openidandprofile. For an explanation of what each scope means, see the Azure documentation.
VMware recommends using scopeprofileso that Azure includespreferred_usernamein the ID token, as shown in the Azure documentation.Azure Active Directory (Microsoft Entra ID) v1 only requires scope
openid, although other scopes can be requested. -
Under Advanced Settings > Attribute Mappings (optional) > User Attributes, select user_name as the User Schema Attribute and enter
preferred_usernameas the Attribute Name. This enables Single Sign‑On to identify the authenticated user.Azure Active Directory (Microsoft Entra ID) v1 uses
unique_nameinstead ofpreferred_username. -
(Optional) Configure additional attribute mappings.
-
Click Create Identity Provider to save your settings.
-
(Optional) Enable identity provider discovery for the service plan.
