


This topic tells you how to install and configure Tanzu Cloud Service Broker for Azure.
Install Cloud Service Broker for Azure
To install the Cloud Service Broker for Azure using Ops Manager Installation Dashboard:
-
Download the product file from Broadcom Support.
-
Navigate to the Ops Manager Installation Dashboard and click Import a Product to upload the product file.
-
Under Import a Product, click + next to the version number of Cloud Service Broker for Azure in the left sidebar. This adds the tile to your staging area.
-
Click the newly added Cloud Service Broker for Azure tile.
Configure the Cloud Service Broker for Azure
The following procedures describe configuring the panes on the Cloud Service Broker for Azure tile.
Configure AZs and networks
This section describes how to choose an AZ to run the service broker for Cloud Service Broker for Azure. It also describes how to select networks for Cloud Service Broker for Azure.
To configure AZs and networks:
-
Click Assign AZs and Networks.
-
Configure the fields as follows:
Field Instructions Place singleton jobs in Select the AZ in which the broker VM for Cloud Service Broker for Azure runs. The broker runs as a singleton job. Balance other jobs in Select the AZs in which other jobs can run. Network Select a subnet for the Cloud Service Broker for Azure broker. This is typically the same subnet that includes the component VMs for VMware Tanzu Application Service for VMs (TAS for VMs). -
Click Save.
Configure Azure credentials
This section describes how to configure the Azure credentials that Cloud Service Broker for Azure requires to manage service instances.
To configure Azure credentials:
-
Click Azure Config.
-
Configure the fields as follows:
Field Instructions Subscription ID Enter the Azure subscription ID Tenant ID Enter the Azure tenant ID * Client ID Enter the Azure client ID * Client Secret Enter the Azure client secret * Default Resource Group Enter the default resource group for Azure resources Location Enter the default Azure location for resources Deactivate Automatic Service Registration Select to deactivate automatic service registration * The
Tenant ID,Client IDandClient Secretrefer to the Azure service principal credentials. To create these credentials, follow the steps in the provider documentation. -
Click Save.
Note
You can use different Azure credentials for each service plan by settingazure_tenant_id,azure_subscription_id,azure_client_secret, andazure_client_idin one of the following ways:- In the Cloud Service Broker for Azure tile, set the credentials when configuring a service plan. See Configure Services with Cloud Service Broker for Azure.
- In the cf CLI, set the credentials as parameters when creating a service. For example:
cf create-service ... -c '{ "azure_subscription_id":"...", ... "'
Configure a state database
This section describes how to associate Cloud Service Broker for Azure with a MySQL database, the state database. The broker requires this database to store its state.
About encrypting the state database
In production environments, VMware recommends that you enable encryption. This encrypts certain sensitive information in the state database, such as IaaS credentials. The encryption password that you enter on the Service Broker Config pane is used to generate an encryption key.
Note Applying changes takes longer than normal when you first enable encryption and when you change the encryption password.
Prerequisite
You must have a small MySQL database to use as the state database.
VMware recommends enabling backup and restore capabilities in the MySQL database before attempting encryption. This is because if something goes wrong, and your database is only partially encrypted, it is safest to revert to the most recent database backup.
Procedure: Configure a state database
To configure Cloud Service Broker for Azure with a state database:
-
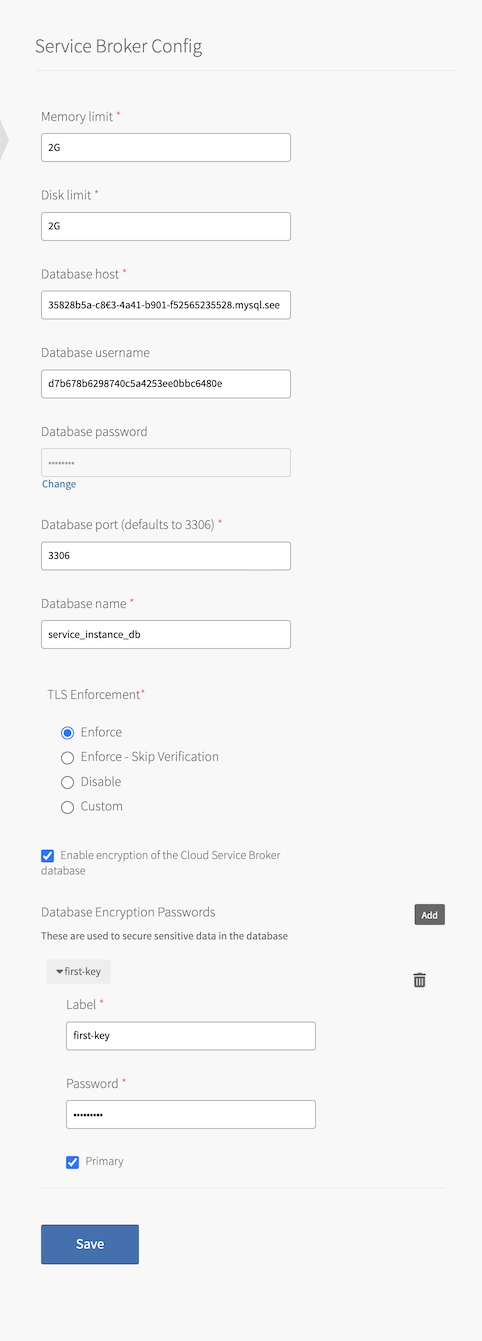
Click Service Broker Config.
-
Configure the fields as follows:
Field Instructions Memory limit Memory limit (for example, 1024M, 2G) for the Service Broker app defaults to 2G.Disk limit Disk limit (for example, 1024M, 2G) for the Service Broker app defaults to 2G.Database host Enter the host name of the prerequisite state database. Database username and Database password Enter the credentials for the state database. The example shown in the screenshot in the previous step refers to setting the username for a MySQL tile provisioned database. If you are configuring a database provisioned by another service, refer to the documentation for that service for the correct username format. For example, for Azure Database for MySQL the username is in the format user@server-name. For more information, see the Azure DB for MySQL documentation.Database port Enter the port number for connection to the state database. Defaults to 3306.Database name Enter the name of an existing database to use as the state database. TLS Enforcement Select the type of TLS enforcement you want. If you select Custom, enter your CA certificate, client certificate, and key. Enable encryption of the Cloud Service Broker database If you want the sensitive data to be encrypted, select this check box and the Add button. If you do not want to encrypt the data, leave the check box unselected and do not fill in the Database Encryption Passwords fields. Label Enter a unique password label. You cannot change this label after you save. Password Enter a secure password that is at least 20 characters long. You cannot change this password after you save. Primary Select this check box if this is the password that you want to use to encrypt the data. You must mark one and only one password as primary. -
Click Save.
-
If upgrading from a previous tile version, service instances must be upgraded. By default, the tile upgrades all instances during installation. To configure the upgrade task, see Upgrade All Service Instances Config. Alternatively, operators can control when service instances are upgraded. For more information, see Upgrading Cloud Service Broker for Azure.
-
Return to the Ops Manager Installation Dashboard.
-
Click Review Pending Changes.
-
Click Apply changes to install the Cloud Service Broker for Azure tile.
If you later want to change the password on the state database, see Rotate the Encryption Password on the State Database below.
If you later want to turn off encryption, see Remove Encryption from the State Database below.
Configure services with Cloud Service Broker for Azure
This section describes how to configure services and service plans offered by the Cloud Service Broker for Azure within the Cloud Foundry Marketplace on your instance of Cloud Foundry.
Cloud Service Broker for Azure specifies new service plans through JSON. An example is provided, using the smallest possible size, within each service.
To configure services and service plans:
-
Click the already-installed Cloud Service Broker for Azure for Azure tile in your Ops Manager tile Dashboard.
-
Find the service you want to make available in the left hand navigation under the Settings tab.
-
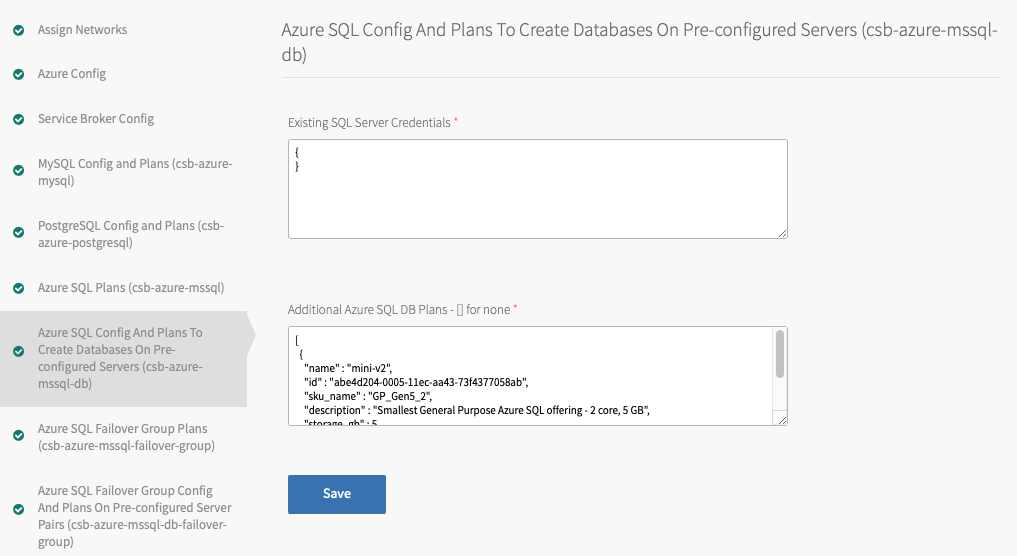
For services using pre-configured database servers, enter Existing SQL Server Credentials.
- For the Azure SQL Config And Plans To Create Databases On Pre-configured Servers plan, enter the credentials in the following format:
Where:{ ... "SERVER-LABEL":{ "admin_username": "SERVER-ADMIN-USERNAME", "admin_password": "SERVER-ADMIN-PASSWORD", "server_resource_group": "SERVER-RESOURCE-GROUP", "server_name": "SERVER-NAME" } ... }SERVER-LABELis a label to refer to the server, which might be the same as the logical server name.SERVER-ADMIN-USERNAMEis the administrative username for the server.SERVER-ADMIN-PASSWORDis the administrative password for the server.SERVER-RESOURCE-GROUPis the Azure resource group.SERVER-NAMEis the logical server name.
- For the Azure SQL Failover Group Config And Plans On Pre-configured Server Pairs plan, enter the credentials in the following format:
Where:{ ... "SERVER-PAIR-LABEL":{ "admin_username": "SERVER-ADMIN-USERNAME", "admin_password": "SERVER-ADMIN-PASSWORD", "primary":{ "resource_group": "PRIMARY-SERVER-RESOURCE-GROUP", "server_name": "PRIMARY-SERVER-NAME" }, "secondary":{ "resource_group": "SECONDARY-SERVER-RESOURCE-GROUP", "server_name": "SECONDARY-SERVER-NAME" } } ... }SERVER-PAIR-LABELis a label to refer to the pair of primary and secondary servers.SERVER-ADMIN-USERNAMEis the administrative username for the server.SERVER-ADMIN-PASSWORDis the administrative password for the server.PRIMARY-SERVER-RESOURCE-GROUPis the Azure Resource Group in which the primary database server resides.PRIMARY-SERVER-NAMEis the name of the primary server in the failover group.SECONDARY-SERVER-RESOURCE-GROUPis the Azure Resource Group in which the secondary database server resides.SECONDARY-SERVER-NAMEis the name of the secondary server in the failover group.
- For the Azure SQL Config And Plans To Create Databases On Pre-configured Servers plan, enter the credentials in the following format:
-
Enter additional plans as additional JSON objects within the provided field. For details about properties for each service configuration, see Service Plan Reference.
Note When developers create or update a service instance, they cannot override any plan-level properties that have been set in this field.
-
(Optional) If you want to use different credentials to the ones specified in the Azure Config tab, supply the credentials as properties to a plan instance in the additional plans box:
[ { "name" : "PLAN-NAME", "id" : "UID", "sku_name" : "SKU-NAME", "description" : "PLAN-DESCRIPTION", "azure_tenant_id" : "TENANT-ID", "azure_subscription_id" : "SUBSCRIPTION-ID", "azure_client_secret" : "CLIENT-SECRET", "azure_client_id" : "CLIENT-ID", ... } ] -
Click Save.
-
Return to the Ops Manager Installation Dashboard and click Review Pending Changes.
-
Click Apply changes.
-
Review your Cloud Foundry Marketplace to see the new plan sizes.
Rotate the encryption password on the state database
If you have already set an encryption password and want to change it, take the following steps.
To rotate the password on the state database:
-
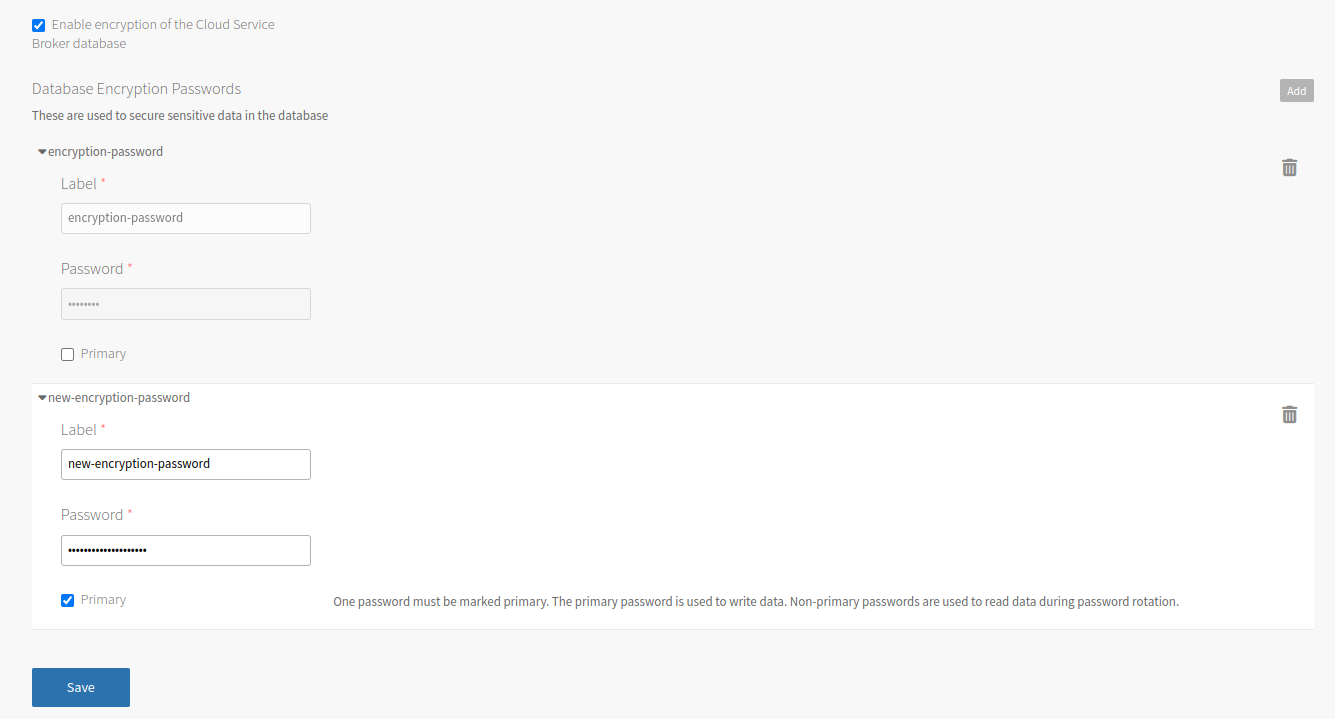
Click Service Broker Config.
-
Deselect the Primary check box.
-
Click Add.
-
Enter a new Label and Password for the new password, and select Primary.
You cannot change the label or password after you save.
-
Click Save.
-
Return to the Ops Manager Installation Dashboard.
-
Click Review Pending Changes.
-
Click Apply changes to install the Cloud Service Broker for Azure tile.
-
(Recommended) After the apply changes process completes, delete the non-primary label and password pair and apply changes again.
Remove encryption from the state database
If the data in the state database was previously encrypted and you want to deactivate encryption, take the following steps.
To remove encryption from the state database:
-
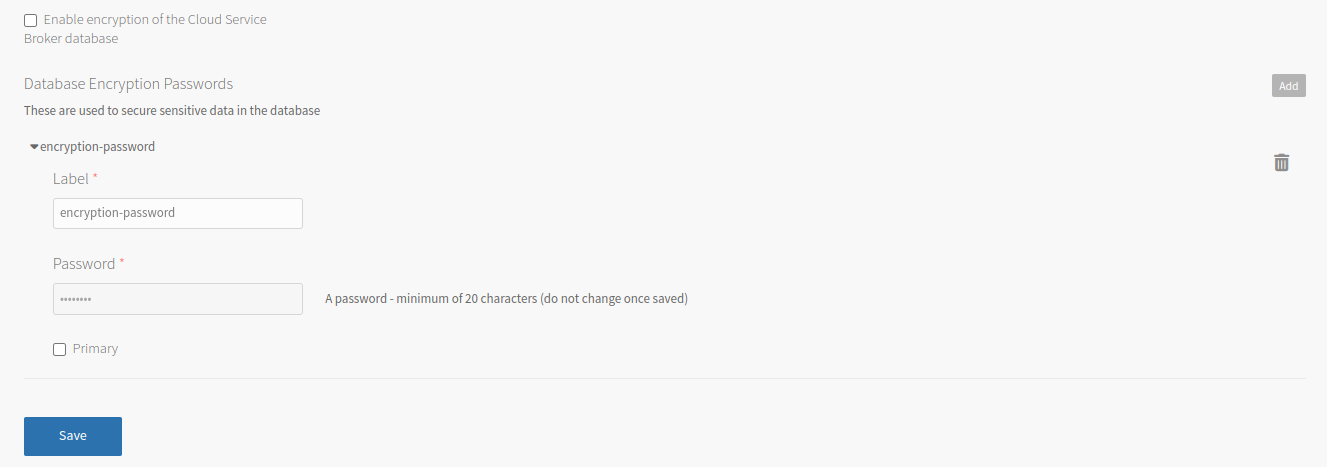
Click Service Broker Config.
-
Deselect the Enable encryption of the Cloud Service Broker database check box.
-
Deselect the Primary check box, but do not change the Label or Password fields.
-
Click Save.
-
Return to the Ops Manager Installation Dashboard.
-
Click Review Pending Changes.
-
Click Apply changes to install the Cloud Service Broker for Azure tile.
-
(Recommended) After the apply changes process completes, delete all label and password pairs and apply changes again.
Upgrade all services instances config
If upgrading from a previous tile version, service instances must be upgraded. By default, the tile upgrades all instances during installation. This section is about the general configuration of upgrades. See Upgrading Cloud Service Broker for Azure for alternatives and details of the upgrade.
If Upgrade all services is unchecked, service instances are not upgraded during installation. The broker might be unable to manage these service instances that are not upgraded. In that case, any operations on that instance (update, bind, unbind, or delete) are blocked until you perform the upgrade task. You can run the upgrade task any time, and as many times as needed.
Note Failure to upgrade one or more instance does not cause the tile installation to fail. Review the deploy all errand logs to verify that all instances are upgraded.
Deleting custom plans before upgrading all instances might cause some instances to become unmanageable by the broker. Delete plans at a later step or see Release Notes for Cloud Service Broker for Azure and Upgrading Cloud Service Broker for Azure to ensure there are no conflicting upgrades.
Important Instances that the broker has subsumed must be changed to a suitable plan, other than the subsume plan, before performing any upgrades. Failure to do so makes the broker unable to manage those instances.
To perform the upgrade task:
-
Go to the Upgrade All Service Instances Config tab.

-
Configure the fields as follows:
Field Description Upgrade all services Enabled by default. Indicates if service instances are upgraded during product installation. The number of upgrades to run in parallel Indicates the number of instances that can be in the upgradingstatus at any given time. -
Click Save.
-
Return to the Ops Manager Installation Dashboard.
-
Click Review Pending Changes.
-
Click Apply changes to install the Cloud Service Broker for Azure tile.
