


Consume VMware Tanzu Application Catalog Helm Charts in your local machine
This section explains how to add the VMware Tanzu Application Catalog (Tanzu Application Catalog) Helm chart repository on your local machine. It also explains how to customize the MariaDB Galera values.yaml file to enable some of the enterprise features it bundles and deploy this custom chart on a running cluster.
Tanzu Application Catalog provides both developers and operators a collection of trusted and up to date containers and Helm charts that can be consumed in different ways depending on the requirements of enterprise development teams.
One of the ways to consume Tanzu Application Catalog content is from a local machine using, in the case of Helm charts, the Helm CLI to add a Tanzu Application Catalog repository and deploy charts directly on a Kubernetes cluster.
What to do first
Ensure:
- You have a Kubernetes cluster. For more information, see Getting Started with Kubernetes guides.
- You have Helm 3 installed.
- (Optional) You have the jq command line tool installed in your local machine.
To deploy a MariaDB Galera cluster on a Kubernetes cluster from Tanzu Application Catalog using a local machine, follow the steps as explained in the sections below:.
Add the Tanzu Application Catalog to your repositories
The first step is to add the Tanzu Application Catalog Helm repository so you can have all the charts available in the catalog in your local machine. Follow these instructions:
-
Open a terminal window and execute:
$ helm repo add REPOSITORY https://MY_REGISTRY/Note Replace the REPOSITORY and https://MY_REGISTRY/ placeholders with a reference to your Tanzu Application Catalog chart repository and the URL of your private registry where your catalog is located, respectively.
-
To display the complete list of Helm charts, execute:
$ helm search repo MY_REGISTRY -
To list only the different versions of MariaDB Galera available in the repository, execute:
$ helm search repo -l MY_REGISTRY/mariadb-galera
This example, instead of using the default chart values, uses custom values to enable some enterprise features that Bitnami has added to this chart. To check the default chart values, execute:
$ helm show values MY_REGISTRY/mariadb-galera
Customize the MariaDB Galera Helm chart
Once you have the Tanzu Application Catalog Helm repository available in your local machine, you can start customizing the MariaDB Galera chart.
Tip The parameters changed in this section are only an example of the customization you can perform in the chart values. You can always enable these or other parameters depending on your needs. For the complete list of parameters, see Parameters. For example, if you have an LDAP server installed in your cluster, it is strongly recommended to enable LDAP support for your chart. For more information, see LDAP support in the MariaDB Galera Helm chart.
Follow the instructions below to enable some of the enterprise features that the MariaDB Galera Helm chart includes.
-
Download the MariaDB Galera values.yaml file:
$ helm show values MY_REGISTRY/mariadb-galera > values.yamlNote /MY_REGISTRY/ is a placeholder. Replace it with the URL of the private registry where your catalog is located.
-
Open the values.yaml file to edit the following values:
-
In the “Database credentials” section, define a custom password for the admin user (remember to replace the DB-ROOT-PASSWORD placeholder with the password you want to set for the database root user):
# Database credentials for root (admin) user # rootUser: password: DB-ROOT-PASSWORD forcePassword: false -
In the “Galera configuration” section, enter a name for the MariaDB Galera cluster and also define a password for the mariabackup user (remember to replace the DB-MARIABACKUP-PASSWORD placeholder with the password you want to set for backups):
# Galera configuration galera: name: my-galera mariabackup: password: DB-MARIABACKUP-PASSWORD -
In the “custom db configuration” section, create a custom database and give access to a user for that database (remember to replace the DB-NAME and DB-CUSTOM-USER-PASSWORD placeholders with the name you want to set for the database and the password for user user01):
# Custom db configuration # db: user: user01 password: DB-CUSTOM-USER-PASSWORD # Database to create # ref: https://github.com/bitnami/bitnami-docker-mariadb-galera#creating-a-database-on-first-run # name: DB-NAME # Option to force users to specify a password. That is required for 'helm upgrade' to work properly. # If it is not force, a random password will be generated. # forcePassword: false -
In the “Prometheus exporter configuration” section, enable metrics to expose the metrics so they can be consumed by Grafana and Prometheus:
# Prometheus exporter configuration # metrics: enabled: true -
In the “Enable persistence using Persistent Volume Claims” section, enable persistence to use volume claims:
# Enable persistence using Persistent Volume Claims # ref: https://kubernetes.io/docs/concepts/storage/persistent-volumes/ # persistence: # If true, use a Persistent Volume Claim, If false, use emptyDir # enabled: true -
In the “serviceAccount” section, create RBAC rules and add a service account:
serviceAccount: # Specifies whether a ServiceAccount should be created # create: true # Role Based Access # Ref: https://kubernetes.io/docs/reference/access-authn-authz/rbac/ # rbac: # Specifies whether RBAC rules should be created # create: true -
In the “Pod Security Context” section, set up a security context to ensure that all the containers that will be deployed use a non-root and an arbitrary user:
# ref: https://kubernetes.io/docs/tasks/configure-pod-container/security-context/ # securityContext: enabled: true fsGroup: 1001 runAsUser: 1001 -
In the “Affinity” section, add a podAntiAffinity to ensure that each of the replicas we have set (in this case, three) go to a different node of the cluster. This ensures that information is replicated in the rest of the nodes so that, if a node fails, service continuity is not affected.
# Affinity for pod assignment. Evaluated as a template.
# Ref: https://kubernetes.io/docs/concepts/scheduling-eviction/assign-pod-node/#affinity-and-anti-affinity
#
affinity:
  podAntiAffinity:
    requiredDuringSchedulingIgnoredDuringExecution:
      - topologyKey: "kubernetes.io/hostname"
        labelSelector:
          matchLabels:
            app.kubernetes.io/name: mariadb-galera
            app.kubernetes.io/instance: my-galera
-
Install the MariaDB Galera Helm chart
The next step is to install the Helm chart using the customized values.yaml chart that you created. In order to show the upgrade process in a subsequent step, this guide will show you how to deploy an older version such as version 2.1.2. If you prefer to deploy a different version, specify it using the –version flag or remove it to deploy the latest version of the chart by default. Follow these instructions:
-
Execute the following command to deploy the version 2.1.2 of the MariaDB Galera Helm chart using its customized values.yaml. Remember to replace MY-RELEASE with the name you want to enter for the deployment.
$ $ helm install -f values.yaml --version 2.1.2 MY_REGISTRY/mariadb-galeraNote /MY_REGISTRY/ is a placeholder. Replace it with the URL of the private registry where your catalog is located.
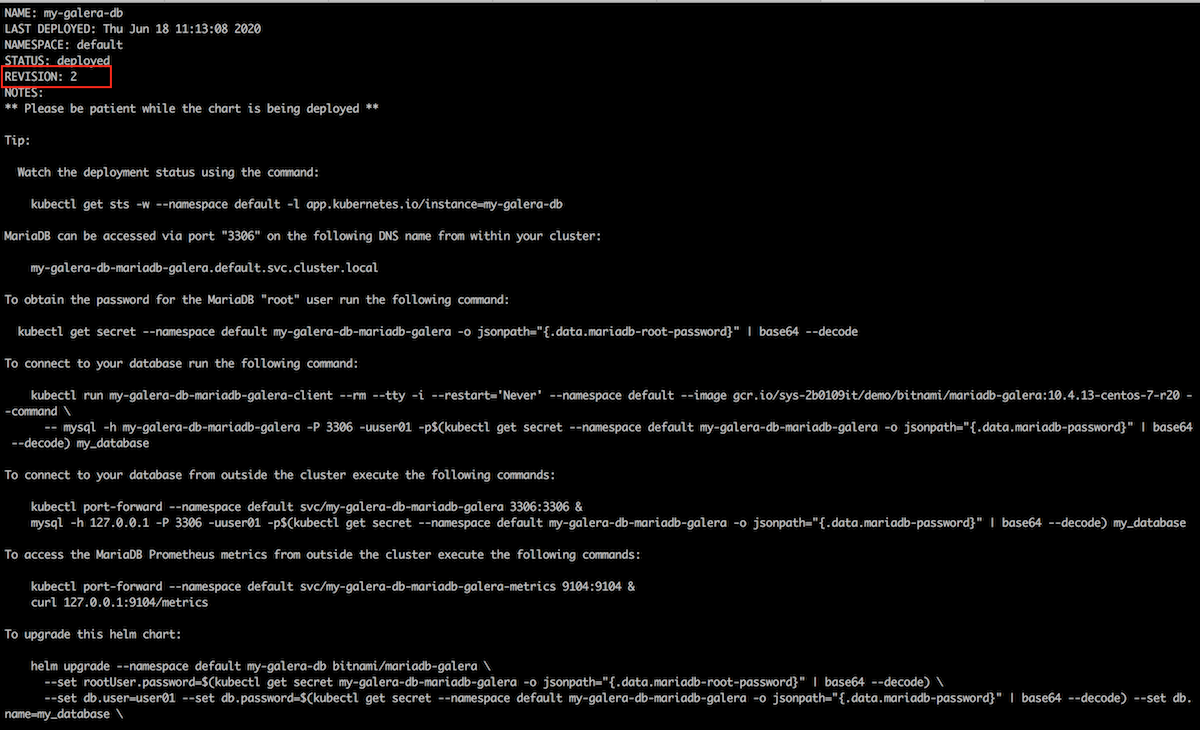
The deployment of the chart takes several minutes. Once the chart is installed, you will see a set of useful commands for getting the root database password, connecting to the database, connecting to Prometheus metrics from outside the cluster, or upgrading the chart.

-
Check that all the production values configured in the previous step are already enabled by executing the following command:
$ helm get values MY-RELEASE
Connect and check the MariaDB Galera services
To ensure all the services that you enabled are working properly:
-
Observe the deployment status by executing:
$ kubectl get sts -w --namespace default -l app.kubernetes.io/instance=MY-RELEASEYou should see an output message similar to this:
NAME READY AGE my-galera-db-mariadb-galera 3/3 53m -
Check the database password by executing the command below. You should get the password you manually entered in the values.yaml for the root admin user.
$ kubectl get secret --namespace default MY-RELEASE-mariadb-galera -o jsonpath="{.data.mariadb-root-password}" | base64 --decode -
Forward ports to the Prometheus services to check the metrics:
$ kubectl port-forward svc/MY-RELEASE-mariadb-galera-metrics 9104:9104Now, you should be able to access MySQLd Exporter metrics by browsing 127.0.0.1:9104:

-
To check the permissions you configured to enable the serviceAccount, role, and RoleBinding, execute:
$ kubectl get serviceaccount
$ kubectl get role
$ kubectl get rolebinding
You should see output similar to this:

-
To check the node affinity, execute:
$ kubectl get pods -o wideAs you can see in the image below, each pod has been scheduled in a different node ensuring the continuity of the service if one of the nodes fails:

-
Finally, you can also check the container images used by the chart. Tanzu Application Catalog is both a container and a Helm charts catalog, so every container included in a Tanzu Application Catalog chart is retrieved from the Tanzu Application Catalog container repository. When a container is updated (for example, with a CVE fix or new features), new deployments of any chart referencing that container will automatically use the updated container.
Check the containers including in the MariaDB Galera chart by executing the command below:
$ kubectl get pods -l app.kubernetes.io/name=mariadb-galera -o json | jq '.items[0].spec.containers[].image'You should see an output message similar to this:

NoteThis guide shows you how to consume Helm charts from the Tanzu Application Catalog catalog, but if you, as a company wants to use your golden image instead of the default provided in the catalog, the whole catalog will be built using your golden images.
Upgrade to the latest version of the MariaDB Galera Chart
As a final step, you can perform an upgrade of the chart to deploy a newest version. At the beginning of this guide, the version installed was the 2.1.2 but the 2.1.4 version was also available.
To upgrade the chart, execute:
$ helm upgrade -f values.yaml --version 2.1.4 MY-RELEASE /mariadb-galera
This will perform an upgrade to v2.1.4 and replace the old containers with the new ones.
NoteFor major updates, see Upgrading section in the README file of the chart.
Useful links
- VMware Tanzu Application Catalog
- How to use and consume trusted content in your organization with Vmware Tanzu Application Catalog
- Consume VMware Tanzu Application Catalog Images Using A Private Harbor Registry
- Transition Applications To VMware Tanzu Application Catalog
- VMware Tanzu Application Catalog FAQs
- VMware Cloud Services documentation
- Getting started with Kubernetes guides
- MariaDB Galera Helm chart documentation
