


As a developer, you need a pipeline that fetches an automation cloud template from an on-premises GitHub instance every time you commit a change. You need the pipeline to deploy a WordPress application to either Amazon Web Services (AWS) EC2 or a data center. Automation Pipelines calls the cloud template from the pipeline and automates the continuous integration and continuous delivery (CICD) of that cloud template to deploy your application.
To create and trigger your pipeline, you'll need a cloud template in Automation Assembler.
For Template source in your Automation Pipelines cloud template task, you can select either:
- Automation Assembler as the source control. In this case, you do not need a GitLab or GitHub repository.
- Source Control if you use GitLab or GitHub for source control. In this case, you must have a Git webhook and trigger the pipeline through the webhook.
If you have a YAML cloud template in your GitHub repository, and want to use that cloud template in your pipeline, here's what you'll need to do.
- In Automation Assembler, push the cloud template to your GitHub repository.
- In Automation Pipelines, create a Git endpoint. Then, create a Git webhook that uses your Git endpoint and your pipeline.
- To trigger your pipeline, update any file in your GitHub repository and commit your change.
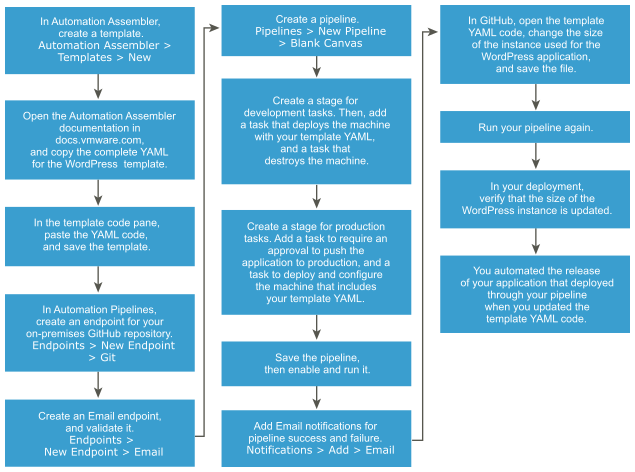
If you don't have a YAML cloud template in your GitHub repository, and want to use a cloud template from source control, use this procedure to learn how. It shows you how to create a cloud template for a WordPress application, and trigger it from an on-premises GitHub repository. Whenever you make a change to the YAML cloud template, the pipeline triggers and automates the release of your application.
- In Automation Assembler, you'll add a cloud account, add a cloud zone, and create the cloud template.
- In Automation Pipelines, you'll add an endpoint for the on-premises GitHub repository that hosts your cloud template. Then, you'll add the cloud template to your pipeline.
This use case example shows you how to use a cloud template from an on-premises GitHub repository.
Prerequisites
- Add a cloud account and a cloud zone in your Automation Assembler infrastructure. See Adding cloud accounts and Learn more about cloud zones.
- To create your cloud template in the following procedure, copy the WordPress YAML code to your clipboard. See Create a basic cloud template.
- Add the YAML code for the WordPress application to your GitHub instance.
- Add a webhook for the Git trigger so that your pipeline can pull your YAML code whenever you commit changes to it. In Automation Pipelines, click .
- To connect Automation Pipelines to your on-premises GitHub endpoint, add a cloud proxy. For an example, see Setting up Automation Pipelines to model my release process.
- If you provision your application to an on-premises data center, you must install and use a cloud proxy so that Automation Pipelines can connect to it. For an example, see Setting up Automation Pipelines to model my release process and What are Endpoints in Automation Pipelines.
- To work with a cloud template task, you must have any of the Automation Assembler roles.
Procedure
- In Automation Assembler, follow these steps.
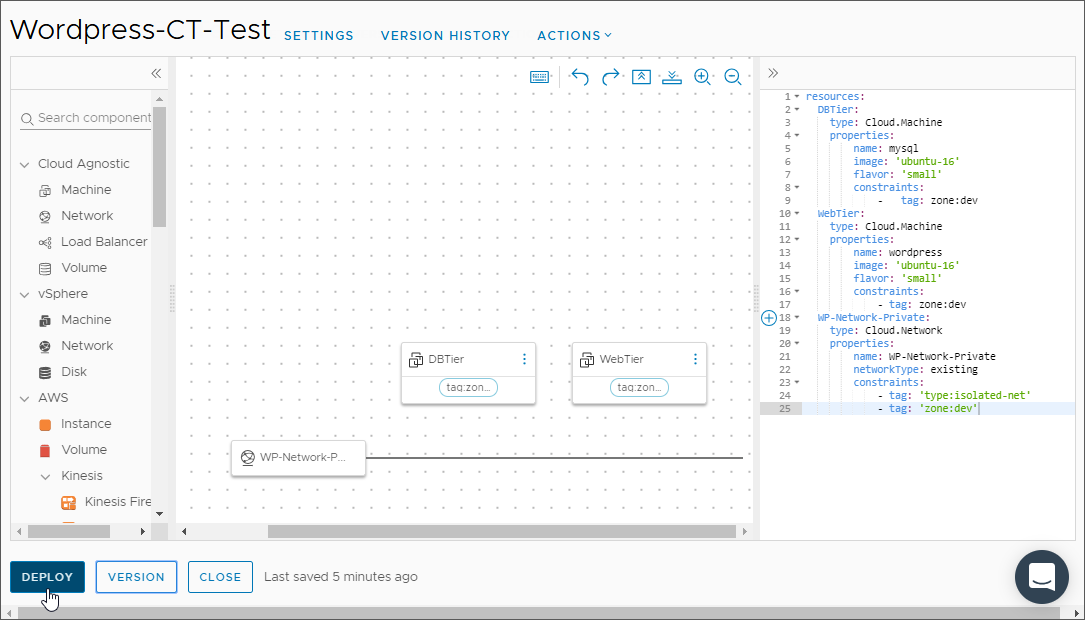
- Click Templates, then create a cloud template and a deployment for the WordPress application.
- Paste the WordPress YAML code that you copied to your clipboard into your cloud template, and deploy it.
- In Automation Pipelines, create endpoints.
- Create a Git endpoint for your on-premises GitHub repository where your YAML file resides.

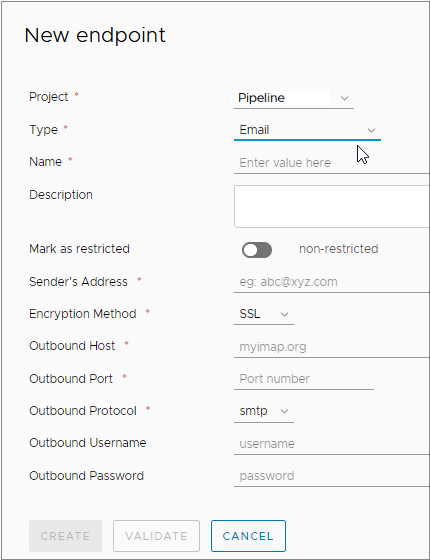
- Add an Email endpoint that can notify users about the pipeline status when it runs.
- Create a Git endpoint for your on-premises GitHub repository where your YAML file resides.
- Create a pipeline, and add notifications for pipeline success and failure.

- Add a stage for production, and include approval and deployment tasks.
- Add a User Operation task to require approval to push the WordPress application to production.
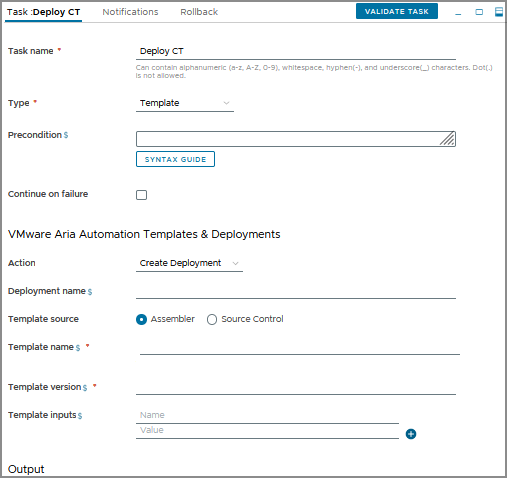
- Add a cloud template task to deploy the machine and configure it with the cloud template YAML for the WordPress application.
When you select Create, the deployment name must be unique. If you leave the name blank, Automation Pipelines assigns it a unique random name.Here's what you must know if you select Rollback in your own use case: If you select the Rollback action and enter a Rollback Version, the version must be in the form of n-X. For example, n-1, n-2, n-3, and so on. If you create and update the deployment in any location other than Automation Pipelines, rollback is allowed.
Results
Congratulations! You automated the release of your application that you deployed from a YAML cloud template.
What to do next
To learn more about how you can use Automation Pipelines, see Tutorials for using Automation Pipelines.
For more information, see the additional resources under Getting Started with VMware Aria Automation.
