


For example, to continuously deploy your updated container image through your CD pipeline, use the Docker trigger. When your container image gets checked into the Docker registry, the webhook in Docker Hub notifies Automation Pipelines that the image changed. This notification triggers the CD pipeline to run with the updated container image, and upload the image to the Docker Hub repository.
To use the Docker trigger, you perform several steps in Automation Pipelines.
| What you do... | More information about this action... |
|---|---|
| Create a Docker registry endpoint. |
For Automation Pipelines to trigger your pipeline, you must have a Docker Registry endpoint. If the endpoint does not exist, you can select an option that creates it when you add the webhook for the Docker trigger. The Docker registry endpoint includes the URL to the Docker Hub repository. |
| Add input parameters to the pipeline that auto inject Docker parameters when the pipeline runs. |
You can inject Docker parameters into the pipeline. Parameters can include the Docker event owner name, image, repository name, repository namespace, and tag. In your CD pipeline, you include input parameters that the Docker webhook passes to the pipeline before the pipeline triggers. |
| Create a Docker webhook. |
When you create the Docker webhook in Automation Pipelines, it also creates a corresponding webhook in Docker Hub. The Docker webhook in Automation Pipelines connects to Docker Hub through the URL that you include in the webhook. The webhooks communicate with each other, and trigger the pipeline when an artifact is created or updated in Docker Hub. If you update or delete the Docker webhook in Automation Pipelines, the webhook in Docker Hub is also updated or deleted. |
| Add and configure a Kubernetes task in your pipeline. |
When an artifact is created or updated in the Docker Hub repository, the pipeline triggers. Then, it deploys the artifact through the pipeline to the Docker host in your Kubernetes cluster. |
| Include a local YAML definition in the task. |
The YAML definition that you apply to the deployment task includes the Docker container image. If you need to download an image from a privately-owned repository, the YAML file must include a section with the Docker config Secret. See the CD portion of Planning a CICD native build in Automation Pipelines before using the smart pipeline template |
When an artifact is created or updated in the Docker Hub repository, the webhook in Docker Hub notifies the webhook in Automation Pipelines, which triggers the pipeline. The following actions occur:
- Docker Hub sends a POST request to the URL in the webhook.
- Automation Pipelines runs the Docker trigger.
- The Docker trigger starts your CD pipeline.
- The CD pipeline pushes the artifact to the Docker Hub repository.
- Automation Pipelines triggers its Docker webhook, which runs a CD pipeline that deploys the artifact to your Docker host.
In this example, you create a Docker endpoint and a Docker webhook in Automation Pipelines that deploys your application to your development Kubernetes cluster. The steps include the example code for the payload that Docker posts to the URL in the webhook, the API code that it uses, and the authentication code with the secure token.
Prerequisites
- Verify that a continuous delivery (CD) pipeline exists in your Automation Pipelines instance. Also verify that it includes one or more Kubernetes tasks that deploy your application. See Planning to natively build, integrate, and deliver your code in Automation Pipelines.
- Verify that you can access an existing Kubernetes cluster where your CD pipeline can deploy your application for development.
- Verify that you are a member of a project in Automation Pipelines. If you are not, ask a Automation Pipelines administrator to add you as a member of a project. See How do I add a project in Automation Pipelines.
- If your Docker Hub repository is an on-premises endpoint, create a cloud proxy so that Automation Pipelines can communicate with it. For an example, see Setting up Automation Pipelines to model my release process.
Procedure
- Create a Docker registry endpoint.
- Click Endpoints.
- Click New Endpoint.
- Start typing name of existing project.
- Select the type as Docker Registry.
- Enter a relevant name.
- If the Docker registry endpoint is on-premises, select the cloud proxy. If the endpoint is cloud-based, keep the setting as Default.
- Select the server type as DockerHub.
- Enter the URL to the Docker Hub repository.
- Enter the name and password that can access the repository.

- In your CD pipeline, set the input properties to auto inject Docker parameters when the pipeline runs.

- Create a Docker webhook.
- Click .
- Click New Webhook for Docker.
- Select a project.
- Enter a relevant name.
- Select your Docker registry endpoint.
If the endpoint does not yet exist, click Create Endpoint and create it.
- Select the pipeline with Docker injected parameters for the webhook to trigger. See Step 2.
If the pipeline was configured with custom added input parameters, the Input Parameters list displays parameters and values. You can enter values for input parameters that will be passed to the pipeline with the trigger event. Or you can leave the values blank, or use the default values if defined.
For more information about parameters on the input tab, see How you'll create the CICD pipeline and configure the workspace.
- Enter the API Token.
The VMware Cloud Services API token authenticates you for external API connections with Automation Pipelines. To obtain the API token:
- Sign in to VMware Aria Automation.
- Sign in to
- Click the drop-down arrow by your name.
- Click My Account.
- Click API Tokens.
- Click Generate a New API Token.
- Enter a Token Name.
- Under Organization Roles, click to expand All Organization Roles and select Organization Owner.
- Under Service Roles, click to expand and select Pipelines Administrator.
- Click Generate.
The Token Generated window displays a token with the name that you specified and the name of your organization.
- Click the COPY icon.
Clicking COPY ensures that you capture the exact string and is more reliable than using your pointer to copy the string.
- Enter the build image.
- Enter a tag.

- Click Save.
The webhook card appears with the Docker webhook enabled. If you want to make a dummy push to the Docker Hub repository without triggering the Docker webhook and running a pipeline, click Disable.
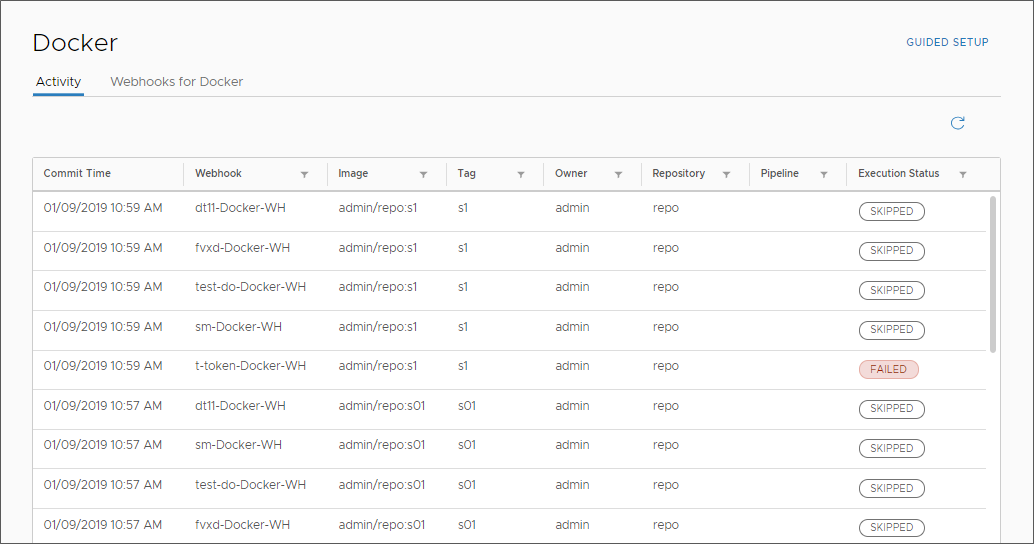
- To confirm that the trigger occurred, and see the activity on the Docker webhook, click .
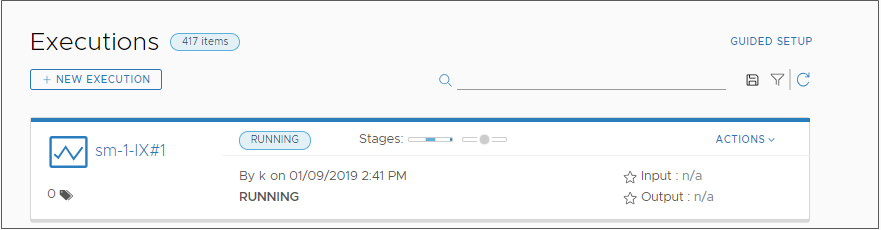
- Click Executions, and observe your pipeline as it runs.
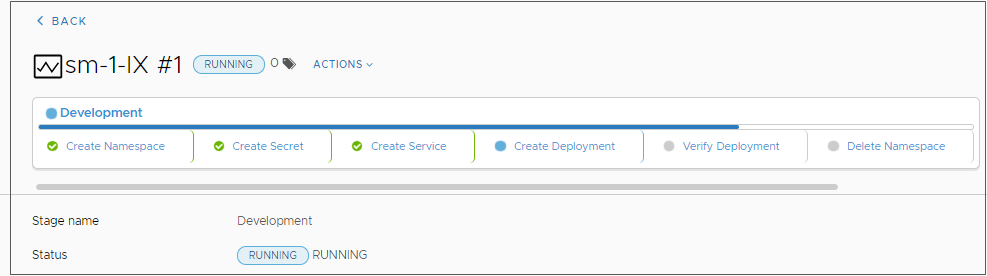
- Click the running stage and view the tasks as the pipeline runs.
Results
Congratulations! You set up the Docker trigger to run your CD pipeline continuously. Your pipeline can now upload new and updated Docker artifacts to the Docker Hub repository.
What to do next
Verify that your new or updated artifact is deployed to the Docker host in your development Kubernetes cluster.
