


To create a continuous integration and continuous delivery (CICD) pipeline in Automation Pipelines, you can use the CICD smart pipeline template. To plan your CICD native build, you gather the information for the smart pipeline template before you create the pipeline in this example plan.
To create a CICD pipeline, you must plan for both the continuous integration (CI) and continuous delivery (CD) stages of your pipeline.
After you enter the information in the smart pipeline template and save it, the template creates a pipeline that includes stages and tasks. It also indicates the deployment destination of your image based on the types of environment you select, such as Dev and Prod. The pipeline will publish your container image, and perform the actions required that run it. After your pipeline runs, you can monitor trends across the pipeline executions.
When a pipeline includes an image from Docker Hub, you must ensure that the image has cURL or wget embedded before you run the pipeline. When the pipeline runs, Automation Pipelines downloads a binary file that uses cURL or wget to run commands.
For information about configuring the workspace, see Configuring the Pipeline Workspace.
Planning the Continuous Integration (CI) stage
To plan the CI stage of your pipeline, you set up the external and internal requirements, and determine the information needed for the CI portion of the smart pipeline template. Here is a summary.
This example uses a Docker workspace.
Cloud-based or remote on-premises endpoints and repositories that you'll need:
- A source code repository where developers check in their code. Automation Pipelines pulls the latest code into the pipeline when developers commit changes.
- A Git endpoint for the repository where the developer source code resides.
- A Docker endpoint for the Docker build host that will run the build commands inside a container.
- A Kubernetes endpoint so that Automation Pipelines can deploy your image to a Kubernetes cluster.
- A Builder image that creates the container on which the continuous integration tests run.
- An Image Registry endpoint so that the Docker build host can pull the builder image from it.
You'll need access to a project. The project groups all your work, including your pipeline, endpoints, and dashboards. Verify that you are a member of a project in Automation Pipelines. If you are not, ask a Automation Pipelines administrator to add you as a member of a project. See How do I add a project in Automation Pipelines.
You'll need a Git webhook that enables Automation Pipelines to use the Git trigger to trigger your pipeline when developers commit code changes. See How do I use the Git trigger in Automation Pipelines to run a pipeline.
Your build toolsets:
- Your build type, such as Maven.
- All the post-process build tools that you use, such as JUnit, JaCoCo, Checkstyle, and FindBugs.
Your publishing tool:
- A tool such as Docker that will deploy your build container.
- An image tag, which is either the commit ID or the build number.
Your build workspace:
- A Docker build host, which is the Docker endpoint.
- An Image Registry. The CI part of the pipeline pulls the image from the selected registry endpoint. The container runs the CI tasks, and deploys your image. If the registry needs credentials, you must create an Image Registry endpoint, then select it here so that the host can pull the image from the registry.
- URL for the builder image that creates the container on which the continuous integration tasks run.
Planning the Continuous Delivery (CD) stage
To plan the CD stage of your pipeline, you set up the external and internal requirements, and determine the information to enter in the CD portion of the smart pipeline template.
Cloud-based or remote on-premises endpoints that you'll need:
- A Kubernetes endpoint so that Automation Pipelines can deploy your image to a Kubernetes cluster.
Environment types and files:
- All the environment types where Automation Pipelines will deploy your application, such as Dev and Prod. The smart pipeline template creates the stages and tasks in your pipeline based on the environment types you select.
Table 1. Pipeline stages that the CICD smart pipeline template creates Pipeline content What it does Build-Publish stage Builds and tests your code, creates the builder image, and publishes the image to your Docker host. Development stage Uses a development Amazon Web Services (AWS) cluster to create and deploy your image. In this stage, you can create a namespace on the cluster, and create a secret key. Production stage Uses a production version of the VMware Tanzu Kubernetes Grid Integrated Edition (formerly known as VMware Enterprise PKS) to deploy your image to a production Kubernetes cluster. - A Kubernetes YAML file that you select in the CD section of the CICD smart pipeline template.
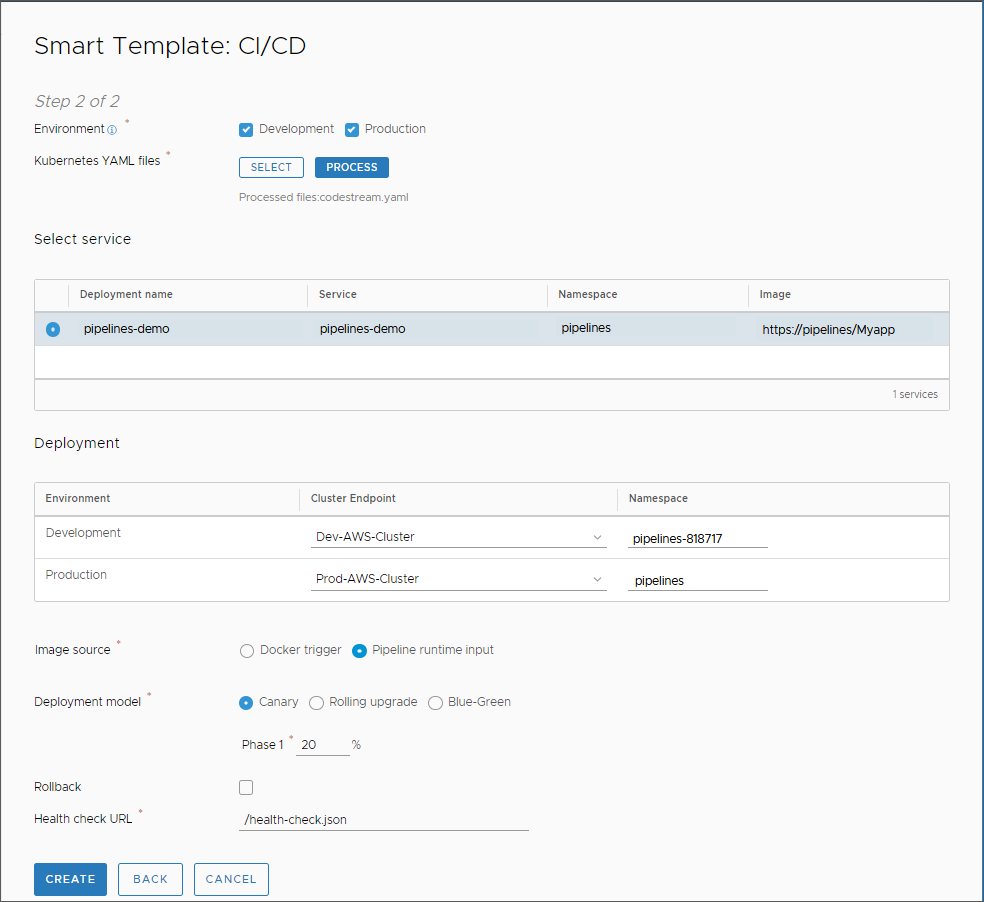
The Kubernetes YAML file includes three required sections for Namespace, Service, and Deployment and one optional section for Secret. If you plan to create a pipeline by downloading an image from a privately-owned repository, you must include a section with the Docker config Secret. If the pipeline you create only uses publicly available images, no secret is required. The following sample YAML file includes four sections.
apiVersion: v1
kind: Namespace
metadata:
  name: pipelines
  namespace: pipelines
---
apiVersion: v1
data:
  .dockerconfigjson: eyJhdXRocyI6eyJodHRwczovL2luZ1234567890lci5pby92MS8iOnsidXNlcm5hbWUiOiJhdXRvbWF0aW9uYmV0YSIsInBhc3N3b3JkIjoiVk13YXJlQDEyMyIsImVtYWlsIjoiYXV0b21hdGlvbmJldGF1c2VyQGdtYWlsLmNvbSIsImF1dGgiOiJZWFYwYjIxaGRHbHZibUpsZEdFNlZrMTNZWEpsUURFeU13PT0ifX19
kind: Secret
metadata:
  name: dockerhub-secret
  namespace: pipelines
type: kubernetes.io/dockerconfigjson
---
apiVersion: v1
kind: Service
metadata:
  name: pipelines-demo
  namespace: pipelines
  labels:
    app: pipelines-demo
spec:
  ports:
    - port: 80
  selector:
    app: pipelines-demo
    tier: frontend
  type: LoadBalancer
---
apiVersion: apps/v1
kind: Deployment
metadata:
  name: pipelines-demo
  namespace: pipelines
  labels:
    app: pipelines-demo
spec:
  replicas: 10
  selector:
    matchLabels:
      app: pipelines-demo
      tier: frontend
  template:
    metadata:
      labels:
        app: pipelines-demo
        tier: frontend
    spec:
      containers:
      - name: pipelines-demo
        image: automationbeta/pipelines-demo:01
        ports:
        - containerPort: 80
          name: pipelines-demo
      imagePullSecrets:
      - name: dockerhub-secret
Note: The Kubernetes YAML file is also used in the CD smart pipeline template, such as in the following use case examples:To apply the file in the Smart Template, click Select and select the Kubernetes YAML file. Then click Process. The smart pipeline template displays the available services and deployment environments. You select a service, the cluster endpoint, and the deployment strategy. For example, to use the Canary deployment model, select Canary and enter a percentage for the deployment phase.
To see an example of using the smart pipeline template to create a pipeline for a Blue-Green deployment, see How do I deploy my application in Automation Pipelines to my Blue-Green deployment.
How you'll create the CICD pipeline by using the smart pipeline template
After you gather all the information and set up what you need, here's how you'll create a pipeline from the CICD smart pipeline template.
In Pipelines, you'll select .

You'll select the CICD smart pipeline template.

You will fill out the template, and save the pipeline with the stages that it creates. If you need to make any final changes, you can edit the pipeline and save it.

Then, you will enable the pipeline and run it. After it runs, here are some things that you can look for:
- Verify that your pipeline succeeded. Click Executions, and search for your pipeline. If it failed, correct any errors and run it again.
- Verify that the Git webhook is operating correctly. The Git Activity tab displays the events. Click .
- Look at the pipeline dashboard and examine the trends. Click Dashboards, and search for your pipeline dashboard. You can also create a custom dashboard to report on additional KPIs.
For a detailed example, see How do I continuously integrate code from my GitHub or GitLab repository into my pipeline in Automation Pipelines.
