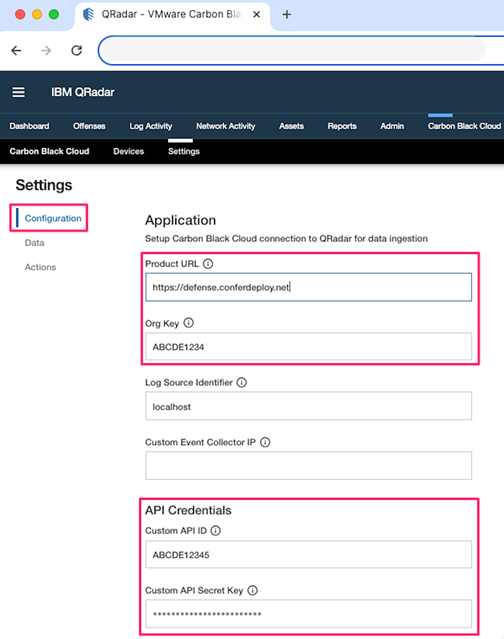
To install and configure the Carbon Black Cloud app for IBM QRadar, perform the following procedure.
Procedure
- Install the Carbon Black Cloud app for IBM QRadar through the IBM X-Force Security App Exchange.
- Open the Carbon Black Cloud console and copy its URL (including the "https://") and the ORG KEY.
- Open the QRadar console.
- Go to Carbon Black Cloud > Settings > Configuration and paste the URL and ORG KEY into their respective fields.
- If you have not filled in the API Credentials section in the Configuration page, follow the steps in Set up Built-in API Input for IBM QRadar to obtain the credentials.
- Click Save.
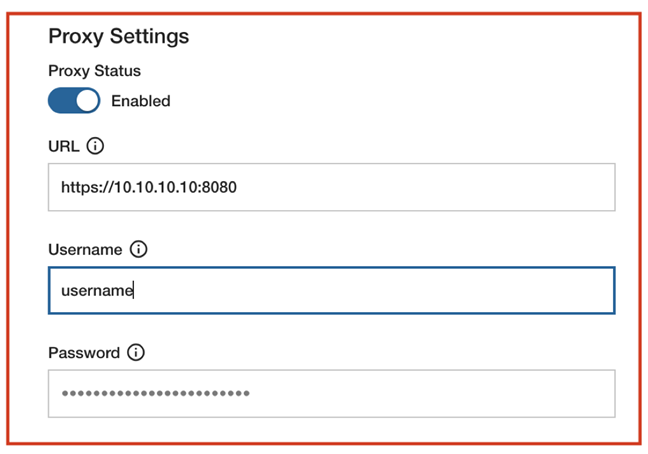
- Optional: If you use a proxy, add your
Proxy URL (format as [http/https]://[ip/hostname]:[port]), Username, and Password under the Proxy Settings section, enable the Proxy Status toggle, and click Save.
- Optional: Enter a custom name for the
Log Source Identifier.
Important: Before entering a custom name, you must create a Custom Log Source and then enter its
Log Source Identifier under
Settings > Configuration > Log Source Identifier. To create a Syslog Log Source, see
Create Syslog Log Source for IBM QRadar.
- Optional: If you are running the app on a dedicated Apphost, enter the QRadar Console IP address or hostname (or an external Event Collector IP address or hostname) for the
Custom Event Collector IP. Otherwise, leave this field empty.
- Click Save.
The configuration is validated. If the configuration is valid, a green message displays in the right upper corner of the page. If the configuration is invalid, a pop-up window describes the validation error with the option to still save the invalid configuration. If you encounter errors, see
Troubleshooting the Carbon Black Cloud App in IBM QRadar.
Configuration validation occurs every time you open the Carbon Black Cloud > Settings > Configuration page.
Note: Administrators can reset and test the configuration any time using the
Reset Configuration and
Test Configuration options.

