


After you create a provider virtual data center in VMware Cloud Director, you can modify its properties, deactivate or delete it, and manage its storage policies and resource pools.
To create a provider virtual data center, you must use either the Service Provider Admin Portal or the vCloud API. For information about using Service Provider Admin Portal, see Create a Provider Virtual Data Center in Your VMware Cloud Director. For information about using the vCloud API, see the VMware Cloud Director API Programming Guide.
Activate or Deactivate a Provider Virtual Data Center in Your VMware Cloud Director
In VMware Cloud Director, to deactivate all existing organization virtual data centers (VDCs) that use the resources of a provider VDC, you can deactivate this provider VDC. You cannot create organization VDCs that use the resources of a deactivated provider VDC.
Running vApps and powered on virtual machines continue to run in the existing organization VDCs backed by this provider VDC, but you cannot create or start additional vApps or virtual machines.
Procedure
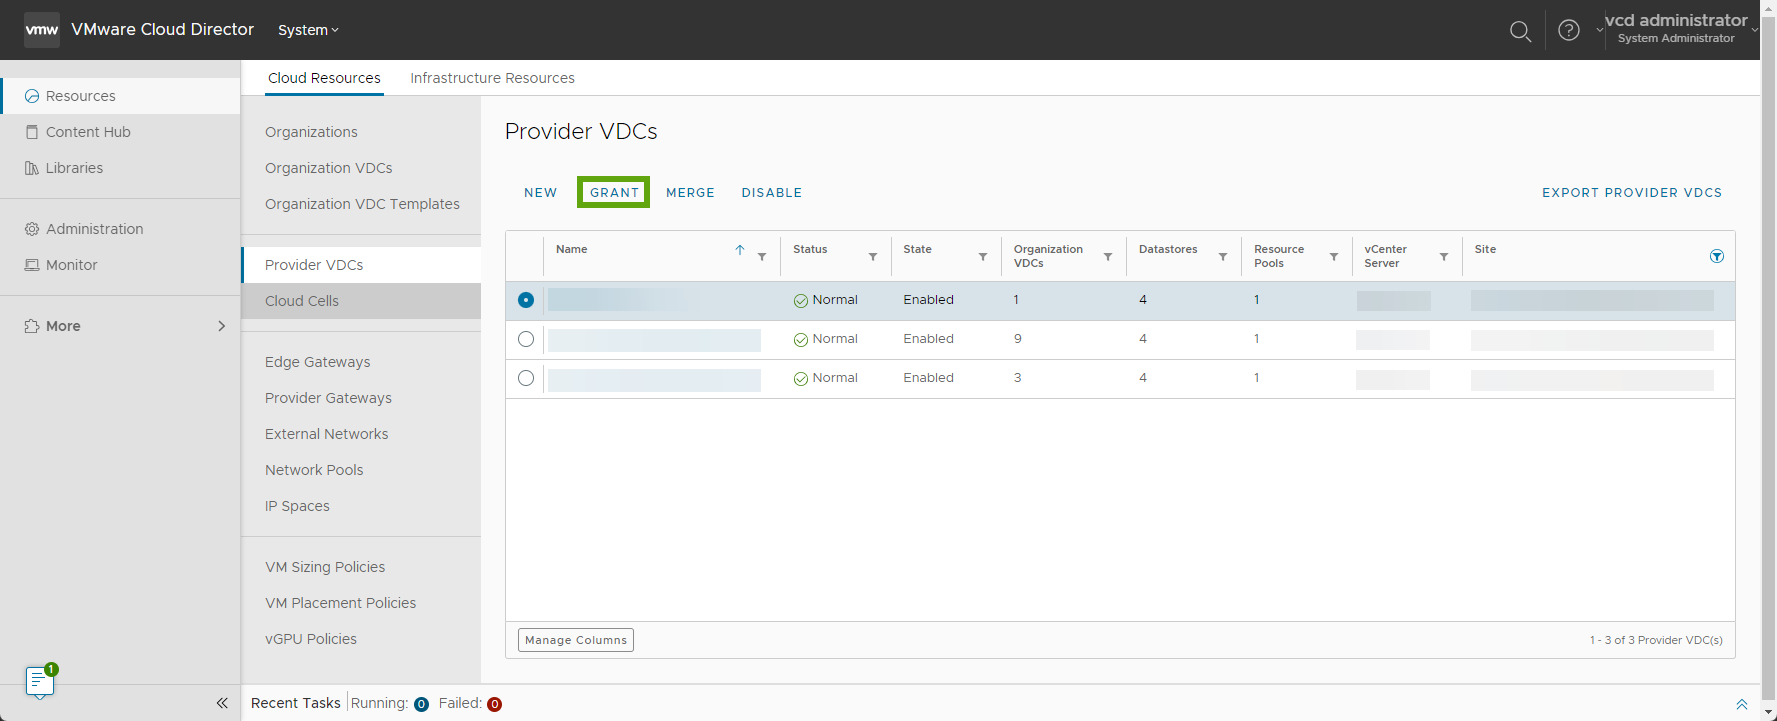
- From the primary left navigation panel, select Resources, and from the page top navigation bar, select Cloud Resources.
- From the secondary left panel, select Provider VDCs.
- Click the radio button next to the name of the target provider VDC, and click Enable or Disable.
- To confirm, click OK.
Edit the General Settings of a Provider Virtual Data Center in Your VMware Cloud Director
In VMware Cloud Director, you can change the name and the description of a provider virtual data center (VDC). If the backing resource pool supports a higher virtual hardware version, you can upgrade the highest virtual hardware supported by a provider VDC.
Procedure
Grant Your VMware Cloud Director Provider VDC Resources to a Sub-Provider
You can enable VMware Cloud Director sub-providers to use resources from your provider virtual data centers (VDCs).
Prerequisites
Verify that at least one organization has the necessary sub-provider rights. For more information on sub-providers and their rights and capabilities, see Overview of VMware Cloud Director Administration.
Procedure
What to do next
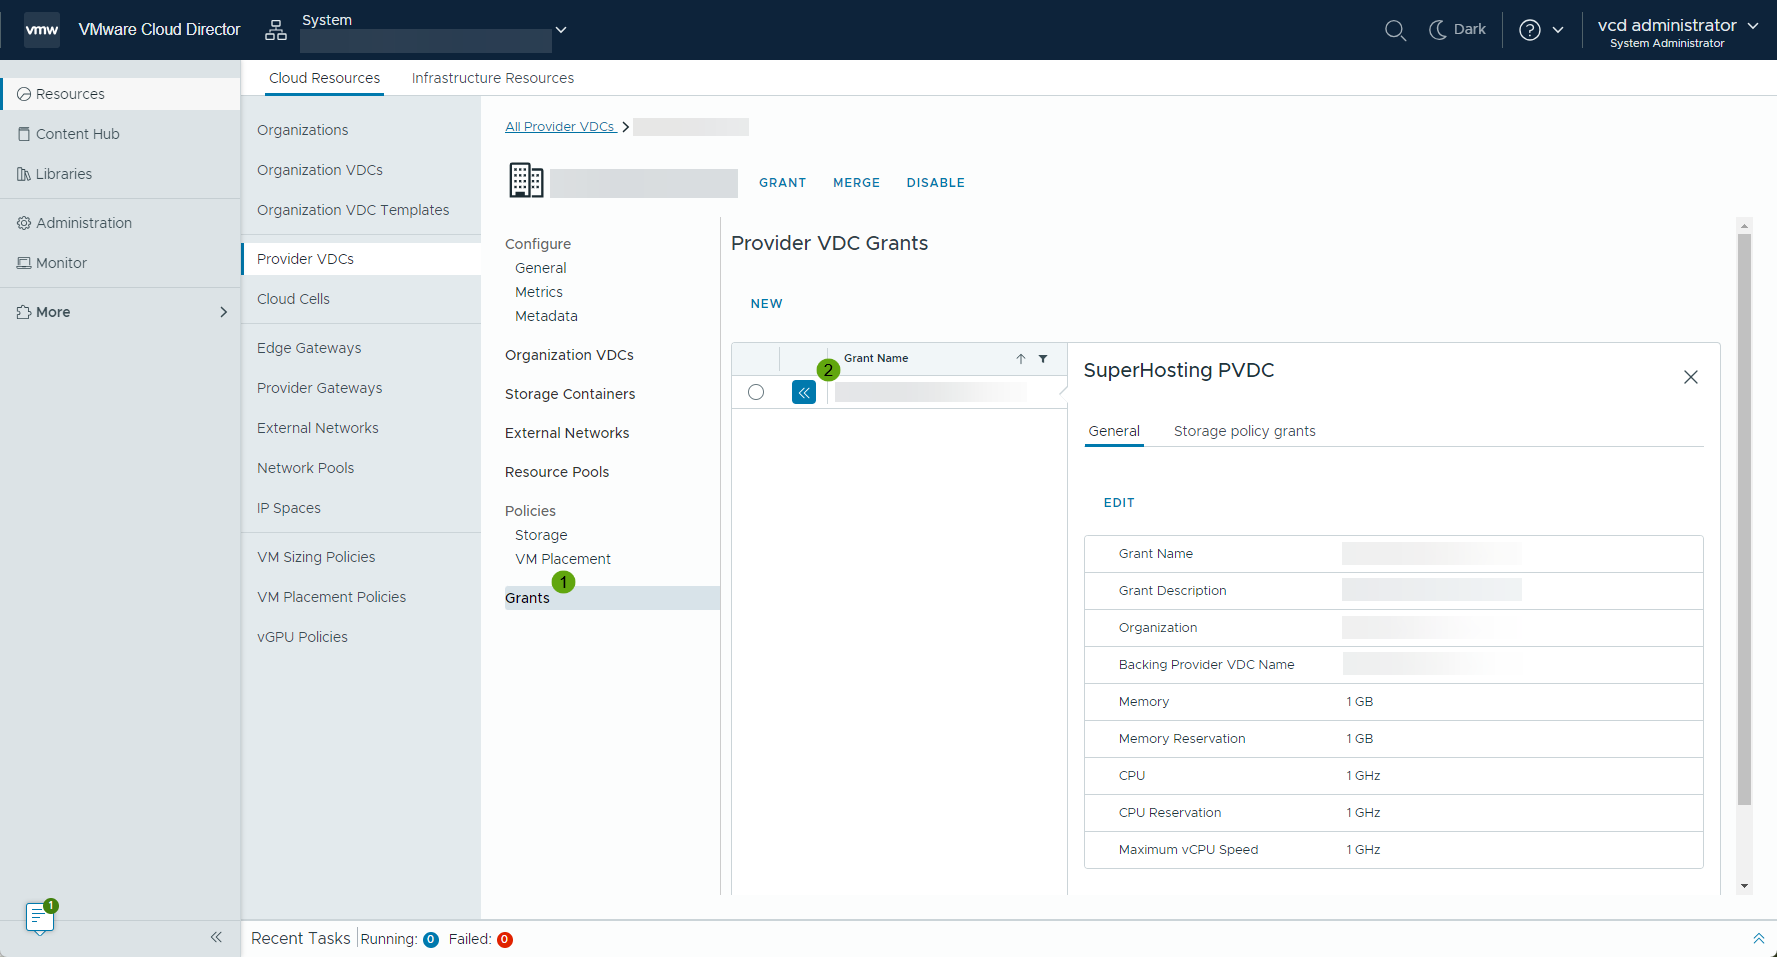
- On the Grants page, you can review all resource grants for a provider VDC. To see the grant details, expand the provider VDC grant.
- Grant a VMware Cloud Director Provider VDC Storage Policy
- To see all the grants for a specific organization sorted by type, you can navigate to the Tenant Portal of a sub-provider organization. From the primary left navigation, select Administration and from the secondary left navigation, under Grants, select Provider VDCs.
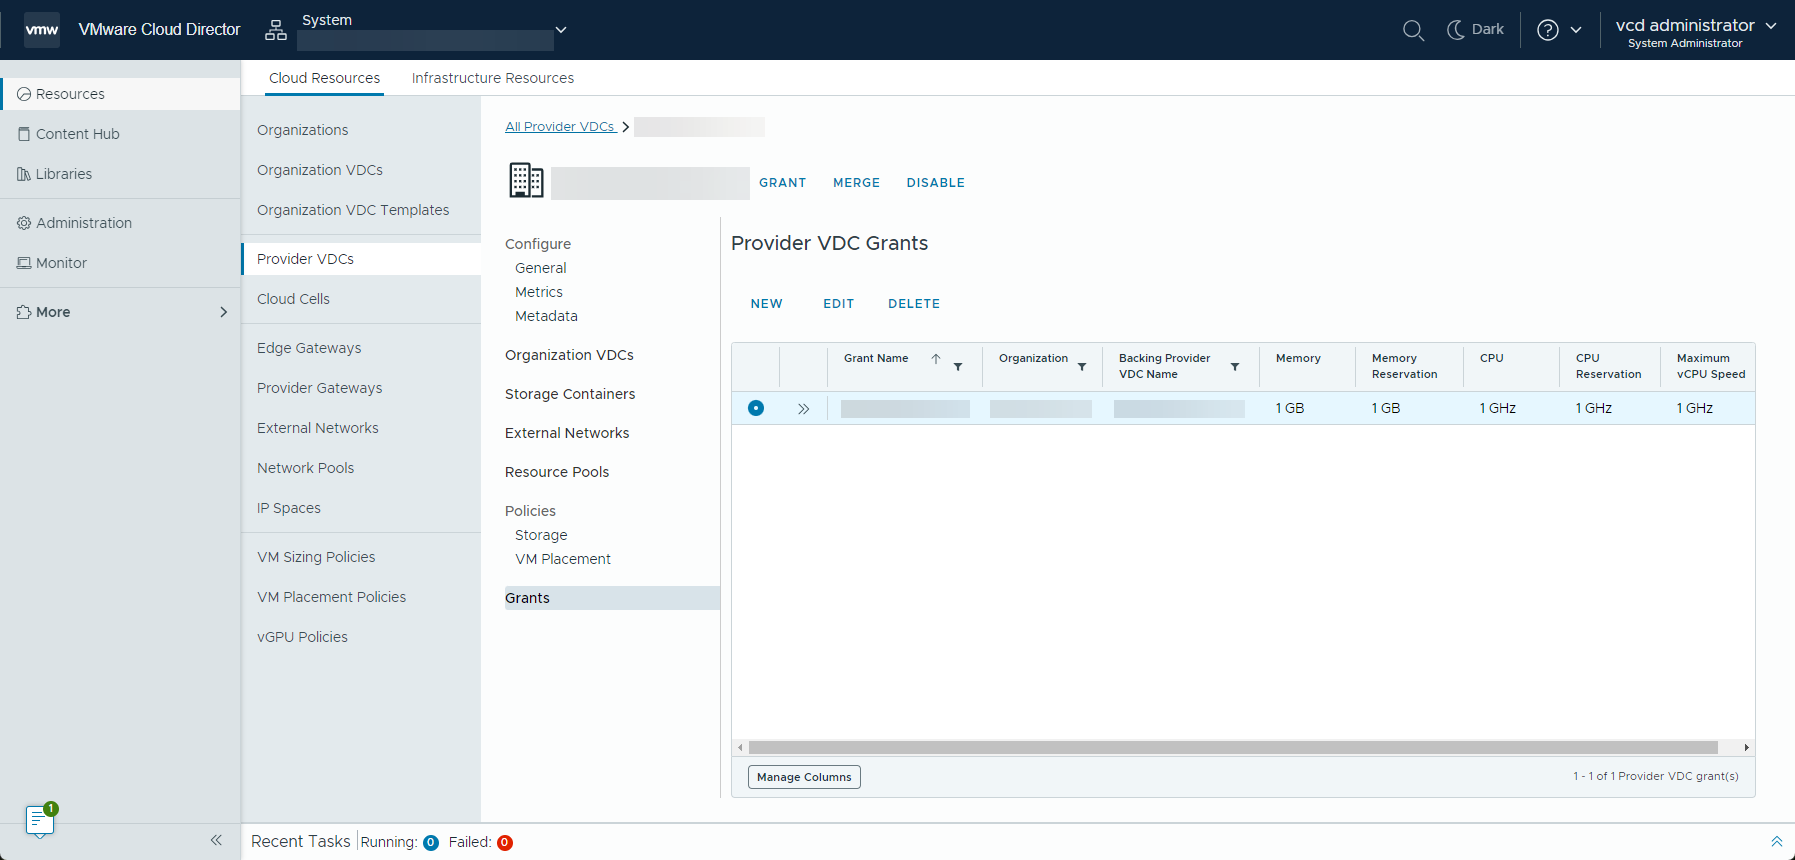
Edit Your VMware Cloud Director Provider VDC Resource Grant
You can change the memory, CPU, and general settings of your provider VDC resource grant.
Prerequisites
Grant Your VMware Cloud Director Provider VDC Resources to a Sub-Provider
Procedure
What to do next
Merge Provider Virtual Data Centers in Your VMware Cloud Director
To combine the resources of two VMware Cloud Director provider VDCs, you can merge these provider VDCs into a single provider VDC.
You can merge provider VDCs that are backed by NSX.
VMware Cloud Director supports merging provider VDCs that are not backed by networking resources, and merging a provider VDC that is not backed by networking resources with an NSX-backed provider VDC.
Prerequisites
- Verify that both provider VDCs have the same enabled state.
- If you want to merge provider VDCs that are backed by NSX, verify that both provider VDCs are backed by the same NSX Manager instance and by the same Geneve network pool.
- Verify that both provider VDCs are backed by the same vCenter instance and by the same data center.
- Verify that the provider VDC that you want to expand supports the highest hardware version used in the provider VDC that is to be merged. If the merging provider VDC contains a VM with a higher hardware version than the highest one supported by the expanding provider VDC, the merge fails.
- Verify that both provider VDCs contain only elastic organization VDCs.
- If you want to merge provider VDCs with network pools that are backed by VXLAN, verify that the VXLAN pools have the same NSX working state. See "Verify the NSX Working State" in the NSX Upgrade Guide.
Procedure
- From the primary left navigation panel, select Resources, and from the page top navigation bar, select Cloud Resources.
- From the secondary left panel, select Provider VDCs.
- Select the provider virtual data center that you want to expand, and click Merge.
- Select the provider virtual data center to merge with the target provider VDC, and click Merge.
View the Organization Virtual Data Centers of a Provider Virtual Data Center in Your VMware Cloud Director
In VMware Cloud Director, you can view a list of the organization virtual data centers that are using resources from a provider virtual data center.
Procedure
- From the primary left navigation panel, select Resources, and from the page top navigation bar, select Cloud Resources.
- From the secondary left panel, select Provider VDCs, and click the name of the target provider virtual data center.
- Click the Organization VDCs tab.
Results
The list of the organization virtual data centers that are consuming the resources from this provider virtual data center displays. For each organization VDC, the list includes information about the status, state, allocation model, organization, vCenter instance, number of networks, number of vApps, number of storage policies, and number of resource pools.
What to do next
- You can go the organization virtual data center view in the VMware Cloud Director Tenant Portal by clicking the pop-out icon (
 ) next to the name of the target organization virtual data center.
 - By clicking the radio button next to the name of an organization virtual data center, you can perform management operations that are similar to the operations described in Managing Organization Virtual Data Centers in VMware Cloud Director.
View the Datastores and Datastore Clusters on a Provider Virtual Data Center in Your VMware Cloud Director
In VMware Cloud Director, you can view details about the datastores and datastore clusters that provide the storage capacity to a provider virtual data center (VDC).
Procedure
What to do next
Configure Low Disk Space Thresholds for a Provider Virtual Data Center Storage Container in Your VMware Cloud Director
You can configure low disk space thresholds on a storage container to receive an email from VMware Cloud Director when the datastore reaches a specific threshold of available capacity. These warnings alert you to a low disk situation before it becomes a problem.
- Red threshold - the amount of free space on a datastore, below which, VMware Cloud Director filters out the datastore during the placement of any entity such as a VM, a template, or a disk.
When a datastore reaches its red threshold, the workload placement engine stops placing new VMs on the datastore except while importing VMs from vCenter. In the case of VM import, if the vCenter VM is already present on the red threshold datastore, the placement engine prefers the existing datastore.
The workload placement engine uses the red threshold for all workflows. When making a request for any new placement, the placement engine first filters out any datastores or storage pods which have breached the red threshold. When making a placement request for an existing entity, if the disks are residing on the datastores that are breaching the red threshold, VMware Cloud Director relocates the disks to other available datastores. Then, the engine selects a datastore out of the remaining datastores or storage pods, either through the selector logic of VMware Cloud Director or from the vSphere Storage DRS recommendations.
- Yellow threshold - the amount of free space on the datastore, below which VMware Cloud Director filters out the datastore during the placement of shadow VMs from which VMware Cloud Director creates fast-provisioned VMs. For more information on shadow VMs, see Fast Provisioning of Virtual Machines.
The yellow threshold does not apply to the linked clones that VMware Cloud Director uses for fast provisioning of VMs. When the placement engine selects a datastore for a linked clone, if the selected datastore is missing a shadow VM, VMware Cloud Director creates a shadow VM on the datastore. The threshold does not apply to the shadow VM in this case.
The yellow threshold applies only to the periodic background job creating shadow VMs. If activated, the job runs every 24 hours and uses eager VM creation on each datastore for a given hub and storage policy pair. To activate the job for eager provisioning of shadow VMs, you must set the following property totrue.valc.catalog.fastProvisioning=true
Note: The periodic background job creates shadow VMs on all datastores for all templates. The job increases the storage consumption even when you are not using the datastores or shadow VMs.
When implementing the threshold logic, VMware Cloud Director does not evaluate the requirements of the current placement subject. For the workload placement engine to place a subject on a datastore, the available space in bytes must be more than the threshold in bytes. For example, for a datastore with available capacity of 5 GB with a red threshold set at 4 GB, the placement engine can place a VM with a requirement for 2 GB. If the VM creation breaches the threshold, the placement engine filters out the datastore for further placements.
When you set thresholds on a stand-alone datastore, they apply only to that datastore. If you set thresholds on a datastore cluster, they apply to all datastores in the cluster. By default, VMware Cloud Director sets the red threshold to 15% and the yellow threshold to 25% of the stand-alone datastore or the datastore cluster's total capacity.
Because the default thresholds on a datastore cluster are based on the total cluster capacity, the thresholds might exceed the capacity of individual datastores within the cluster. When setting thresholds on a datastore cluster, consider the capacity of each datastore in the cluster and set thresholds manually rather than accepting the default threshold configurations.
Procedure
- From the primary left navigation panel, select Resources, and from the page top navigation bar, select Cloud Resources.
- From the secondary left panel, select Provider VDCs, and click the name of the target provider virtual data center.
- Select the Storage Containers tab.
- Click the name of a storage container and click Edit.
- Select the disk space thresholds for the storage container.
- Click Save.
Results
View the External Networks on a Provider Virtual Data Center in Your VMware Cloud Director
In VMware Cloud Director, you can view a list of the external networks that are accessible to a provider virtual data center.
Procedure
- From the primary left navigation panel, select Resources, and from the page top navigation bar, select Cloud Resources.
- From the secondary left panel, select Provider VDCs, and click the name of the target provider virtual data center.
- Click the External Networks tab.
Results
You can view a list of the available external networks with information about their gateway CIDR settings and IP pool use.
Delete a Provider Virtual Data Center in Your VMware Cloud Director
To remove the resources of a provider virtual data center from VMware Cloud Director, you can delete this provider virtual data center.
Prerequisites
- Deactivate the target provider virtual data center. See Activate or Deactivate a Provider Virtual Data Center in Your VMware Cloud Director.
- Delete all organization virtual data centers that use resources from this provider virtual data center. See Delete an Organization Virtual Data Center From VMware Cloud Director.
Procedure
- From the primary left navigation panel, select Resources, and from the page top navigation bar, select Cloud Resources.
- From the secondary left panel, select Provider VDCs.
- Click the radio button next to the name of the provider virtual data center that you want to remove, and click Delete.
- To confirm, click OK.
