


The management domain in your environment must be upgraded before you upgrade VI workload domains. To upgrade to VMware Cloud Foundation 5.2.x, all VI workload domains in your environment must be at VMware Cloud Foundation 4.5 or higher. If your environment is at a version lower than 4.5, you must upgrade the workload domains to 4.5 and then upgrade to 5.2.x.
- NSX.
- vCenter Server.
- ESXi.
- Workload Management on clusters that have vSphere with Tanzu. Workload Management can be upgraded through vCenter Server. See Updating the vSphere with Tanzu Environment.
- If you suppressed the Enter Maintenance Mode prechecks for ESXi or NSX, delete the following lines from the /opt/vmware/vcf/lcm/lcm-app/conf/application-prod.properties file and restart the LCM service:
lcm.nsxt.suppress.dry.run.emm.check=true
lcm.esx.suppress.dry.run.emm.check.failures=true
- If you have stretched clusters in your environment, upgrade the vSAN witness host. See Upgrade vSAN Witness Host for VMware Cloud Foundation.
- For NFS-based workload domains, add a static route for hosts to access NFS storage over the NFS gateway. See Post Upgrade Steps for NFS-Based VI Workload Domains.
- Remove the VM snapshots you took before starting the update.
- Take a backup of the newly installed components.
Plan VI Workload Domain Upgrade
Before proceeding with a VI workload domain upgrade you must first plan the upgrade to your target version.
Prerequisites
Upgrade the Management Domain to VMware Cloud Foundation 5.2.x.
Procedure
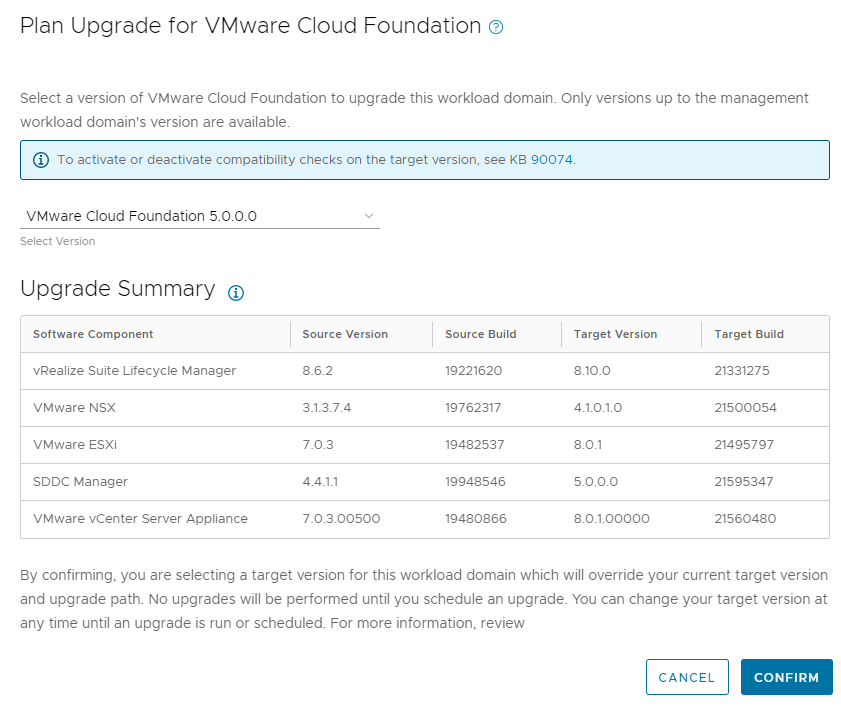
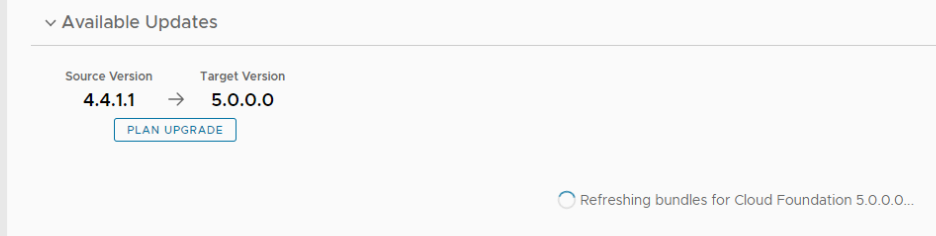
- Under Available Updates, click PLAN UPGRADE.
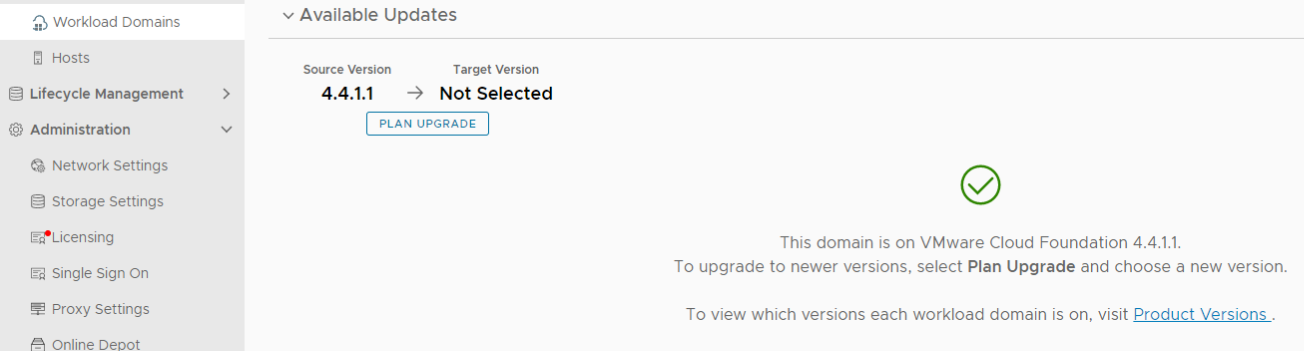
- On the Plan Upgrade for VMware Cloud Foundation screen, select the target version from the drop-down, and click CONFIRM.
Caution:
You must upgrade all VI workload domains to VMware Cloud Foundation 5.x. Upgrading to a higher 4.x release once the management domain has been upgraded to 5.x is unsupported.
Results
Bundles applicable to the chosen release will be made available to the VI workload domain.
Perform Update Precheck in SDDC Manager
You must perform a precheck in SDDC Manager before applying an update bundle to ensure that your environment is ready for the update.
Bundle-level pre-checks for vCenter are available in VMware Cloud Foundation.
Because ESXi bundle-level pre-checks only work in minor-version upgrades (for example: from ESXi 7.x through 7.y, or from ESXi 8.x through 8.y), these prechecks do not run in VMware Cloud Foundation.
If you silence a vSAN Skyline Health alert in the vSphere Client, SDDC Manager skips the related precheck and indicates which precheck it skipped. Click RESTORE PRECHECK to include the silenced precheck. For example: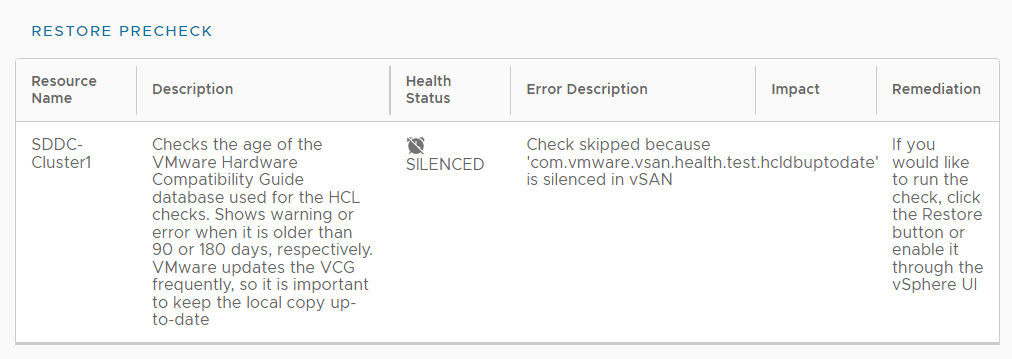
You can also silence failed vSAN prechecks in the SDDC Manager UI by clicking Silence Precheck. Silenced prechecks do not trigger warnings or block upgrades.
Only silence alerts if you know that they are incorrect. Do not silence alerts for real issues that require remediation.
Procedure
- On the domain summary page, click the Updates tab.
(The following image is a sample screenshot and may not reflect current product versions.)
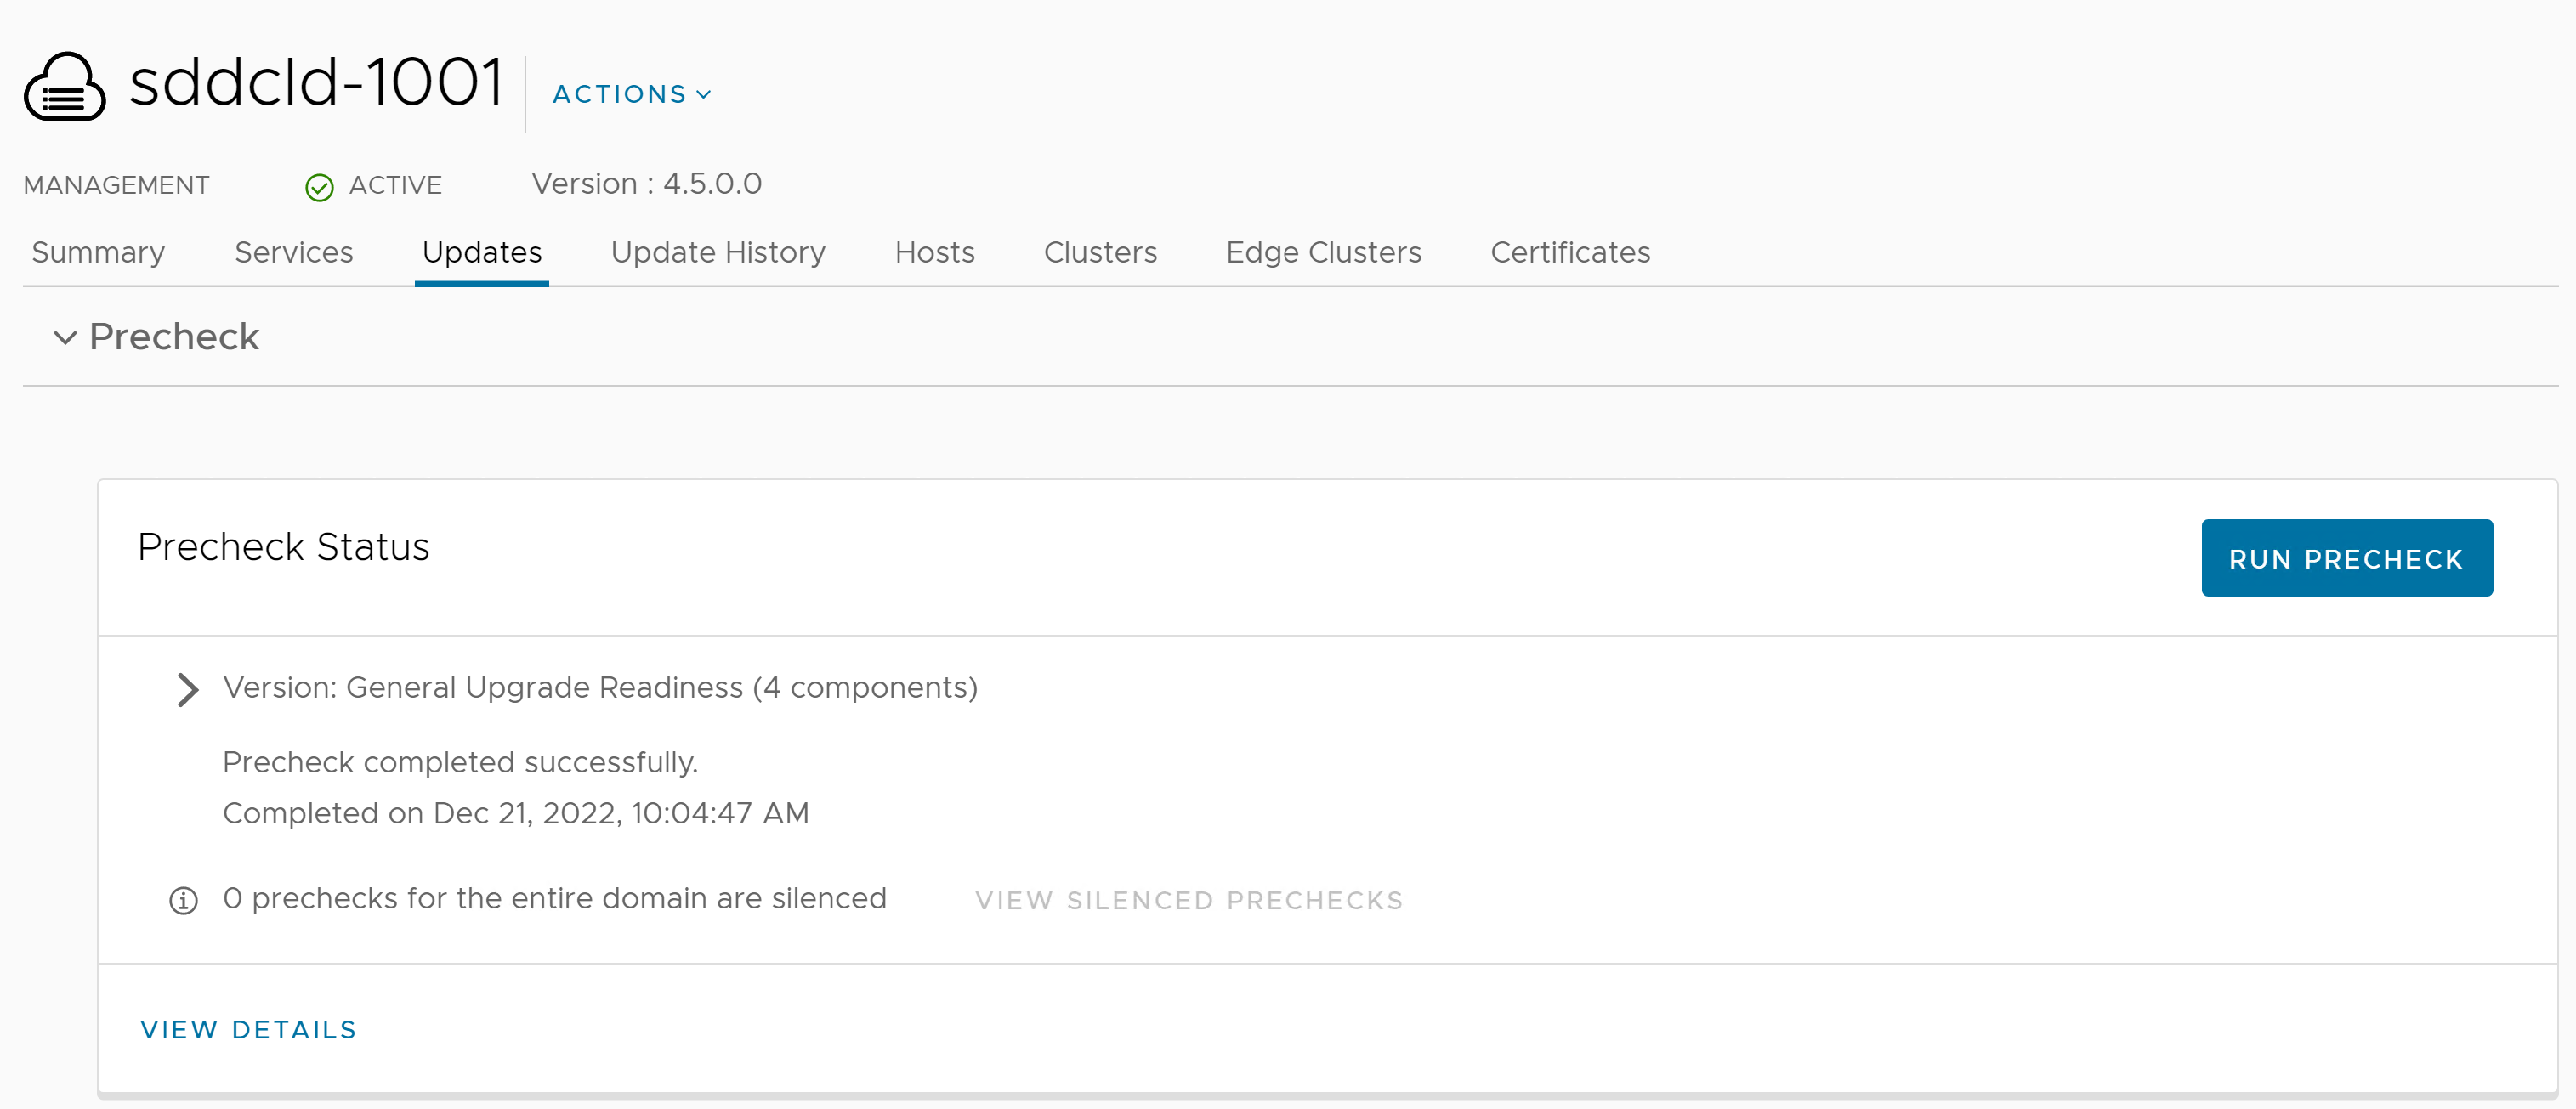
Note:It is recommended that you Precheck your workload domain prior to performing an upgrade.
- Click RUN PRECHECK to select the components in the workload domain you want to precheck.
- You can select to run a Precheck only on vCenter or the vSphere cluster. All components in the workload domain are selected by default. To perform a precheck on certain components, choose Custom selection.
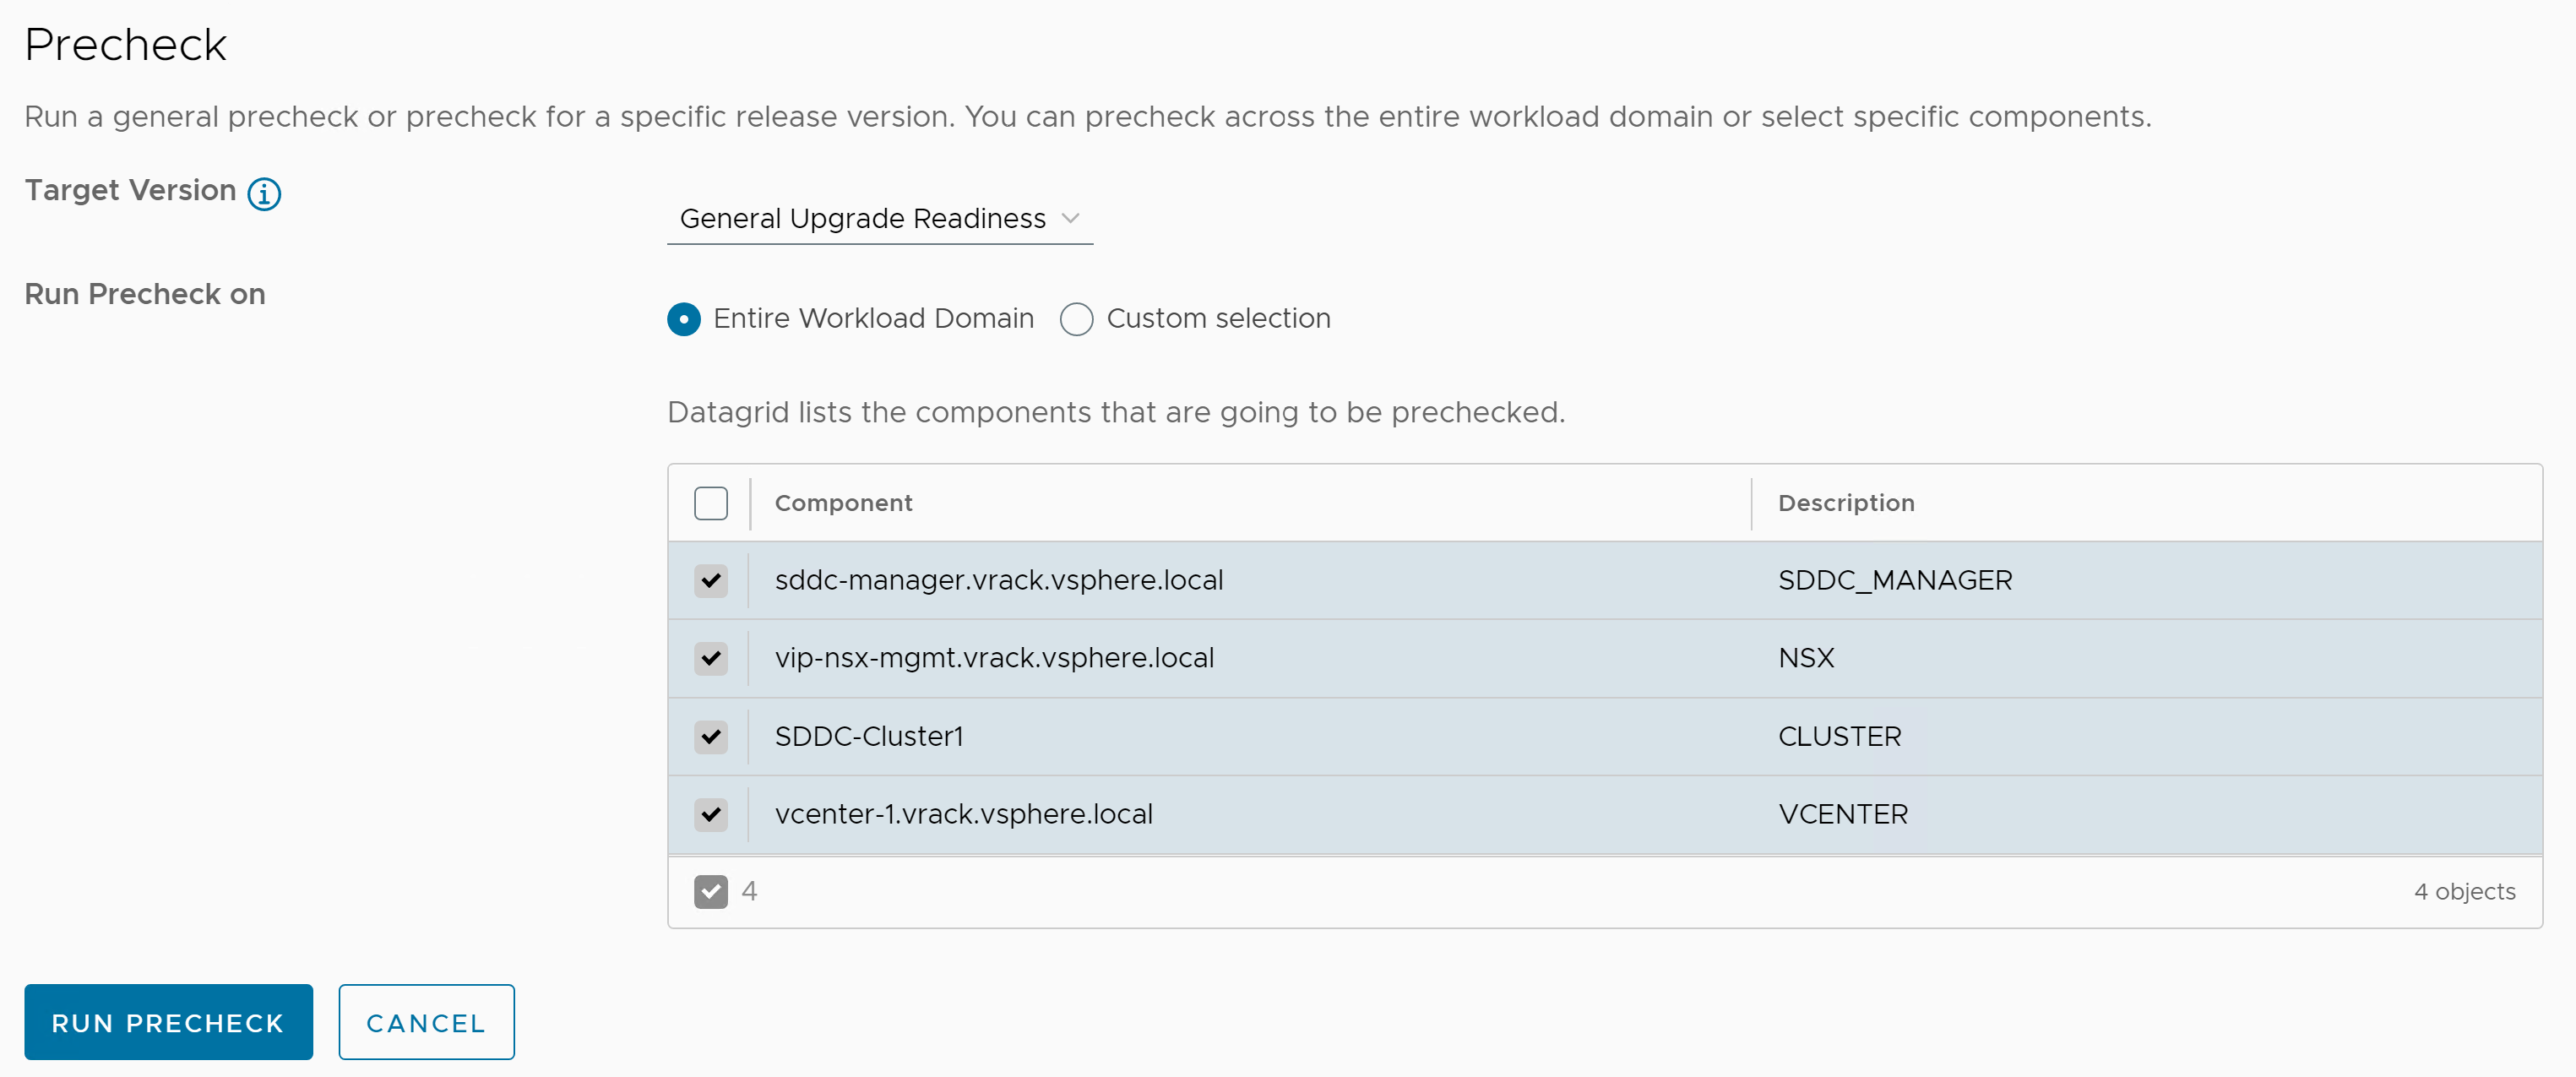
- If there are pending upgrade bundles available, then the "Target Version" dropdown contains "General Upgrade Readiness" and the available VMware Cloud Foundation versions to upgrade to. If there is an available VMware Cloud Foundation upgrade version, there will be extra checks - bundle-level prechecks for hosts, vCenter Server, and so forth. The version specific prechecks will only run prechecks on components that have available upgrade bundles downloaded.
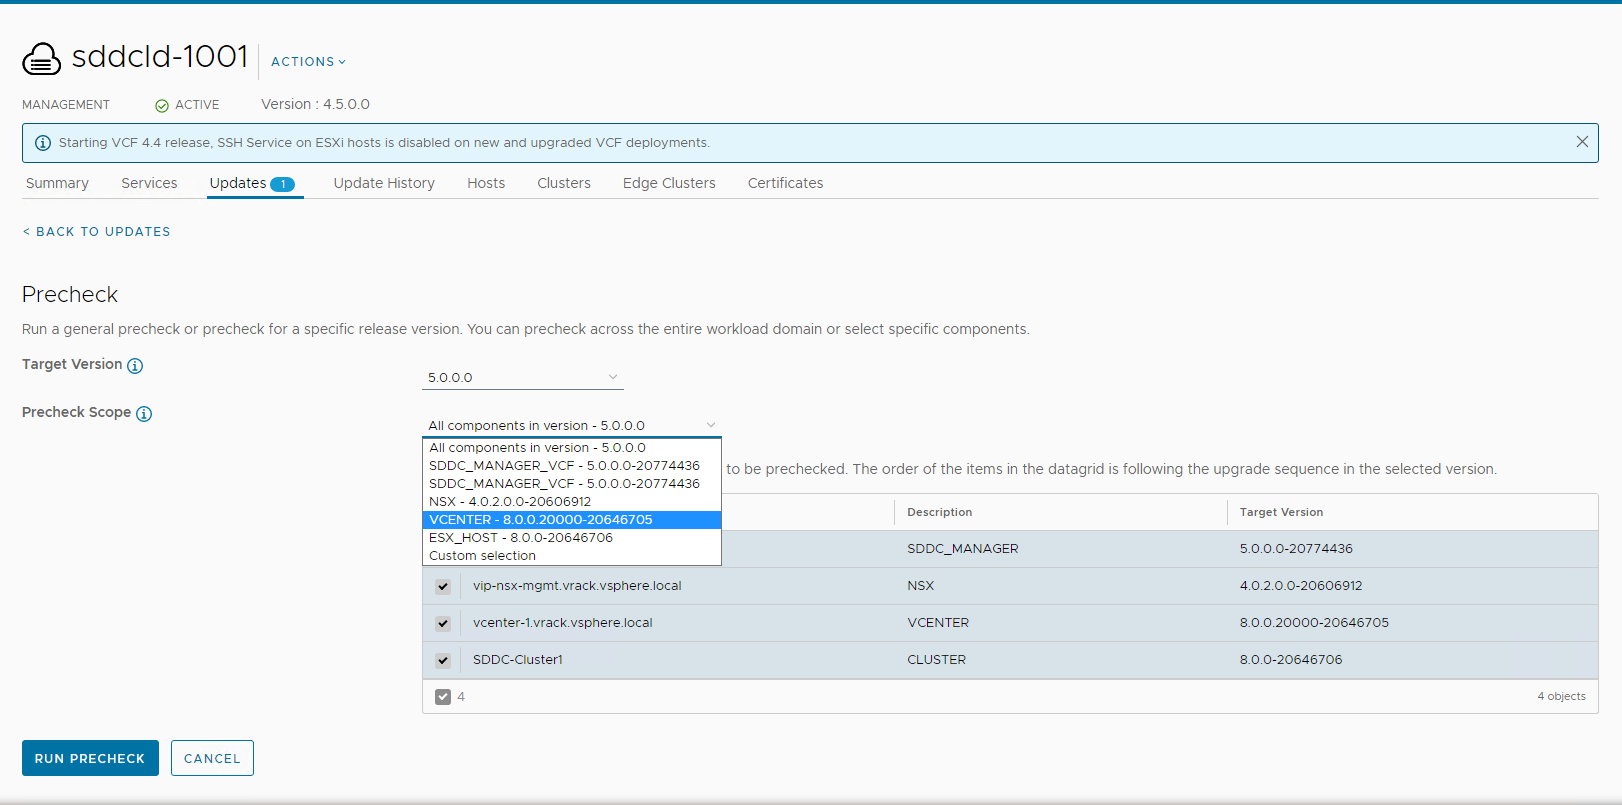
- You can select to run a Precheck only on vCenter or the vSphere cluster. All components in the workload domain are selected by default. To perform a precheck on certain components, choose Custom selection.
- When the precheck begins, a progress message appears indicating the precheck progress and the time when the precheck began.
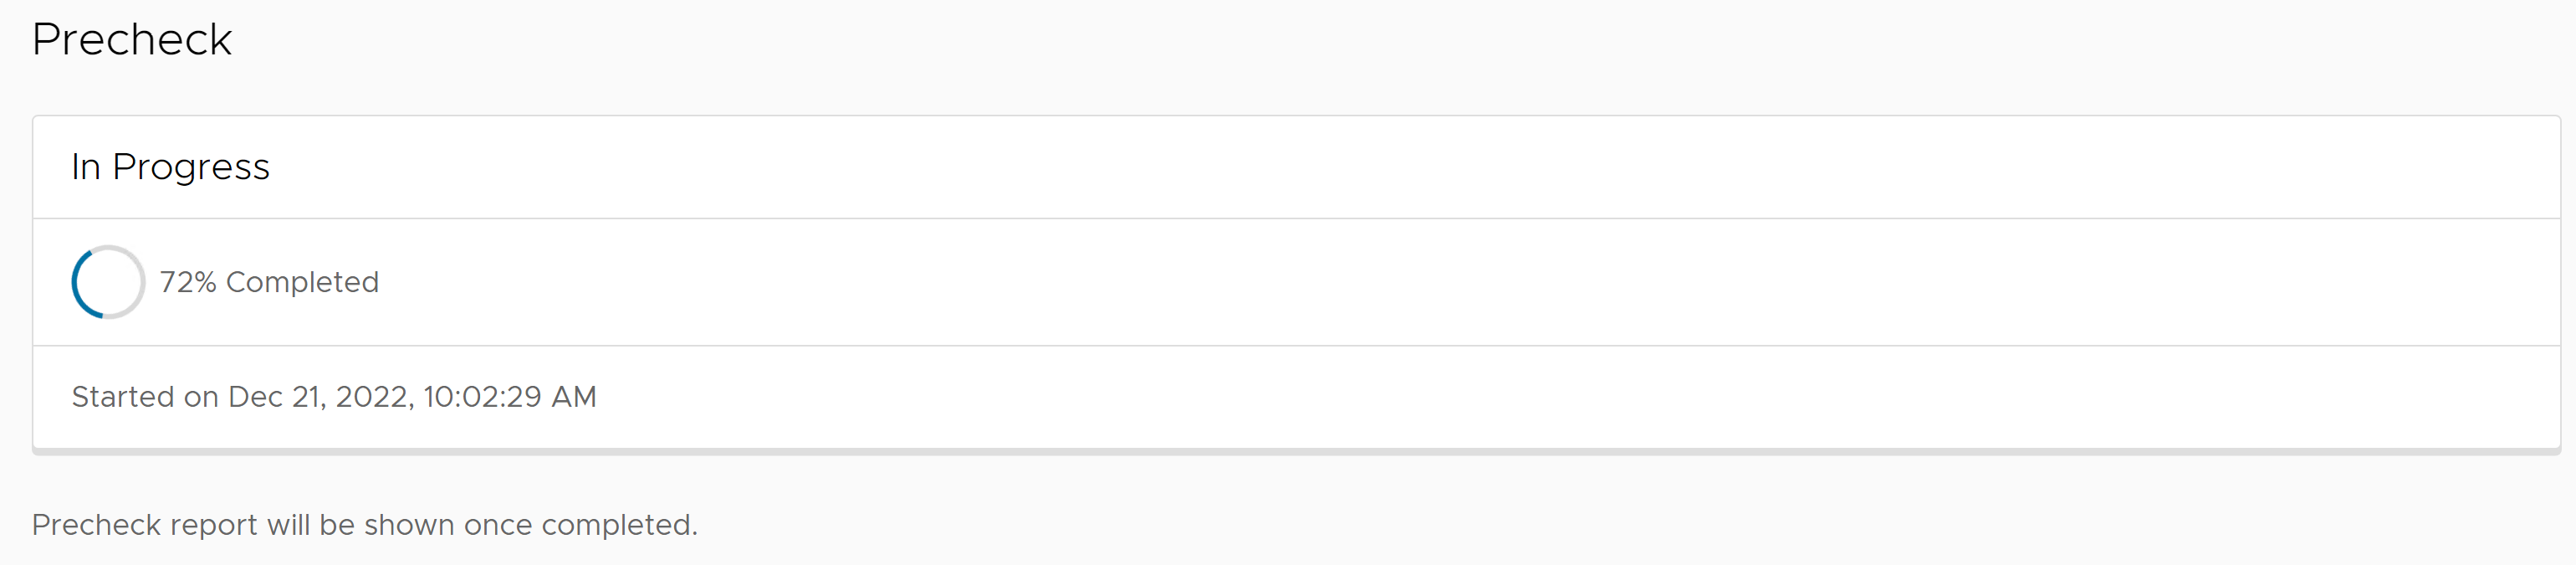
Note: Parallel precheck workflows are supported. If you want to precheck multiple domains, you can repeat steps 1-5 for each of them without waiting for step 5 to finish. - Once the Precheck is complete, the report appears. Click through ALL, ERRORS, WARNINGS, and SILENCED to filter and browse through the results.
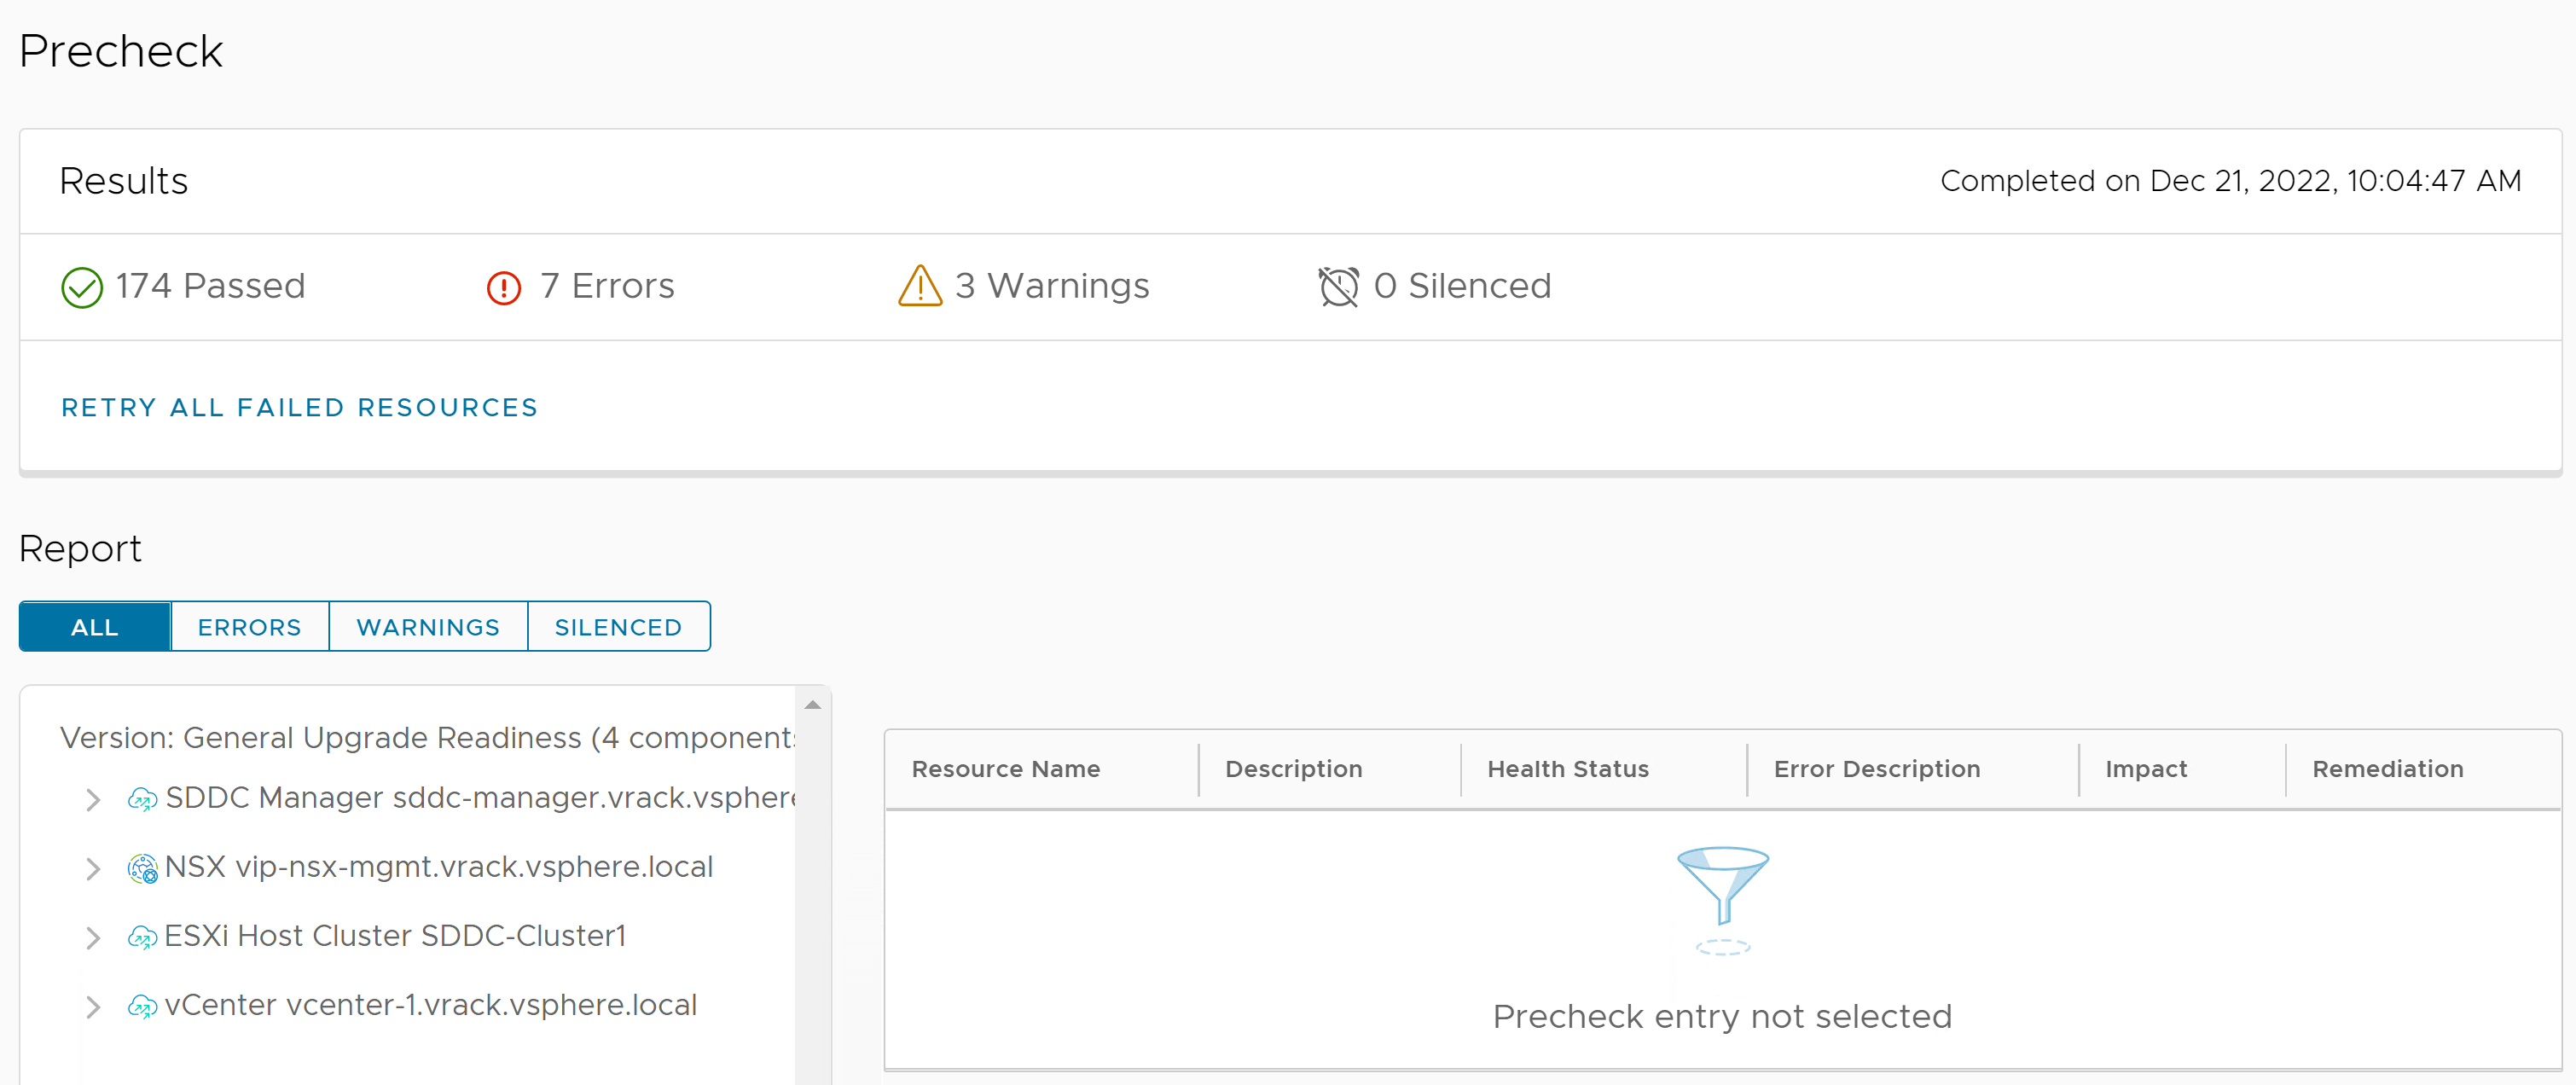
Results
The precheck result is displayed at the top of the Upgrade Precheck Details window. If you click Exit Details, the precheck result is displayed at the top of the Precheck section in the Updates tab.
Ensure that the precheck results are green before proceeding. Although a failed precheck will not prevent the upgrade from proceeding, it may cause the update to fail.
Upgrade NSX for VMware Cloud Foundation in a Federated Environment
If NSX Federation is configured between two VMware Cloud Foundation instances, SDDC Manager does not manage the lifecycle of the NSX Global Managers. You must manually upgrade the NSX Global Managers for each instance.
Download NSX Global Manager Upgrade Bundle
SDDC Manager does not manage the lifecycle of the NSX Global Managers. You must download the NSX upgrade bundle manually to upgrade the NSX Global Managers.
Procedure
Upgrade the Upgrade Coordinator for NSX Federation
The upgrade coordinator runs in the NSX Manager. It is a self-contained web application that orchestrates the upgrade process of hosts, NSX Edge cluster, NSX Controller cluster, and the management plane.
The upgrade coordinator guides you through the upgrade sequence. You can track the upgrade process and, if necessary, you can pause and resume the upgrade process from the UI.
Procedure
Upgrade NSX Global Managers for VMware Cloud Foundation
Manually upgrade the NSX Global Managers when NSX Federation is configured between two VMware Cloud Foundation instances.
Prerequisites
Procedure
Upgrade NSX for VMware Cloud Foundation 5.2.x
Upgrade NSX in the management domain and VI workload domains. VMware Cloud Foundation 5.2.1 supports in-place host upgrades for clusters that use vSphere Lifecycle Manager baselines.
Upgrading NSX involves the following components:
-
Upgrade Coordinator
-
NSX Edges/Clusters (if deployed)
-
Host clusters
-
NSX Manager cluster
Procedure
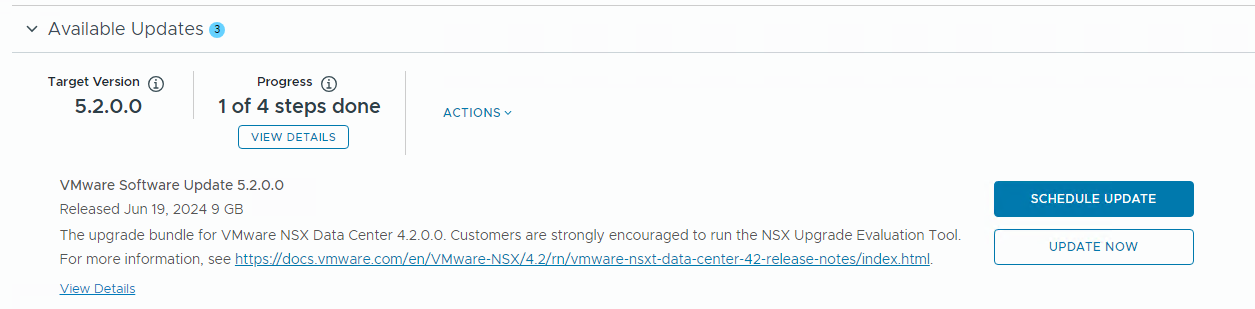
- For VMware Cloud Foundation 5.2:
- In the Available Updates section, click Update Now or Schedule Update next to the VMware Software Update for NSX.
- On the NSX Edge Clusters page, select the NSX Edge clusters you want to upgrade and click Next.
By default, all NSX Edge clusters are upgraded. To select specific NSX Edge clusters, select the Upgrade only NSX Edge clusters check box and select the Enable edge selection option. Then select the NSX Edges you want to upgrade.
- On the Host Cluster page,select the host cluster you want to upgrade and click Next.
By default, all host clusters across all workload domains are upgraded. If you want to select specific host clusters to upgrade, select Custom Selection. Host clusters are upgraded after all Edge clusters have been upgraded.Note:
The NSX Manager cluster is upgraded only if you select all host clusters. If you have multiple host clusters and choose to upgrade only some of them, you must go through the NSX upgrade wizard again until all host clusters have been upgraded.
- On the Upgrade Options dialog box, select the upgrade optimizations and click Next.
By default, Edge clusters and host clusters are upgraded in parallel. You can enable sequential upgrade by selecting the relevant check box.
- If you selected the Schedule Upgrade option, specify the date and time for the NSX bundle to be applied and click Next.
- On the Review page, review your settings and click Finish.
If you selected Upgrade Now, the NSX upgrade begins and the upgrade components are displayed. The upgrade view displayed here pertains to the workload domain where you applied the bundle. Click the link to the associated workload domains to see the components pertaining to those workload domains. If you selected Schedule Upgrade, the upgrade begins at the time and date you specified.
- In the Available Updates section, click Update Now or Schedule Update next to the VMware Software Update for NSX.
Results
When all NSX workload components are upgraded successfully, a message with a green background and check mark is displayed.
Upgrade vCenter Server for VMware Cloud Foundation 5.2.x
The upgrade bundle for VMware vCenter Server is used to upgrade the vCenter Server instances managed by SDDC Manager. Upgrade vCenter Server in the management domain before upgrading vCenter Server in VI workload domains.
Prerequisites
Download the VMware vCenter Server upgrade bundle. See Downloading VMware Cloud Foundation Upgrade Bundles.
Take a file-based backup of the vCenter Server appliance before starting the upgrade. See Manually Back Up vCenter Server.
Note:After taking a backup, do not make any changes to the vCenter Server inventory or settings until the upgrade completes successfully.
If your workload domain contains Workload Management (vSphere with Tanzu) enabled clusters, the supported target release depends on the version of Kubernetes (K8s) currently running in the cluster. Older versions of K8s might require a specific upgrade sequence. See KB 92227 for more information.
Procedure
- Upgrading to VMware Cloud Foundation 5.2:
- In the Available Updates section, click Update Now or Schedule Update next to the VMware Software Update for vCenter Server.
- Click Confirm to confirm that you have taken a file-based backup of the vCenter Server appliance before starting the upgrade.
- If you selected Schedule Update, click the date and time for the bundle to be applied and click Schedule.
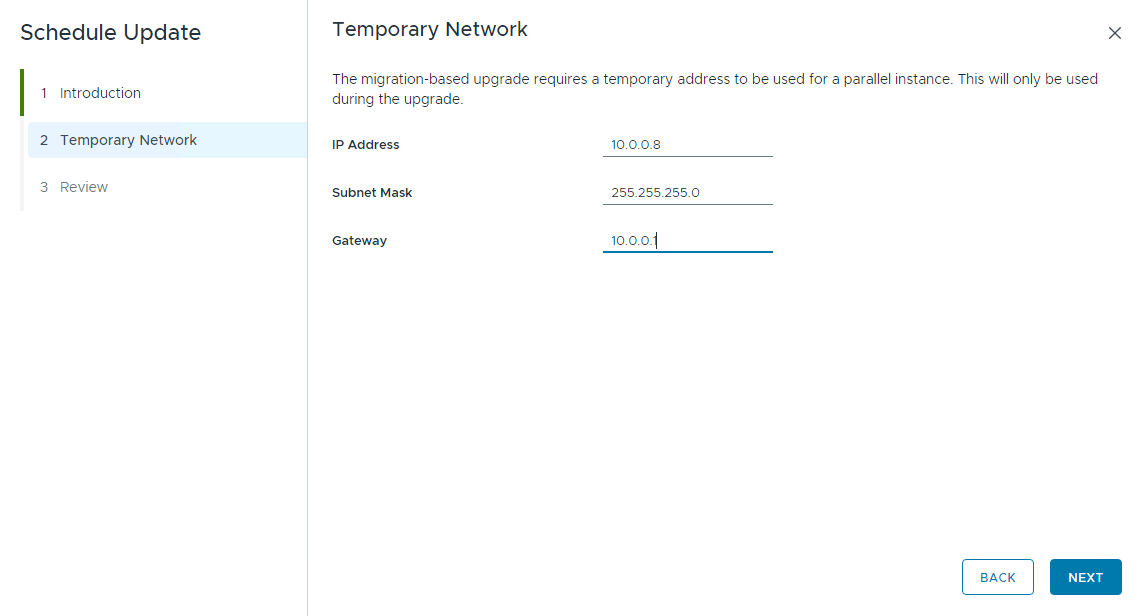
- If you are upgrading from VMware Cloud Foundation 4.5.x, enter the details for the temporary network to be used only during the upgrade. The IP address must be in the management subnet.
- Review the upgrade settings and click Finish.
What to do next
Once the upgrade successfully completes, use the vSphere Client to change the vSphere DRS Automation Level setting back to the original value (before you took a file-based backup) for each vSphere cluster that is managed by the vCenter Server. See KB 87631 for information about using VMware PowerCLI to change the vSphere DRS Automation Level.
Upgrade ESXi for VMware Cloud Foundation 5.2.1
VMware Cloud Foundation 5.2.1 and later support workload domains that include vSphere Lifecycle Manager baseline clusters and vSphere Lifecycle Manager image clusters. There is a single procedure for upgrading both vSphere Lifecycle Manager baseline clusters and vSphere Lifecycle Manager image clusters.
For information about upgrading ESXi in workload domains that use vSphere Lifecycle Manager images when your target version is VMware Cloud Foundation 5.2, see Upgrade ESXi with vSphere Lifecycle Manager Images for VMware Cloud Foundation 5.2.
For information about upgrading ESXi in workload domains that use vSphere Lifecycle Manager baselines when your target version is VMware Cloud Foundation 5.2, see Upgrade ESXi with vSphere Lifecycle Manager Baselines for VMware Cloud Foundation 5.2.
If you are using external (non-vSAN) storage, the following procedure updates the ESXi hosts attached to the external storage. However, updating and patching the storage software and drivers is a manual task and falls outside of SDDC Manager lifecycle management. To ensure supportability after an ESXi upgrade, consult the vSphere HCL and your storage vendor.
- If you want to skip any hosts while applying an ESXi update a workload domain, you must add these hosts to the application-prod.properties file before you begin the update. See "Skip Hosts During ESXi Update".
- To perform ESXi upgrades with custom ISO images or async drivers see "Upgrade ESXi with Custom ISOs" and "Upgrade ESXi with Stock ISO and Async Drivers".
Prerequisites
- Validate that the ESXi passwords are valid.
- Ensure that the domain for which you want to perform cluster-level upgrade does not have any hosts or clusters in an error state. Resolve the error state or remove the hosts and clusters with errors before proceeding.
- For clusters that use vSphere Lifecycle Manager images:
- You must upgrade NSX and vCenter Server before you can upgrade ESXi hosts with a vSphere Lifecycle Manager image.
- If you want to add firmware to the vSphere Lifecycle Manager image, you must install the Hardware Support Manager from your vendor. See Firmware Updates.
- A supported vSphere Lifecycle Manager image must be available in SDDC Manager. See steps 1-3 in Upgrade ESXi with vSphere Lifecycle Manager Images for VMware Cloud Foundation 5.2 for more information.
-
For clusters that use vSphere Lifecycle Manager baselines, download the ESXi bundle. See Downloading VMware Cloud Foundation Upgrade Bundles.
Procedure
What to do next
Upgrade the vSAN Disk Format for vSAN clusters. The disk format upgrade is optional. Your vSAN cluster continues to run smoothly if you use a previous disk format version. For best results, upgrade the objects to use the latest on-disk format. The latest on-disk format provides the complete feature set of vSAN. See Upgrade vSAN on-disk format versions.
Upgrade ESXi with vSphere Lifecycle Manager Baselines for VMware Cloud Foundation 5.2
The following procedure describes upgrading ESXi hosts in workload domains that use vSphere Lifecycle Manager baselines when your target version is VMware Cloud Foundation 5.2.
For information about upgrading ESXi in workload domains that use vSphere Lifecycle Manager images when your target version is VMware Cloud Foundation 5.2, see Upgrade ESXi with vSphere Lifecycle Manager Images for VMware Cloud Foundation 5.2.
VMware Cloud Foundation 5.2.1 and later support workload domains that include vSphere Lifecycle Manager baseline clusters and vSphere Lifecycle Manager image clusters. If you are upgrading to VMware Cloud Foundation 5.2.1, see Upgrade ESXi for VMware Cloud Foundation 5.2.1.
By default, the upgrade process upgrades the ESXi hosts in all clusters in a workload domain in parallel. If you have multiple clusters in a workload domain, you can select the clusters to upgrade.
If you want to skip any hosts while applying an ESXi update a workload domain, you must add these hosts to the application-prod.properties file before you begin the update. See "Skip Hosts During ESXi Update".
To perform ESXi upgrades with custom ISO images or async drivers see "Upgrade ESXi with Custom ISOs" and "Upgrade ESXi with Stock ISO and Async Drivers".
If you are using external (non-vSAN) storage, the following procedure updates the ESXi hosts attached to the external storage. However, updating and patching the storage software and drivers is a manual task and falls outside of SDDC Manager lifecycle management. To ensure supportability after an ESXi upgrade, consult the vSphere HCL and your storage vendor.
Prerequisites
Validate that the ESXi passwords are valid.
Download the ESXi bundle. See Downloading VMware Cloud Foundation Upgrade Bundles.
Ensure that the domain for which you want to perform cluster-level upgrade does not have any hosts or clusters in an error state. Resolve the error state or remove the hosts and clusters with errors before proceeding.
Procedure
What to do next
Upgrade the vSAN Disk Format for vSAN clusters. The disk format upgrade is optional. Your vSAN cluster continues to run smoothly if you use a previous disk format version. For best results, upgrade the objects to use the latest on-disk format. The latest on-disk format provides the complete feature set of vSAN. See Upgrade vSAN on-disk format versions.
Upgrade vSAN Witness Host for VMware Cloud Foundation
If your VMware Cloud Foundation environment contains stretched clusters, update and remediate the vSAN witness host.
Prerequisites
Download the ESXi ISO that matches the version listed in the the Bill of Materials (BOM) section of the VMware Cloud Foundation Release Notes.
Procedure
- In a web browser, log in to vCenter Server at https://vcenter_server_fqdn/ui.
- Upload the ESXi ISO image file to vSphere Lifecycle Manager.
- Click .
- Click the Imported ISOs tab.
- Click Import ISO and then click Browse.
- Navigate to the ESXi ISO file you downloaded and click Open.
- After the file is imported, click Close.
- Create a baseline for the ESXi image.
- On the Imported ISOs tab, select the ISO file that you imported, and click New baseline.
- Enter a name for the baseline and specify the Content Type as Upgrade.
- Click Next.
- Select the ISO file you had imported and click Next.
- Review the details and click Finish.
- Attach the baseline to the vSAN witness host.
- Click .
- In the Inventory panel, click .
- Select the vSAN witness host and click the Updates tab.
- Under Attached Baselines, click .
- Select the baseline that you had created in step 3 and click Attach.
- Click Check Compliance.
After the compliance check is completed, the Status column for the baseline is displayed as Non-Compliant.
- Remediate the vSAN witness host and update the ESXi hosts that it contains.
- Right-click the vSAN witness and click .
- Click OK.
- Click the Updates tab.
- Select the baseline that you had created in step 3 and click Remediate.
- In the End user license agreement dialog box, select the check box and click OK.
- In the Remediate dialog box, select the vSAN witness host, and click Remediate.
The remediation process might take several minutes. After the remediation is completed, the Status column for the baseline is displayed as Compliant.
- Right-click the vSAN witness host and click .
- Click OK.
Skip Hosts During ESXi Update
You can skip hosts while applying an ESXi update to a workload domain. The skipped hosts are not updated.
You cannot skip hosts that are part of a VI workload domain that is using vSphere Lifecycle Manager images, since these hosts are updated at the cluster-level and not the host-level.
Procedure
Results
The hosts added to the application-prod.properties are not updated when you update the workload domain.
Upgrade ESXi with Custom ISOs
For clusters in workload domains with vSphere Lifecycle Manager baselines, you can upgrade ESXi with a custom ISO from your vendor. VMware Cloud Foundation 4.4.1.1 and later support multiple custom ISOs in a single ESXi upgrade in cases where specific clusters or workload domains require different custom ISOs.
Prerequisites
Download the appropriate vendor-specific ISOs on a computer with internet access. If no vendor-specific ISO is available for the required version of ESXi, then you can create one. See Create a Custom ISO Image for ESXi.
Procedure
Upgrade ESXi with VMware Cloud Foundation Stock ISO and Async Drivers
For clusters in workload domains with vLCM baselines, you can apply the stock ESXi upgrade bundle with specified async drivers.
Prerequisites
Download the appropriate async drivers for your hardware on a computer with internet access.
Procedure
Upgrade ESXi with vSphere Lifecycle Manager Images for VMware Cloud Foundation 5.2
Prior to VMware Cloud Foundation 5.2.1, workload domains can use either vSphere Lifecycle Manager baselines or vSphere Lifecycle Manager images for ESXi host upgrade. The following procedure describes upgrading ESXi hosts in workload domains that use vSphere Lifecycle Manager images when your target version is VMware Cloud Foundation 5.2.
For information about upgrading ESXi in workload domains that use vSphere Lifecycle Manager baselines when your target version is VMware Cloud Foundation 5.2, see Upgrade ESXi with vSphere Lifecycle Manager Baselines for VMware Cloud Foundation 5.2.
VMware Cloud Foundation 5.2.1 and later support workload domains that include vSphere Lifecycle Manager baseline clusters and vSphere Lifecycle Manager image clusters. If you are upgrading to VMware Cloud Foundation 5.2.1, see Upgrade ESXi for VMware Cloud Foundation 5.2.1.
You create a vSphere Lifecycle Manager image for upgrading ESXi hosts using the vSphere Client. During the creation of the image, you define the ESXi version and can optionally add vendor add-ons, components, and firmware. After you extract the vSphere Lifecycle Manager image into SDDC Manager, the ESXi update will be available for the relevant VI workload domains.
Prerequisites
- Validate that the ESXi passwords are valid.
- Ensure that the domain for which you want to perform cluster-level upgrade does not have any hosts or clusters in an error state. Resolve the error state or remove the hosts and clusters with errors before proceeding.
- You must upgrade NSX and vCenter Server before you can upgrade ESXi hosts with a vSphere Lifecycle Manager image.
- If you want to add firmware to the vSphere Lifecycle Manager image, you must install the Hardware Support Manager from your vendor. See Firmware Updates.
Procedure
- Create a vSphere Lifecycle Manager image.
- Right-click the management domain data center and select New Cluster.
- Enter a name for the cluster (for example, ESXi upgrade image) and click Next.
Keep the default settings for everything except the cluster name.
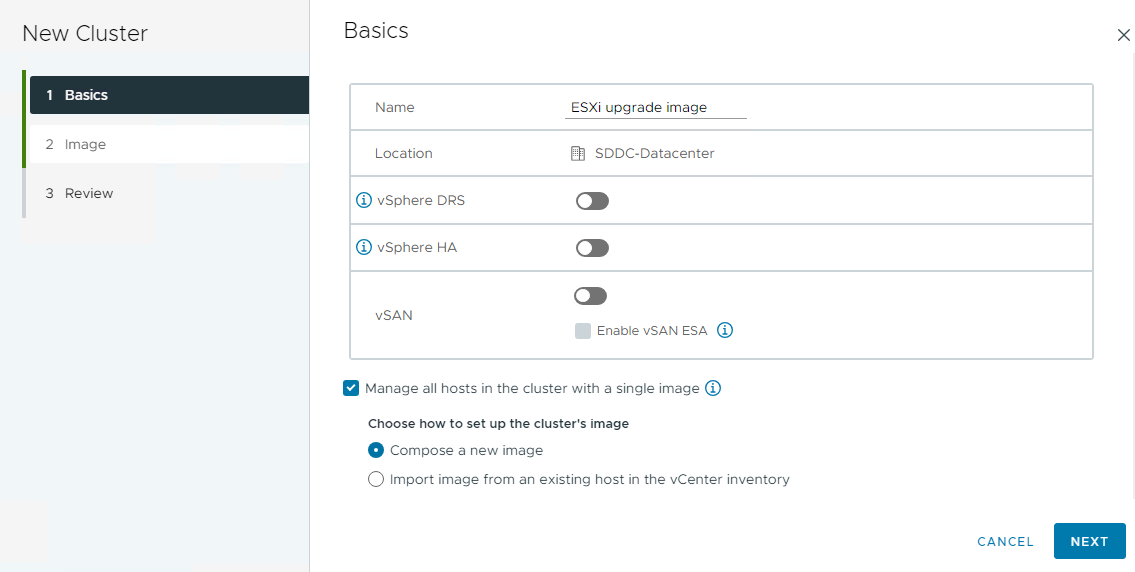
- Define the vSphere Lifecycle manager image and click Next.
Image Element Description ESXi Version From the ESXi Version drop-down menu, select the ESXi version specified in the VMware Cloud Foundation BOM. If the ESXi version does not appear in the drop-down menu, see Working With the vSphere Lifecycle Manager Depot.
Vendor Add-On (optional) To add a vendor add-on to the image, click Select and select a vendor add-on. You can customize the image components, firmware, and drivers later. - Click Finish.
- After the cluster is created successfully, click the Updates tab for the new cluster to further customize it, if needed.
- Click and then click Edit.
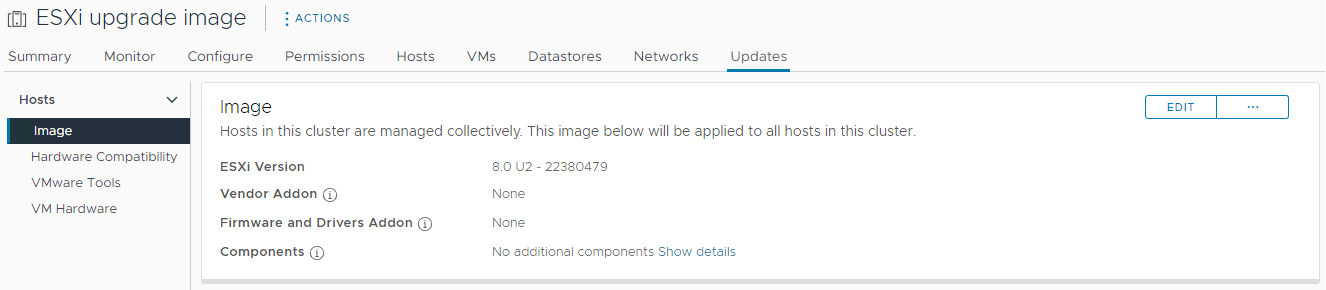
- Edit the vSphere Lifecycle manager image properties and click Save.
You already specified the ESXi version and optional vendor add-on, but you can modify those settings as required.
Image Element Description ESXi Version From the ESXi Version drop-down menu, select the ESXi version specified in the VMware Cloud Foundation BOM. If the ESXi version does not appear in the drop-down menu, see Synchronize the vSphere Lifecycle Manager Depot and Import Updates to the vSphere Lifecycle Manager Depot.
Vendor Add-On (optional) To add a vendor add-on to the image, click Select and select a vendor add-on. Firmware and Drivers Add-On (optional) To add a firmware add-on to the image, click Select. In the Select Firmware and Drivers Addon dialog box, specify a hardware support manager and select a firmware add-on to add to the image. Selecting a firmware add-on for a family of vendor servers is possible only if the respective vendor-provided hardware support manager is registered as an extension to the vCenter Server where vSphere Lifecycle Manager runs.
Components To add components to the image: - Click Show details.
- Click Add Components.
- Select the components and their corresponding versions to add to the image.
vSphere saves the cluster image. - Extract the vSphere Lifecycle Manager image into SDDC Manager.
- In the SDDC Manager UI, click .
- Click Import Image.
- In the Option 1 section, select the management domain from the drop-down menu.
- In the Cluster drop-down, select the cluster from which you want to extract the vSphere Lifecycle manager image. For example, ESXi upgrade image.
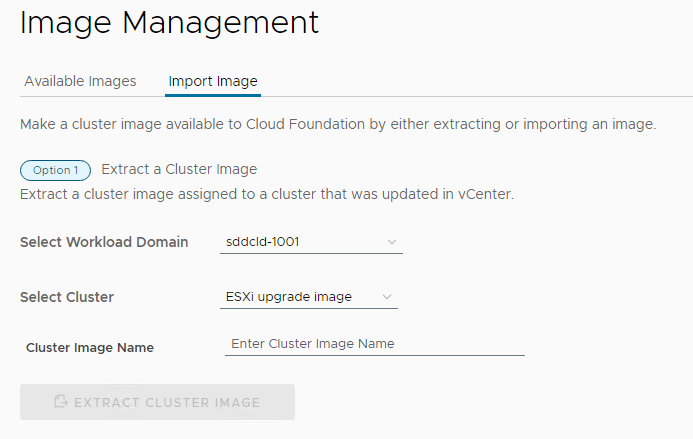
- Enter a name for the cluster image and click Extract Cluster Image.
You can view status in the Tasks panel. - Upgrade ESXi hosts with the vSphere Lifecycle Manager image.
- Navigate to the Updates tab of the VI workload domain.
- In the Available Updates section, click Configure Update.
- Click Next.
- Select the clusters to upgrade and click Next.
The default setting is to upgrade all clusters. To upgrade specific clusters, click Enable cluster-level selection and select the clusters to upgrade.
- Select the cluster and the cluster image, and click Apply Image.
- Click Next.
- Select the upgrade options and click Next.
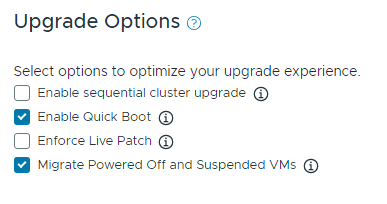
By default, the selected clusters are upgraded in parallel. If you selected more than five clusters to be upgraded, the first five are upgraded in parallel and the remaining clusters are upgraded sequentially. To upgrade all selected clusters sequentially, select Enable sequential cluster upgrade.Select Enable Quick Boot to reduce the upgrade time by skipping the physical reboot of the host.
Select Enforce Live Patch when the cluster image includes a Live Patch. With the Enforce Live Patch option, vSphere Lifecycle Manager does not place the hosts in the cluster into maintenance mode, hosts are not rebooted, and there is no need to migrate the virtual machines running on the hosts in the cluster.
Select Migrate Powered Off and Suspended VMs to migrate the suspended and powered off virtual machines from the hosts that must enter maintenance mode to other hosts in the cluster.
- Review the settings, and click Finish.
VMware Cloud Foundation runs a cluster image hardware compatibility and compliance check. Resolve any reported issues before proceeding.
- Click Schedule Update and click Next.
- Select Upgrade Now or Schedule Update and click Finish.
- Monitor the upgrade progress. See Monitor VMware Cloud Foundation Updates.
What to do next
Upgrade the vSAN Disk Format for vSAN clusters. The disk format upgrade is optional. Your vSAN cluster continues to run smoothly if you use a previous disk format version. For best results, upgrade the objects to use the latest on-disk format. The latest on-disk format provides the complete feature set of vSAN. See Upgrade vSAN on-disk format versions.
Firmware Updates
You can use vSphere Lifecycle Manager images to perform firmware updates on the ESXi hosts in a cluster. Using a vSphere Lifecycle Manager image simplifies the host update operation. With a single operation, you update both the software and the firmware on the host.
To apply firmware updates to hosts in a cluster, you must deploy and configure a vendor provided software module called hardware support manager. The deployment method and the management of a hardware support manager is determined by the respective OEM. For example, the hardware support manager that Dell EMC provides is part of their host management solution, OpenManage Integration for VMware vCenter (OMIVV), which you deploy as an appliance. See Deploying Hardware Support Managers.
You must deploy the hardware support manager appliance on a host with sufficient disk space. After you deploy the appliance, you must power on the appliance virtual machine, log in to the appliance as an administrator, and register the appliance as a vCenter Server extension. Each hardware support manager has its own mechanism of managing firmware packages and making firmware add-ons available for you to choose.
For detailed information about deploying, configuring, and managing hardware support managers, refer to the vendor-provided documentation.
Update License Keys for a Workload Domain
If upgrading from a VMware Cloud Foundation version prior to 5.0, you need to update your license keys to support vSAN 8.x and vSphere 8.x.
You first add the new component license key to SDDC Manager. This must be done once per license instance. You then apply the license key to the component on a per workload domain basis.
Prerequisites
You need a new license key for vSAN 8.x and vSphere 8.x. Prior to VMware Cloud Foundation 5.1.1, you must add and update the component license key for each upgraded component in the SDDC Manager UI as described below.
With VMware Cloud Foundation 5.1.1 and later, you can add a component license key as described below, or add a solution license key in the vSphere Client. See Managing vSphere Licenses for information about using a solution license key for VMware ESXi and vCenter Server. If you are using a solution license key, you must also add a VMware vSAN license key for vSAN clusters. See Configure License Settings for a vSAN Cluster.
Procedure
- Add a new component license key to the SDDC Manager inventory.
- In the navigation pane, click .
- On the Licensing page, click + License Key.
- Select a product from the drop-down menu.
- Enter the license key.
- Enter a description for the license key.
- Click Add.
- Repeat for each license key to be added.
- Update a license key for a workload domain component.
- In the navigation pane, click .
- On the Workload Domains page, click the domain you are upgrading.
- On the Summary tab, expand the red error banner, and click Update Licenses.
- On the Update Licenses page, click Next.
- Select the products to update and click Next.
- For each product, select a new license key from the list, and select the entity to which the licensekey should be applied and click Next.
- On the Review pane, review each license key and click Submit.
The new license keys will be applied to the workload domain. Monitor the task in the Tasks pane in SDDC Manager.
Upgrade vSphere Distributed Switch versions
[Optional] Upgrade the distributed switch to take advantage of features that are available only in the later versions.
Prerequisites
ESXi and vCenter Upgrades are completed.
Procedure
- On the vSphere Client Home page, click Networking and navigate to the distributed switch.
- Right-click the distributed switch and select
- Select the vSphere Distributed Switch version that you want to upgrade the switch to and click Next
Results
The vSphere Distributed Switch is successfully upgraded.
Upgrade vSAN on-disk format versions
[Optional] Upgrade the vSAN on-disk format version to take advantage of features that are available only in the later versions.
The upgrade may cause temporary resynchronization traffic and use additional space by moving data or rebuilding object components to a new data structure.
Prerequisites
ESXi and vCenter Upgrades are completed
Verify that the disks are in a healthy state. Navigate to the Disk Management page to verify the object status.
Verify that your hosts are not in maintenance mode. When upgrading the disk format, do not place the hosts in maintenance mode.
Verify that there are no component rebuilding tasks currently in progress in the vSAN cluster. For information about vSAN resynchronization, see vSphere Monitoring and Performance
Procedure
- Navigate to the vSAN cluster.
- Click the Configure tab.
- Under vSAN, select Disk Management.
- Click Pre-check Upgrade. The upgrade pre-check analyzes the cluster to uncover any issues that might prevent a successful upgrade. Some of the items checked are host status, disk status, network status, and object status. Upgrade issues are displayed in the Disk pre-check status text box.
- Click Upgrade.
- Click Yes on the Upgrade dialog box to perform the upgrade of the on-disk format.
Results
vSAN successfully upgrades the on-disk format. The On-disk Format Version column displays the disk format version of storage devices in the cluster
Post Upgrade Steps for NFS-Based VI Workload Domains
After upgrading VI workload domains that use NFS storage, you must add a static route for hosts to access NFS storage over the NFS gateway. This process must be completed before expanding the workload domain.
