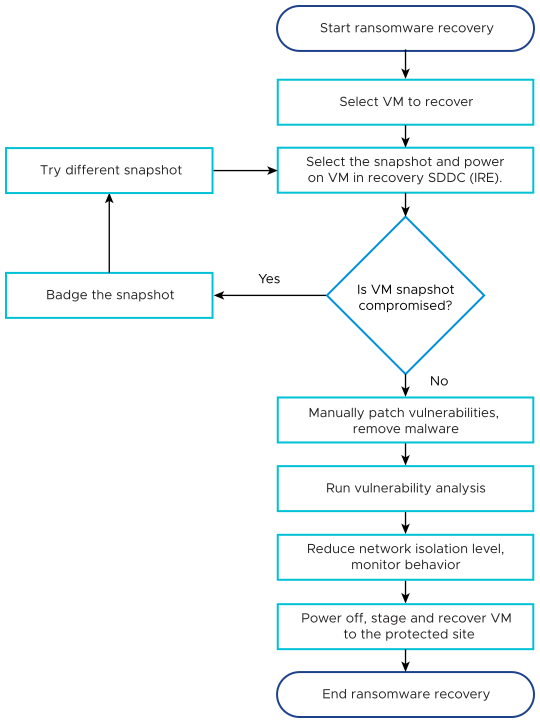
VMware Ransomware Recovery provides an isolated recovery environment (IRE) on a VMware Cloud recovery SDDC that allows you to inspect, analyze, and recover infected VMs before restoring them to a production environment.

| Ransomware Recovery Task | Description |
|---|---|
| Start ransomware recovery plan and start VMs in recovery SDDC. |
|
| Perform security analysis and remediation |
When you start VMs in validation, the following behavior occurs:
|
| Power off, stage and recover VMs | When powering off and staging VMs, VMware Live Cyber Recovery takes a snapshot of the VMs to prepare them for recovery to a protected site. The staging snapshot reflects the current state of the VMs in validation. |
| End ransomware recovery | Ending the recovery plan deletes all staging snapshots, removes running VM instances in the recovery SDDC, and resumes snapshot retention schedules for VMs in the plan. After you end a recovery plan, it reverts to a ready state. |
For more information on ransomware recovery workflow, see Ransomware Recovery.
Start Ransomware Recovery for Critical Workloads with Cloud-Based Ransomware Recovery for VMware Cloud Foundation
To begin the ransomware recovery, select the VMs from the VMs list included in your recovery plan.
Procedure
- Log in to the VMware Cloud Services console at https://console.cloud.vmware.com/ with a user assigned the VMware Live Cyber Recovery Protection Admin role.
- On the Services page, locate the VMware Live Recovery tile, and click Launch service.
- On the VMware Live Recovery page, for the region where the service is enabled, click Manage region.
-
On the VMware Live Cyber Recovery page, in the left pane, click Recovery plans.
-
On the Recovery plans page, click the Recovery plan you want to run.
- On the Recovery plan page, click Ransomware Recovery.
-
In the Ransomware recovery dialog box, click Start ransomware recovery and wait for the completion of the process.
- On the Recovery plan page, in the VM list pane, click the VM name.
-
On the VM page, in the Start workflow pane, click Start VM in recovery SDDC.
-
In the Validate VM in recovery SDDC dialog box, in the Snapshots section, select the snapshot and click Start VM in recovery SDDC.
Perform Security Analysis and Remediation for Cloud-Based Ransomware Recovery for VMware Cloud Foundation
When you start VMs for ransomware recovery, VMware Live Cyber Recovery begins integrated security and vulnerability analysis of the VMs.
Prerequisites
Verify VMs have VMware Tools version 11.2 or later installed.
Verify VMs can reach Carbon Black Cloud servers to send security analysis data during ransomware recovery.
Verify you uninstall any pre-existing third party security software or Carbon Black sensors before proceeding with ransomware validation. See Uninstalling Sensors.
Procedure
On the Recovery plan page, in the Security and vulnerability analysis section, monitor security events and alerts generated by integrated behavioral analysis and malware scanning.
Note:You can view the discovered security events and alerts from and Vulnerabilities tab of the VM under validation.
(Optional) If any security events are found, manually patch them, remove malware, and from the Security tools drop-down menu, click Run vulnerability analysis.
In the Toolkit section, click Change network isolation.
In the Change VM network isolation dialog box, configure the network isolation levels for VMs running on the recovery SDDC according to your requirements, click Change network isolation, and monitor the analysis status for the different network isolation rule.
If the VM snapshot is clean and safe, in the Protected site base snapshot section, click Set badge.
In the Badge snapshot dialog box, select Verified and click Set badge.
(Optional) If the VM is infected:
Set the badge accordingly and, in the End validating iteration section, click Try different snapshot.
Run the analysis again with a different snapshot until you have a clean and safe snapshot.
In the Protected site base snapshot section, click Set badge.
In the Badge snapshot dialog box, select Verified and click Set badge.
Stage and Recover VMs for Cloud-Based Ransomware Recovery for VMware Cloud Foundation
When you find good VM candidates to recover to a protected site, you are ready to power off and stage the VMs for recovery.
Procedure
-
After you find good VM candidates, on the Recovery plan page, in the End validating iteration section, click Power off and stage.
-
In the Power off and stage dialog box, select Take a new staging snapshot, click Power off and stage and wait for the completion of the process.
-
In the End staging section, click Recover VMs.
-
In the Recover in protected site dialog box, under Recovery location, select Original protected site, select the confirmation check box and click Recover.
-
After the recovery operation finishes, verify that the VMs workflow state is Recovered.
End Ransomware Recovery for Cloud-Based Ransomware Recovery for VMware Cloud Foundation
After you finish recovering VMs, you can end ransomware recovery by stopping the plan.
Procedure
On the VMware Live Cyber Recovery page, in the left pane, click Recovery plans.
On the Recovery plans page, click the Recovery plan you want to end.
On the Summary page, click End recovery.
In the End ransomware recovery dialog box, in the Failback plan section, configure the settings according to your requirements and click End ransomware recovery.
Refresh your browser.