This section first covers the core components of Data Loss Prevention (DLP) for the VMware Cloud Web Security service and how they are used to create rules that prevent data leakage for a customer enterprise. The DLP Guide concludes with a workflow for configuring a DLP Rule and verifying that the rule works properly.
Overview
The Data Loss Prevention (DLP) feature prevents the unintentional or intentional leakage of sensitive data to the Internet to ensure compliance with HIPAA, PCI, GDPR, and other data privacy laws. The DLP feature inspects file uploads and text entered into Web pages for sensitive data by referencing it . When a DLP inspection discovers sensitive data, the Cloud Web Security administrator can set the action to skip, log, or block while also providing an optional email alert to an Auditor. While the DLP requirements for every organization are different, the workflow for creating a DLP policy is the same regardless.
Prerequisites
- A customer enterprise on a production VMware SASE Orchestrator with Cloud Web Security Enabled. Both the Edges and Orchestrator must use VMware Release 4.5.0 or later.
- A customer must have a Cloud Web Security Advanced package to access the DLP feature.
Important: A customer with a Cloud Web Security Standard package would not be able to access DLP and a locked icon would appear next to all DLP options on the Orchestrator UI.
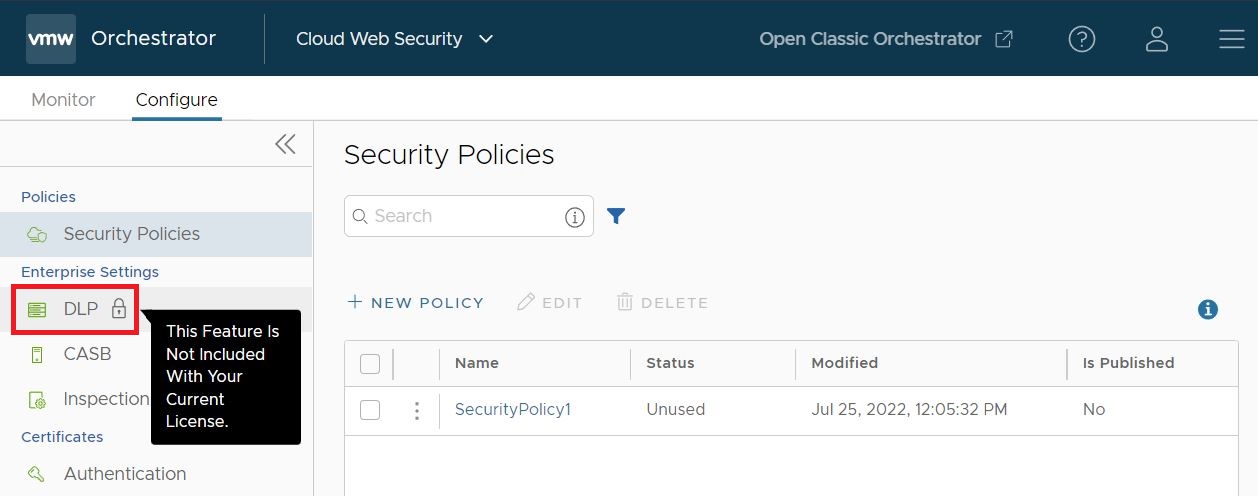
Overview of DLP Dictionaries
A DLP Dictionary uses matching expressions to identify sensitive data. For example, credit card numbers and social security numbers follow a specific format. And dictionaries can match against those patterns and determine if sensitive data is or is not present in a file upload or text input.
Predefined Dictionaries
Cloud Web Security predefined data dictionaries are a combination of pattern matching, checksums, context scoring, and fuzzy logic to identify sensitive data. Cloud Web Security has more than 340 predefined data dictionaries covering the following major data categories:
- Document Classification
- Financial Data
- Health Care
- HIPAA
- Item Identifiers
- PCI DSS
- PII
Additionally, the predefined data dictionaries are region-specific to ensure correct pattern matching is applied across the globe. Data dictionaries can be set to 29 different countries or regions. Of those 29, two are reserved for Global and Other. These two options allow categorizing multinational data or data that does not neatly fit into a country or region category.
You can explore dictionaries on the VMware SASE Orchestrator by going to the Cloud Web Security section and navigating to 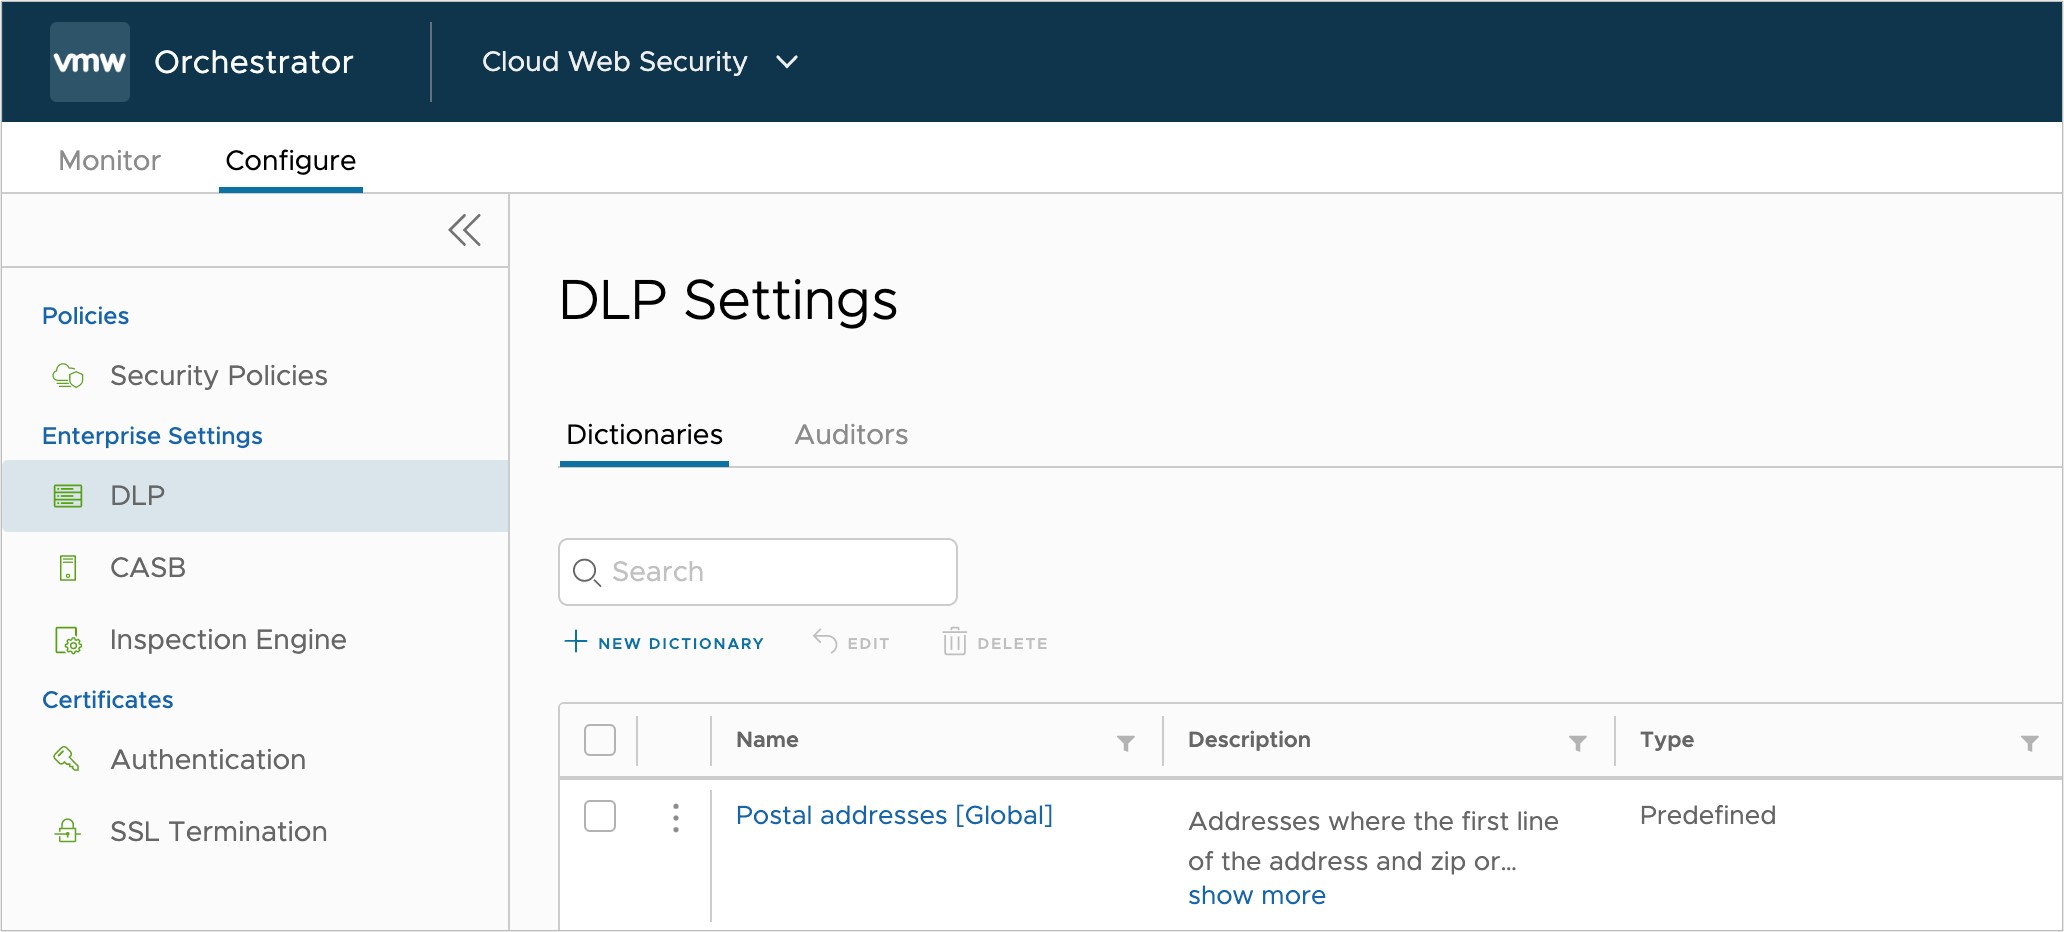
On this page you are shown all the dictionaries available for use in DLP policy. The dictionaries are organized in a table containing names, descriptions, types, categories, and region fields.
- Name is used to identify the dictionary for use in policy.
- Description provides a high-level overview of what the dictionary matches.
- Type distinguishes two different dictionary types:
- Predefined
- Custom
- Category includes:
- Canadian Health Service
- Document Classification
- Financial Data, HIPAA
- HIPAA/Health Care
- Health Care
- Item Identifiers
- Other
- PCI DSS
- Personally Identifiable Information
- UK National Health Service
- Region represents the geography the dictionary applies to, which includes:
- Australia
- Belgium
- Brazil
- Canada
- Denmark
- Finland
- France
- Germany
- Global
- Hong Kong
- India
- Indonesia
- Ireland
- Italy
- Japan
- Malaysia
- Netherlands
- New York
- New Zealand
- Norway
- Other
- Poland
- Singapore
- South Africa
- Spain
- Sweden
- United Kingdom (UK)
- United States of America (USA)
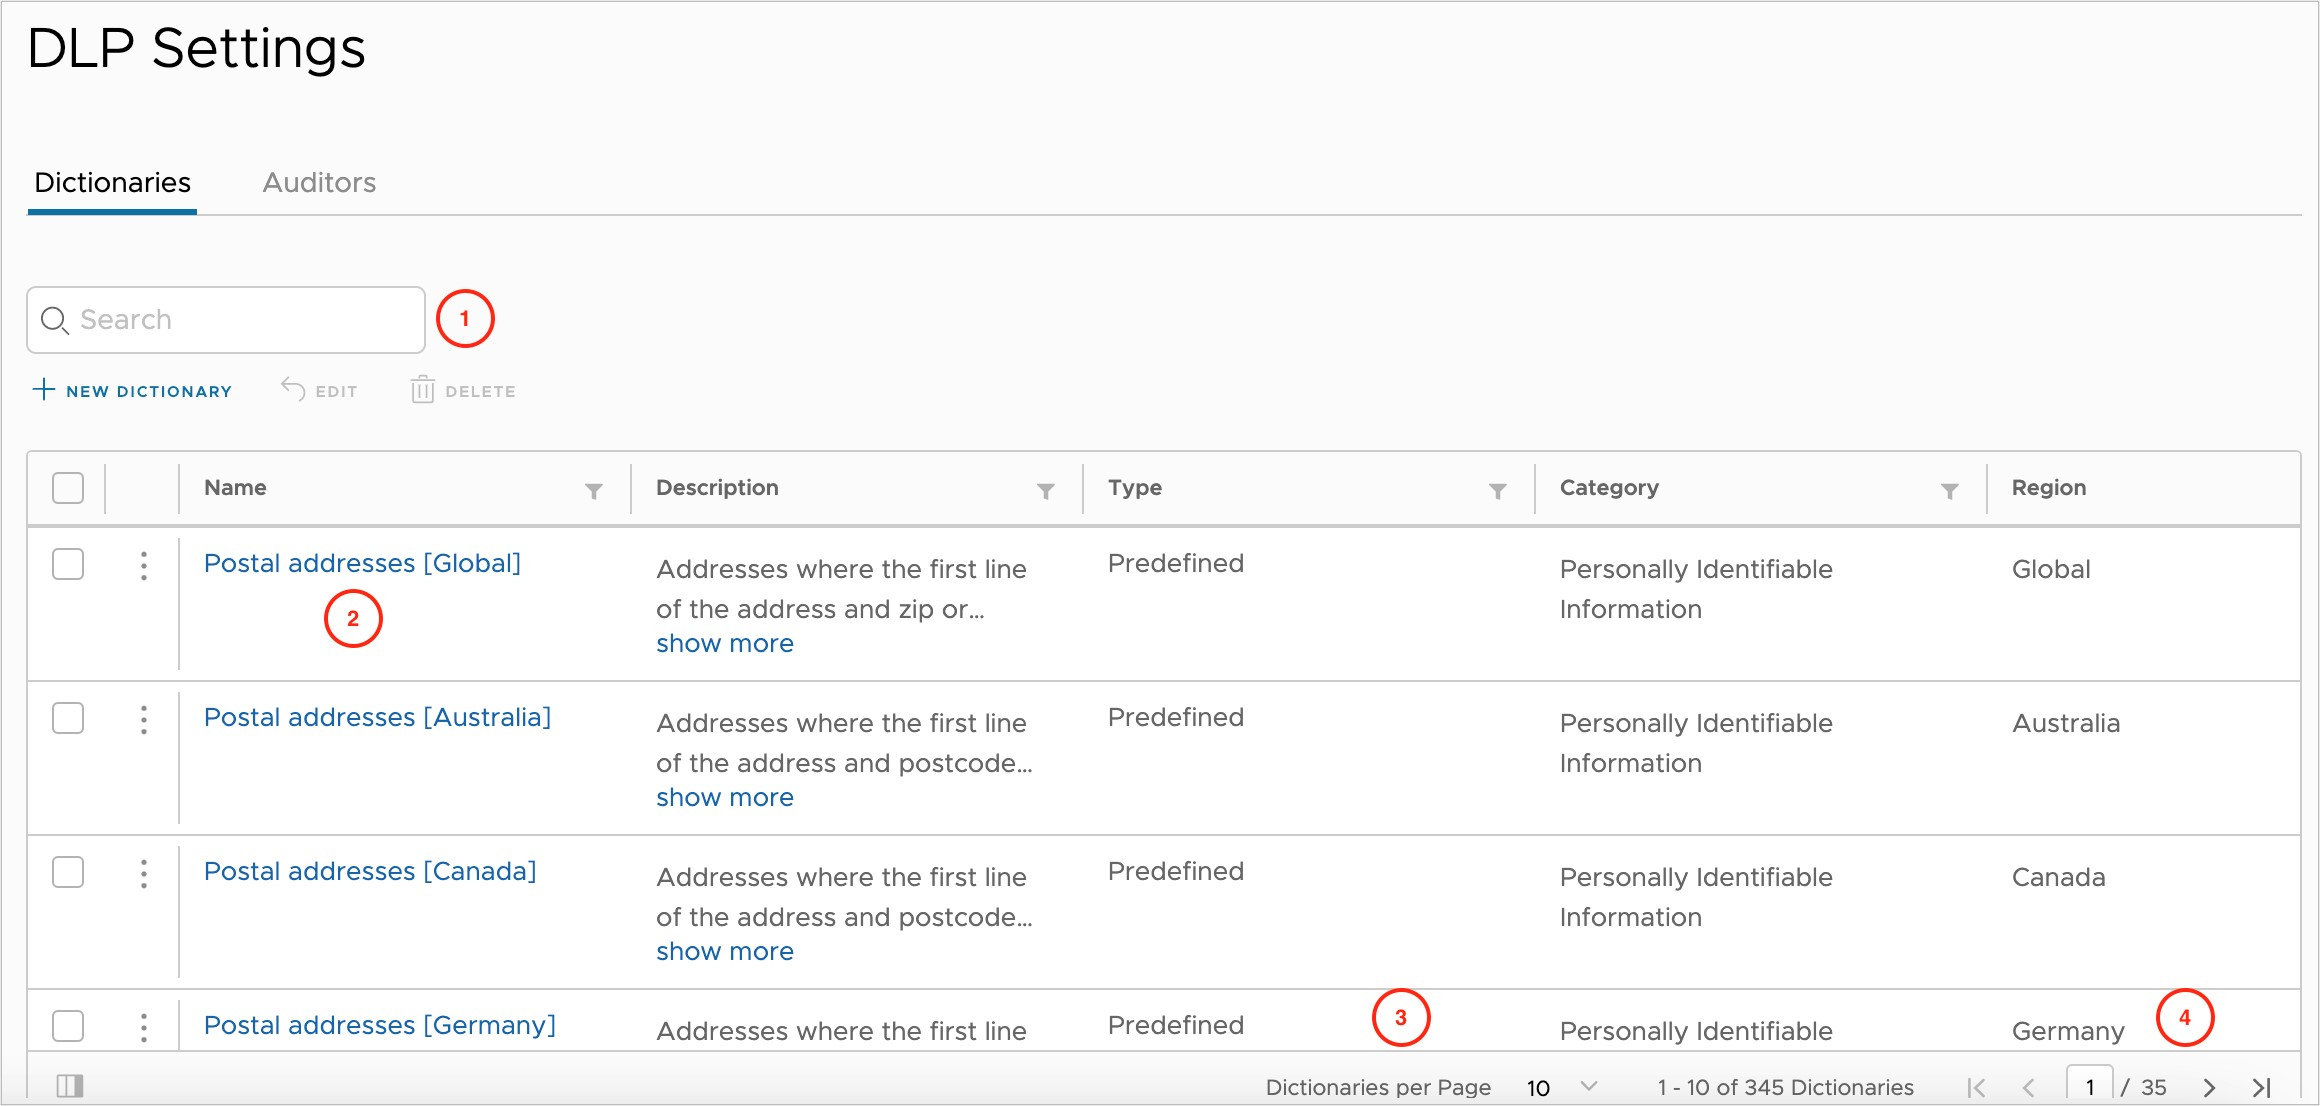
- The Search bar applies to all fields on the Dictionaries page and can be used to quickly display specific dictionaries you are interested in viewing.
- Each row contains a dictionary that can be clicked to explore further.
- The Dictionaries per Page can display up to 100 entries on a single page.
- Page Navigation buttons are provided for going back or skipping ahead.
To continue this examination, find the Postal addresses [Global] dictionary and click on the blue text to bring up the Edit Dictionary screen.
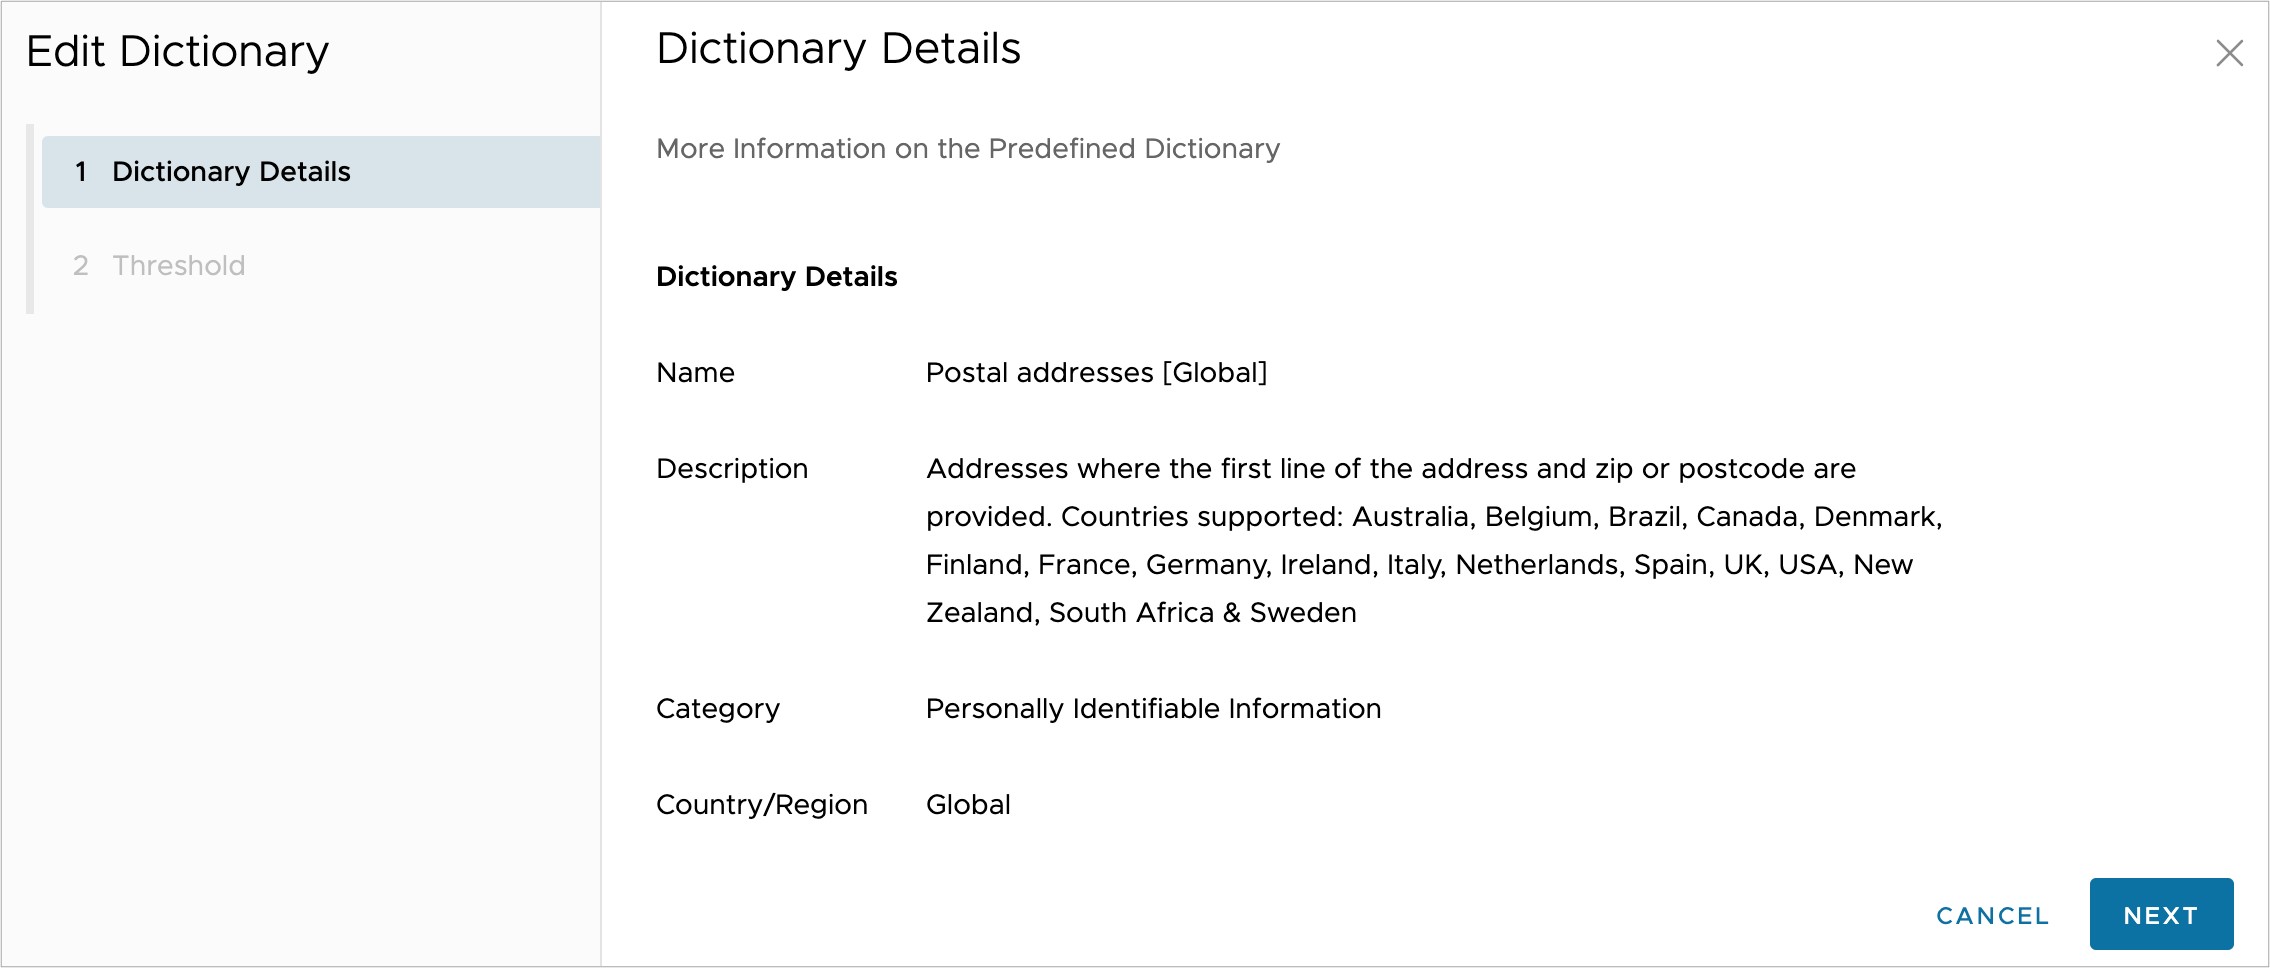
Clicking on the Next button in the modal brings you to the Threshold settings. It is not recommended to adjust the Threshold Details from their default values unless necessary.
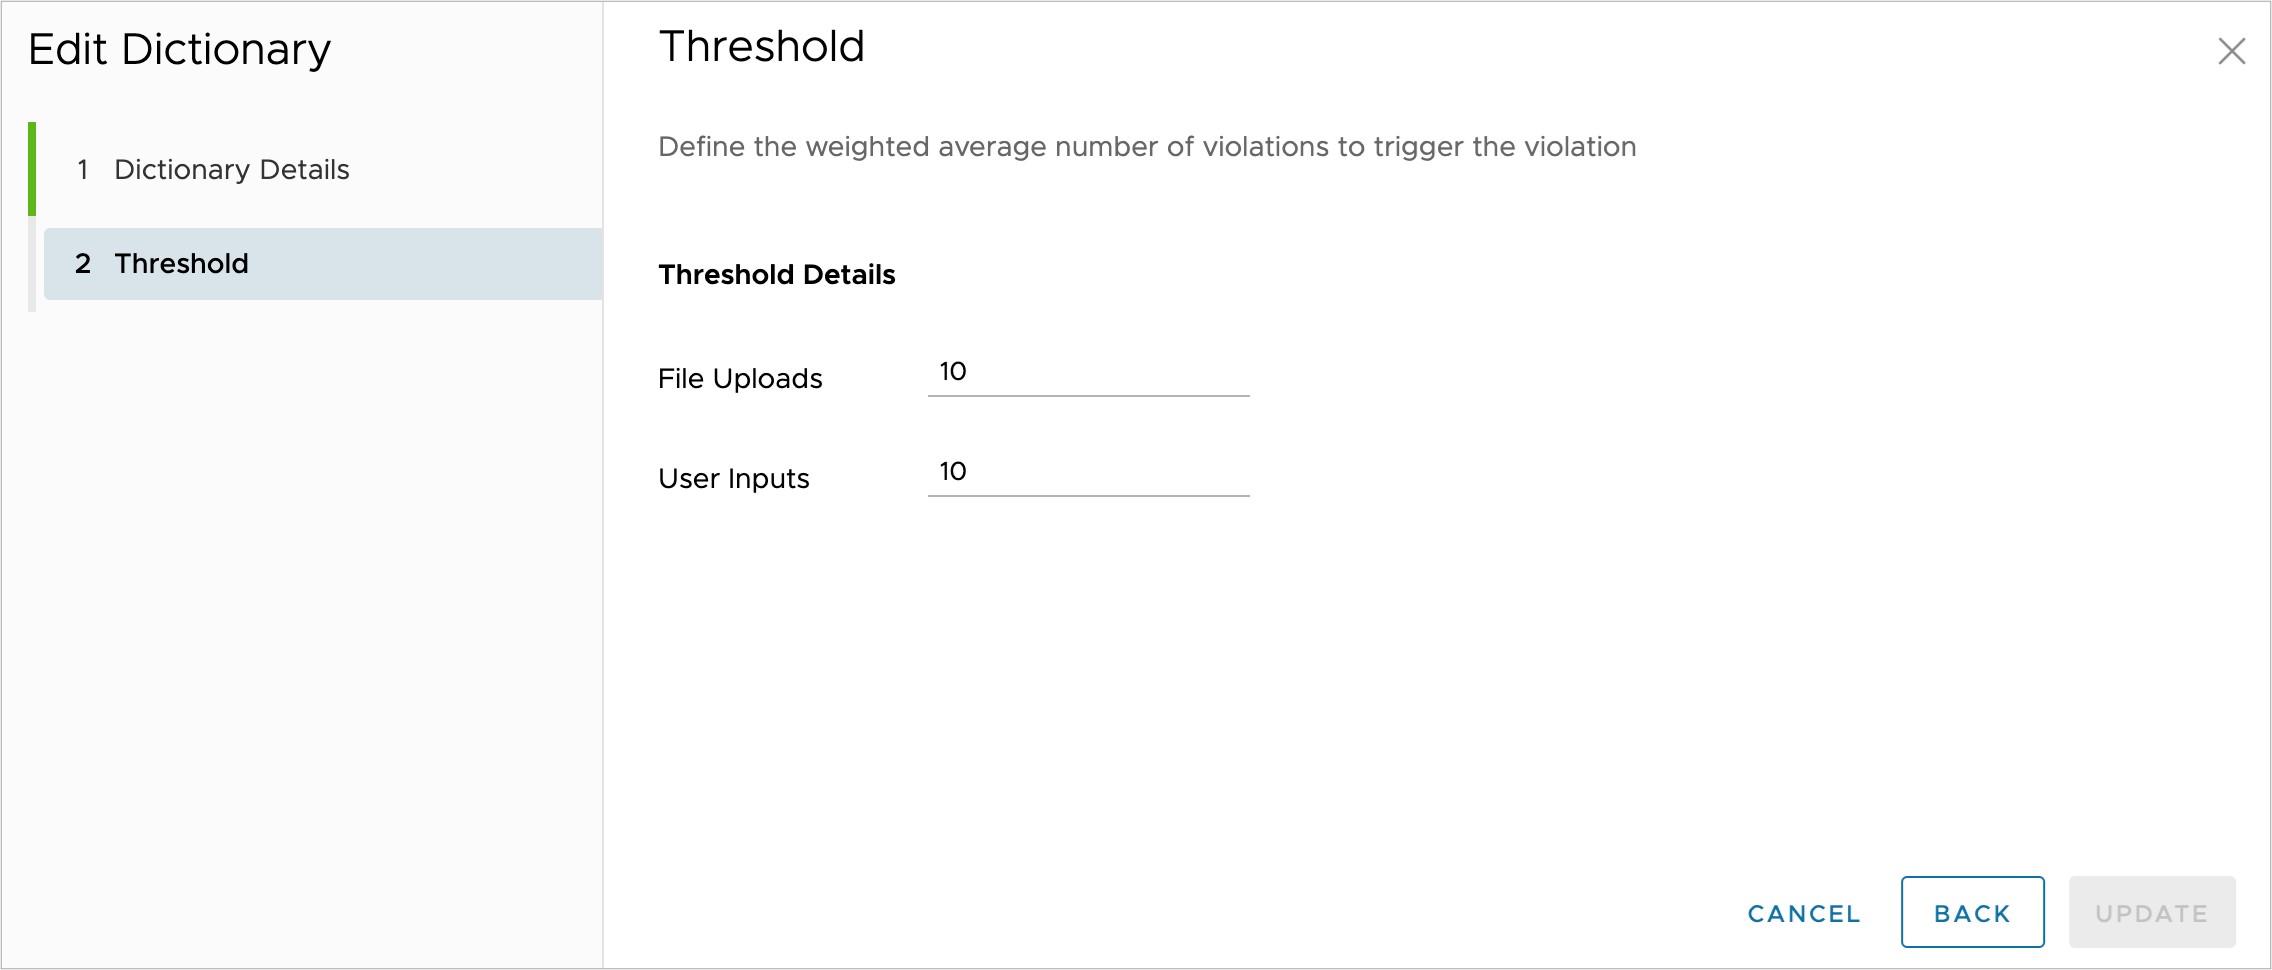
The screen shot above shows the weighted average number of violations for both File Uploads and User Inputs is set to 10. For predefined dictionaries, do not think of this as a simple occurrence count but rather a computational scoring of all information discovered in a document. This scoring mechanism helps to reduce the number of false positives observed when using this data dictionary. When finished viewing this modal, click Cancel. Please note that if you made changes to any editable values, you would need to click Update to preserve those changes.
Custom Dictionaries
Cloud Web Security DLP Custom Dictionaries give you the flexibility to create data dictionaries pertinent to your organization. As with predefined dictionaries, customer dictionaries start by having you add four fields:
- Name
- Description
- Category
- Country/Region
These are the same four fields shown for predefined dictionaries, but with the ability to set each value to what is relevant for the dictionary you are creating.
- String is used to match an exact combination of alphanumeric and special characters. It can be set to match or ignore casing.
- Expression uses Perl regular expressions (regex) to find data patterns that are otherwise difficult to find with a simple string.
To create a Custom Dictionary, click the New Dictionary button from page.
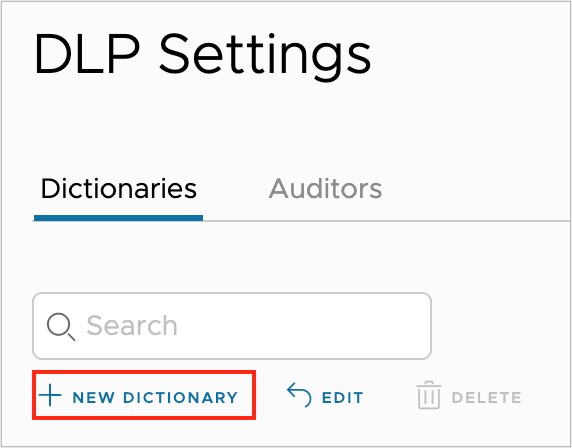
The Dictionary Details screen prompts you to enter values for Name, Description, Category, and Country/Region.
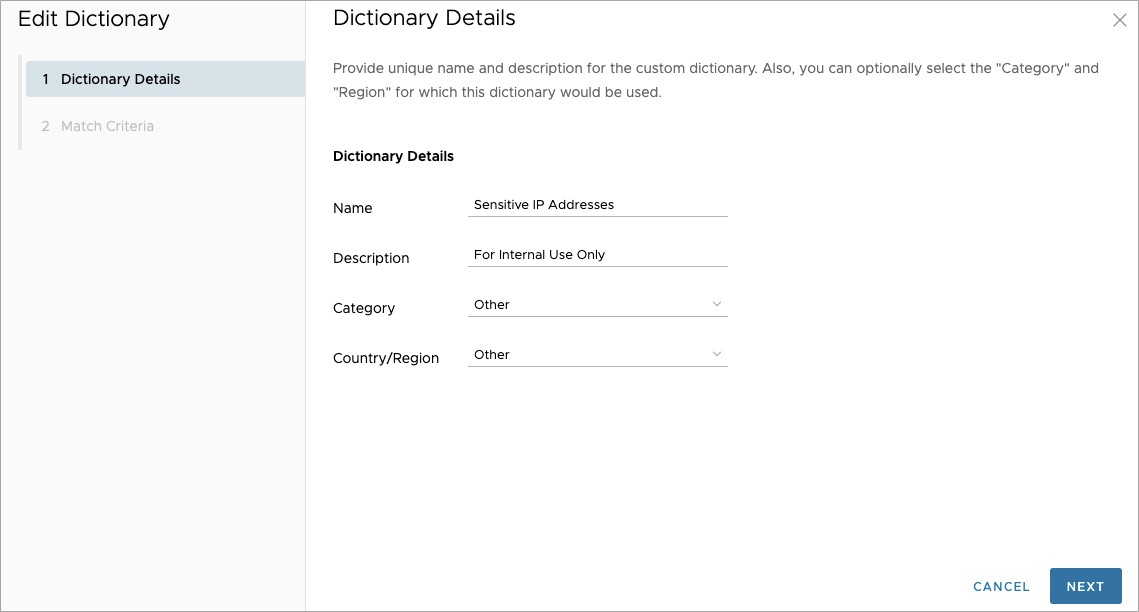
The screen shot above indicates that this dictionary is meant to identify Sensitive IP Addresses and is For Official Use Only. The selection of Other for both category and country/region indicate that the data matched by this dictionary either does not fit into one of the preexisting categories, or the additional metadata is not necessary.
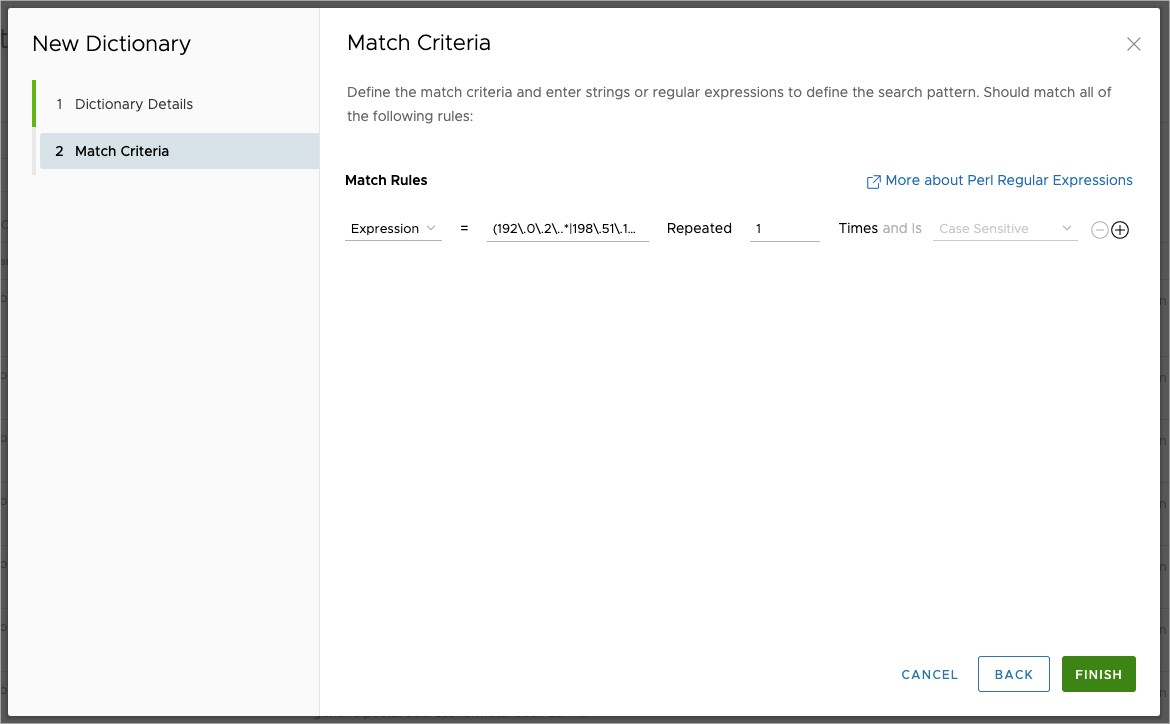
For the Match Data screen, the example configuration is based on the IP address ranges 192.0.2.0/24, 198.151.100.0/24, and 203.0.133.0/24 (RFC 5737), the sensitive data the company needs to protect. The regex used to look for any IP addresses in those ranges is: (192\.0\.2\..*|198\.51\.100\..*|203\.0\.113\..*)
The regex is not broken up over several lines using the Plus Icon to add another row because the dictionary logic across multiple rows is a logical AND. Had the Match Criteria been defined in this manner, the dictionary would trigger only when all three IP address ranges were present in a document.
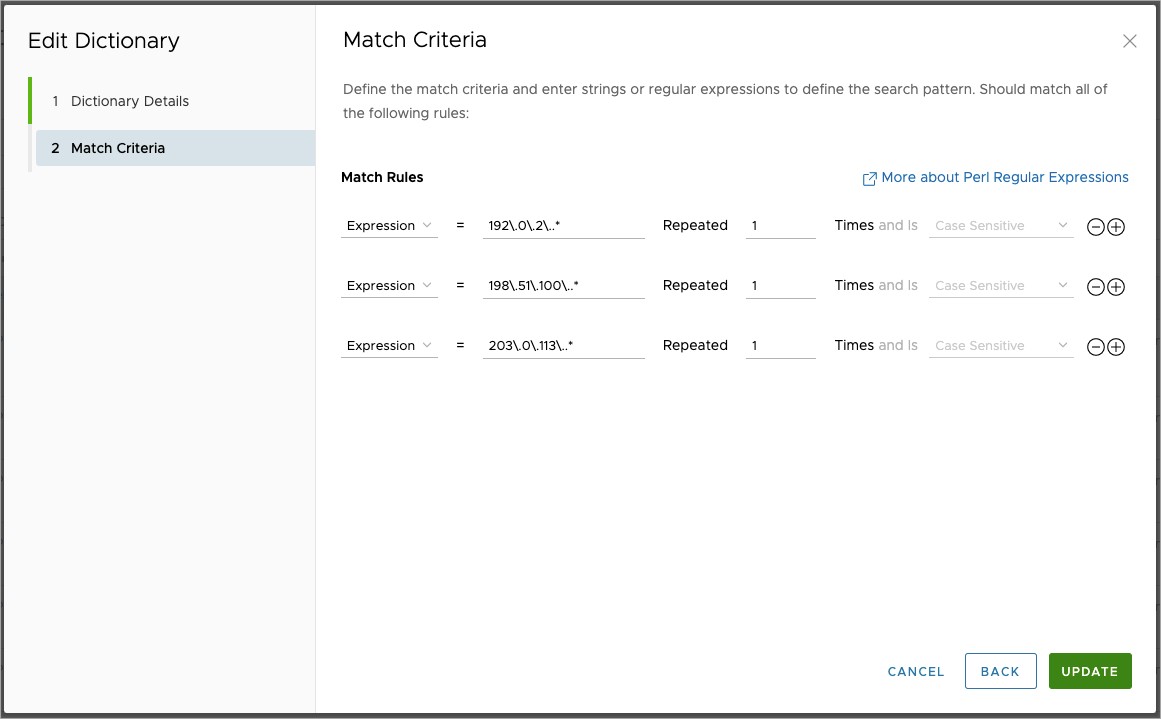
Once you are satisfied with the Custom Dictionary settings, click Finish to make the dictionary available for use in Cloud Web Security.
Auditors
An Auditor is someone in the organization designated to follow up on any incidents that pertain to the attempted exfiltration of data, whether intentional or accidental. This individual can be notified via email from the Orchestrator that a DLP rule has been violated. The email sent to the Auditor contains the name of the DLP rule, the user input or file name that contained sensitive data, the destination to which the user was trying to send the data, and the person's username that tried to expose the data. Optionally, the user input or file can be sent to the Auditor, either in its original format, as a ZIP file, or an encrypted ZIP file.
You can add, edit, delete, and view auditors by logging into Cloud Web Security and navigating to:
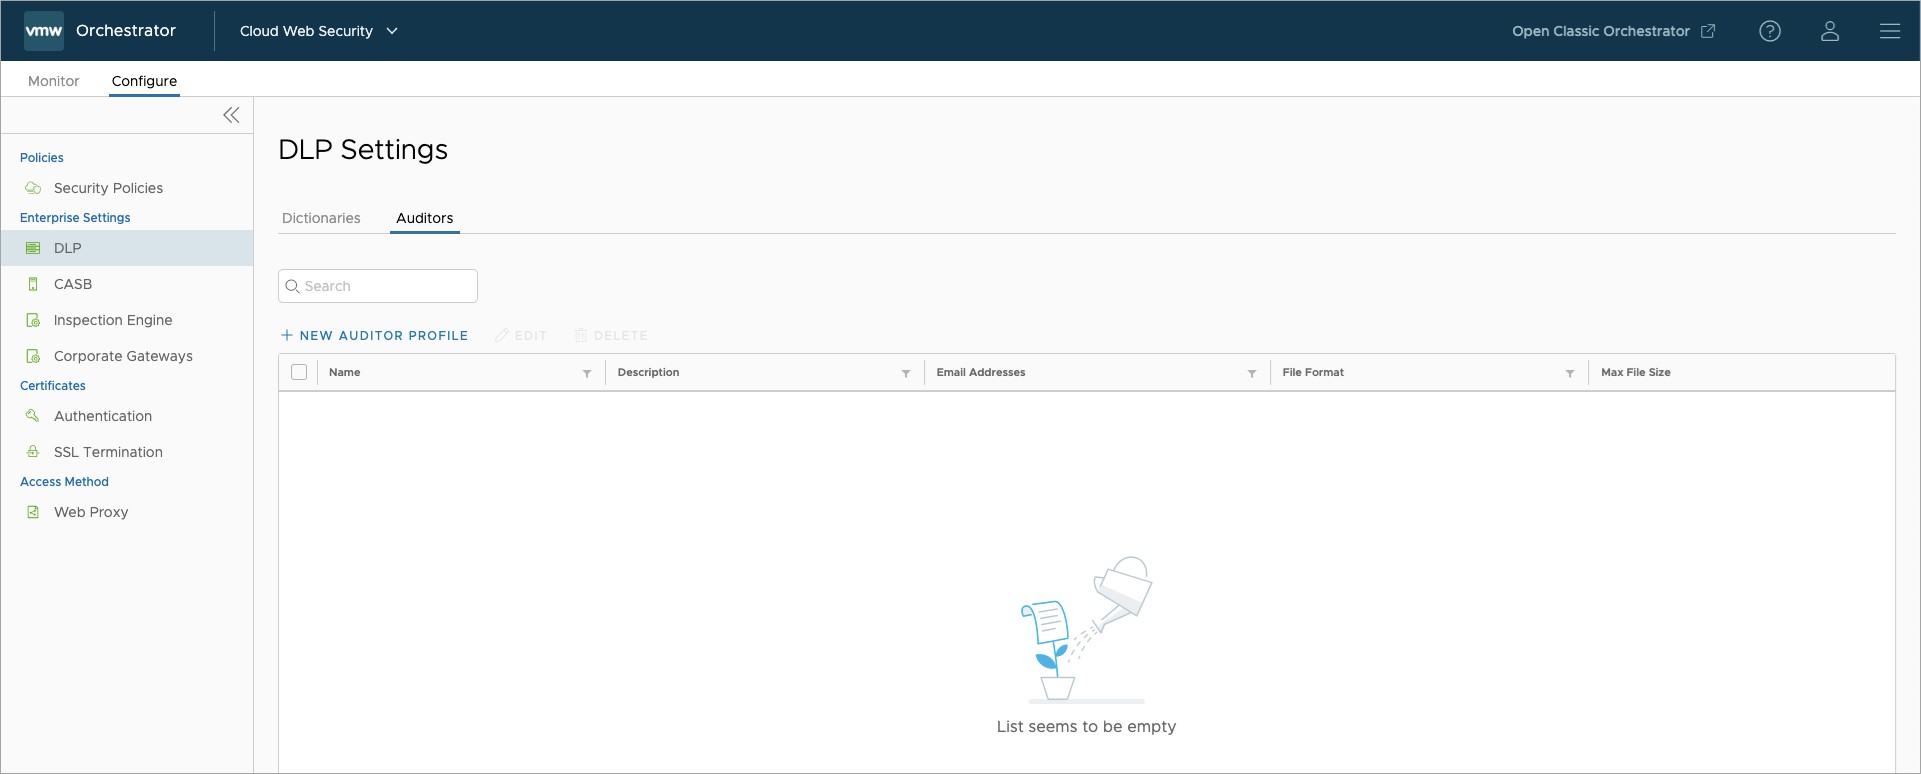
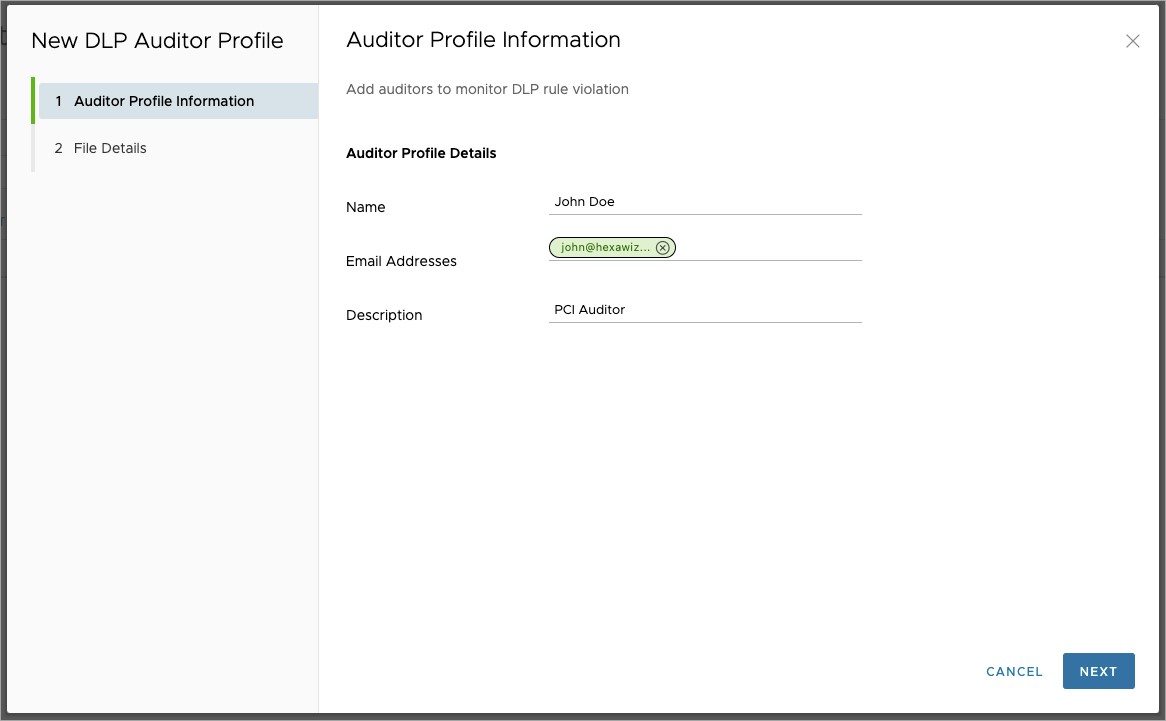
In the Auditors screen shown above you see that there are currently no auditors in the system. To add your first Auditor select + NEW AUDITOR PROFILE. A pop-up will prompt you to provide the following information :
- Name (mandatory): is the Auditor's name. Typically this includes a person's family and given names.
- Email Address (mandatory): is a valid email address account for this individual.
- Description (optional): is any relevant information you wish to provide about the Auditor. For example, "PCI Auditor" if the Auditor's primary function is to monitor for PCI violations.
The next page will ask you for File Details. This page is completely optional, but it provides you with the option to send the offending file to the DLP Auditor for their review. Configuration options include:
- Send File to the Auditors, with the default behavior being to not send the file to the Auditor(s).
- File Format becomes available when you select Send the file to the Auditor(s). You have the option of selecting the Original File, Zip, or Encrypted Zip. Since this file will contain sensitive information, it is recommended to use the Encrypted Zip option.
- Maximum File Size is the maximum size of the attachment included with the email that is sent by the system. The limit can be set for up to 1GB, but it is recommended to match your organization's email file size restrictions.
Important: If a file size exceeds the Maximum File Size, then that file is bypassed. In other words, the file is not attached to the DLP violation alert, and the alert is sent without the file.
- Encrypted Zip Password is autogenerated by the system and can be regenerated if compromised. You can also configure your own password if desired.
- Maximum File Size is the maximum size of the attachment included with the email that is sent by the system. The limit can be set for up to 1GB, but it is recommended to match your organization's email file size restrictions.
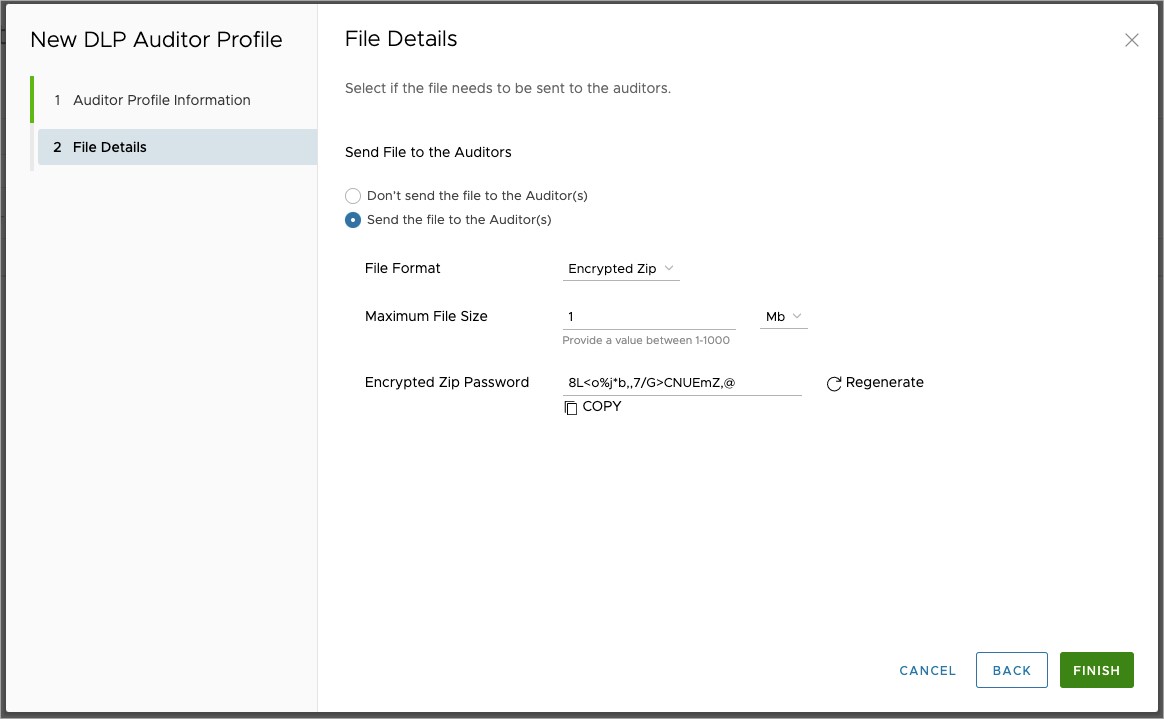
Once complete, click the Finish button to save the New DLP Auditor Profile configuration. You may now view, edit, or delete the Auditor entry saved on this page.

DLP Configuration workflow
Having covered the two key components that comprise the Data Loss Prevention (DLP) feature, this section will cover the overall DLP workflow.
Create, Configure, and Apply a Security Policy
A DLP rule is part of a Security Policy and thus prior to configuring a DLP rule, there must first be a Security Policy. For details on Creating, Configuring, or Applying a Security Policy for the Cloud Web Security service, consult the relevant documentation in the Cloud Web Security Guide.
Create and Apply a DLP Rule
- On the VMware SASE Orchestrator, navigate to .
- Either Edit an existing policy or select + New Policy to create a new Security Policy. This workflow will focus on creating a new Security Policy but steps 4 and later apply equally to an existing Security Policy.

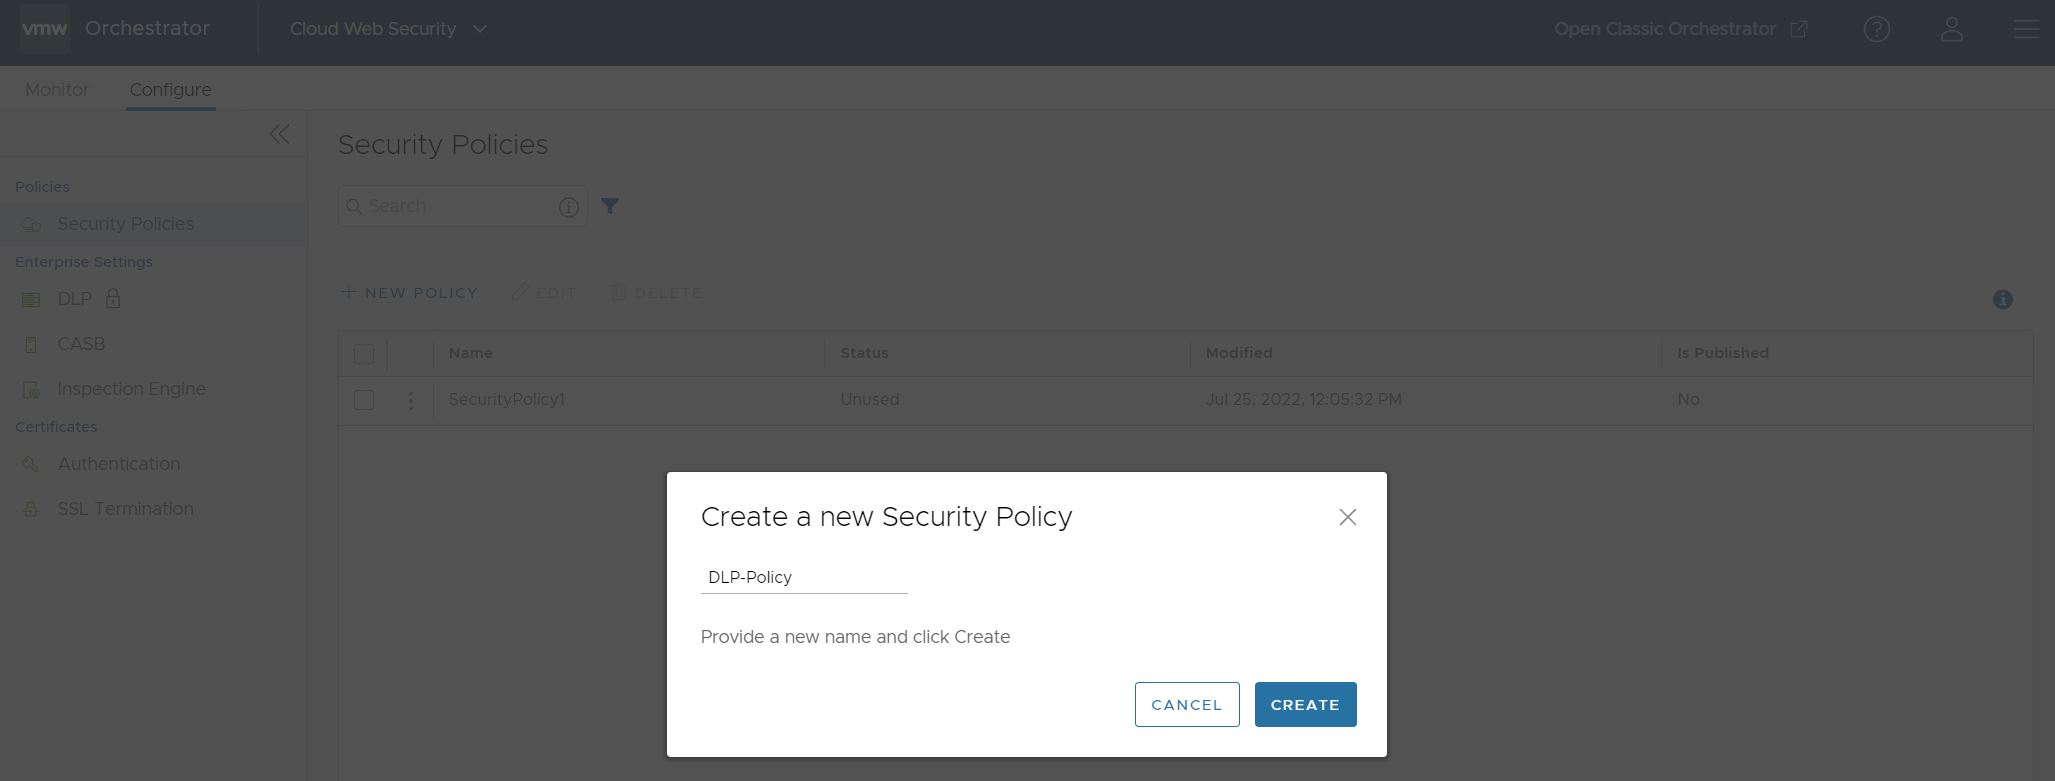
- For the new Security Policy, enter a policy name and click Create.
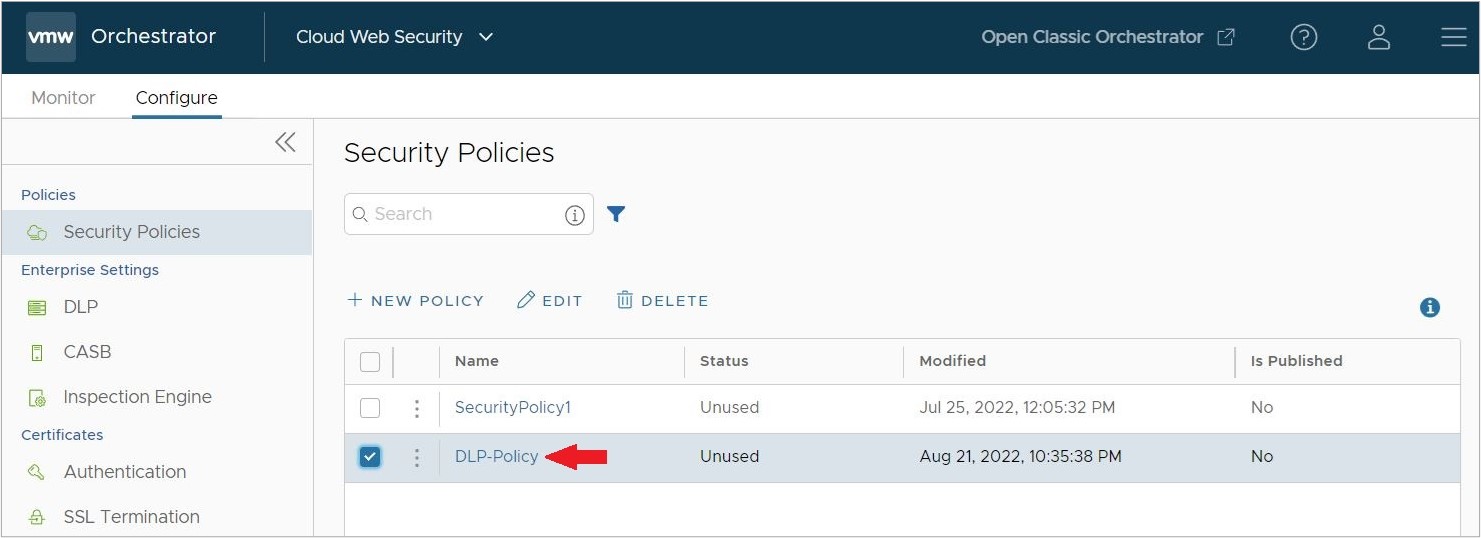
- Once the new Security Policy is created, click on the named policy.
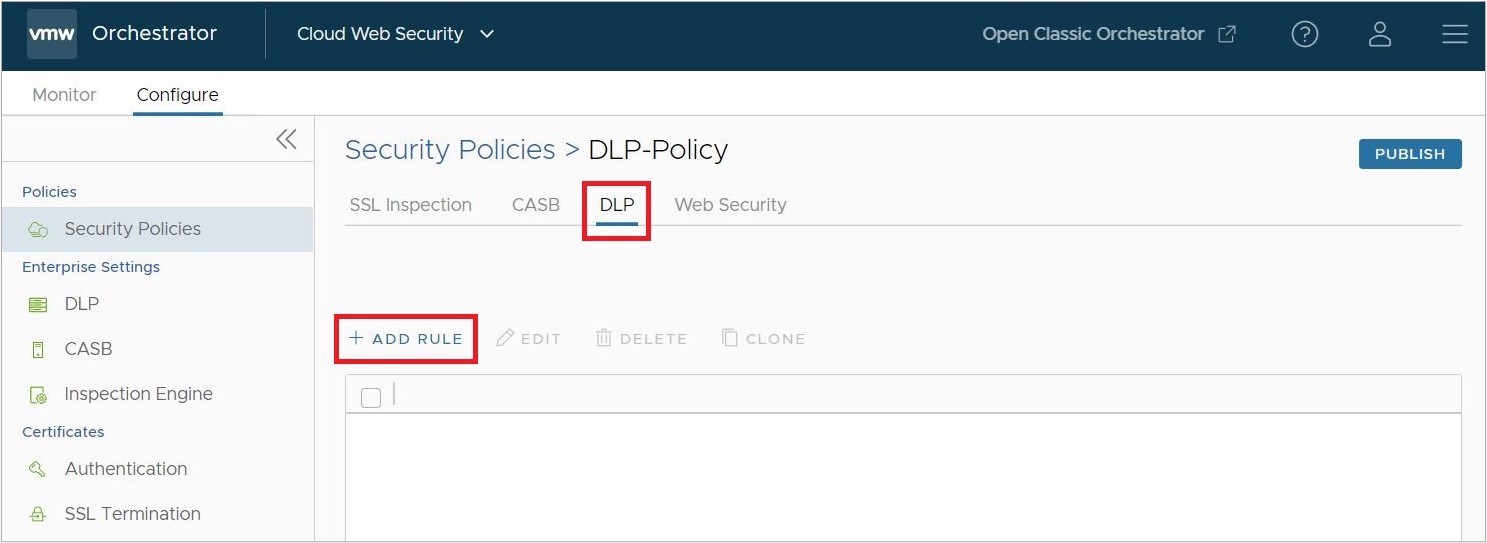
- On the rules screen for the Security Policy, click on the DLP tab, and then click Add Rule.
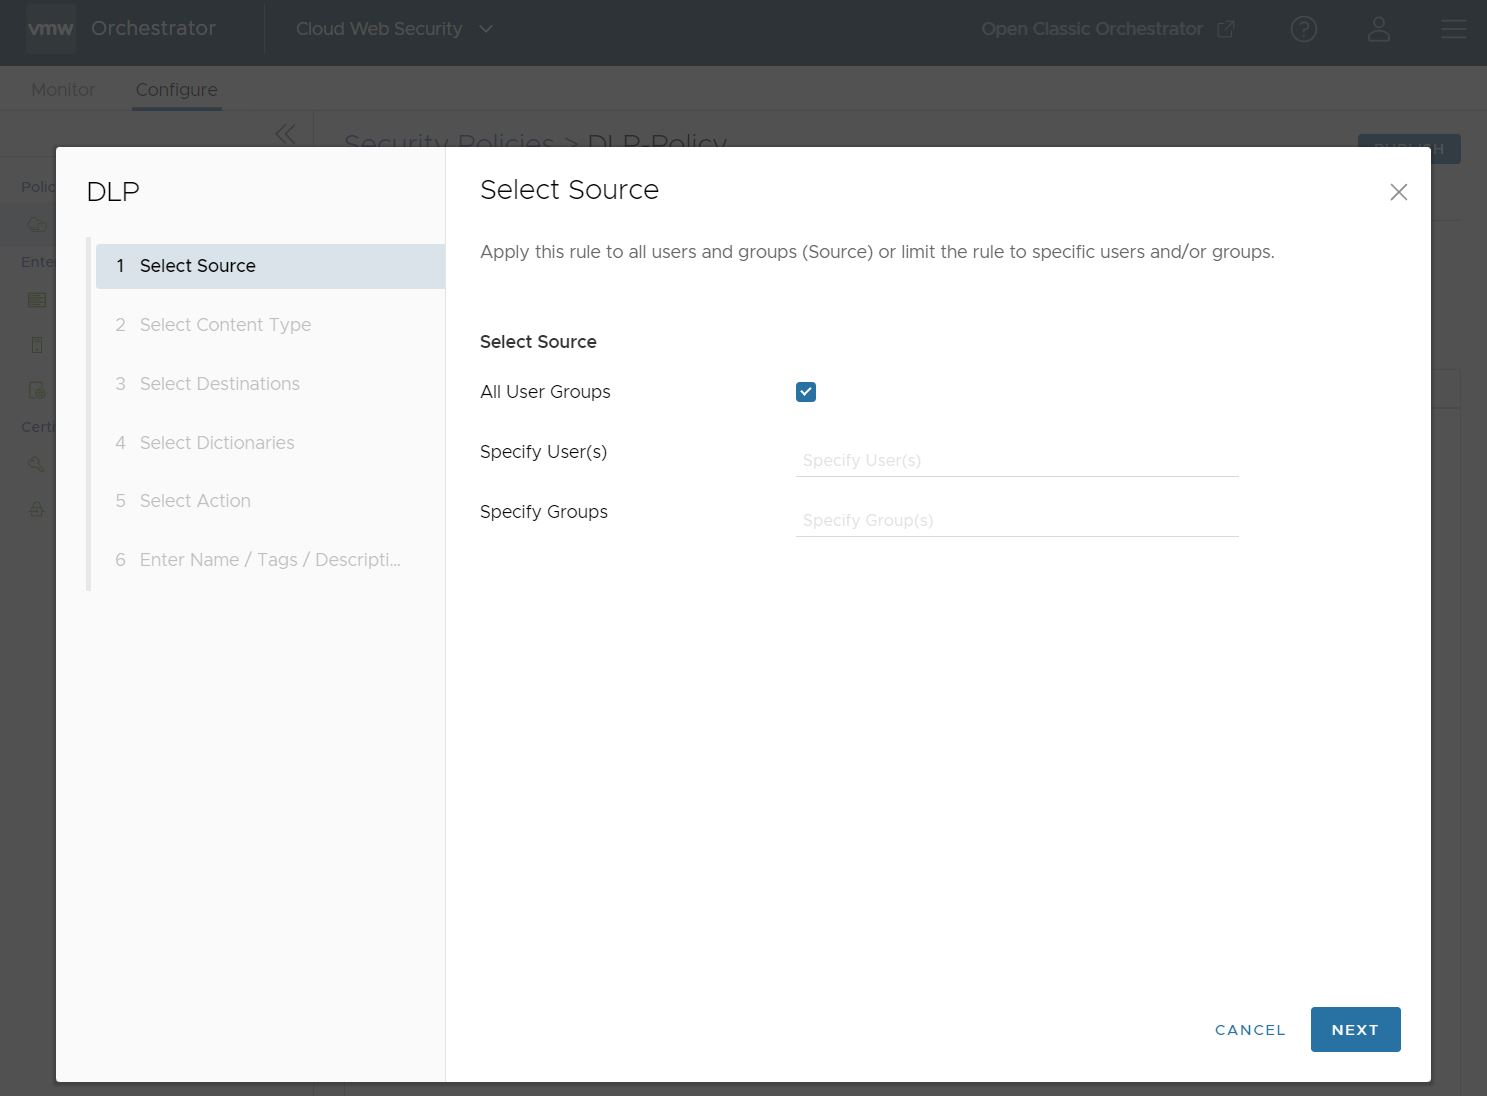
- Begin on the DLP rule configuration screen by selecting a Source, this can be either:
- All Users and Groups. This is the default setting for Source.
Note: All Users and Groups is the only option for customers that do not have an Identity Provider (IdP) like Workspace ONE or Azure Active Directory (AD) configured for Cloud Web Security.
- Or can be a specific set of Users and Groups.
Note: Cloud Web Security must be configured with an Identity Provider (IdP) like Workspace ONE or Azure Active Directory (AD) for specific Users and Groups to work.
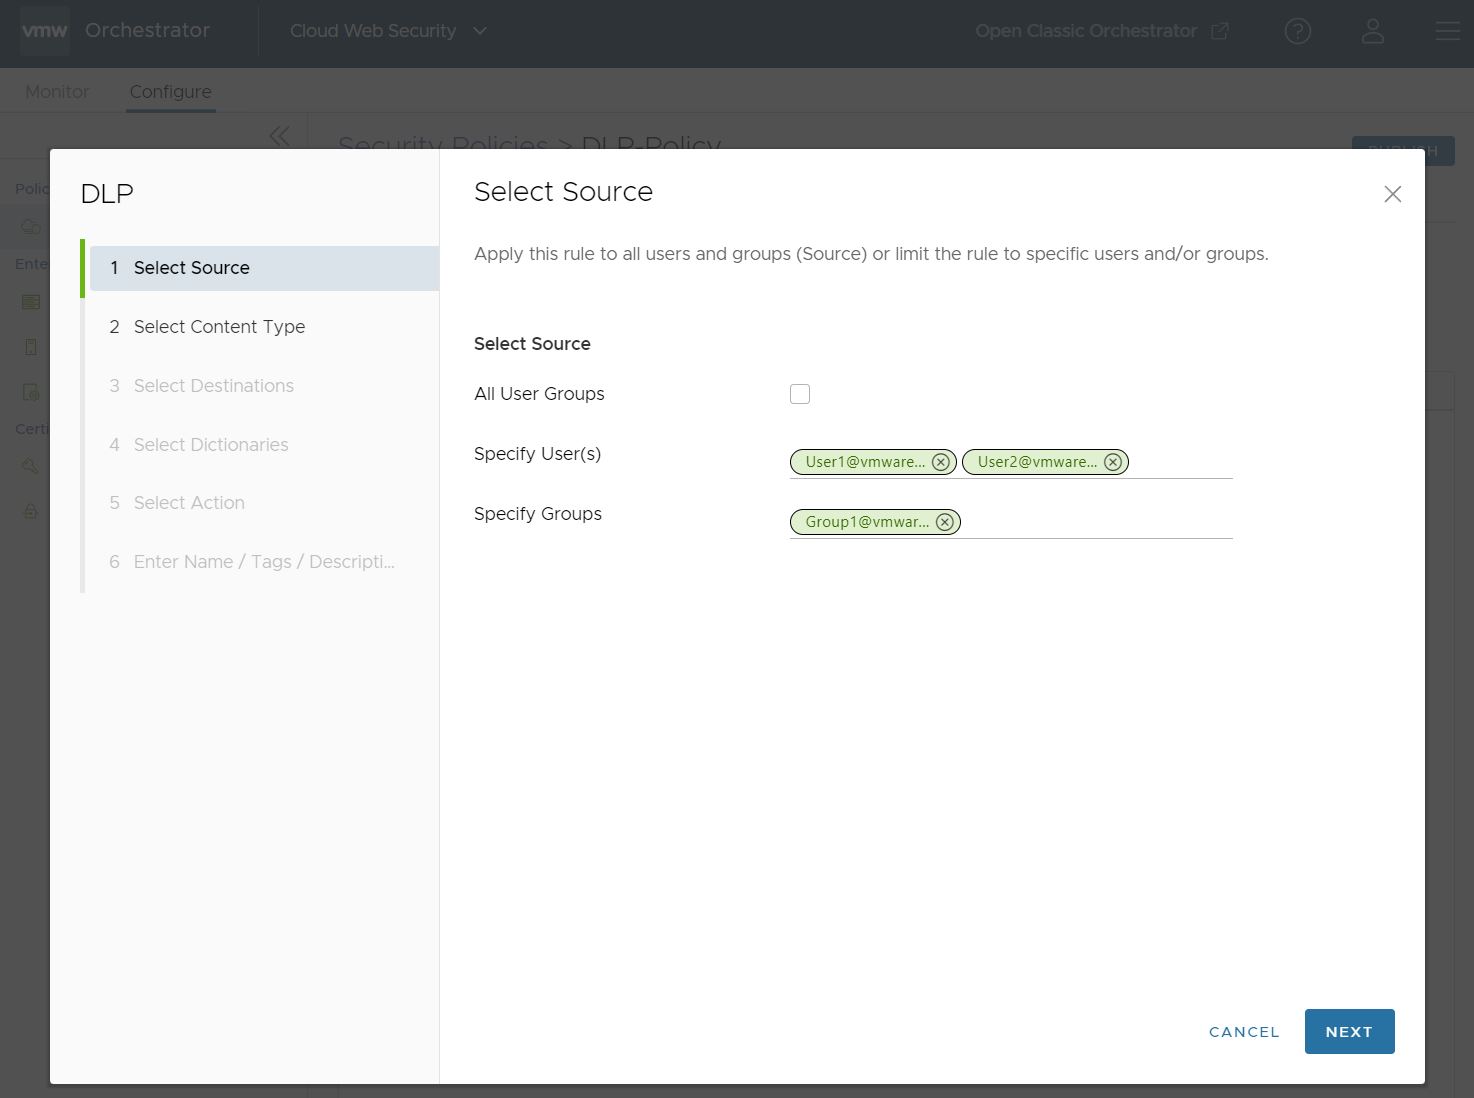
Whichever Source is configured, click Next to continue.
- All Users and Groups. This is the default setting for Source.
- On the Select Content Type screen, a user can configure the types of content that are triggered by the DLP inspection feature. There are three parameters that can be configured for content type:
- Choose whether the DLP rule should Inspect Text Input or not. The default for this option is Off. When toggled to On, user Text Input will pass through DLP inspection when network submissions are requested.
Note: Text Input is like a form post or text message. Text Input is different from a Text File, which is an actual .txt attached to an upload.
- Maximum File Size allows the user to choose whether to inspect file uploads by defining a maximum file size permitted. The default setting for this option is 50 Megabytes (MB), and a user can configure a Maximum File Size value both numerically, and by units of storage: Byte (B), Kilobyte (KB), Megabyte (MB), or Gigabyte (GB). If the uploaded file size is greater than the configured Maximum File Size value, the file is dropped, and the Auditor is alerted.
Note: The Maximum File Size numerical value can configured as a number between 1 and 1000 on the Orchestrator. The number 0 is not valid for this field.Important: While it is possible to configure extremely small and large values, DLP has a maximum file size limit of 5 GB. Even if a user configures a larger value, that value will not be honored beyond 5 GB. DLP also has minimum supported content sizes as follows:
Table 1. Mimimum Supported Content Sizes User Input File Input 1024 Bytes 5120 Bytes 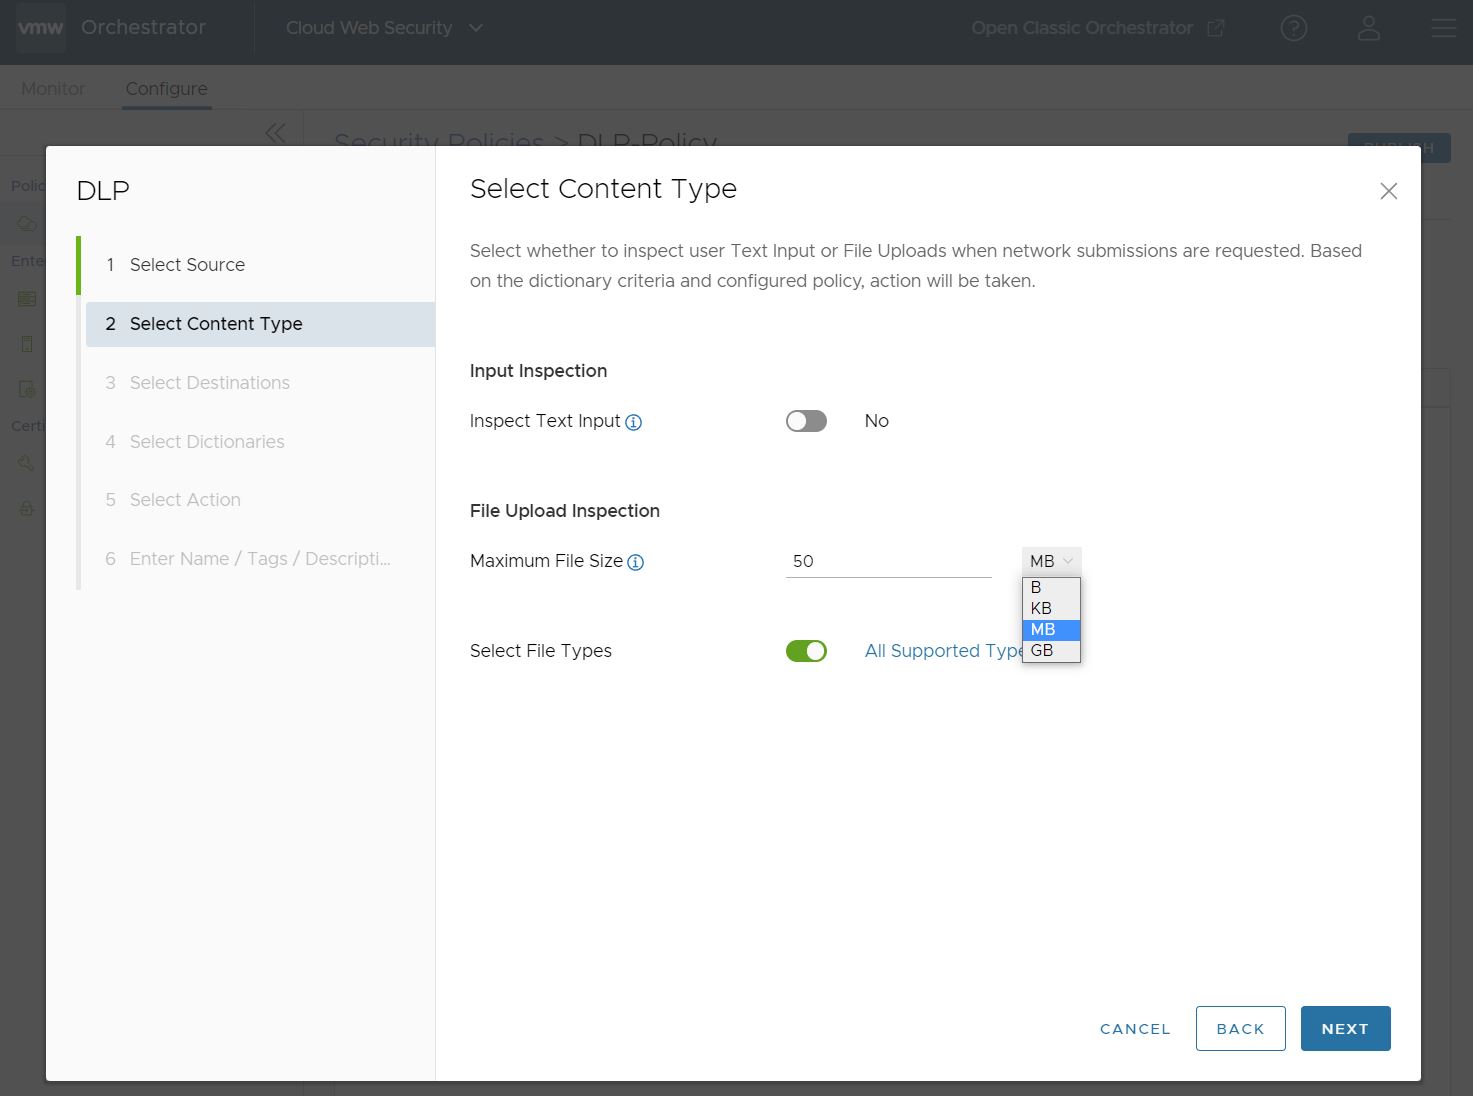
- Choose specific file types to inspect. The default setting is to inspect All Supported File Types, 36 file types in total. If the user toggles off All Supported File Types, they will see a complete menu of all 36 file types sorted by 11 categories:
- Archives and Compressed Packages (9): 7-Zip, ARJ, BZIP, CAB, GZIP, LZH, RAR, TAR, ZIP
- Calendar (1): ICS Meeting Invitation
- Engineering Applications (2): AutoCAD, Visio
- Multimedia (2): Audio Files, Video Files
- Other Documents (1): RTF
- Other Downloads (1): Other Files and Documents
- Presentation Tools (2): OpenOffice Presentation, PowerPoint
- Productivity (2): Microsoft One Note, Microsoft Project
- Scripts and Executables (6): Android Executable, JAR, Linux Executable, Mac Executable, Text-based script files
- Spreadsheets (3): CSV, Excel, OpenOfficeSpreadsheet
- Word Processors (7): Hangul, Ichitaro, OpenOffice Text, PDF, Word, Word Perfect, XPS
A user can select several, or all the File Types under a file category. If the number of File Types selected is less than all the File Types available for that category, the file category name will show as blue and display how many File Types are selected out of the total available.
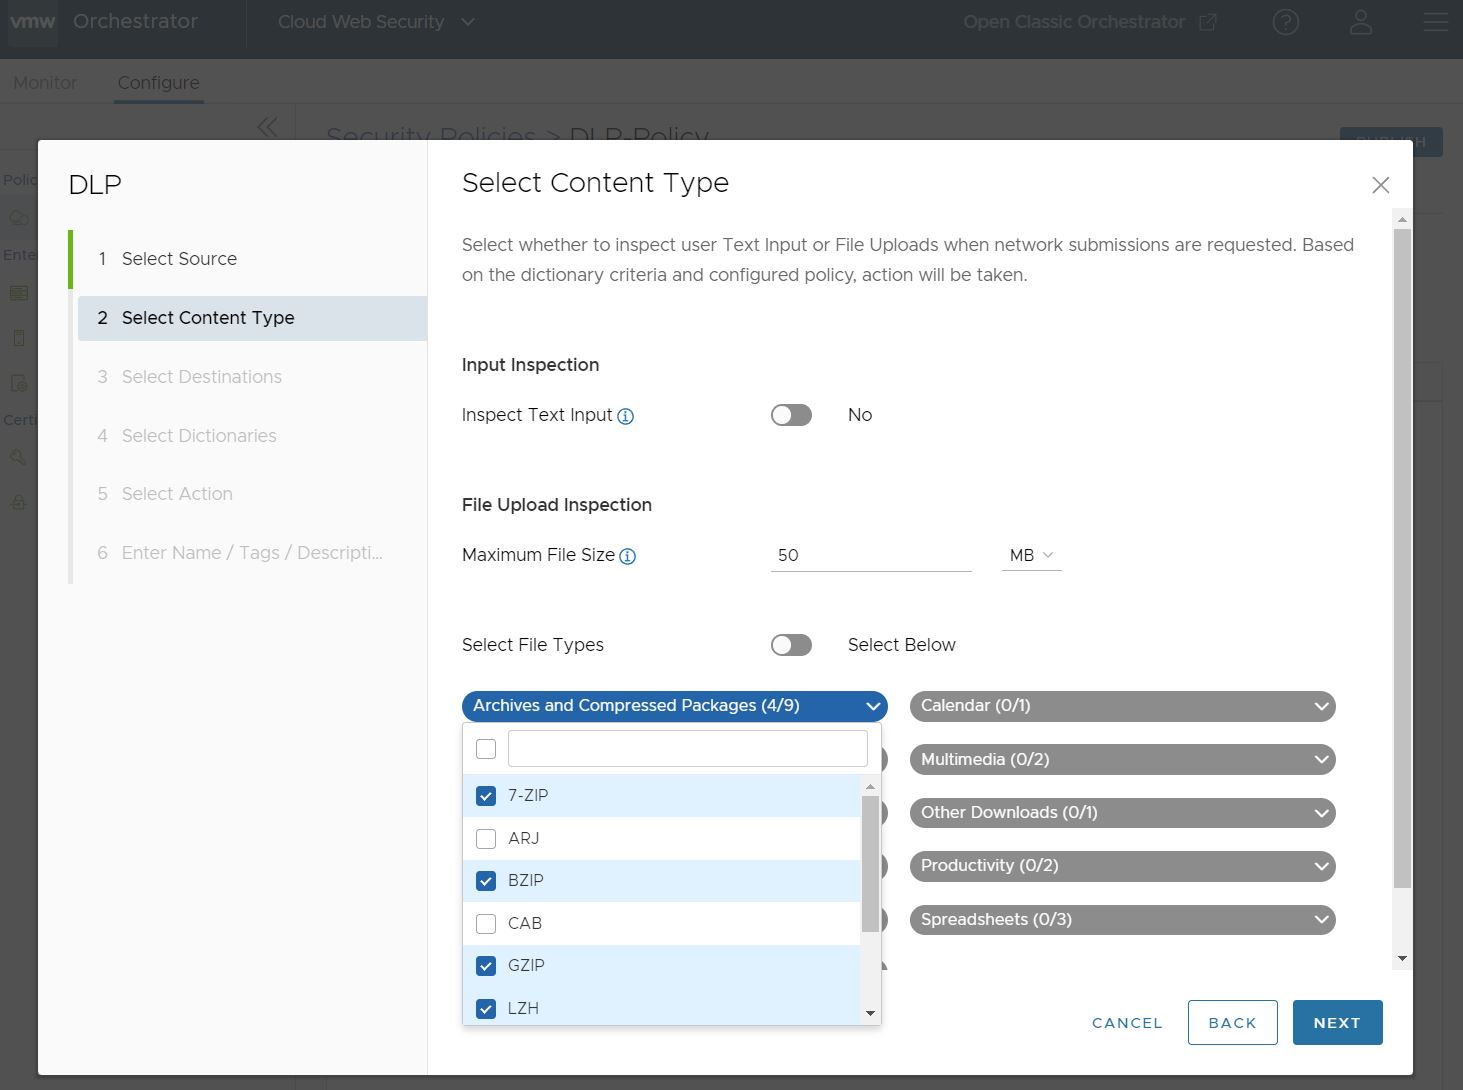
If the user wishes to select all the File Types for that category, they can click on the top selection box and all the File Types are selected. When this is done, the category header becomes green and shows all File Types have been selected for that category.
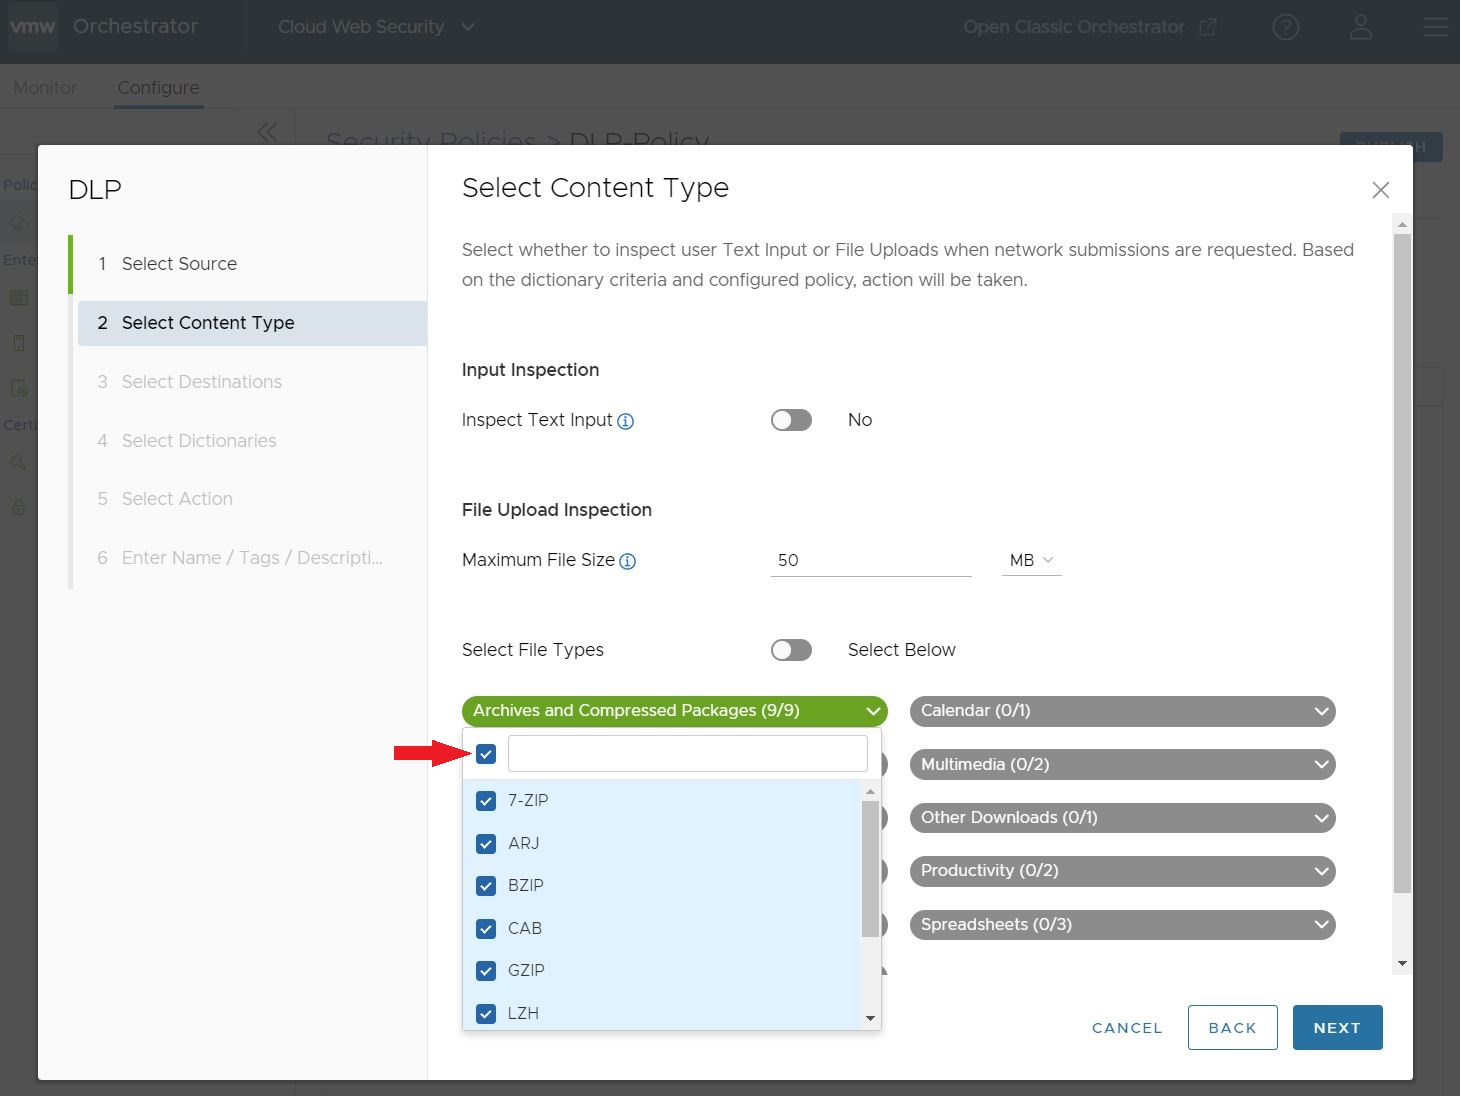
When you are satisfied with all of the Select Content Type fields, click Next.
- Choose whether the DLP rule should Inspect Text Input or not. The default for this option is Off. When toggled to On, user Text Input will pass through DLP inspection when network submissions are requested.
- On the Select Destinations screen the user can specify the domains and/or categories for which DLP inspection should take place. The default setting is All Domains and Categories, which means that DLP inspects all Domains and all 84 Categories.
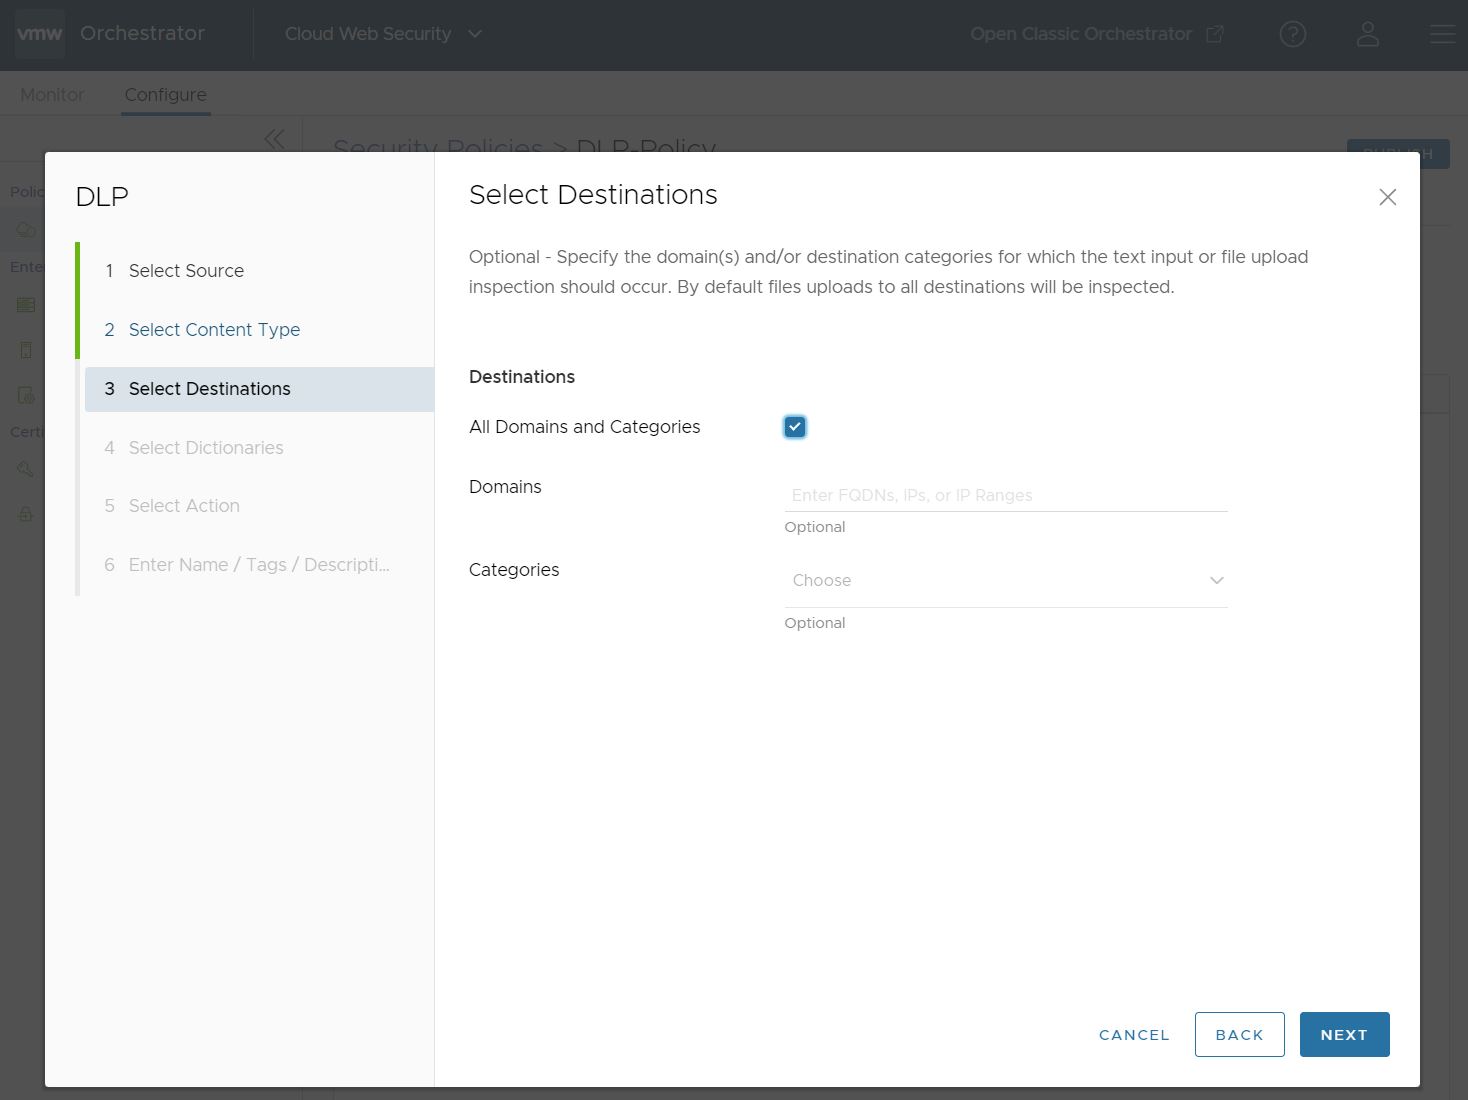
If the user unchecks the box for All Domains and Categories, the user is required to configure customized Domains and/or Categories.
For the Domains field, a user can specify Fully Qualified Domain Names (FQDN), IP Addresses, or IP Ranges that would trigger an Auditor Alert. A user can freely mix FQDNs, IP Addresses, and IP Ranges.
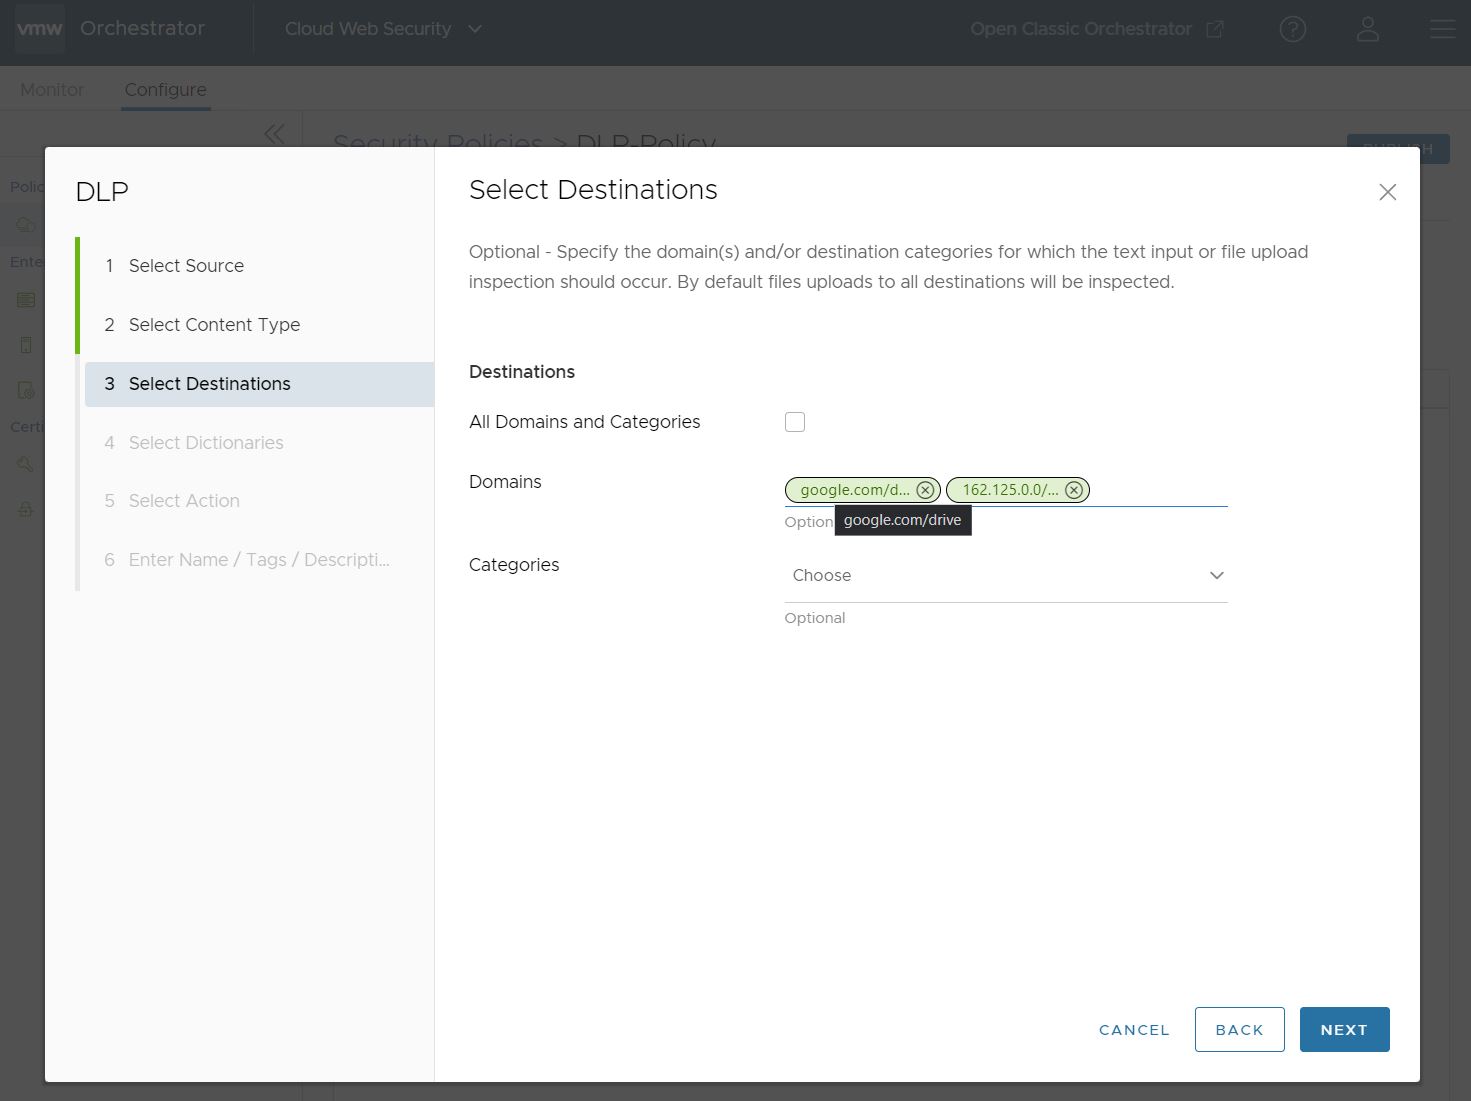
In the Categories field, a user can choose from up to 84 distinct categories for which a file can match and require a DLP inspection. A user can also select all categories at once by clicking the top left check box.
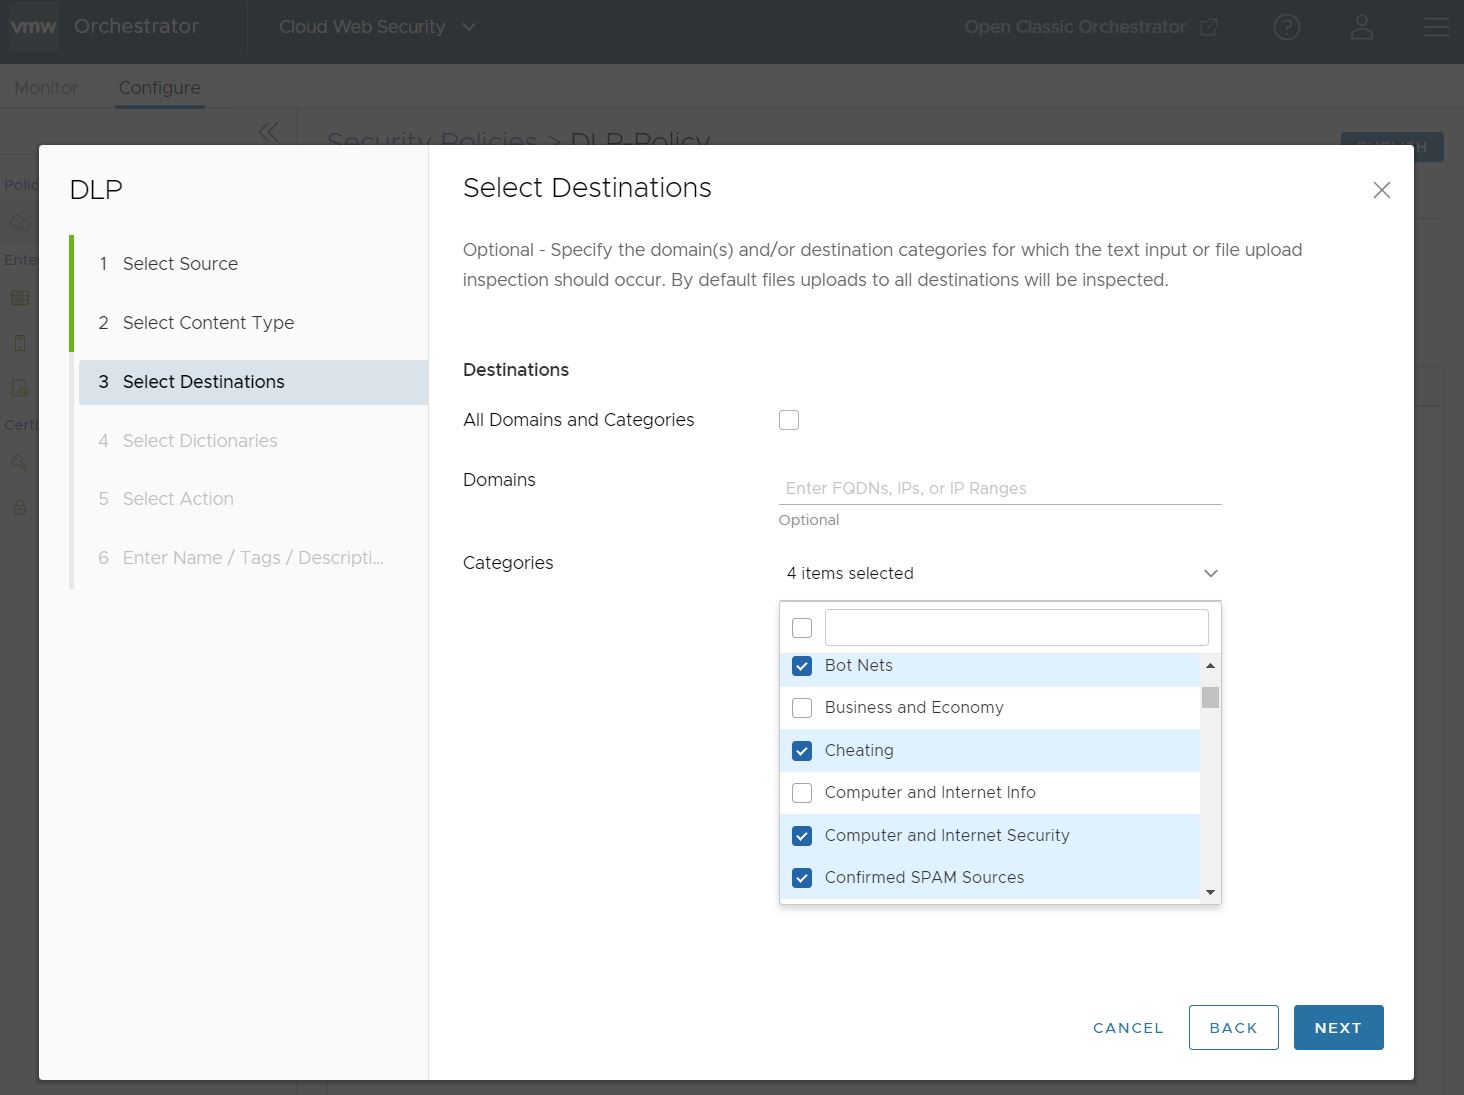
When you are satisfied with all of the Select Destinations fields, click Next.
- In the Select Dictionaries section, the user must choose one or more Dictionaries to associate with this rule. The Dictionaries can be Custom, Predefined, or a combination of Custom and Predefined. All selected Dictionaries are evaluated, and action is taken based on the criteria specified in the respective dictionaries.
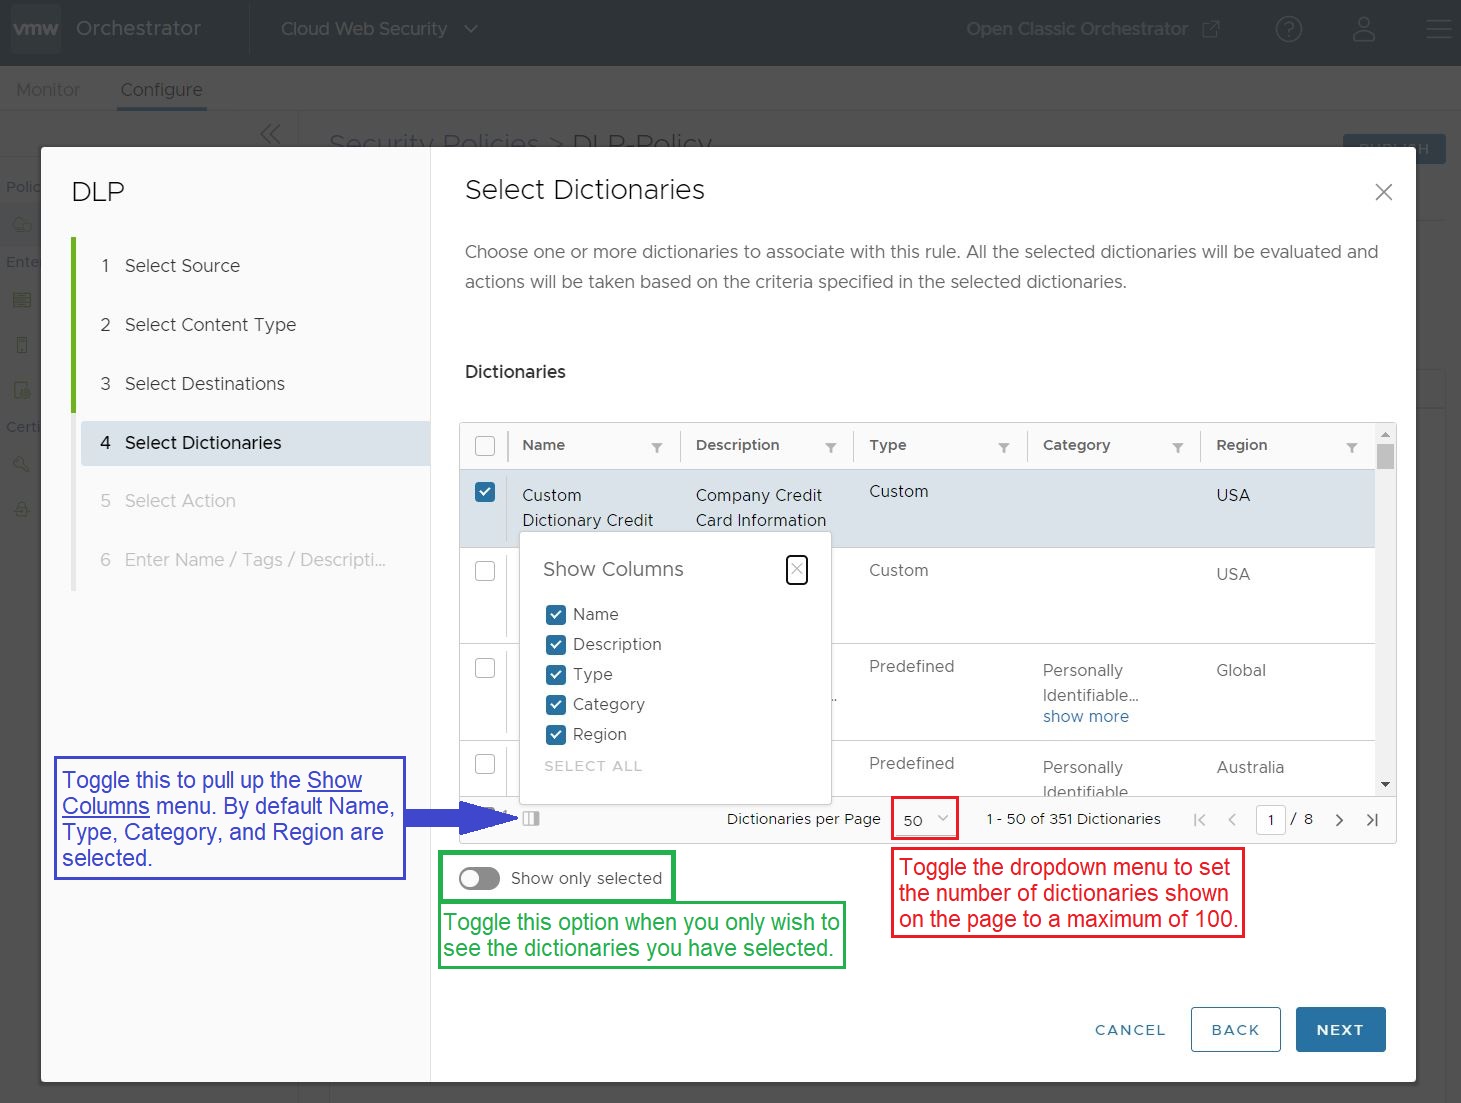
Because there are more than 340 Predefined Dictionaries to choose from in addition to the Custom Dictionaries you may create, you should narrow your Dictionary options using one or more filters located at the top of each column. In this example, the user is filtering for dictionaries that match the Category term "HIPAA" to link up with the Custom Dictionary they already created. The user could just as easily filtered for Name, Description, Type, or Region.
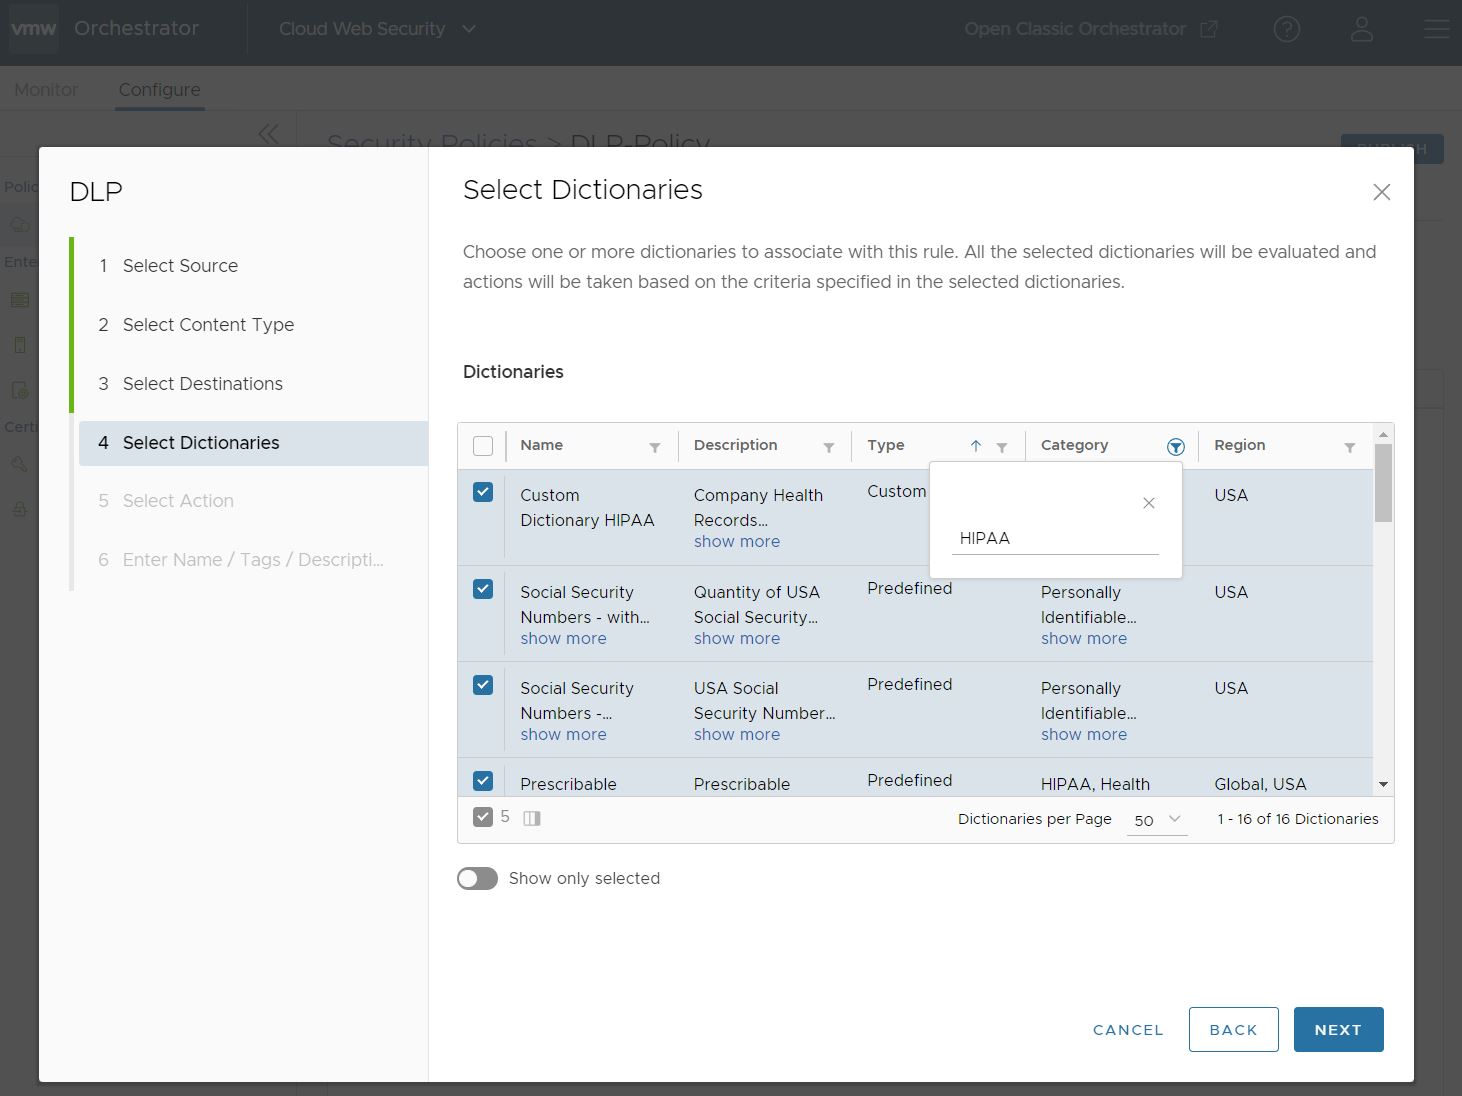
When you are satisfied with the Dictionaries selected for this rule, click Next.
- On the Select Action screen you decide what action is taken when the defined criteria are met. The action can be set to Block, Log, or Skip Inspection. The default settings for Select Action are Block, with no Audit Email sent and both HTTP and HTTPS toggled on as Protocols to Inspect.
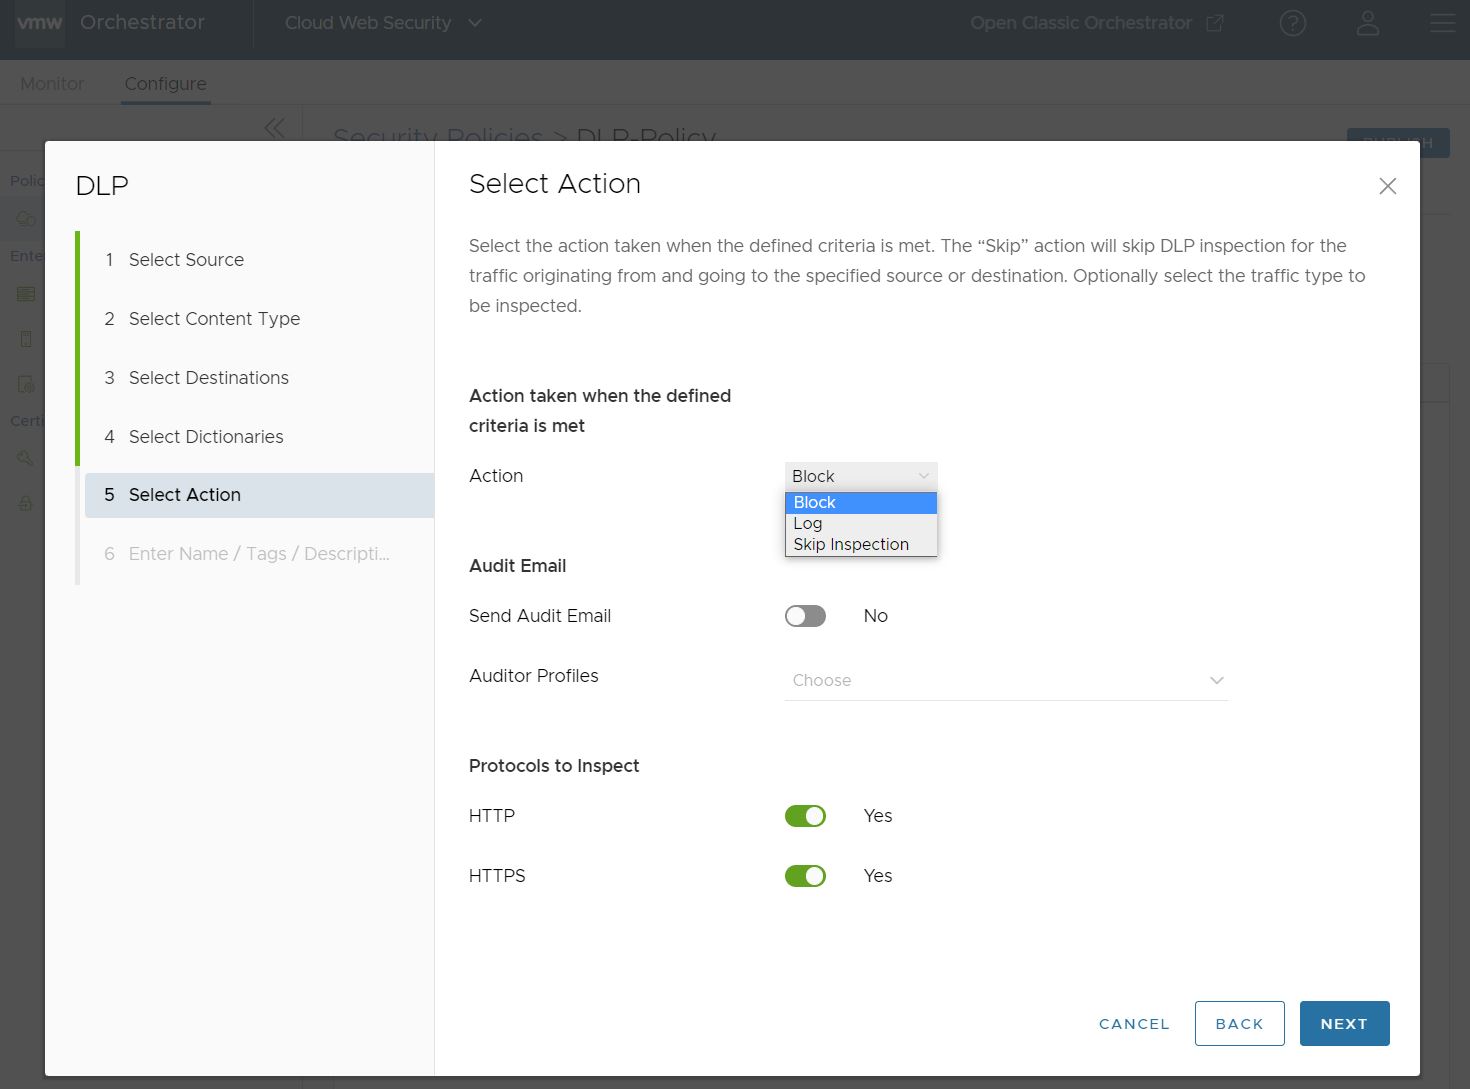
If you toggle the Send Audit Email to Yes, you will also need to select an Auditor Profile(s) who will receive the Audit Email. In this case, the user chooses the Auditor Profile configured earlier in the Auditors section.
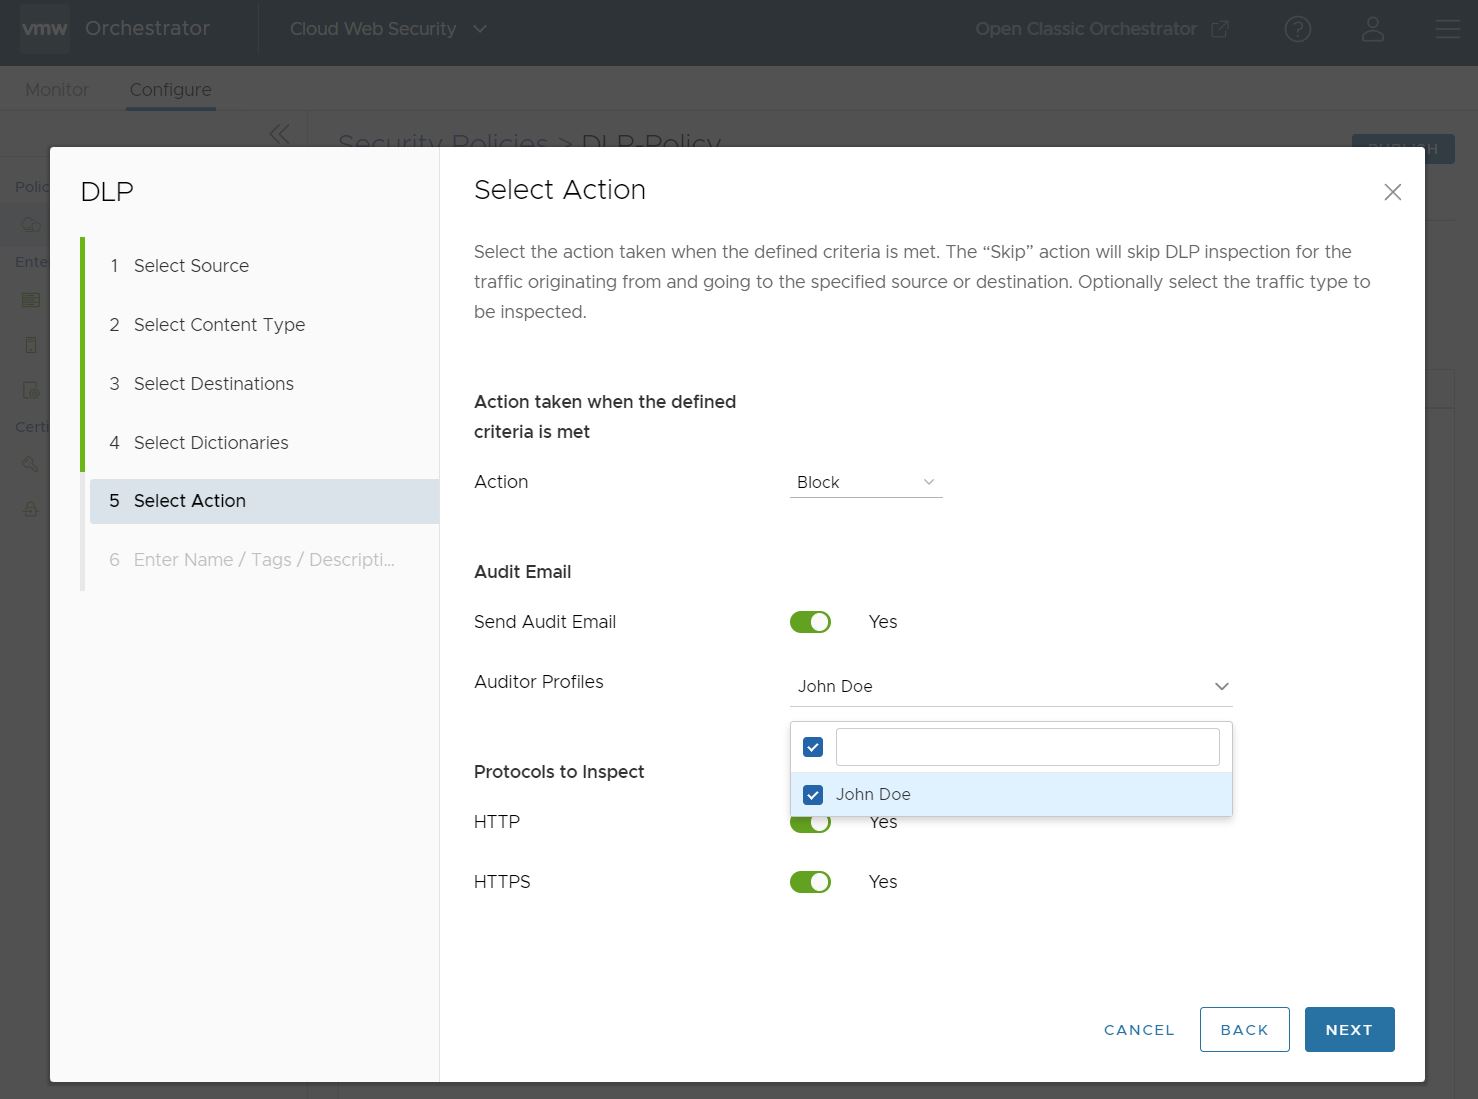
When you are satisfied with the Action taken for this rule, click Next.
- On the Enter Name /Tags / Description screen you must configure a Name for the DLP Rule. You can also configure Tags, Notification, and Reason for the rule.
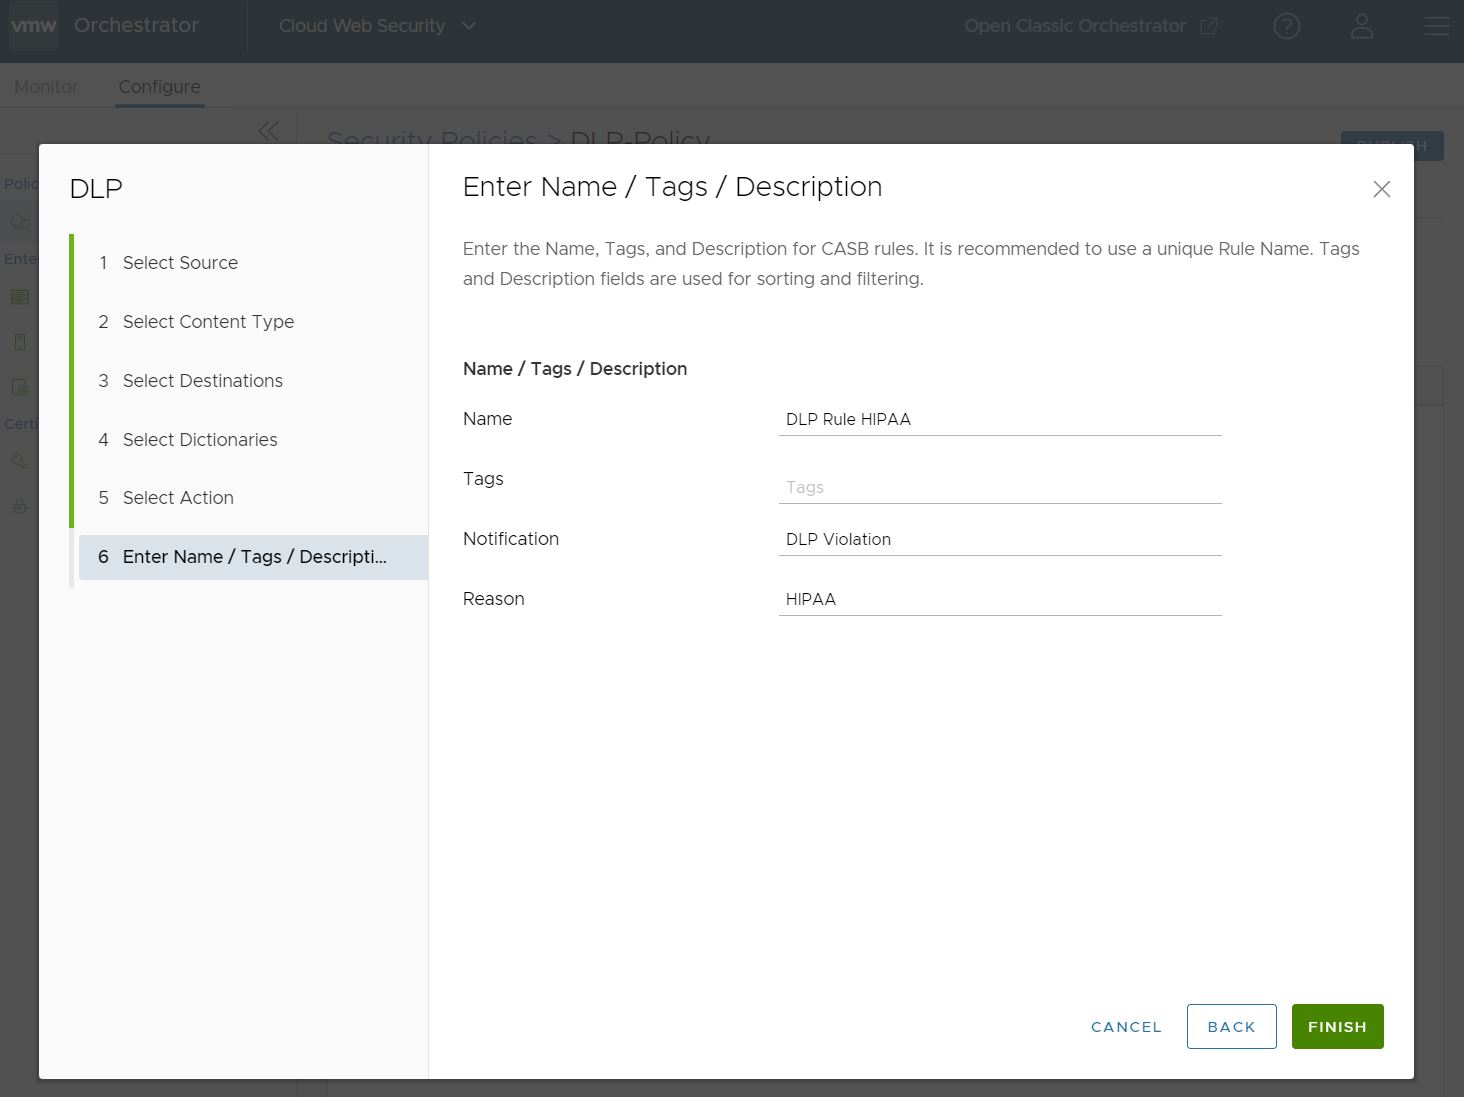
When you are satisfied with the Name and optional Tags, Notification, and Reason for this rule and satisfied that the DLP Rule is configured correctly, click Finish.
- Finally, verify that the DLP Rule is created and listed on the DLP rule section for this Security Policy. If you are satisfied the DLP Rule is correct, click on Publish for the DLP Rule to take effect in this Security Policy.
Note: It takes about five minutes for the DLP Rule to take effect from the time you publish it.

Once published, a DLP Rule can be reedited and republished as needed in the same way that it was first created.
Verify a DLP Rule is Working
- Cloud Web Security blocks the exfiltration of sensitive data that matches a DLP Rule.
- Cloud Web Security detects and logs the attempt to exfiltrate sensitive data.
- Cloud Web Security sends an email alert to a DLP Auditor when the rule is triggered.
- From an endpoint device (Windows, MacOS, iOS, or Android) that sits behind an SD-WAN Edge, login to a file hosting service (for example, Apple iCloud, Dropbox, Google Drive, Microsoft OneDrive or similar).
- If the rule includes a Custom Dictionary, upload a Text Input, Text File, or PDF which matches the criteria set in the DLP Rule.
Note: Text Input is like a form post or text message. A Text File is an actual .txt attached to an upload.
- Alternatively, use any of the Predefined Dictionaries and their respective thresholds for PII data, Social Security numbers, Bank Account numbers, or something similar.
Note: With Predefined Dictionaries, the threshold to trigger the DLP violation is based on the combination of a sensitivity level and DLP engine heuristics. This contrasts with the Custom Dictionary which uses a specific repeat count.
- The text file/input or file upload is blocked.
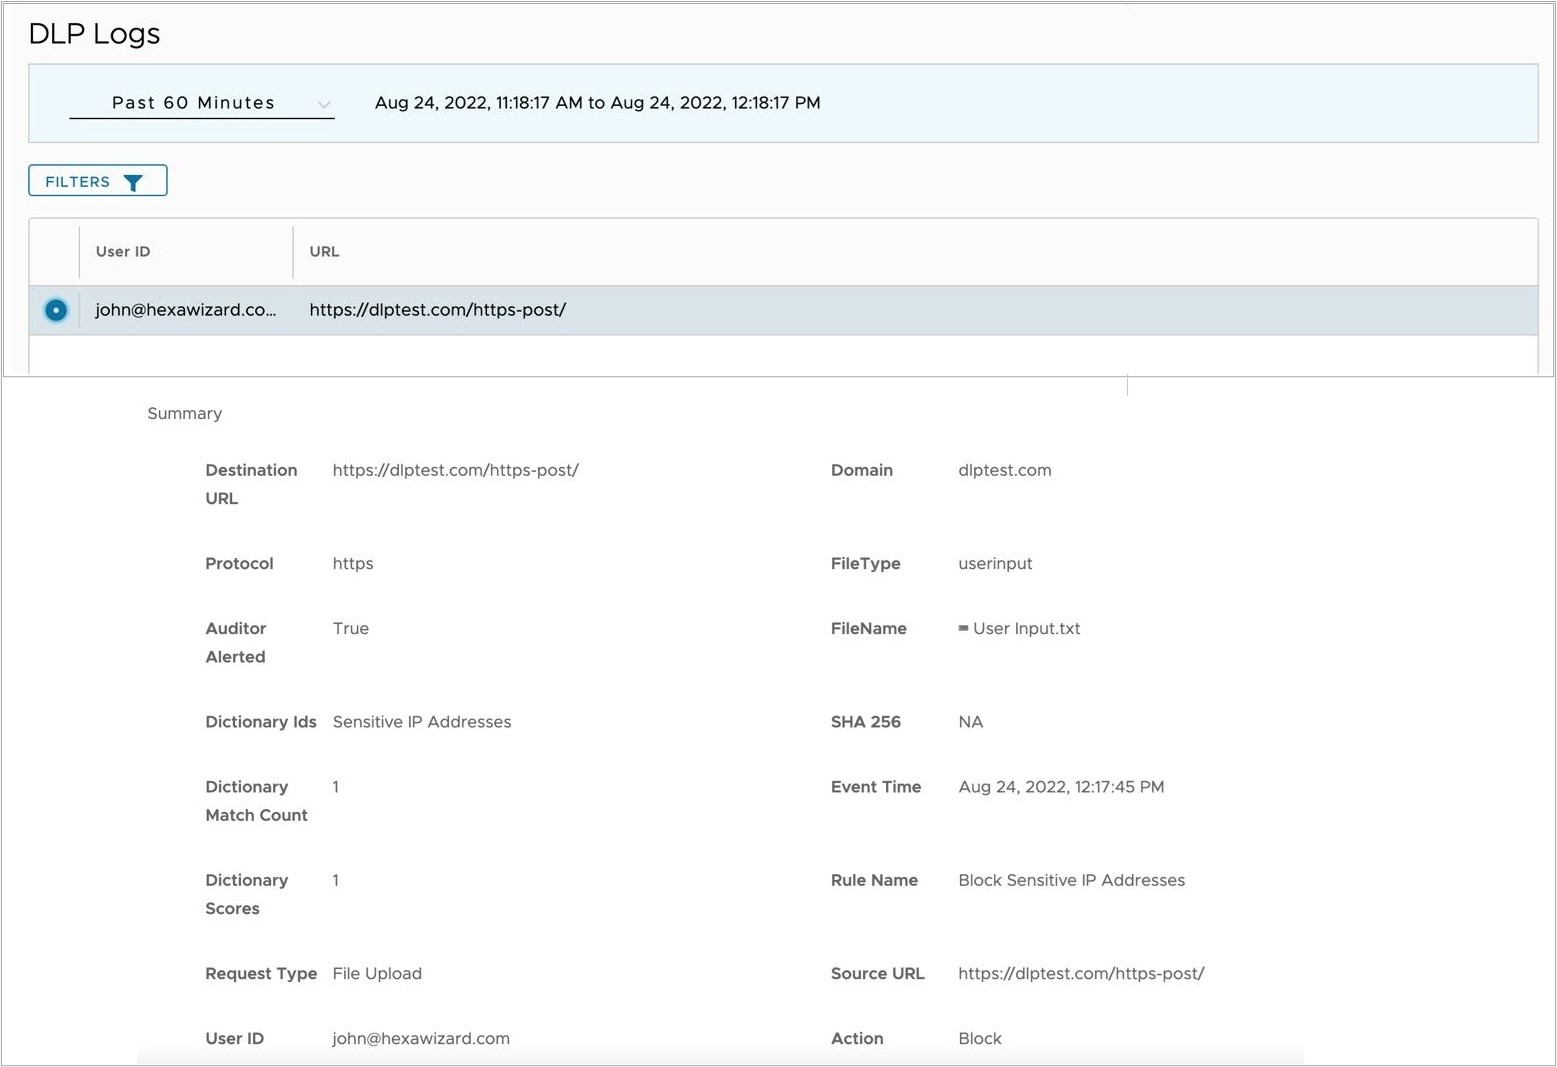
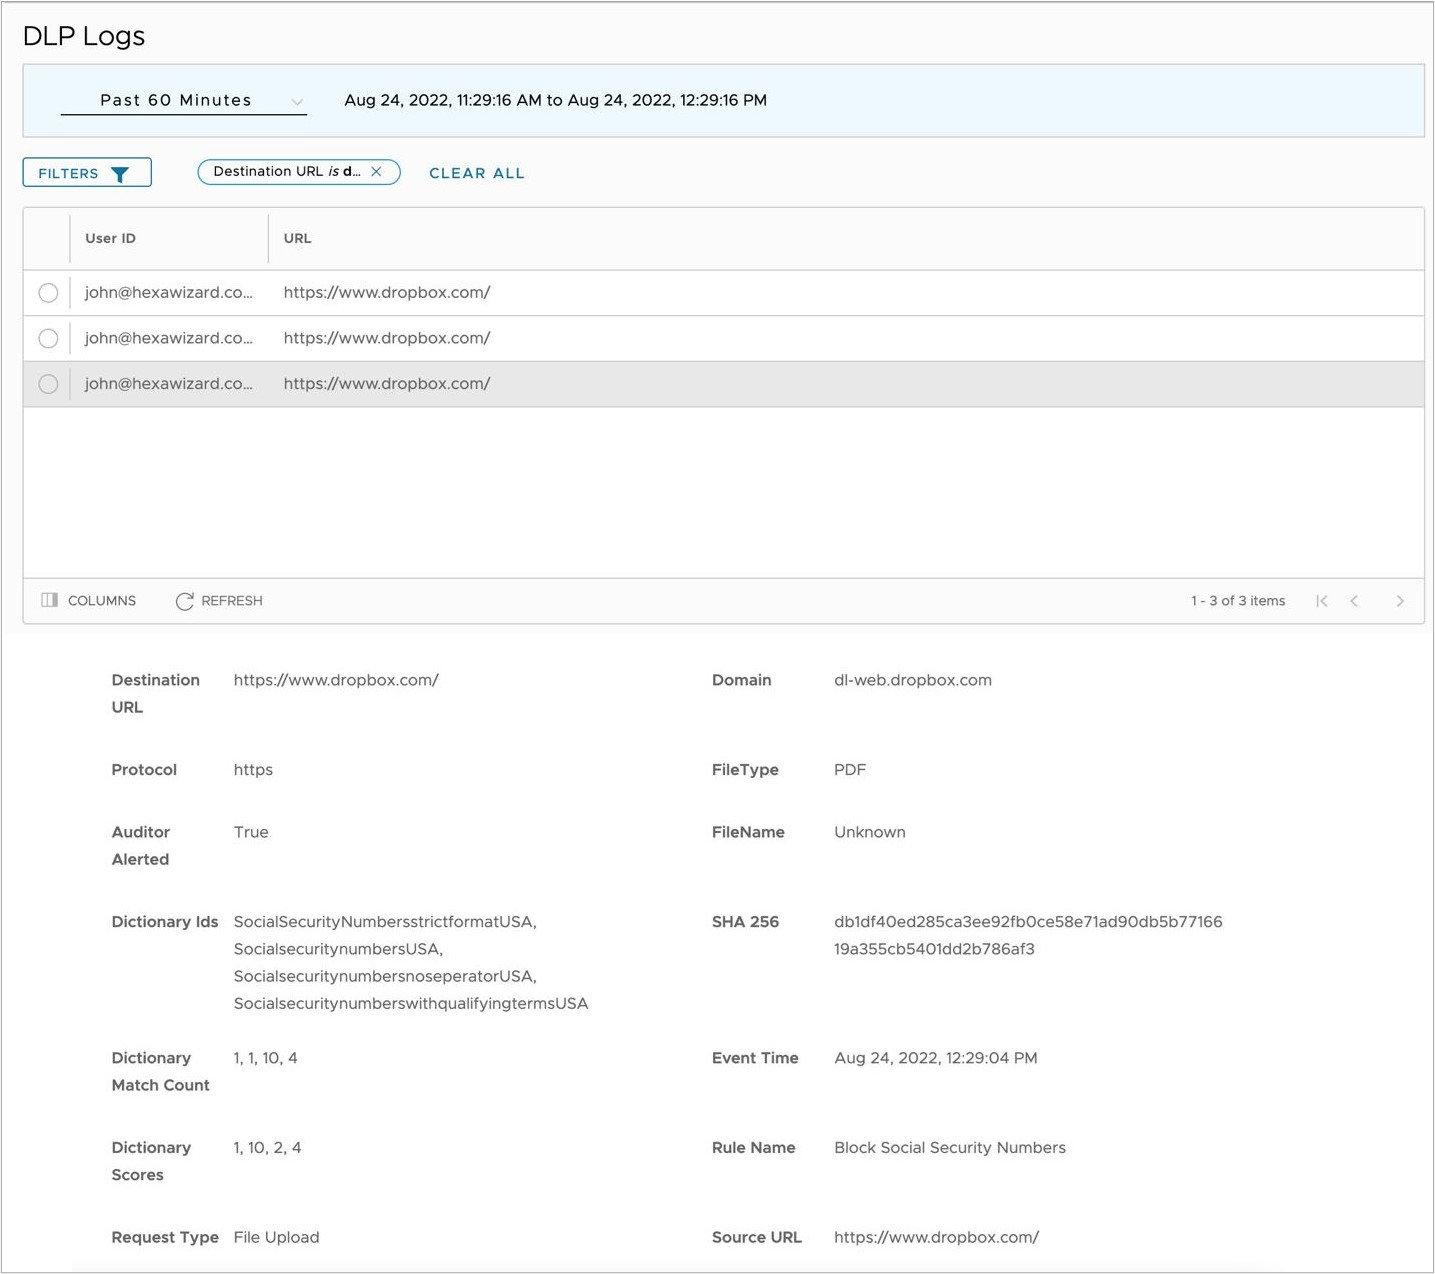
- Verify in the DLP logs that the block action has been logged.
- Displayed below is a sample log for a Text Input block in DLP Test which matches a Custom Dictionary the DLP Rule uses.
- Displayed below is a sample log for a PDF file blocked in Dropbox for a Social Security number match from a Predefined Dictionary.
- Displayed below is a sample log for a Text Input block in DLP Test which matches a Custom Dictionary the DLP Rule uses.
- Verify that a DLP Auditor has received an alert email based on the DLP Rule and the action configured for this rule.
- Displayed below is a sample email for a Text Input block in DLP Test for a Custom Dictionary the DLP Rule uses.

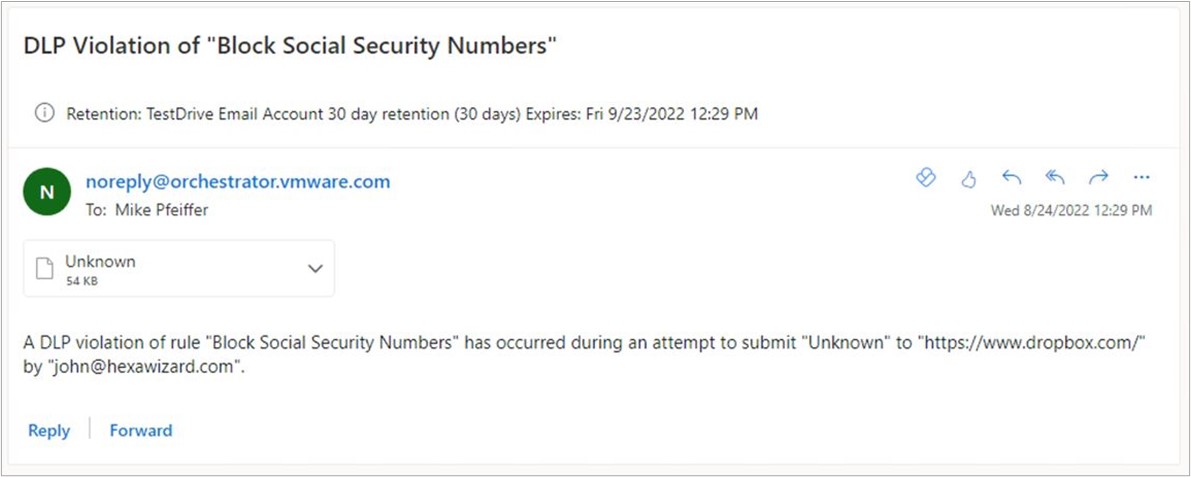
- Displayed below is a sample email for a PDF file blocked in Dropbox for a Social Security number match from a Predefined Dictionary.
Note: Non-text files may appear with an "Unknown" file name. As a result, the attached file in the Auditor email would also show as "Unknown".
- Displayed below is a sample email for a Text Input block in DLP Test for a Custom Dictionary the DLP Rule uses.