


This topic describes how to integrate Harbor Registry with VMware Tanzu Kubernetes Grid Integrated Edition (TKGI).
Note: This documentation supports the Harbor v1.9.x and 1.10.x releases.
Prerequisites
- You must have installed TKGI. For more information, see Installing TKGI in the TKGI documentation.
- You must have installed Harbor. For more information, see Installing and Configuring VMware Harbor Registry.
Update DNS for Harbor
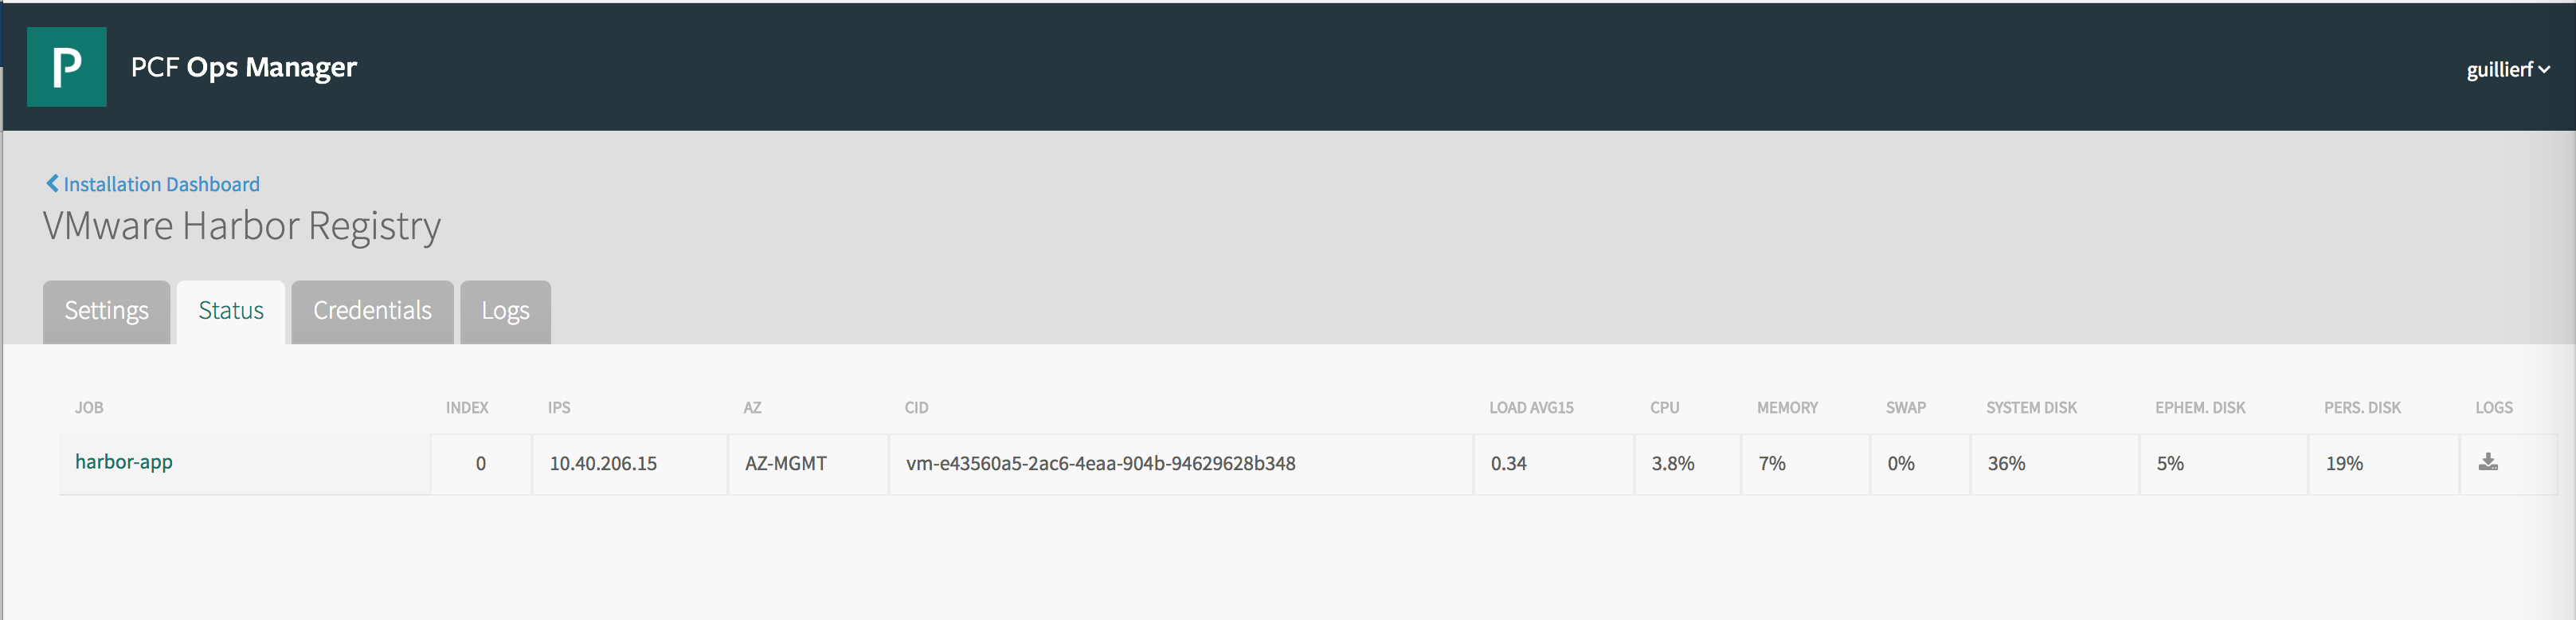
After you install and configure Harbor, you must update the DNS entry for the Harbor hostname with the IP address of the Harbor VM assigned by BOSH.
To view the IP address assigned to Harbor, click the Harbor tile and select the Status tab.
Import the CA Certificate Used to Sign the Harbor Certificate and Key to BOSH
TKGI must authenticate connections to Harbor to pull images from and push images to Harbor. Before you can use Harbor with TKGI, you must configure the BOSH Director with the CA certificate that was used to sign the Harbor certificate and private key. For more information, see Configure SSL Certificate and Key in Installing and Configuring VMware Harbor Registry.
By adding the CA certificate that was used to sign the Harbor certificate and key to the BOSH Director security configuration, all Kubernetes clusters deployed by TKGI can automatically trust this Harbor registry instance.
Note: Follow the procedures in this topic to configure all of your TKGI Kubernetes clusters with the same Harbor Registry CA certificate. If you use TKGI v1.6 or later, and you want to apply Docker Registry CA certificates to individual TKGI clusters, or you want to allow different clusters to connect to different Harbor registry instances, see Configuring Cluster Access to Private Docker Registries (Beta).
Obtain the CA Certificate Used to Sign the Harbor Certificate and Key
If you installed Harbor with a custom certificate and private key, follow the steps below. For more information, see Use Custom Certificate in Installing and Configuring VMware Harbor Registry.
-
Obtain the third-party CA certificate that was used to sign the Harbor certificate and key.
-
Import the CA certificate to the BOSH Director. For instructions, see the Load the CA Certificate to the BOSH Director Security Configuration section below.
If you had Ops Manager automatically generate the certificate and key for Harbor, download the Ops Manager Root CA Certificate by following the steps below. For more information, see Use Generated Certificate in Installing and Configuring VMware Harbor Registry.
-
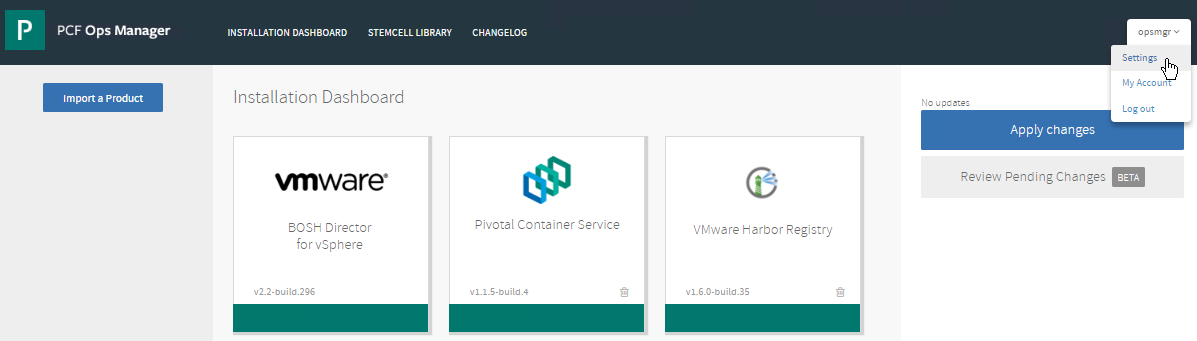
Navigate to the Ops Manager Installation Dashboard.
-
In the upper right corner, click your username and select Settings.
-
Select Advanced Options.
-
Click Download Root CA Cert.

-
Import the CA certificate to the BOSH Director. For instructions, see the Load the CA Certificate to the BOSH Director Security Configuration section below.
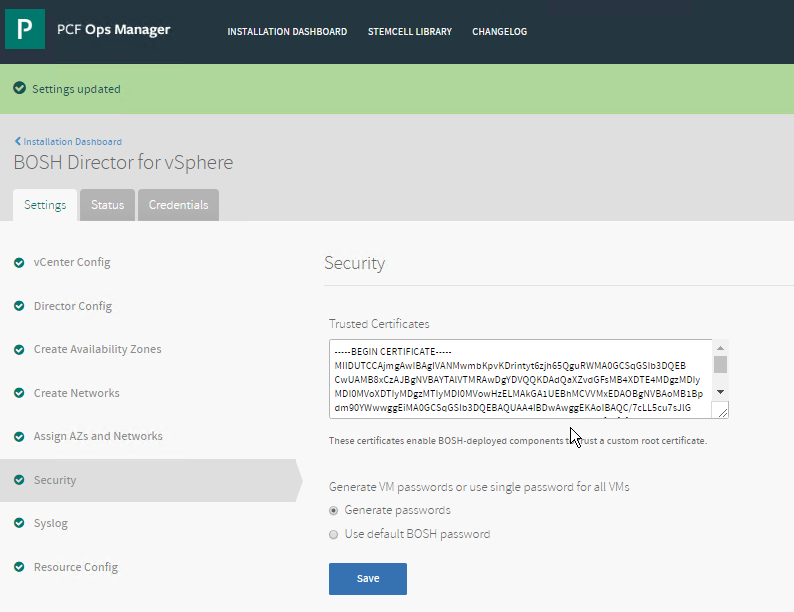
Load the CA Certificate to the BOSH Director Security Configuration
Once you have obtained the Harbor CA Certificate file, perform the following steps to load the certificate in the BOSH Director security configuration:
-
Log in to Ops Manager.
-
Navigate to the Installation Dashboard.
-
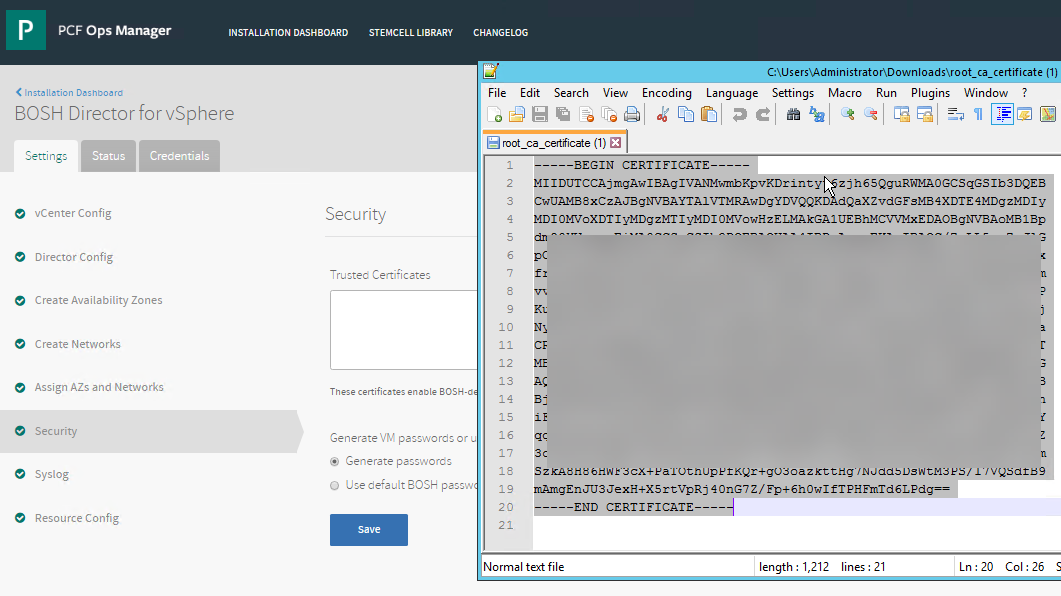
Click the BOSH Director tile.
-
Click Security.

-
Open the CA certificate file from Obtain the Harbor CA Certificate in a text editor.
-
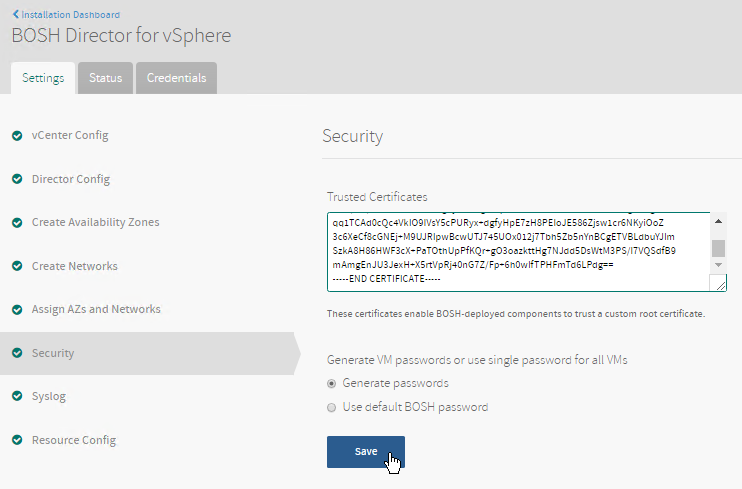
Copy and paste the contents of the CA certificate file into the Trusted Certificates field.
-
Click Save.
-
Return to the Installation Dashboard.
-
If the TKGI cluster is already provisioned, check the “Upgrade all clusters errand” in the TKGI tile so that each TKGI cluster node will trust the new CA certificate.
-
Click Apply Changes.
Create DNAT Rule for Harbor (NSX-T only)
If you integrate Harbor with TKGI in a NSX-T environment that uses NAT mode, the IP address for Harbor provided by Ops Manager is not publicly inaccessible, and you cannot access the Harbor UI from https://harbor_host_address:443. For more information about Nat mode, see NAT Topology in NSX-T Deployment Topologies for TKGI.
To access the Harbor UI, you must create a DNAT rule in the NSX-T Tier-0 router that maps the Harbor IP address to a routable IP address in your virtual network. For more information, see:
- NSX-T v2.4 or v2.5: Create DNAT Rule on T0 Router for Harbor Registry
- NSX-T v3.0: Create Management Plane
Note: The IP address that your FQDN resolves to should be in the range of the NSX-T external-ip-pool (Inventory > Groups > IP Pools). If the IP address is not in this range, you must assign an IP address from the CIDR that is outside of the specified range in use for external-ip-pool.
If you are using Harbor with TKGI with NSX-T in NAT mode, create a DNAT rule for Harbor as follows:
-
In the NSX-T Manager, select Routing > NAT > T0-Router.
-
Click ADD.
-
Configure the NAT rule as follows:
- Priority:
1024 - Action:
DNAT - Protocol:
Any Protocol - Destination IP: The external IP address that your FQDN resolves to
- Translated IP: The IP address of the Harbor VM
- Status:
Enabled - Firewall Bypass:
Enabled
- Priority:
-
Click Save.

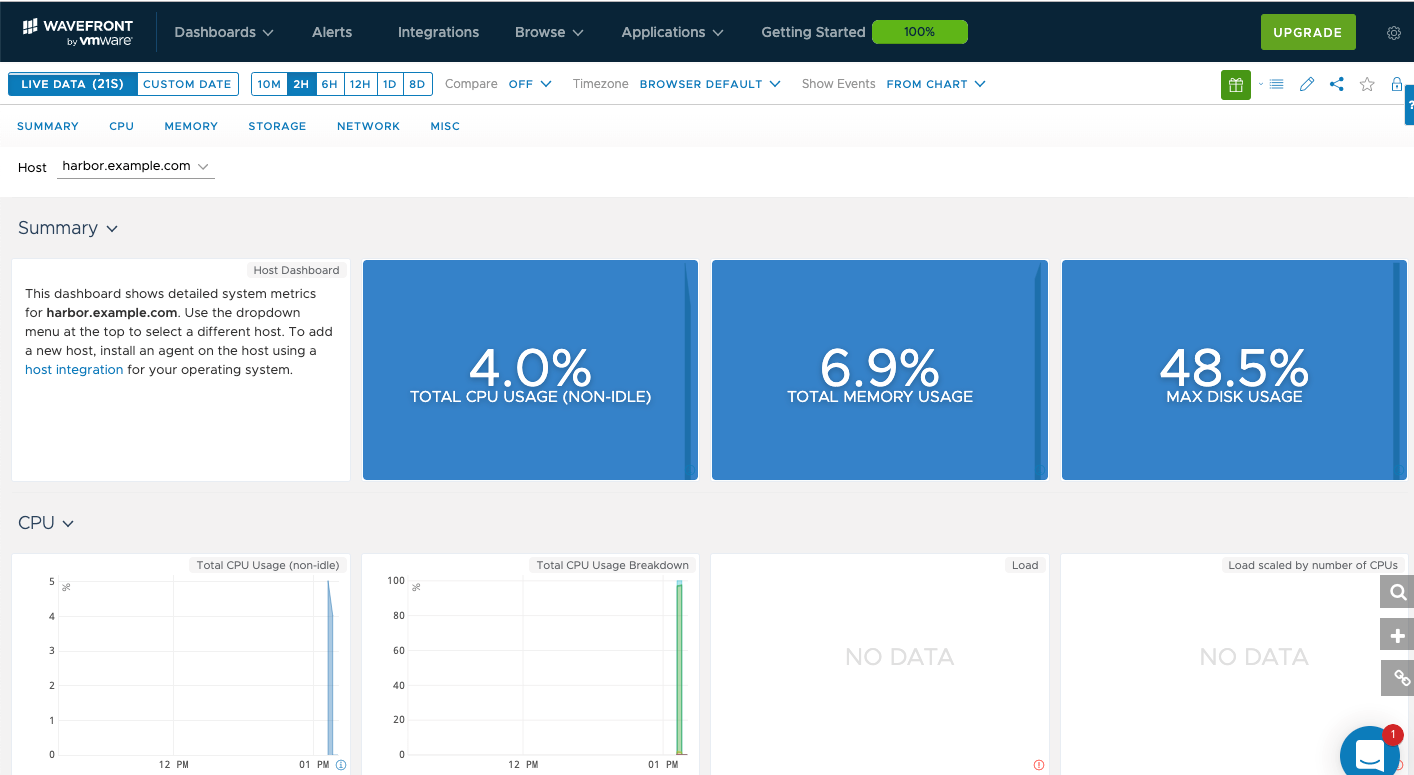
Monitor Harbor Using Wavefront
If you enabled Wavefront monitoring in the Harbor tile, there are additional steps to take to initiate monitoring with Wavefront.
-
After Wavefront is configured and installed in the Harbor tile, go to your Wavefront portal URL (for example, https://longboard.wavefront.com) and login with your user name and password.

-
Click Integrations and install the Linux Host.
-
Click the Dashboard tab and select Install Dashboards.

-
Go to Dashboards > All dashboards > Linux Host Dashboards.
-
From here you can view the CPU, Memory and Disk usage of the Harbor VM.
For more information about monitoring with Wavefront, refer to the Wavefront documentation.
Next Steps
- Starting Harbor in Using VMware Harbor Registry
- Using Harbor in Using VMware Harbor Registry
