


This topic describes how to install and configure the VMware Harbor Registry Tile for use with your VMware Tanzu Kubernetes deployments.
These instructions are valid for new installations, reconfigurations of existing installations, and upgrades. If you are upgrading the Harbor Registry Tile, follow the procedure in Upgrading the VMware Harbor Registry Tile before performing these steps.
Prerequisite: VMware Tanzu Operations Manager
To install, configure, or upgrade the VMware Harbor Registry Tile, you must have the VMware Tanzu Operations Manager installed. Refer to the Operations Manager documentation for instructions. Check the VMware Harbor Registry Tile release notes for supported Operations Manager versions.
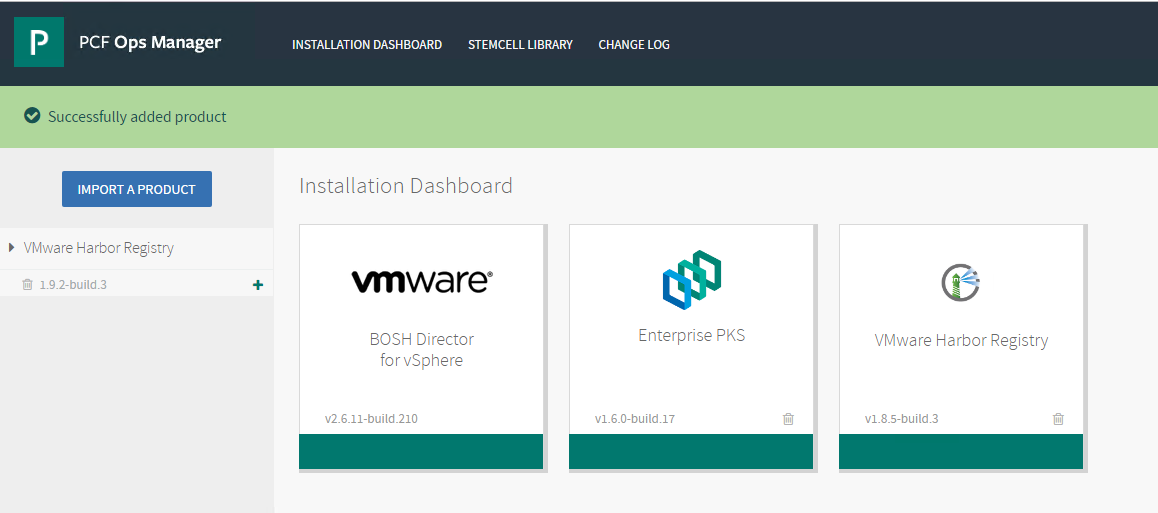
Import the VMware Harbor Registry Tile to Ops Manager
To initiate the deployment of Harbor, import the tile.
- Download the Harbor tile from the Broadcom Support.
- Log in to the Ops Manager Installation Dashboard.
- Click Import a Product and upload the Harbor tile.
- Below the Import a Product button, click the + next to the VMware Harbor Registry version number to add the tile to your staging area.
- Click the VMware Harbor Registry tile to begin the configuration process.
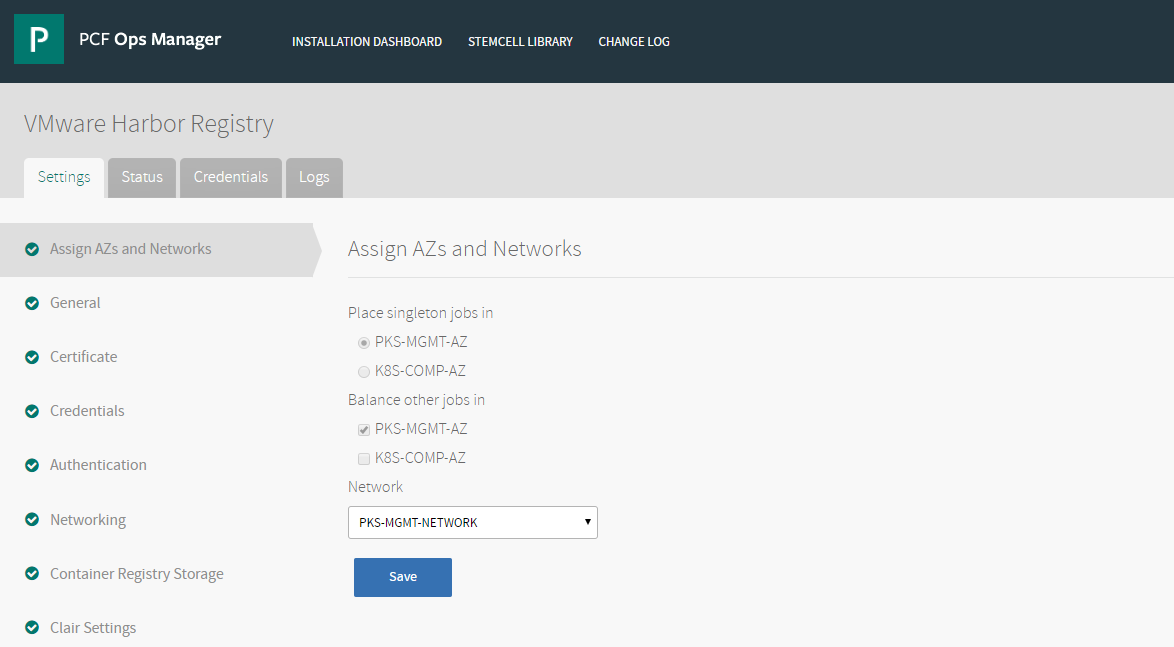
Assign AZs and Networks
Begin the installation of the Harbor tile by assigning availability zones (AZs) and networks.
- In the Harbor tile, select Assign AZs and Networks.
- In the Assign AZs and Networks pane, under Place singleton jobs in, select the availability zone (AZ) where you want to run singleton jobs. VMware Harbor is a singleton job and is placed on this network.
- Under Balance other jobs in, select the AZ where you want to balance other jobs. For TKGI, this is the same AZ as the one that you selected for Place singleton jobs in.
- Under Network, select the network where you want to deploy Harbor. For TKGI, this is the management network where you deploy the Ops Manager, BOSH Director, and TKGI virtual machines (VMs).
- Click Save to preserve your changes.
Configure General Settings
In the General Settings pane, you set the hostname and IP address for Harbor.
Note: In previous releases, this pane also included the container network settings. Starting with Harbor v1.9.x, those settings are now in the Networking section. See “Configure Networking” for details.
- In the Harbor tile, select General.
- Under Hostname, enter the FDQN of a host to access the Harbor administration UI and registry service. The hostname must include a domain and must be able to resolve to the IP address of the Harbor instance VM by an external DNS server.
Kubernetes worker nodes can resolve the Harbor FQDN through the local BOSH DNS server. To enable Docker clients external to Kubernetes worker nodes to resolve the Harbor FQDN, you must provide a Harbor FQDN that can be resolved by an external DNS server. When Harbor is successfully deployed, you must update the Harbor external DNS record with the IP address of the Harbor VM. - Optionally Under Static IP Address, enter the static IP address that you want to use for the Harbor web interface. This static IP address must be inside the netblock used for the ‘Network’ above. Create a DNS record that maps the Harbor FQDN to the static IP address.
If a static IP address is not used, the external IP assigned by BOSH or a custom load balancer will need to direct traffic to the hostname specified above. - Optionally modify the Wait time for Harbor Tile migration complete from the default of 60 minutes. This option is available in v1.9.x and later.
- Click Save.

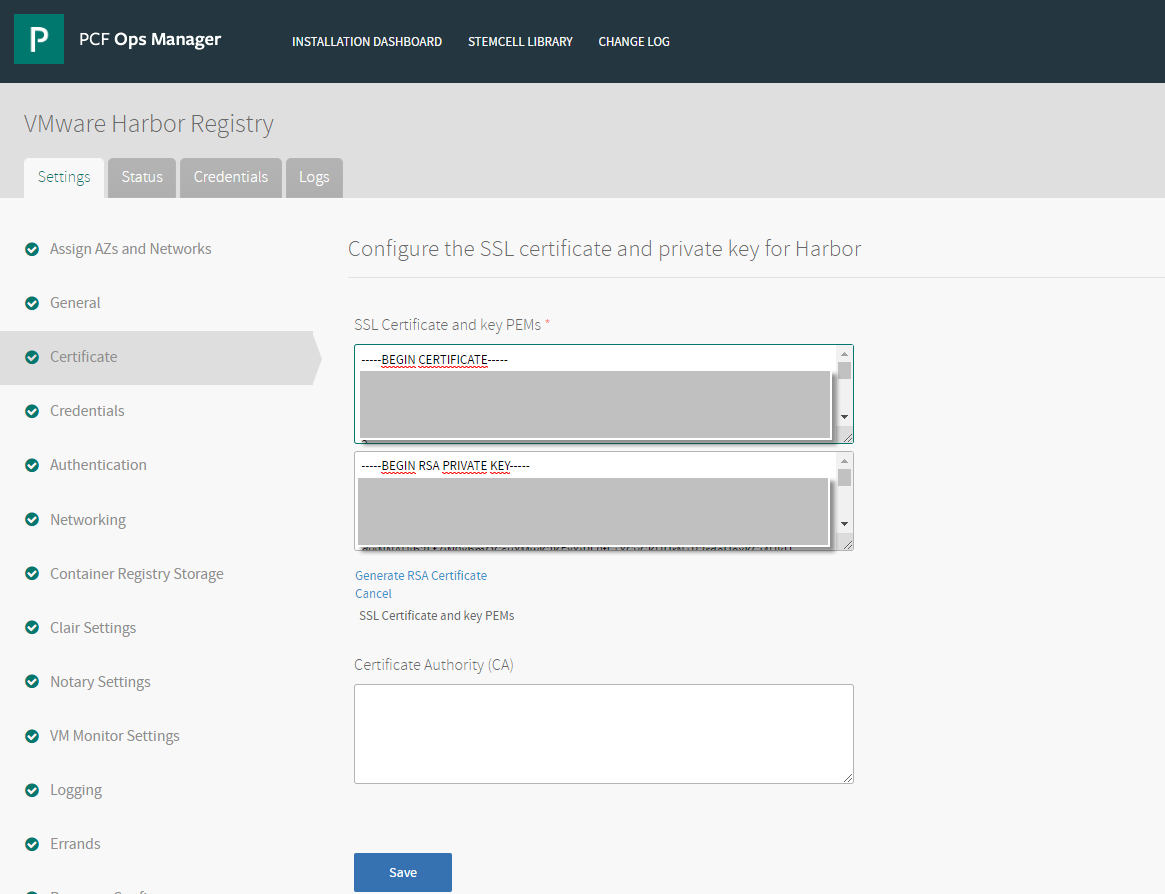
Configure SSL Certificate and Key
On the Certificate pane, you configure the SSL certificate and private key for Harbor. You can generate the certificate and private key or provide a custom signed certificate and private key. Additionally, you must provide the Certificate Authority (CA) certificate, which is used to sign the Harbor certificate. The domain name used to generate RSA certificate in the Harbor Tile can be different than the domain name used to generate the RSA certificate in the Tanzu Kubernetes Grid Integrated Edition or TAS for VMs tile.
If this is an existing instance of Harbor that you are reconfiguring or upgrading, you can change the previous certificate by clicking Change. You can then either generate a new RSA certificate or add a new custom certificate, key, and CA.
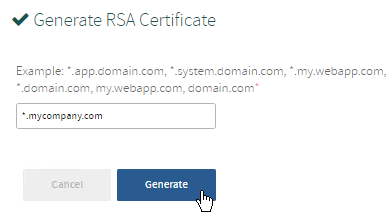
Use a Generated Certificate
To use a certificate that Ops Manager generates automatically, follow the steps below.
Note: If you use a wildcard domain name, be sure to truncate it appropriately. For example: “SSL: certificate subject name (*.harbor.tkgi.corp.local) does not match target host name (harbor.tkgi.corp.local).” In this case, the proper wildcard name for the cert is “*.tkgi.corp.local”.
- In the Harbor tile, select Certificate.
- Click Generate RSA Certificate.
- Enter the domain for your Harbor instance in the Generate RSA Certificate field. This can be a standard FQDN or a wildcard domain. The domain must match the DNS resolvable domain name that you used when you specified the hostname for Harbor.
- Click Generate.
- Click Save.
Use a Custom Certificate
To use a custom signed certificate from a third-party CA, follow the steps below.
- In the Harbor tile, select Certificate.
- Copy the contents of your certificate file into the Certificate PEM field. Certificates must be in PEM-encoded format. The certificate CN or SAN must match the DNS-resolvable domain name that you used as the hostname for Harbor.
- Copy the contents of the corresponding key (PEM) into the Private Key PEM field.
- Enter the Certificate Authority (CA) for the server certificate, which is used to sign the Harbor certificate.
- If you use a self-signed certificate, copy the corresponding CA here.
- If you are using the root CA of Ops Manager, leave this field empty.
- If you use a certificate for TKGI that is not signed by the default Ops Manager CA, and you configure Harbor to use the TKGI UAA for authentication, enter the root certificate of the TKGI UAA, so that Harbor can trust the correct certificate.
- Click Save.
Configure Harbor Credentials
If you are configuring an initial installation of Harbor, these credentials are used for the first login to the Harbor interface. If you are reconfiguring or upgrading Harbor, you cannot change the initial credentials. If you have changed the credentials in the Harbor interface since the initial installation, see Update Harbor Credentials below.
Configure Initial Credentials
- Select Credentials.
- Enter the password for the Harbor system administrator account. The default Harbor user name is
admin. Both the user name and password can be changed after installation using the Harbor web interface. See instructions below.Note: The password must contain at least 8 characters with 1 lowercase letter, 1 uppercase letter and 1 numeric character. The password cannot start with the pound sign
#. - Click Save.

Update Harbor Credentials
You cannot change the Harbor administrator password in Ops Manager after you set it during installation. You must use the Harbor interface to make subsequent changes to the password after deployment.
- Update the Harbor system administrator password using the Harbor web interface.
- In the Credentials section of the Harbor tile, enter the new password in the Admin Password to run smoke test field.
- Apply changes to the Harbor tile and redeploy Harbor using Ops Manager for the updated password to take effect.
Configure Harbor Authentication Mode
On the Authentication pane in Ops Manager you select an authentication mode. You use the Harbor web console to configure detailed settings for the selected authentication mode. For more information, see Managing authentication in the Harbor User Guide.
If you are reconfiguring or upgrading Harbor, you cannot change the authentication mode that was set during the initial installation.
- In the Harbor tile, select Authentication.
- Choose one of the following Authentication Modes:
- Internal (default): Harbor user credentials are stored in a local database
- LDAP: LDAP authentication
- UAA in TKGI: User Account and Authentication with TKGI
- UAA in VMware Tanzu Application Service for VMs: User Account and Authentication with TAS for VMs
- Click Save.
Configure Networking
You can configure a global proxy that is used by Harbor and the image scanner (if enabled). You can also customize the container network settings.
- In the Harbor tile, select Networking.
- (Optional) In both the HTTP Proxy and HTTPS Proxy fields, enter the URL to proxy traffic for Harbor server components, such as the jobservice, and to access the external network.
Set both the HTTP and HTTPS proxy options. Each field should be configured with the same URL.
For example: Http Proxyhttp://your.proxy.com:3128and Https Proxyhttp://your.proxy.com:3128, or Http Proxyhttps://your.proxy.com:3128and Https Proxyhttps://your.proxy.com:3128. Usually HTTPS is used, because most sites use HTTPS.
Note: To use basic authentication with the HTTP/S proxy, include the user name and password in the proxy host URL, for example:
http://user:password@myproxy.internal.domain:8080.
Note: Some proxy servers change the certificate of the HTTPS site and replace it with a self-signed certificate generated with the proxy server root CA. If the proxy server root CA is not trusted by the client, it will return the error “X509 certificate signed by unknown authority.” To avoid this error, either a) add the proxy server’s root certificate to the Ops Manager trusted CA list (instructions here), or b) add the HTTPS site URL to the proxy server whitelist so that the original HTTPS certificate is not replaced. Use the following command to check if the original server certificate is being replaced by the proxy server certificate:
curl -x <proxy_server_url> -v https://auth.docker.io. If the proxy server replaced the certificate, the certificate fails verification when it passes through the proxy server. -
(Optional) In the No Proxy field, specify the endpoints that will bypass the proxy host. The required values,
127.0.0.1,localhost,core,registry, are populated by default.
-
By default Docker assigns each running container a private IP address. To use the default container network settings, select Keep the default container network settings.
-
To customize the container network settings, select Specify customized container network settings.
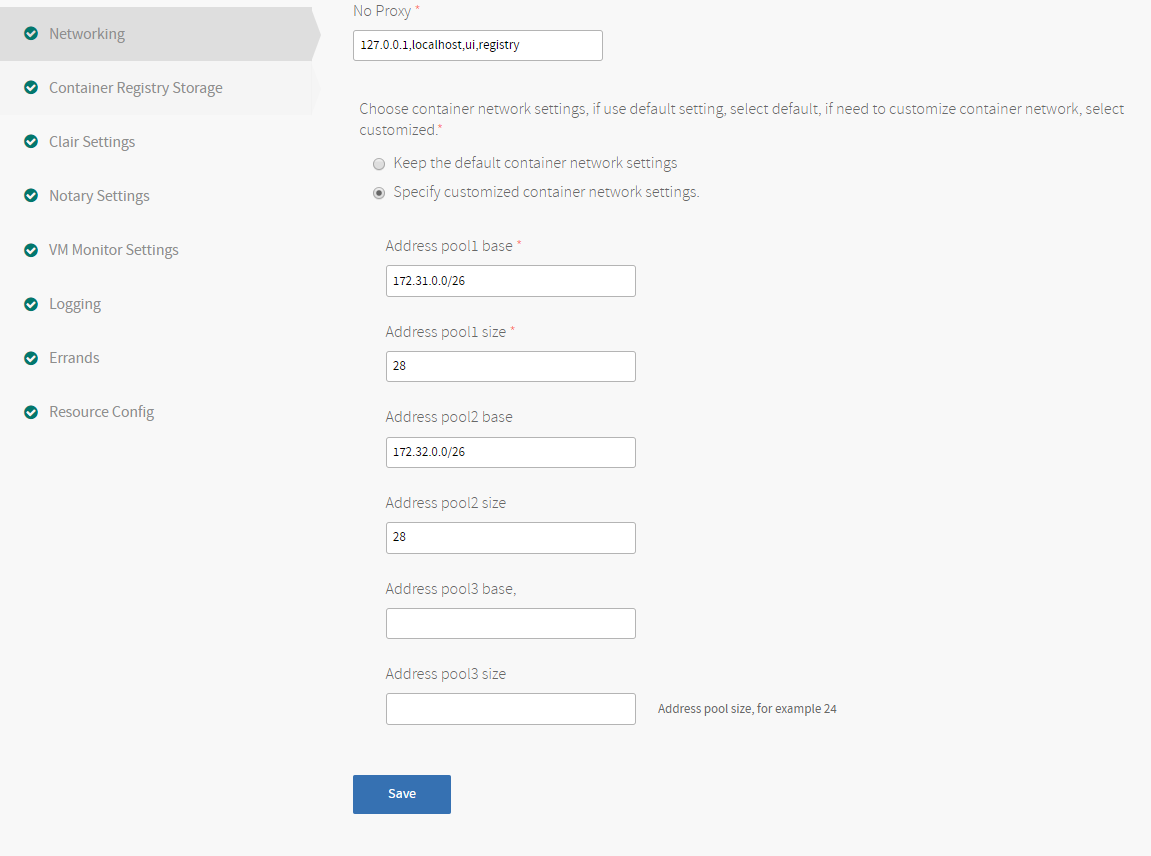
If you select Specify customized container network settings, you must specify at least one address pool base and size. When a Docker container starts, the Docker daemon (dockerd) selects an IP address from the address pool and allocates it to the container.
Because the smallest network in Docker private network is
a.b.c.d/28, if you input only one pool, the smallest CIDR block isa.b.c.d/25. If input two pools, the smallest CIDR block isa.b.c.d/26.Note: There are 10 networks in the Harbor VM. Make sure there are enough subnetworks in the specified CIDR. If there are not enough subnets in the network, the Harbor server fails to start.
For example, if you select this option, for the Address pool1 base you might enter
172.31.0.0/25, and for the Address pool1 size you might enter28. Additional entry pairs are optional. - Click Save.
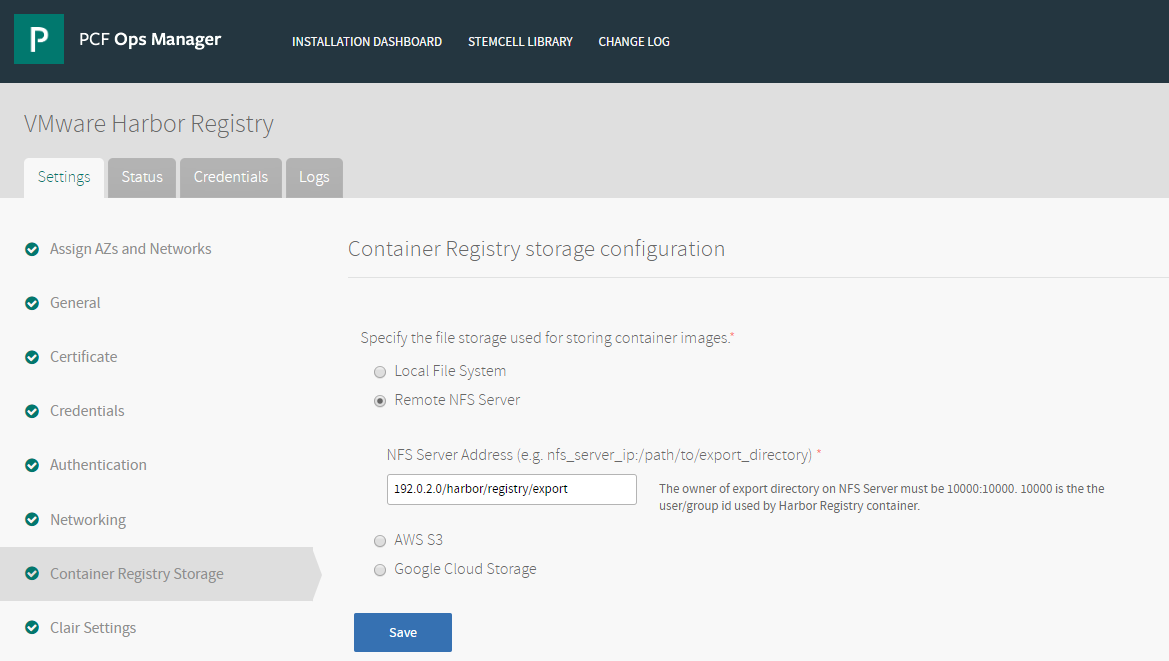
Configure Container Registry Storage
On the Container Registry Storage pane you specify the type of file storage to use for storing container images.
- In the Harbor tile, select Container Registry Storage.
-
Choose one of the following as your desired storage for container images. (This selection cannot be changed after deployment of Harbor.)
- Local File System (default)
- Remote NFS Server
- AWS S3
- Google Cloud Storage
- Azure Storage
See the sections below for configuration instructions.
-
Click Save.
Remote NFS Server Configuration
If you choose Remote NFS Server, provide the NFS Server Address in the form nfs_server_ip:/path/to/export_directory, for example: 192.0.2.0:/harbor/registry/export.
The user/group ID (UID) for the owner of the export directory on the NFS Server must be 10000:10000, where 10000 is the UID used by the Harbor Registry container.
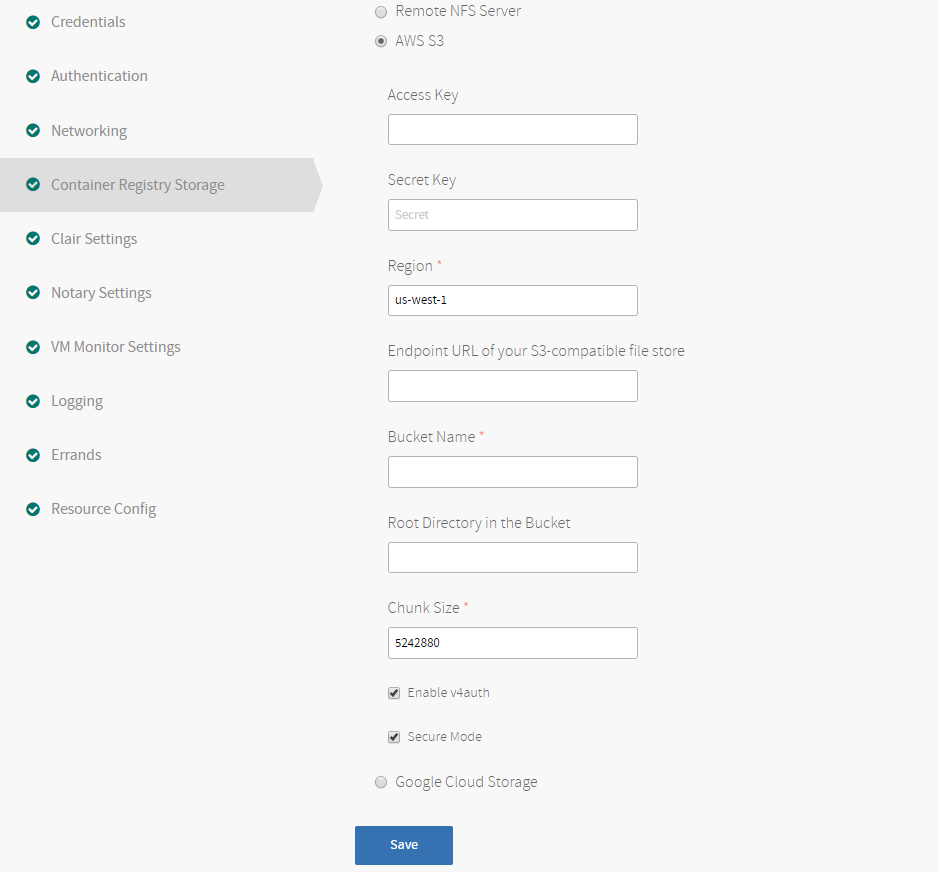
AWS S3 Configuration
Note: The Harbor Registry tile officially supports AWS S3 storage only. Other S3-compatible object stores, such as Dell EMC ECS and Minio, are not officially supported.
If you choose AWS S3, configure the following settings:
- Access Key: The access key for your S3 bucket.
- Secret Key: The secret key for your S3 bucket.
- Region: The AWS region where your S3 bucket is located.
- Endpoint URL of your S3-compatible file store: The URL of your S3-compatible filestore. If you are using the AWS S3 service, leave this field empty.
- Bucket Name: The name you gave your S3 bucket when you created it.
- Root Directory in the Bucket: The root directory of your S3 bucket. This field is optional.
- Chunk Size: The default value is
5242880(5 MB). - Enable v4auth: Access to your S3 bucket is authenticated by default. Deselect this checkbox for anonymous access.
-
Secure Mode: Access to your S3 bucket is secure by default. Deselect this checkbox to disable secure mode.
Note: When using Harbor with an S3-compatible object store, the object store must be configured with a TLS cipher suite supported by the Docker client. If the S3 bucket is not configured with a compatible cipher suite, when performing a docker push command to the Harbor Registry, you receive the following: “remote error: tls: handshake failure”. The Harbor Registry redirects the connection from the Docker client to the S3-compatible object store. The TLS handshake is between the Docker client and the S3-compatible object store. To address this error, you must determine the cipher suites supported by the Docker client and S3-compatible object store, and ensure that there is at least one common cipher suite between them.
Google Cloud Storage Configuration
If you selected Google Cloud Storage, configure the following settings:
- Bucket Name: The name you gave your bucket when you created it.
- Root Directory in the Bucket: The root directory of your bucket. This field is optional.
- Chunk Size: The default value is
5242880(5 MB). - Key File: The service account key for your bucket.

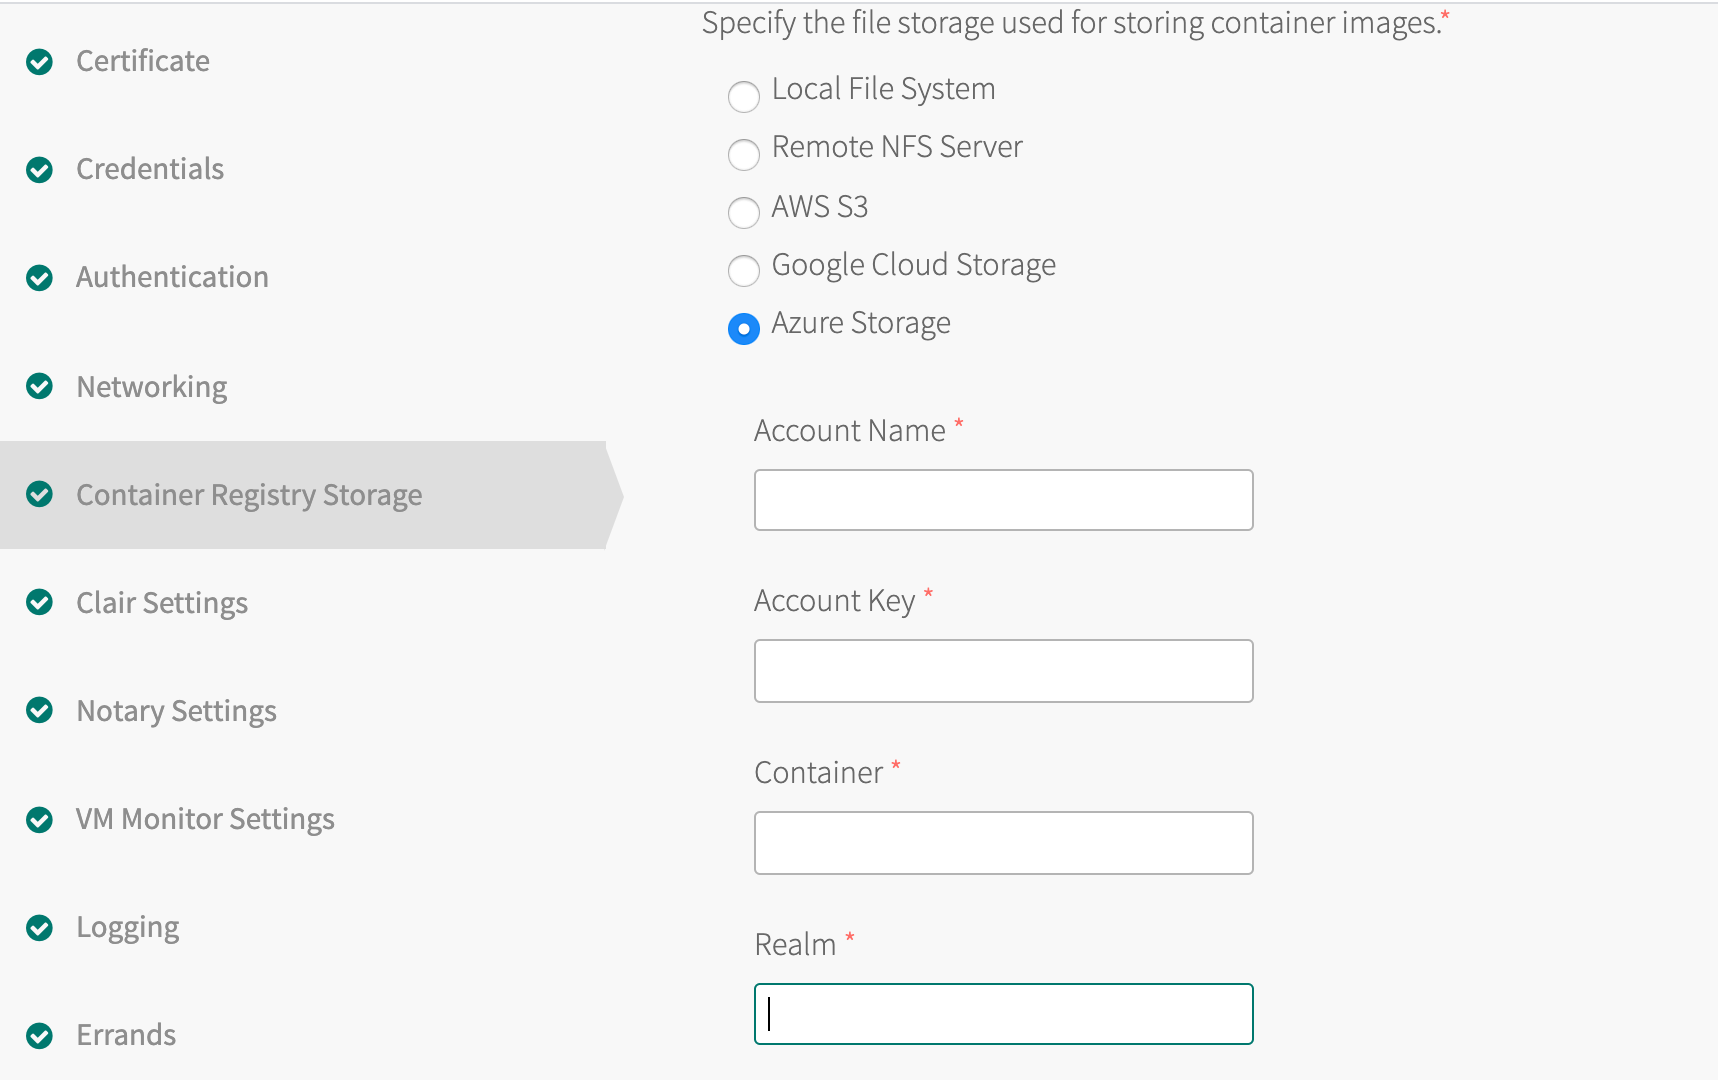
Azure Storage Configuration
If you selected Azure Storage, configure the following properties (all are required):
- Account Name: Name of the Azure Storage Account.
- Account Key: Primary or Secondary Key for the Storage Account.
- Container: Name of the Azure root storage container in which all registry data is stored. The name must comply with the Azure container name requirements.
- Realm: Domain name suffix for the Storage Service API endpoint. The default is
core.windows.net. Examples: The realm for “Azure in China” iscore.chinacloudapi.cn. The realm for “Azure Government” iscore.usgovcloudapi.net.
Configure Image Scanner
Harbor gives you the ability to install and use an image scanner for assessing the vulnerability of container images. Harbor supports Trivy for container image scanning.
Trivy is an open-source project for the static analysis of vulnerabilities in Docker and appc containers. For more information, see the Trivy GitHub repository.
To install Trivy with Harbor, select the option Install Trivy and click Save.
The Trivy image scanner requires internet connectivity to update the CVE database. When updating the Trivy CVE database, you may need to provide a GitHub authentication token to avoid being throttled. If you are using Harbor in an air-gapped environment, disable CVE database updates by selecting the Skip to update Trivy CVE database option.
Note: In-product support for the Clair image scanner is deprecated with Harbor tile v2.2.1. To use Clair you can install it separately from the Harbor tile VM.

Configure Container Signing Using Docker Notary
Harbor provides Docker Notary for container signing and trust. Notary is installed by default. For more information about Docker Notary, see Getting started with Docker Notary.
- In the Harbor tile, select Notary Settings.
- By default, Install Notary is selected. Deselect to not install Notary.
- Click Save.
NoteThe installation for the Notary 1.0 is deprecated with Harbor tile v2.11.0. You can use the notary v2 (notation) or Cosign to sign the OCI artifact in Harbor. No special configuration is required.
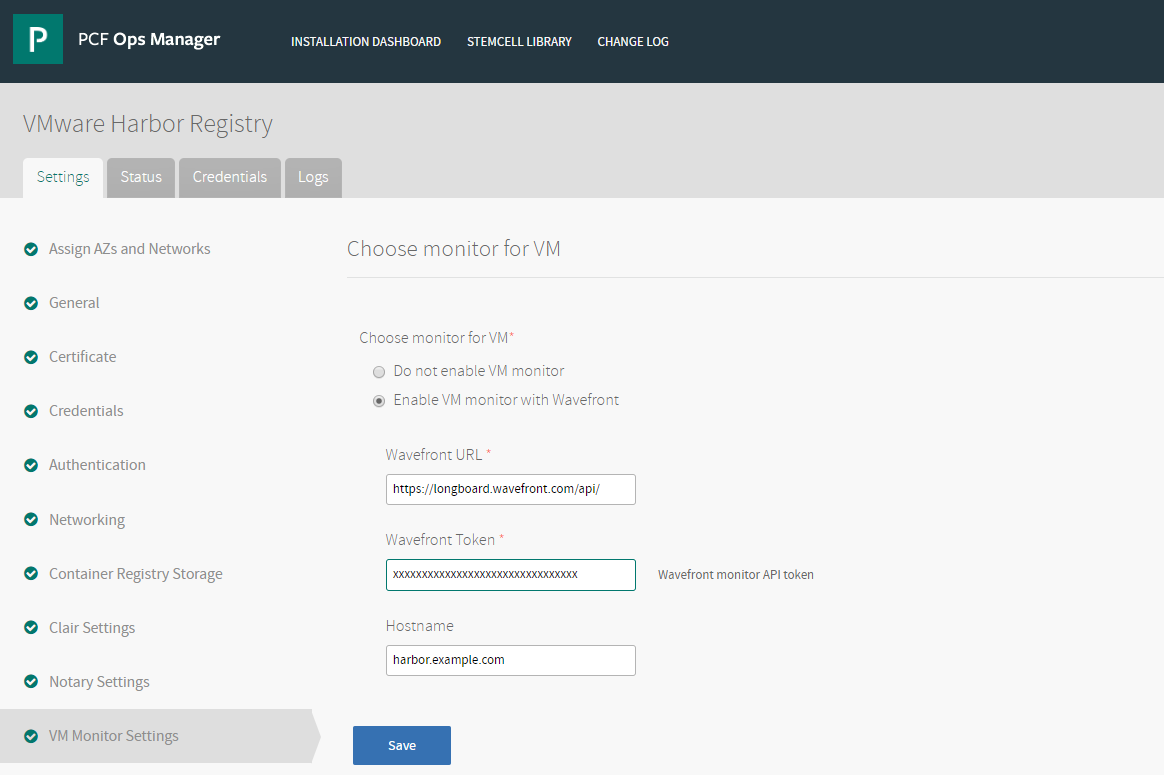
(Optional) Configure VM Monitor Settings
Wavefront is a high-performance streaming analytics platform that helps you monitor and optimize your environment. To use Wavefront monitoring with Harbor, you enable it in the Harbor tile and configure a few parameters.
Wavefront must be installed, licensed, running, and available in your environment before you enable the option.
Note: To monitor the Harbor VM with Wavefront, you will need to deploy the Wavefront dashboard. See Monitor Harbor with Wavefront for details.
- Go to www.wavefront.com and sign up. You will receive an API server and a token.
- In the Harbor tile, select VM Monitor Settings.
- For the Choose monitor for VM option, select Enable VM monitor with Wavefront.
- Configure the following three parameters:
- Wavefront URL: Enter the Wavefront API server URL where the performance metrics are sent to.
- Wavefront Token: Enter the token to access the Wavefront API server.
- Hostname (optional): All metrics sent to the Wavefront API server are categorized to a hostname. Keep this field blank if you want to use the same hostname that was used for the Harbor FQDN.
- Click Save.
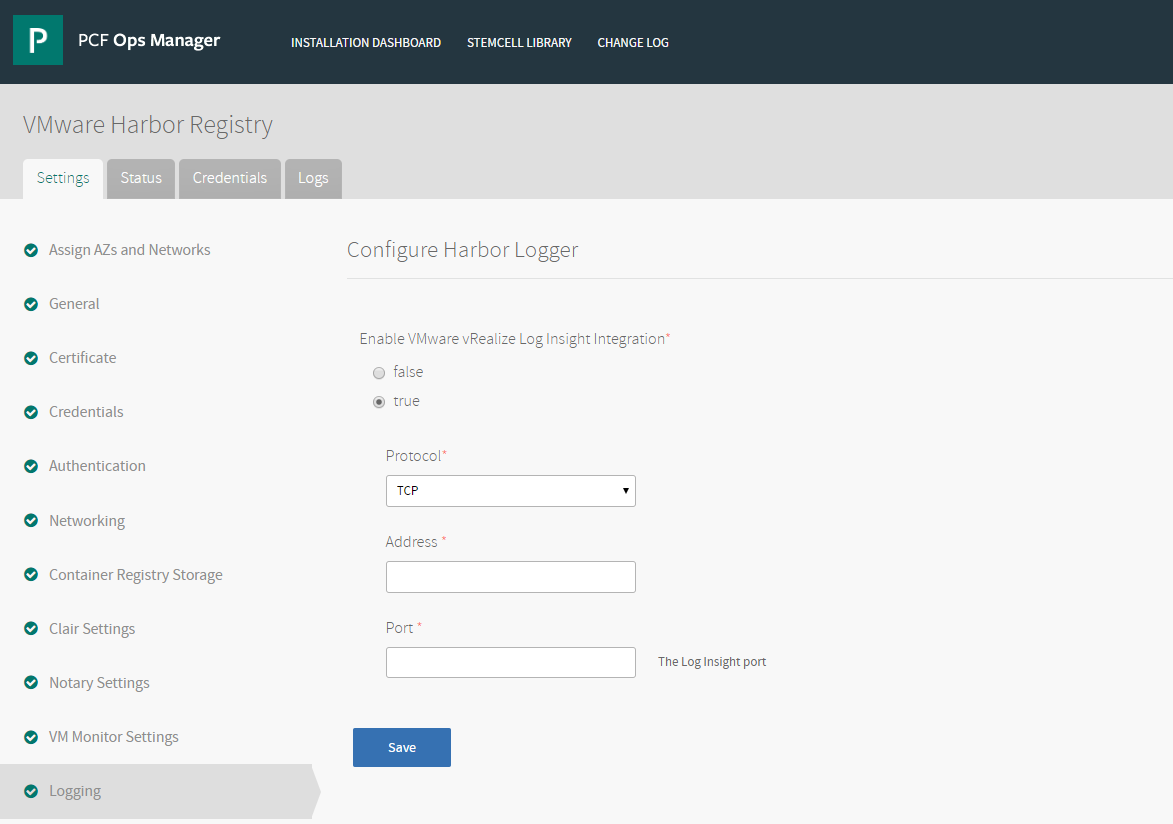
Configure Harbor Logger
You can configure Harbor so that an existing deployment of VMware vRealize Log Insight pulls logs from the Harbor instance.
After enabling Harbor integration with vRealize Log Insight, all Harbor application logs are sent to the vRealize Log Insight server. The local Harbor VM no longer contains the Harbor application logs. You must access them through vRealize Log Insight.
vRealize Log Insight must be installed, licensed, running, and available in your environment before you enable the option. For instructions and additional information, see the [vRealize Log Insight documentation] (https://docs.vmware.com/en/vRealize-Log-Insight/index.html).
To configure vRealize Log Insight integration with Harbor, the vRealize Log Insight server must be accessible on the local network. Access to the vRealize Log Insight server through an HTTP/S proxy server is not supported.
- Go to www.wavefront.com and sign up. You will receive an API server and a token.
- In the Harbor tile, select Logging.
- For the Enable VMware vRealize Log Insight Integration option, select true to enable vRealize Log Insight integration.
- For the Protocol, select TCP or UDP.
- For Address, enter the address of your vRealize Log Insight instance.
- For Port, enter the port on which your vRealize Log Insight instance listens.
-
Click Save.
Configure BOSH Deployment Errands
Deployment errands are BOSH scripts that run at designated points during an installation using Ops Manager.
- In the Harbor tile, select Errands.
- For Post-deploy Errands, select the smoke-testing errand:
- On (default)
- Off
- For Pre-delete Errands, select the deregister Harbor UAA client errand:
- On
- Off (default)
- Click Save.
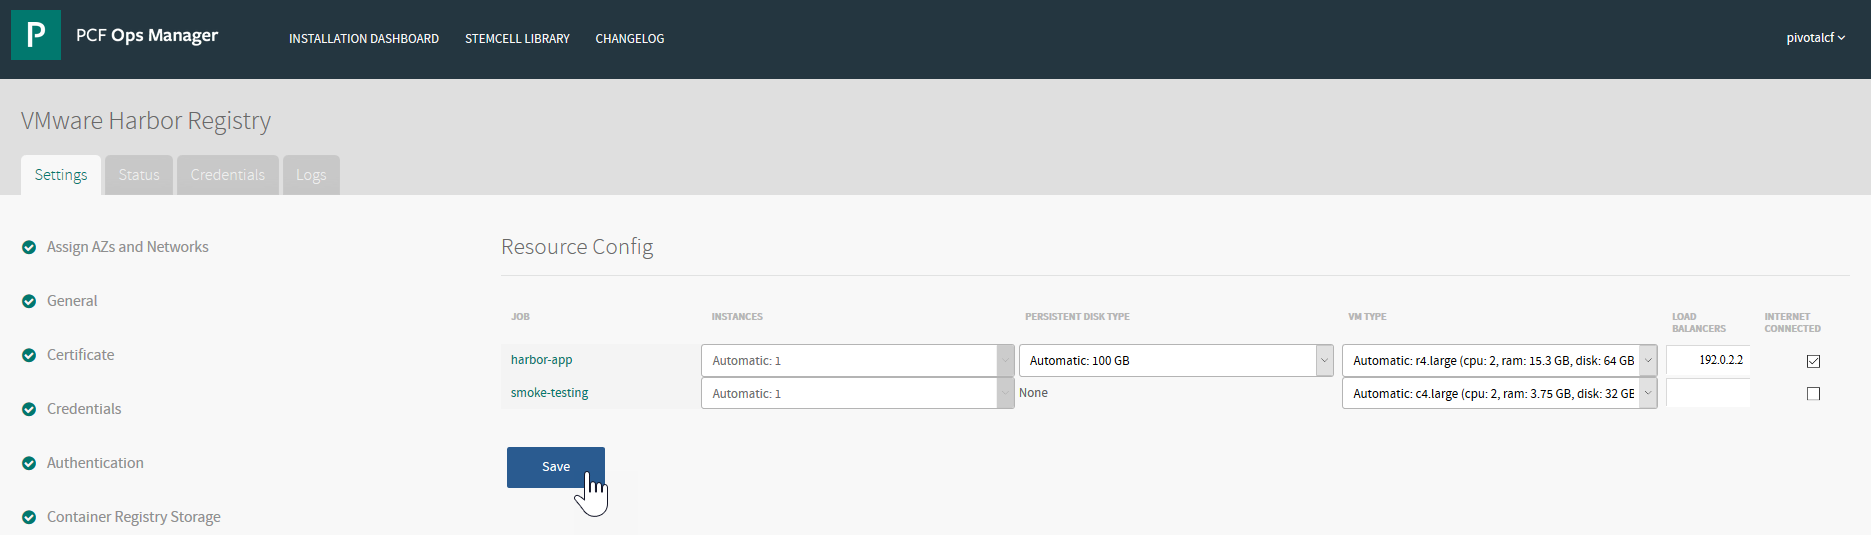
Configure Harbor VM Resources
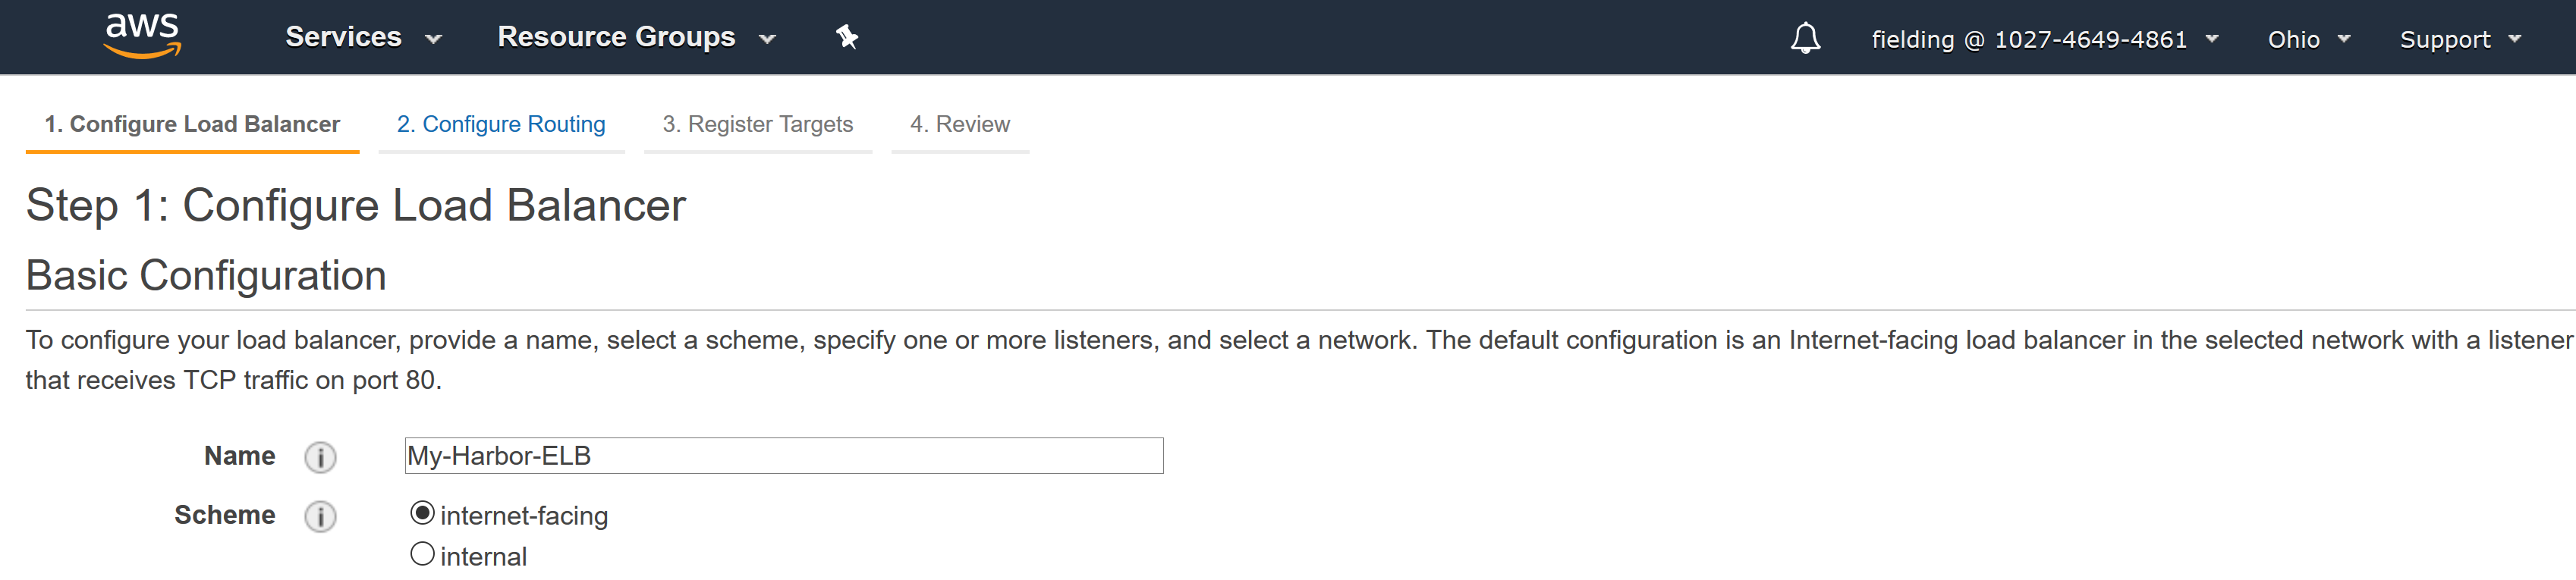
The Harbor VM runs as a single instance. On the Resource Config pane in Ops Manager you configure the resource settings for the Harbor VM, including disk size and type. If you are deploying Harbor on AWS or GCP, you can specify a load balancer that allows external access to the Harbor VM.
For standard Harbor Registry deployments, the default size and type for the Harbor VM are sufficient. The compute and storage capacity of the Harbor VM depends on the size of the images you are deploying to the Harbor registry. Some images are 30 MB, while others are 2 GB. In addition, storage requirements depend on how images are built and what base images are leveraged. In general, if your Harbor instance manages a large number of images, increase the storage size and select a VM type that has greater CPU capacity and more RAM. Using a smaller size VM than the default is not common.
If you are deploying Harbor using BOSH Director for AWS or GCP, and you are fronting the Harbor VM with a load balancer, provide its name in the resource settings. AWS and GCP load balancers can be internal or external. The load balancer type dictates whether you need to select or deselect the Internet Connected checkbox. The image below shows the load balancer “scheme” options for the AWS classic load balancer. For more information, see the following topics:
- Internal Classic Load Balancers in the AWS documentation.
- Internet-Facing Classic Load Balancers in the AWS documentation.
-
External versus internal load balancing in Overview of Load Balancing in the GCP documentation.
To configure the Harbor VM resources, follow the instructions below.
- In the Harbor tile, click Resource Config.
- To change the configuration of the
harbor-appVM, edit the following properties:- Instances: This value cannot be changed. PCF supports one Harbor instance only.
- Persistent Disk Type: Increase or decrease the storage capacity of the Harbor disk.
- VM Type: Select a VM type with more CPU capacity and RAM depending on your storage requirements.
- To change the configuration of the
smoke-testingVM, specify the desired VM Type. This is an ephemeral VM deployed and used by BOSH to test the deployment of the Harbor VM. Typically, the default size is sufficient. However, if you change the size of theharbor-appVM from the default, you may need to adjust the size of thesmoke-testingVM accordingly. - For AWS and GCP environments, specify the name of the load balancer that allows external access to the Harbor VM.
- Click Save.
Update the Stemcell Version
If the version of the Harbor tile that you are installing requires a more recent stemcell version than is currently deployed in Ops Manager, the Harbor tile displays a “Missing stemcell” error message.
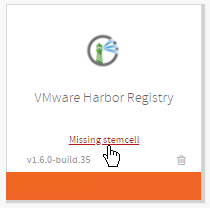
To update the stemcell, follow the steps below.
- In Tanzu Operations Manager, return to the Installation Dashboard.
- Click the Harbor tile.
- In the Harbor tile, click the Missing stemcell link.
- In the Stemcell Library, record the name and version of the required stemcell for Harbor.
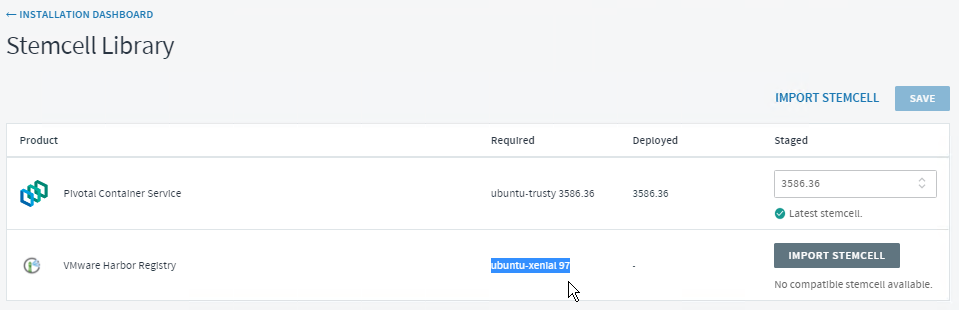
- Log in to the Broadcom Support.
- Search for Stemcells for PCF (Ubuntu Xenial).
- Download the required Harbor stemcell for your platform to the Ops Manager host. For example, if you are using vSphere, download the BOSH stemcell for vSphere that matches the version that you recorded in a previous step.
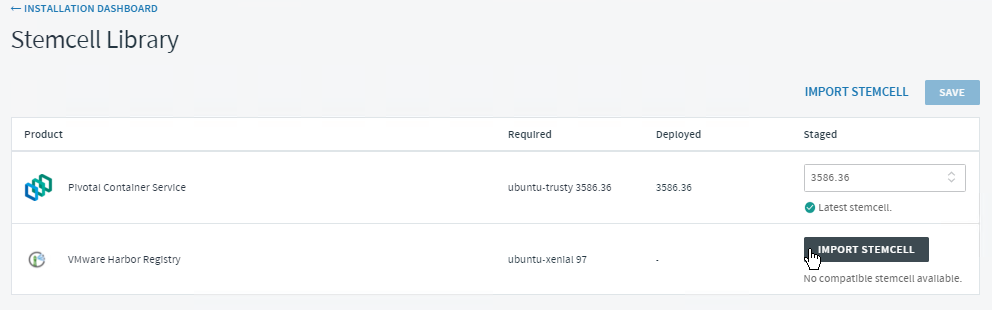
- In Ops Manager, return to the Installation Dashboard.
- On the Harbor tile, click the Missing stemcell link.
- Click Import Stemcell, navigate to the stemcell you downloaded, and click Open to import the stemcell.
- When prompted, apply the imported stemcell to the Harbor product.
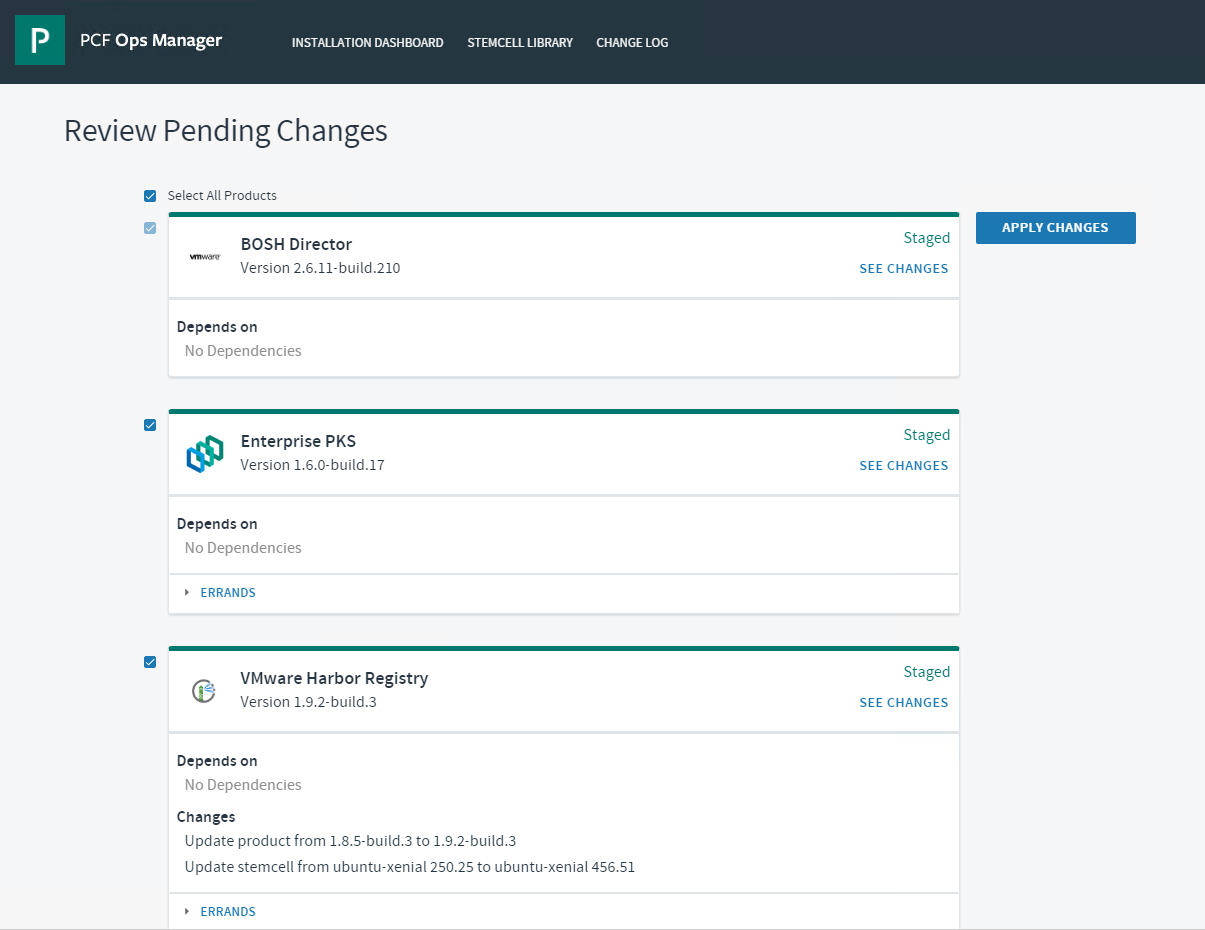
Deploy Harbor Registry
- Return to the Ops Manager Installation Dashboard.
- Click Review Pending Changes > Apply Changes to deploy Harbor.
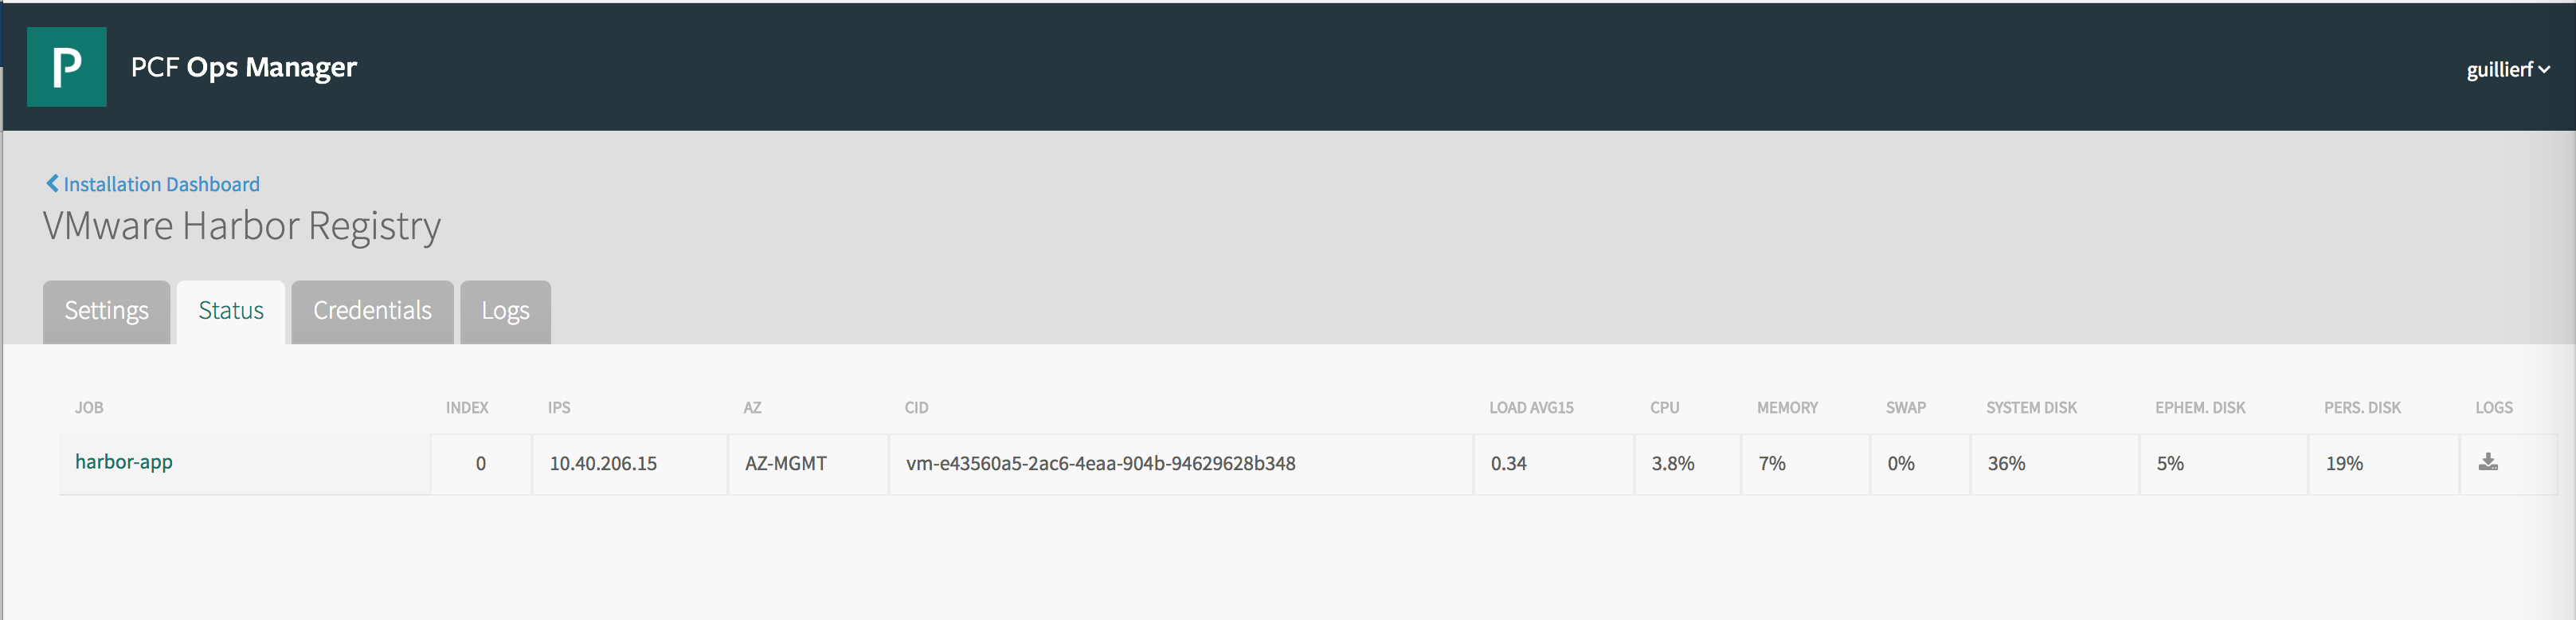
View Harbor VM Information
When the deployment finishes, verify the deployment by checking the Harbor instance information the Harbor tile in Ops Manager.
- Select the Status tab to see the IP address of the Harbor host and status information about the Harbor VM.
- Select the Credentials tab to see Harbor credentials, including the Harbor administrator account for SSH access to the VM and the Clair database credentials.
- Select the Logs tab to collect Harbor log files and generate and download the Harbor log bundle.
Next Steps
After you install and configure Harbor, you must update the DNS entry for Harbor and provide the Harbor CA certificate to Ops Manager. If you use TKGI with NSX-T, define a NAT rule to the Harbor IP address.
- Update the DNS entry for the Harbor hostname with the IP address of the Harbor VM assigned by BOSH. See Update DNS for Harbor in Integrating VMware Harbor Registry with TKGI.
- Obtain the Harbor CA certificate and provide it to Ops Manager:
- If you are using Harbor with TKGI with NSX-T in NAT mode, you must create a DNAT rule to access the Harbor UI. See Create DNAT Rule (NSX-T) in Integrating VMware Harbor Registry with TKGI.
- Start Harbor and log in. See Starting Harbor in Using VMware Harbor Registry.
- Use Harbor. See Using Harbor in Using VMware Harbor Registry.
