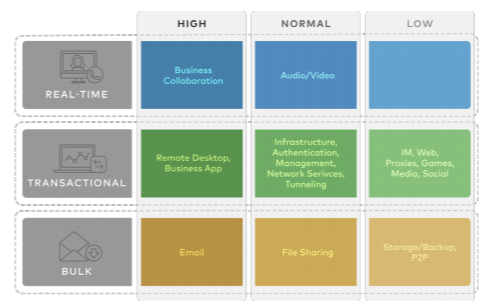
A Traffic Class is defined with a combination of Priority (High, Normal, or Low) and Service Class (Real-Time, Transactional, or Bulk) resulting into a 3x3 matrix with nine Traffic Classes. You can map Application/Category and scheduler weight onto these Traffic Classes. All applications within a Traffic Class will be applied with the aggregate QoS treatment, including Scheduling and Policing.

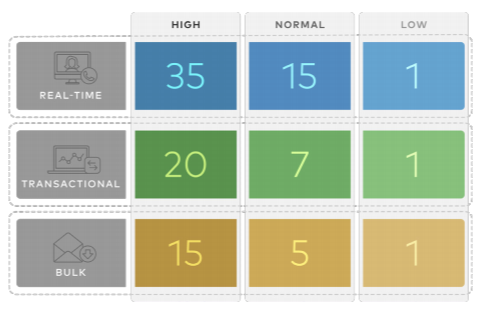
The Business Policy contains the out-of-the-box Smart Defaults functionality that maps more than 2,500 applications to Traffic Classes. You can use application-aware QoS without having to define policy. Each Traffic Class is assigned a default weight in the Scheduler, and these parameters can be changed in the Business Policy. Below are the default values for the 3x3 matrix with nine Traffic Classes. See the image below for default of the Weight and Traffic Class Mapping.

Example:
In this example, a customer has 90 Mbps Internet link and 10 Mbps MPLS on the Edge and the aggregate Bandwidth is 100 Mbps. Based on the default weight and Traffic Class mapping above, all applications that map to Business Collaboration will have a guaranteed bandwidth of 35 Mbps, and all applications that map to Email will have a guaranteed bandwidth of 15 Mbps. Note that business policies can be defined for an entire category like Business Collaborations, applications (e.g. Skype for Business), and more granular sub-applications (e.g. Skype File Transfer, Skype Audio, and Skype Video).
Configure Overlay QoS CoS Mapping
To enable Overlay QoS CoS Mapping:
- Go to Configure > Profiles.
- Click the link of the appropriate configuration profile.
- Click the Business Policy tab.
- In the SD-WAN Traffic Class and Weight Mapping area, type in numerical values for Real Time, Transactional, and/or Bulk as necessary.
- Check the Policing checkbox for a Service Class if necessary.
