


Operators, Partners, and Admins of all levels can create a business policy.
Before you begin: Know the IP Addresses of your devices and understand the implications of setting a wildcard mask.
About this task: New for the 3.3.1 release, there are three IP Address options available: CIDR Prefix, Subnet Mask, and Wildcard Mask.
To create a business policy:
- Click the New Rule button to add a Business Policy rule.
The Configure Rule dialog box appears.
- In the Match area of the Configure Rule dialog box, there are three sections to configure traffic:
- Source
- Destination
- Application
- In the Source section, click the Define button if you want to narrow the source traffic to a specific VLAN, an IP Address, or an Operating System. By default, the Any button is selected.
- If you click the Define button, complete the appropriate options in the sub steps below.
- None: Selected by default.
- VLAN: Click the VLAN radio button and choose the appropriate VLAN from the drop-down menu.
- IP Address: Click the IP Address radio button and type in the IP Address, and then choose one of the three options from the drop-down menu (CIDR prefix, Subnet mask, or, Wildcard mask). See image below. Wildcard mask and subnet mask are new for the 3.3.1 release. See the table below for a description of each of these options.
Option Description CIDR prefix Choose this option if you want the network defined as a CIDR value (for example: 172.10.0.0 /16).Subnet mask Choose this option if you want the network defined based on a Subnet mask (for example, 172.10.0.0 255.255.0.0).Wildcard mask Choose the Wildcard mask option if you want the ability to narrow the enforcement of a policy to a set of devices across different IP subnets that share a matching host IP address value. The Wildcard mask matches an IP or a set of IP addresses based on the inverted Subnet mask. A '0' within the binary value of the mask means the value is fixed and a 1 within the binary value of the mask means the value is wild (can be 1 or 0). For example, a Wildcard mask of 0.0.0.255 (binary equivalent = 00000000.00000000.00000000.11111111) with an IP Address of 172.0.0, the first three octets are fixed values and the last octet is a variable value. Note: After you set up this rule using a Wildcard mask, you are narrowing the number of clients this rule applies to. 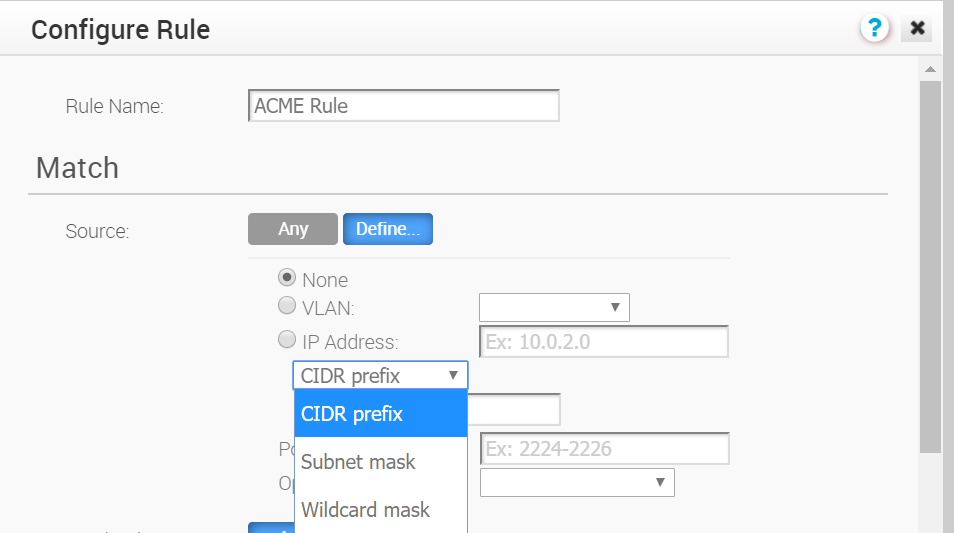
- Ports: Type in the ports in the appropriate text box.
- Operating System: From the drop-down menu, choose the Operating System of the Client device.
- In the Destination section, you can assign additional parameters to identify the traffic destination as shown in the sub steps below:
- Define your traffic destination by clicking one of the following radio buttons (Any, Internet, VeloCloud Edge, or Non-VeloCloud Site). See Configure Match Destination for a description of these traffic destinations. NOTE: Branch to Branch Cloud VPN must be activated before you can define your traffic destination .
- Type in the IP Address in the appropriate text box and specify an IP Address option: CIDR Prefix, Wildcard mask, and Subnet mask. (Wildcard mask and Subnet mask are new for the 3.3.1 release).
Option Description CIDR prefix Choose this option if you want the network defined as a CIDR value (for example: 172.10.0.0 /16).Subnet mask Choose this option if you want the network defined based on a Subnet mask (for example, 172.10.0.0 255.255.0.0).Wildcard Mask Choose the Wildcard mask option if you want the ability to narrow the enforcement of a policy to a set of devices across different IP subnets that share a matching host IP address value. The Wildcard mask matches an IP or a set of IP addresses based on the inverted Subnet mask. A '0' within the binary value of the mask means the value is fixed and a 1 within the binary value of the mask means the value is wild (can be 1 or 0). For example, a Wildcard mask of 0.0.0.255 (binary equivalent = 00000000.00000000.00000000.11111111) with an IP Address of 172.0.0, the first three octets are fixed values and the last octet is a variable value. Note: After you set up this rule using a Wildcard mask, you are narrowing the number of clients this rule applies to. - Enter a Hostname: Use this field to match the entire hostname or a portion of the hostname. For example, "salesforce" will match traffic to "www.salesforce.com."
- Protocol: A protocol is a set of rules and standards that define a language devices use to communicate. Choose a protocol from the drop-down menu (GRE, ICMP, TCP, or UDP).
- Ports: A port is an address on a single machine you can tie to a specific piece of software. Enter the appropriate port number in the Port textbox.
- Choose the applications from the Application section:
- Click the Define button if you want to choose specific applications. By default, the Any button is selected.
- From the Browse list, select an application category. A list of specific applications display on the right side of the Browse list. Scroll down the list and select the specific application you want to define.
- Choose a DSCP from the drop-down menu.
- In the Actions area, complete the following sub-steps below:
- Priority: Designate the priority of the rule (High, Normal, or Low). Click the Rate Limit check box to set limits for inbound and outbound traffic directions.
- Network Service: Choose one of the options (Direct, Multi-Path, or Internet Backhaul). With the Direct option, traffic is sent to the destination directly, bypassing the VeloCloud Gateway. The Internet Backhaul option can only be used on Internet rules. For information about these options see the section titled, Configure Action Network Service.
- Link Steering: Choose one of the following options from the table below. (For information about DSCP, DSCP marking for both Underlay and Overlay traffic, see Link Steering: DSCP Marking for Underlay and Overlay Traffic).
Option Description Auto By default, all applications are put in automatic Link Steering mode. When an application is in the automatic Link Steering mode, the DMPO automatically chooses the best links based on the application type and automatically activates on-demand remediation when necessary. For more information about this topic, see Link Selection: Auto. Enter an Inner Packet DSCP Tag from the drop-down menu and an Outer Packet DSCP Tag from the drop-down menu. Transport Group A transport group is a bundle of WAN links grouped together by similar characteristics and functionality. For a description of the Transport Group options below, see Linked Steering by Transport Group. Choose Public Wired, Public Wireless, or Private Wired from the drop-down menu. Choose one of the following radio buttons: Mandatory, Preferred, or Available. Choose the Inner and Outer Packet DSP Tag from the appropriate drop-down menus. Interface Complete the following options for the Interface below. For more information, see section titled, Link Steering by Interface. - Choose an Interface from the drop-down menu.
- Type in the VLAN in the text box.
Note: VLAN cannot be specified when using the Multi-Path network service.
- Choose one of the following radio buttons: Mandatory, Preferred, Available. If you choose the Preferred option, the Error Correct Before Steering check box appears. If you unselect this check box, the application will steer before Error Correction occurs.
- ICMP Probe: If applicable, choose an ICMP Probe from the drop-down menu.
- Choose Inner and Outer Packet DSCP Tags from the appropriate drop-down menus.
WAN Link For this option, the interface configuration is separate and distinct from the WAN link configuration. You will be able to select a WAN link that was either manually configured or auto-discovered. Select a WAN link from the drop-down menu. For more information, see WAN Link Drop-down Menu. - NAT: Deactivate or activate NAT. For more information, see section titled, Configure Policy Based NAT.
- Service Class: Choose a Service Class option. The Service Class parameter can be set to Real-time (time sensitive traffic), Transactional, or Bulk. This option is only for a custom application. VeloCloud Apps/Categories fall in one of these categories.
- Click OK to configure your rule. The business policy rule will be created successfully.
Reference: Overlay QoS CoS Mapping
