


Set up the infrastructure to create an application environment
An application environment is represented by an abstraction called a Space. After you have created a Space, it’s easy to deploy an application to that Space with a single command.
This section includes the procedures for setting up the infrastructure and objects required to enable anyone on your team to create a Space (then you can proceed through the Space creation and application deployment sections).
Before you begin
Make sure you have the following objects in place and have performed the following tasks:
Tanzu setup and information
- Read the Release Notes.
- Log in to Tanzu Platform hub.
- To create a project in your organization, you need either Organization Administrator or Organization Owner roles.
-
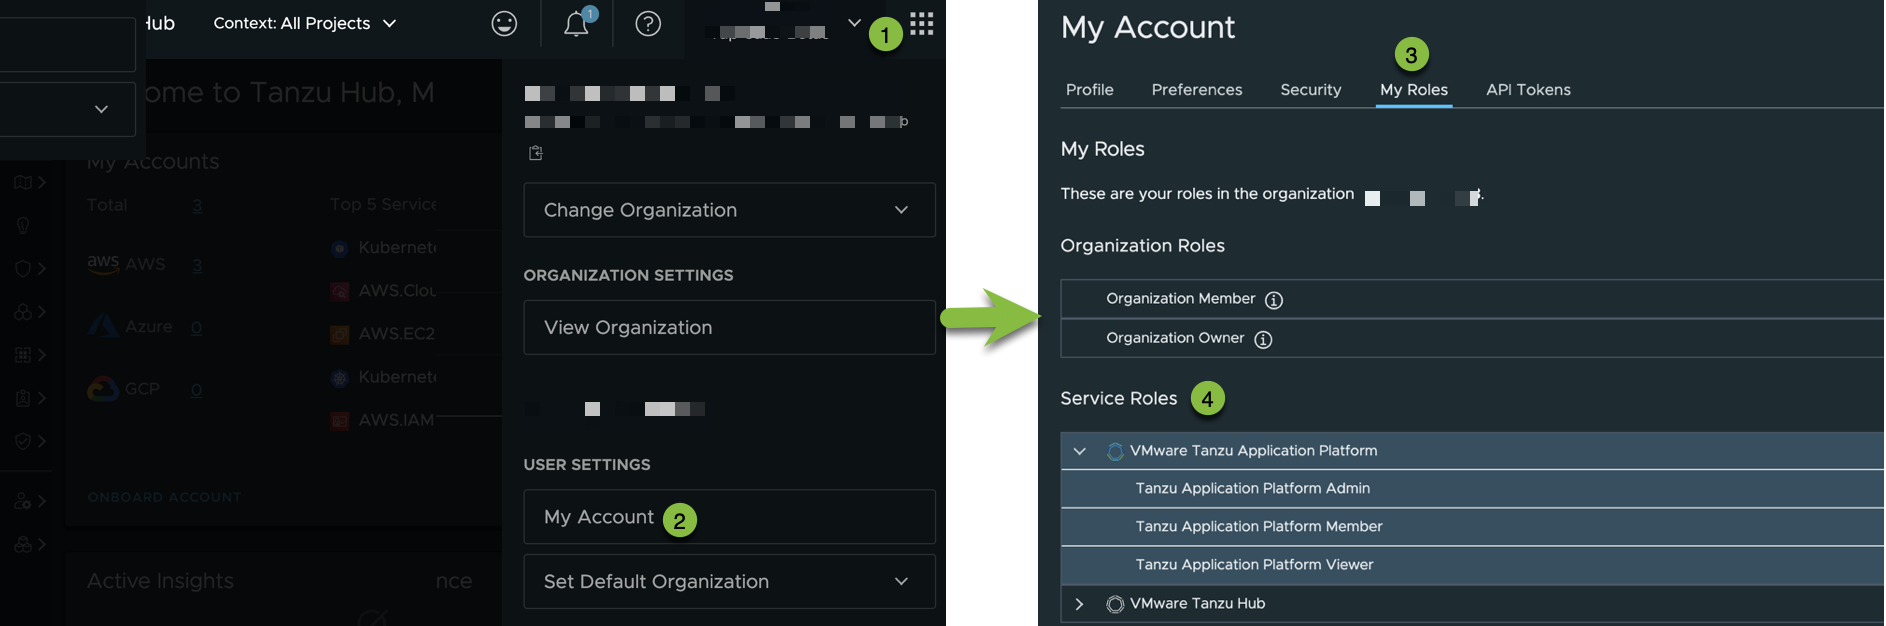
Make sure you have the Tanzu Application Platform Admin service role for VMware Tanzu Platform.
To view your roles, click on your name in the top right-hand corner of the VMware Cloud Services interface and select My Account > My Roles.
AWS setup and information
- Installed the AWS CLI. See Get started with the AWS CLI in the AWS documentation.
- The Account ID for the Amazon Web Services account that you plan to use.
-
An IAM account with the following policy or equivalent:
{ "Version": "2012-10-17", "Statement": [ { "Effect": "Allow", "Action": [ "sns:*", "cloudtrail:*", "cloudformation:*", "events:*", "iam:*", "ec2:DescribeRegions" ], "Resource": "*" } ] } -
An AWS Access Key and the AWS Secret Access Key set as environment variables for the IAM account. See the instructions in the AWS environment variables documentation.
-
A Route 53 Public Hosted Zone.
The Route 53 Public Hosted Zone will be used to create DNS records and associated health checks for deployed applications. You will need the domain name and Hosted Zone ID for the Route 53 public hosted zone. See Creating a public hosted zoned for more information.
Overview of steps
The following provides an overview of the main steps to set up your infrastructure.
Initial setup
Before you can create an application environment in the Tanzu Platform, you must perform some initial configuration of Tanzu Platform, the Tanzu CLI, and AWS. You only need to perform these procedures once.
Create a Project
Tanzu Platform for Kubernetes resources are created in a project. The project acts as a logical grouping within Tanzu Platform for Tanzu Platform for Kubernetes resources. Therefore, before you create any resources, you must create a project. A project allows you to manage packages, configurations, and role-based access controls for all clusters in a cluster group, rather than managing each cluster on an individual basis. Creating a project in your organization requires either Organization Admin or Organization Owner roles.
Do the following in Tanzu Platform hub to create a project:
- On the upper left hand corner, click the dropdown menu, and then select All Projects.
- In the left navigation pane, expand Setup & Configuration, and then click Projects.
- On the Projects page, click + New Project.
- Enter a name for the project.
- (Optional) Enter a description for the project.
- Click Create Project And Continue.
- Click Close to finish creating the project.
- Refresh your browser, and then select your newly created project from the project context drop-down list.
For more information about creating projects in Tanzu Platform, see Add projects and assign users.
Add an AWS account to Tanzu Platform
NoteYou can associate only one AWS account to a project.
Do the following to connect your AWS account to Tanzu Platform.
- In the left navigation pane, click to expand Setup & Configuration, and then click Cloud Accounts.
- On the Accounts page, click + New Account.
- In the Create Account dialog, click the Amazon Web Services tile.
- For onboarding method, select Single account.
- For account type, select Commercial.
- Click Continue.
- Enter your account information.
- Enter an name for the cloud account, and optionally a description.
- Enter your AWS account ID.
- Select the Tanzu Platform project you created in Create a Project to associate with the AWS account.
- Accept the default values for the remaining fields.
- Click Next.
-
In the Connect Account section, follow the on-screen steps.
The on-screen steps take you to the AWS console to create an AWS IAM role with least privileged account within your AWS account. Note the name and ARN of the role. 1. Enter the IAM Role ARN. 1. Click Save Account and Continue.
-
In the Event Monitoring section, follow the on-screen steps to enable event monitoring.
Important
You must enable event monitoring to use Tanzu Platform for Kubernetes with AWS.
- After the script runs successfully, return to Tanzu Platform hub and click Next.
- Click Save and Finish.
- On the Accounts page, verify that the data source is added, the status is
OK, and the event monitoring state isConnected.
For more information, see Add an Amazon Web Services account to VMware Tanzu Hub in Using and Managing VMware Tanzu Hub.
Create EKS credentials
You create EKS credentials to allow you to manage your EKS clusters from Tanzu Platform. The EKS credentials you create include the roles and policies required for the Tanzu Platform to manage the EKS clusters in your project.
Do the following in Tanzu Platform hub to create an EKS credential:
- In the left navigation pane, click to expand Setup & Configuration, and then click Credentials.
- On the Credential Management page, click Add Credential, and then choose Kubernetes Operation.
- In the add credential dialog, define the type of credential you want to create.
- For Credential Type, select Lifecycle Management.
- For Cluster Type, select AWS EKS.
- Click Continue.
- Follow the prompts to create the EKS credential.
Tanzu EKS credentials rely on AWS IAM Roles. Therefore, EKS credentials do not require traditional user-based security tokens such as access keys or passwords. For more information, see Providing access to AWS accounts owned by third parties in the AWS documentation.
Create Route 53 GSLB credentials
To enable DNS records to be dynamically created and deleted for applications within a Space, a role is required to manage Route 53 records. These steps create a role with the required policy and add it to your project.
- In the left navigation pane, click to expand Setup & Configuration, and then click Credentials.
- On the Credential Management page, click Add Credential, and then choose Kubernetes Operation.
- In the add credential dialog, define the type of credential you want to create.
- For Credential Type, select Route 53 GSLB.
- Click Continue.
- Follow the prompts to create the Route 53 GSLB role in AWS and add the ARN.
- After the credential is created, expand the newly created credential and note the CredentialID as it is used later.
Route 53 GLSB credentials rely on AWS IAM Roles. Therefore, the Route 53 GLSB credentials do not require traditional user-based security tokens such as access keys or passwords. For more information, see Providing access to AWS accounts owned by third parties in the AWS documentation.
Create a VPC with subnets
You must add or create a functional EKS-compliant virtual private cloud (VPC) for EKS cluster lifecycle management. If you already have an EKS-compliant VPC set up, you can reuse it.
If you do not have an EKS-compliant VPC set up, you can use the AWS guide to use a CloudFormation stack to create a VPC that will meet all of the requirements for EKS. When creating the stack, you can simply provide a name for the stack, and accept all the other defaults, unless you choose to create a more advanced VPC.
For more information about VPCs and subnets for EKS, see Amazon EKS VPC and subnet requirements and considerations, Create a VPC plus other VPC resources in the AWS documentation.
Create a cluster
When you create a project, Tanzu Platform creates a run cluster group for you. The run cluster group contains the Capabilities required for deploying a Space for a run application environment.
If you want to create a new cluster group, see Create a cluster group. You must create the cluster in a cluster group.
Create an EKS cluster in the run cluster group
You will use the cluster you create to run the example Where for Dinner application. The steps of how to deploy the example Where for Dinner application is described later in this guide.
If you have an existing EKS cluster or a separate process to create the cluster, you can attach an existing cluster instead. For more information on how to attach an existing EKS cluster, see Add an existing EKS cluster.
Do the following to create a cluster in your project in Tanzu Platform hub:
- In the left navigation pane, click to expand Infrastructure, and then click Kubernetes Clusters.
- On the Kubernetes Clusters page, on the the Cluster Groups tab, click the
runcluster group. - On the cluster group detail page, click Create EKS Cluster.
- On the create cluster page, enter a name for the cluster, for example,
eks-run-cluster. - For the cluster group, select Application Engine groups and make sure the
runcluster group is selected. - Click Next.
-
Configure the control plane.
-
Select the account credential you configured in Create EKS credentials.
Note
The account credential has to be verified before it appears in the dropdown, which may take up to 5 minutes.
- Select the Kubernetes version, for example,
1.29. -
In the Network section, select the region where your VPC is configured.
For example,
us-east-1. - Select the VPC you created in Create a VPC with subnets.
- In Advanced Settings, for Cluster endpoint access, select Public and private.
- Click Next.
-
-
For node pools, set the scaling and compute to meet your requirements.
Note
The minimum cluster size is 3
t3.xlargenodes. -
Click Create.
Wait for the cluster to be created and for the status in Tanzu Platform hub to be
Healthy. This could take 30-45 minutes.
Now that you have created a cluster, you are ready to begin creating the application environment. Before you create an application environment, you must first create an Availability Target.
Viewing the EKS cluster in the Tanzu-provided Availability Target
Tanzu Platform for Kubernetes provides a all-regions.tanzu.vmware.com Availability Target with every project, that includes all clusters regardless of region by default. You use this availability target in the next section to create your application environment on. To view this Availability Target, do the following:
- In the left navigation pane, expand Application Spaces, and then click Availability Targets.
- Click View Details on the
all-regions.tanzu.vmware.comAvailability Target. - Observe the newly created cluster in the Availability Target, which makes it available to have application environments created on it when targeted by a Space in the next section.
What you can do now
The following table lists some actions you can take on managed clusters.
| Actions | Steps to follow |
|---|---|
| Create application environments using Spaces | See Create an application environment using Spaces |
| Edit the configuration of a cluster | Go to Infrastructure > Kubernetes Clusters > Clusters and select a cluster to reconfigure. |
| Create an Availability Target for fault isolation | See managing Availability Targets |
