


With Workspace ONE Drop Ship Provisioning (Online), you can dynamically assign Workspace ONE UEM payloads like profiles and applications. You can also provision your Windows devices with assignments at the manufacturer (OEM) and ship devices directly to your end users. Workspace ONE Drop Ship Provisioning (Online) is supported for SaaS cusomters only.
Workspace ONE Drop Ship Provisioning (Online) Explanation
Workspace ONE Drop Ship Provisioning (Online) is an alternate method to provision devices before they ship to your workplace or to your end users. This method provides a more dynamic way to assign and provision because you can add and update what you want provisioned over the air (OTA). Make changes anytime, and the system stores these changes. They become part of your resources suite for future devices.
With Workspace ONE Drop Ship Provisioning (Online), you configure the system in the Workspace ONE UEM console. You also work with the manufacturer order devices for Workspace ONE Drop Ship Provisioning (Online). Your OEM requests specific information about your Workspace ONE UEM console, along with any Workspace ONE UEM tags that you want to apply to these devices to determine payload assignments. With this information, the manufacturer builds your devices and puts a Provisioning Agent from Workspace ONE UEM on the devices. This agent communicates with Workspace ONE UEM to get your profiles, apps, and device login method. This process results in your device user receiving a device from the manufacturer that is current with your business's approved settings, apps, and resources.
How Does Workspace ONE Drop Ship Provisioning (Online) Work?
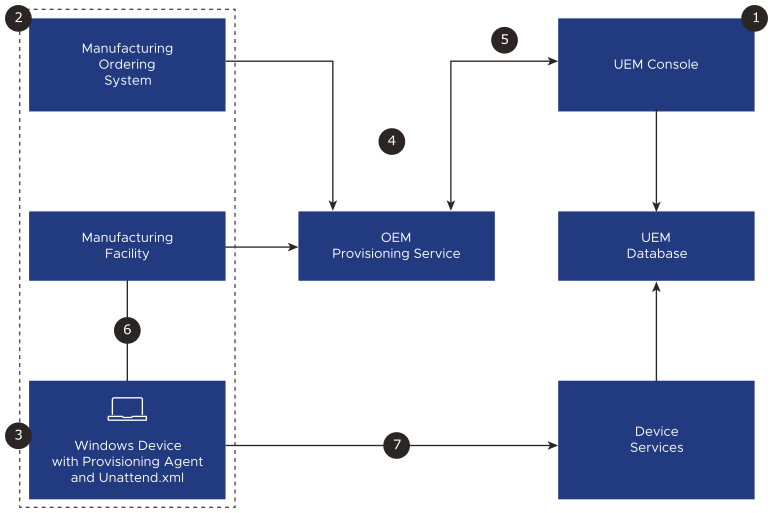
- Enable Workspace ONE Drop Ship Provisioning (Online) in Workspace ONE UEM.
- Order your devices and give the manufacturer your Workspace ONE UEM information.
- The manufacturer builds your devices and puts the Provisioning Agent on them.
- The information from Workspace ONE UEM and the registration information from the manufacturer are stored in the OEM Provisioning Service.
- The Workspace ONE UEM scheduler syncs or you manually sync and get registered information from the OEM Provisioning Service. Devices are now listed on the Enrollment Status page in the console.
- The manufacturer powers on the device and the Provisioning Agent communicates with the OEM Provisioning Service.
- The Provisioning Agent enrolls with Workspace ONE UEM and gets the current profiles, apps, and login configurations.
Requirements
- Tasks required for the admin.
- Use the Workspace ONE Intelligent Hub for Windows 20.10 or later.
- Configure it to update automatically.
- Enable the setting Intelligent Hub Automatic Updates in the Workspace ONE UEM console in .
- Configure Software Distribution in the organization group where your Workspace ONE Drop Ship Provisioning (Online) settings reside. For details about this system, access Software Distribution of Win32 Applications.
- Use Workspace ONE UEM 2105 or later.
- Workspace ONE Drop Ship Provisioning (Online) does not support On-Demand or User context applications. Ensure your app assignments are in the Device context, and are set to Automatic deployment.
- Disable the Auto Enrollment setting in the Workspace ONE UEM console found at .
- You must complete the registration of an email domain for enrollment, also known as Autodiscovery Enrollment, at the customer organization group (OG) level in Workspace ONE UEM.
- Find this configuration in the Workspace ONE UEM console at . For details, access Autodiscovery Enrollment.
- You can only enable Workspace ONE Drop Ship Provisioning (Online) at the customer OG where you registered and enabled Autodiscovery Enrollment. Drop Ship devices enroll automatically into this OG.
- Use the Workspace ONE Intelligent Hub for Windows 20.10 or later.
- Tasks and packages required for the device.
- Register all devices with the Workspace ONE OEM Provisioning Service.
- Stage all devices with the Generic PPKG file, an answer file (unattend.xml), and run Sysprep.
Step 1: Configure Workspace ONE Drop Ship Provisioning (Online) in the Workspace ONE UEM console.
- Select the organization group you want to configure Workspace ONE Drop Ship Provisioning (Online).
- Go to .
- Go to the Workspace ONE Drop Ship Provisioning section and select Enabled.
- Copy the pre-configured values in this area and give it to your manufacturer.
- UPN
- Username
- Password
- Organization Group UUID
- Save the settings.
Step 2: Create a tag in the Workspace ONE UEM console.
- Select the applicable organization group.
- Go to and select Create Tag.
- Enter a name for the tag. You can use any name you want. Consider using a name that identifies the business unit that uses these provisioned devices. For example, enter the name RnD for the research and development unit.
- Save your tag.
Step 3: Create a smart group in the Workspace ONE UEM console and assign the tag to it.
- Ensure you are in the right organization group.
- Go to and select Add Smart Group.
- Enter a name for the smart group and use the Criteria type.
- Select the Tag section and enter the tag you previously created.
- Save your smart group.
Step 4: Configure the log in experience in the Workspace ONE UEM console for end users.
To create local accounts for access, create a local administrator account using a Custom Settings profile and using Microsoft's Accounts CSP. For access to the SyncML for this profile, see VMware Policy Builder.
If you have an on-premises domain, you can join your devices to the domain and enable users to login with their Active Directory credentials. Find information on domain join through Workspace ONE UEM at How Do You Deploy Domain Join Configurations for Windows Desktop?.
Step 5: Assign profiles and apps to the Workspace ONE Drop Ship Provisioning (Online) smart group in the Workspace ONE UEM console.
Configure or edit profiles and assign them to the provisioning smart group you previously created. Also, publish apps to this smart group. Workspace ONE Drop Ship Provisioning (Online) does not support On-Demand or User context applications. Ensure your app assignments are in the Device context, and are set to Automatic deployment.
Step 6: Register devices with the manufacturer and give them your item information (checklist).
Work with your device manufacturer to order your devices. The manufacturer registers your devices using the Workspace ONE UEM tag. They also ask you for the pre-configured information you copied from the Workspace ONE Drop Ship Provisioning section.
- Give them pre-configured values from Workspace ONE UEM in the Staging & Provisioning area.
- UPN
- Username
- Password
- Organization Group UUID
- Give them the tag you created in Workspace ONE UEM in the Tags area
Step 7: Sync devices in the Workspace ONE UEM console, either manually or wait for the scheduler.
- Ensure you are in the correct organization group.
- Go to .
- Select .
