Before you can begin using the Management Pack, you must create an adapter instance to identify the host from which the Management Pack will retrieve data.
Prerequisites
Procedure
- Log in to vRealize Operations as an admin user.
- Click the Administration
 icon. In the right panel, the Solutions view will be displayed.
 - Select EMC VNX File or EMC VNX Block from the Solutions list.

- Click the Configure
 icon. The Manage Solution window will appear as follows:
Note: Click the Add
 icon above the
Instance Name (not shown here) to create multiple adapter instances.
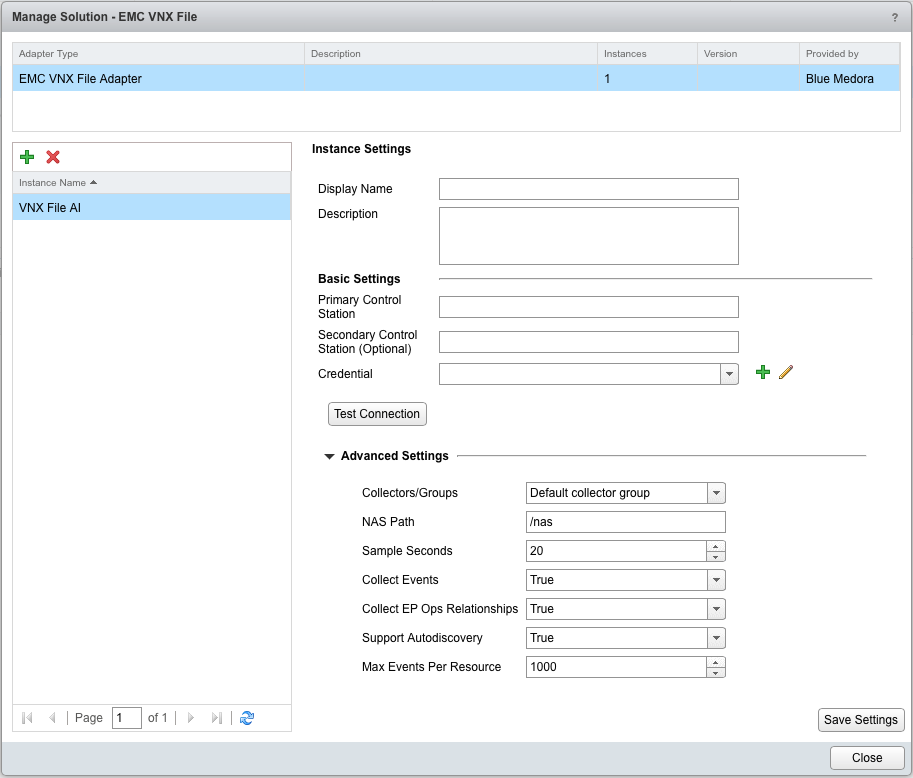
- VNX File

- ForVNXFile, in the Manage Solution window, enter the following information:
- Instance Settings:
- Display Name: A name for this particular instance of the Management Pack
- Description: Optional, but it can be helpful to describe multiple adapter instances of the Management Pack
- Basic Settings:
- Primary Control Station: Hostname or IP address of primary Control Station
- Secondary Control Station (Optional): Hostname or IP address of secondary Control Station
- Credential: Click the Add
 icon then enter the credential you created when Creating a Credential (VNX).
- Advanced Settings:
- Collectors/Groups: Default Collector/Group is automatically selected. Click the drop-down menu if you want to run the collection on a different node.
- NAS Path: Default is /nas.
- Sample Seconds: Default is 20 seconds.
- Collect Events: True/False
- Collect EP Ops Relationships: True/False
- Support Autodiscovery: Default setting is True, which enables the adapter instance to create resources for you. This should not be set to False.
-
Max Events Per Resource: Max events collected per resource per collection. It does not mean that resources have a maximum limit of total events since they can accumulate many over time.
- Instance Settings:
- ForVNXFile, in the Manage Solution window, enter the following information:
-
VNX Block

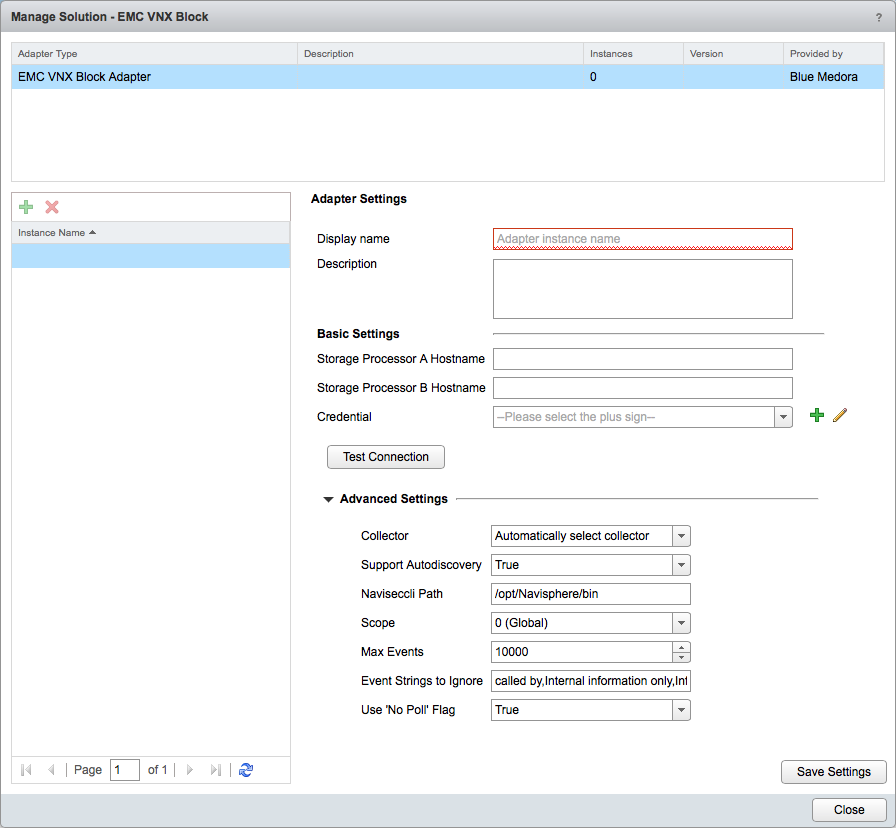
- For VNXBlock, in the Manage Solution window, enter the following information:
- Instance Settings:
- Display Name: A name for this particular instance of the Management Pack
- Description: Optional, but it can be helpful to describe multiple instances of the Management Pack
- Basic Settings:
- Storage Processor A Hostname: Hostname or IP address of Storage Processor A
- Storage Processor B Hostname: Hostname or IP address of Storage Processor B
- Credential: Click the Add
 icon then enter the credential you created when Creating a Credential (VNX).
- Advanced Settings:
- Collectors/Groups: Default Collector/Group is automatically selected. Click the drop-down menu if you want to run the collection on a different node.
- Support Autodiscovery: Default setting is True, which enables the adapter instance to create resources for you. This should not be set to False.
- Naviseccli Path:
- Linux default: /opt/Navisphere/bin
-
Windows default: C:\Program Files (x86)\EMC\Navisphere CLI
- Scope: 0 (Global), 1 (Local), 2 (LDAP)
- Max Events: 10000
- Event Strings to Ignore: Allows the user to specify event keywords to ignore.
- Use “No Poll” Flag: Default is True, which can increase performance when dealing with large/multiple storage systems. Use caution when disabling this setting.
- Instance Settings:
- For VNXBlock, in the Manage Solution window, enter the following information:
- VNX File
- Click Test Connection to test the configured connection information. Click Save Settings and Close to save your adapter instance.
What to do next
- To validate data collection, see: Validating Data Collection (VNX).