


A vSphere Lifecycle Manager cluster is a cluster of ESXi hosts that you manage either with baselines or with a single image. You decide whether to manage a cluster with baselines or with a single image during the creation of the cluster.
Creating a vSphere Lifecycle Manager Cluster That Uses a Single Image
When you create a cluster, the option to use a single image for that cluster is selected by default. You must keep it selected unless you want to create a cluster that uses baselines. During cluster creation, you must set up an image yourself or use the image of a host within or outside the current vCenter Server instance. In both cases, you can also enable vSphere Configuration Profiles for the cluster that you create.
Starting with vSphere 8.0, the default selections in the New Cluster wizard are based on the presumption that you are creating a cluster that uses a single image.
Creating a vSphere Lifecycle Manager Cluster That Uses Baselines
To create a cluster that uses baselines, during cluster creation, you deselect the option to manage the cluster with a single image. You can switch from using baselines to using images at a later time. For more information about switching from using baselines to using images, see Convert a Cluster or a Host That Uses Baselines Into a Cluster or a Host That Uses vSphere Lifecycle Manager Images.
Adding Hosts to a vSphere Lifecycle Manager Cluster
You can add hosts of any version to a cluster that you manage with baselines.
You can add hosts of ESXi version 7.0 or later to a cluster that you manage with a single image. You can add a host to a cluster and at the same time use the image on that host as an image for the entire cluster.
Removing Hosts from a vSphere Lifecycle Manager Cluster
Removing a host from a cluster is a straightforward procedure. If you remove a host from a cluster that uses a single image, the host retains the software and firmware installed during the last remediation against the image for the cluster.
All cluster-related operations are described in full detail in the vCenter Server and Host Management documentation.
For information about using Auto Deploy to deploy and provision ESXi hosts, see the VMware ESXi Installation and Setup documentation.
Create a Cluster That Uses a Single Image by Composing a New Image
You can create a vSphere Lifecycle Manager cluster that uses a single image by setting up the desired image during the creation of the cluster. When you choose to set up the image manually instead of importing it from a host, you must have the necessary software available in the vSphere Lifecycle Manager depot.
When you set up an image manually, you must specify the ESXi version for the image and, optionally, a vendor add-on. After the cluster creation is complete, you can further customize the image. For example, you can add components to the image. You can also configure a hardware support manager and add a firmware and drivers add-on to the image. For information about editing an image, see Edit a vSphere Lifecycle Manager Image.
If you decide to enable vSphere Configuration Profiles on the cluster, you must set up the host configuration manually after you complete the cluster creation.
Prerequisites
- Review the requirements for using a single image in What Are the Requirements for Using vSphere Lifecycle Manager.
- Verify that the hosts are of ESXi version 7.0 or later.
- Verify that a data center exists in the vCenter Server inventory.
- Verify that you have an ESXi image available in the vSphere Lifecycle Manager depot.
- If you want to enable vSphere Configuration Profiles on the cluster, verify that the following requirements are met:
- You have the required license.
- The hosts in the cluster are of ESXi version 8.0 or later.
- vCenter Server is version 8.0 or later.
Procedure
Results
A cluster that uses a single image appears in the vCenter Server inventory. You can view and customize the cluster image on the Updates tab for the cluster.
If the cluster has vSphere Configuration Profiles enabled, you can configure the settings of the hosts in the cluster collectively by going to the Configure tab for the cluster and clicking . See Edit the Host Settings of a Draft Configuration in vSphere Client.
What to do next
Add hosts to the cluster.
Create a Cluster That Uses a Single Image by Importing an Image from a Host
During cluster creation, instead of composing a new image, you can import the desired software specification from a reference host. If you choose to import an image, vSphere Lifecycle Manager extracts the software specification from the reference host and uses it for the newly created cluster. Importing an image saves you the time and effort of ensuring that you have all necessary components and images available in the vSphere Lifecycle Manager depot. Also, because you use a ready-made image, you do not need to spend time validating the new image.
During image import, along with extracting the software specification from the reference host, vSphere Lifecycle Manager also extracts the software depot associated with the image, and imports the software components to the vSphere Lifecycle Manager depot in the vCenter Server instance where you create the cluster. As a result, in air-gap scenarios, you only need one reference host to obtain the necessaryESXi image and components in the local depot and to create a software specification for your clusters.
You can import an image from an ESXi host that is in the same or a different vCenter Server instance. You can also import an image from an ESXi host that is not managed by vCenter Server. The reference host can also be in a cluster that you manage with baselines. Along with importing the image, you can also choose to move the reference host to the cluster. As a result, the newly created cluster uses the same image as the image on the reference host, which is now part of that cluster. If the reference host is in another vCenter Server instance, you can import the image from that host, but you cannot move it to the cluster.
In vSphere 8.0, you can use the image of a reference host that is in a DPU-based cluster and import it into a non-DPU cluster. Similarly, you can select a non-DPU host as the reference host for a DPU-based cluster.
Prerequisites
- Verify that the vCenter Server version is 7.0 Update 2
- Verify that a data center exists in the vCenter Server inventory.
- Verify that the reference host is version ESXi 7.0 Update 2 or later.
- Obtain the user name and password of the root user account for the reference host if it is not in your vCenter Server instance.
- Review the requirements for using a single image in What Are the Requirements for Using vSphere Lifecycle Manager.
- If you want to enable vSphere Configuration Profiles on the cluster, verify that the following requirements are met:
- You have the required license.
- The hosts in the cluster are of ESXi version 8.0 or later.
- vCenter Server is version 8.0 or later.
Procedure
Results
A cluster that uses a single image appears in the vCenter Server inventory. Depending on your selections, the reference host might be in the newly created cluster. The image for that cluster is identical to the image on the selected reference host. You can view and customize the cluster image on the Updates tab for the cluster.
If the cluster has vSphere Configuration Profiles enabled, you can configure the settings of the hosts in the cluster collectively by going to the Configure tab for the cluster and clicking . See Edit the Host Settings of a Draft Configuration in vSphere Client.
What to do next
Add other hosts to the cluster.
Add Hosts to a Cluster that Uses a Single Image
When you add hosts to a cluster, you can appoint one of those hosts as a reference host. vSphere Lifecycle Manager extracts and uses the image on the reference host as the new image for the cluster. The option to import a host's image to the cluster facilitates and simplifies the cluster upgrade operation by removing the need for you to manually import components to the vSphere Lifecycle Manager depot, set up and validate a new image, check the compliance of the hosts against the image, and then remediate the cluster against the image to apply the new software specification to all hosts.
Along with extracting the software specification from the appointed reference host, vSphere Lifecycle Manager also extracts the software depot associated with the image, and imports the components to the vSphere Lifecycle Manager depot in the vCenter Server instance where the target cluster is.
Prerequisites
- Verify that the vCenter Server version is 7.0 or later.
- Verify that the hosts to add are of version ESXi 7.0 or later.
- Verify that the hosts that you add to the cluster are of the same main and patch version as the rest of the hosts.
- Obtain the user name and password of the root user account for the hosts that are not in your vCenter Server instance.
- Review the requirements for using a single image in What Are the Requirements for Using vSphere Lifecycle Manager.
- To add a host and import its image to the cluster, verify that the following requirements are met.
- The vCenter Server instance is of version 7.0 Update 2 or later.
- The ESXi version on the reference host is 7.0 Update 2 or later.
- To add a host to a cluster that has vSphere Configuration Profiles enabled, verify that the following requirements are met.
- The vCenter Server instance is of version 8.0 or later.
- The ESXi version of the host 7.0 Update 3 or later.
- The host doesn't have NSX or vSphere Distributed Switch configured.
- No host profile is attached to the host.
Procedure
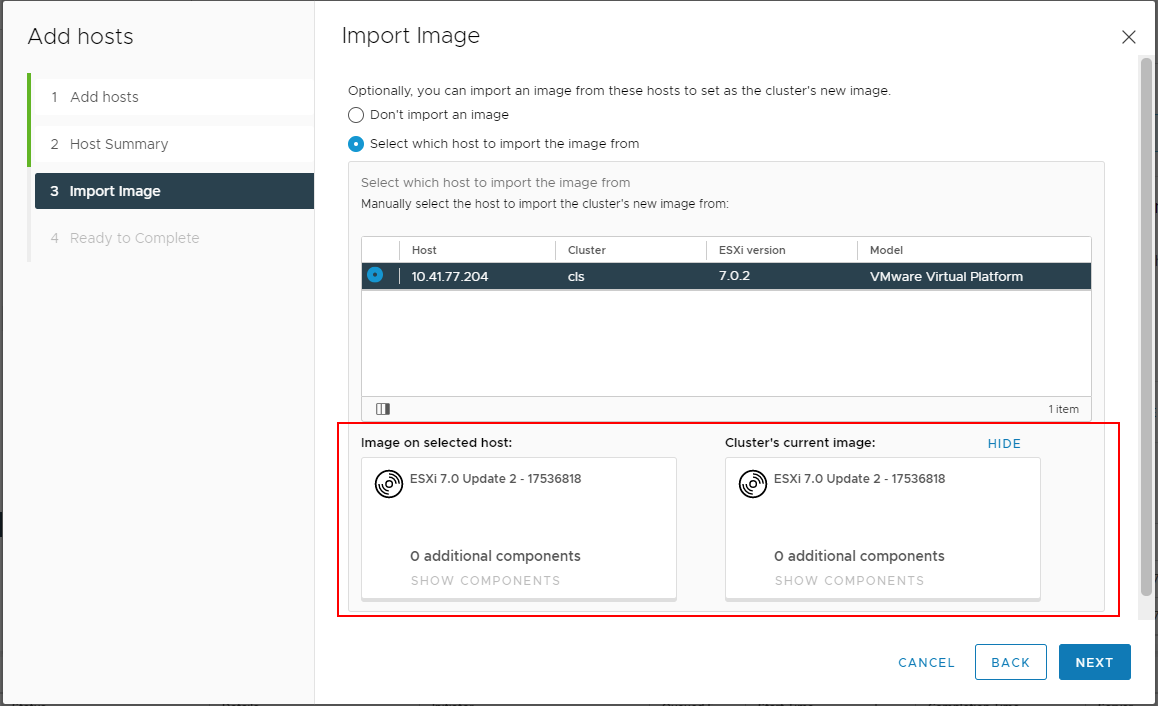
- If you selected the Select which host to import the image from radio button, click Show Cluster's Current Image at the bottom of the page.
A card with information about the current image for the cluster appears. Before you proceed, you can review and compare the current cluster image with the image on the selected host before you proceed. In this way, you can ensure that you selected the right reference host.
Results
The specified hosts are added to the cluster.
If you chose to import an image from a host during the host addition procedure, the image for the cluster changes. The new software specification for the cluster is identical to the one on the selected and added reference host.
What to do next
If you chose to import an image from a host during the host addition procedure, remediate the cluster to apply the new image to all the hosts.
