


You can prepare a virtual machine with software and configuration metadata that work in conjunction with the vSphere Client to register a plug-in solution when the virtual machine starts up in a production environment.
Prerequisites
- vCenter Server 6.7 or later.
- An OVA package that contains a virtual machine with virtual hardware version 11 or later. PhotonOS, as used in this procedure, is recommended.
rootoradministratoraccess to the guest operating system.- (If you choose to use Docker to download nginx) access to the Docker Hub.
Outline of Steps to Prepare a Plug-in Server for Self-Registration and Installation
- Acquire the OVA file for PhotonOS, virtual hardware version 11
- Use the vSphere Client to install the OVA in a development environment
- Configure vApp options for deployment in a production environment
- Configure solution properties in the OVF
- Run the virtual machine and set the
rootpassword in the guest OS - Install your web application server in the guest OS
- Installing VMware Tools if needed
- Copy startup files to the /etc/rc.d/ directory
- Export the virtual machine as a new OVF template
- Deploy the OVF template in a production environment
When a user deploys a virtual machine from the finished OVF template, the virtual machine starts the plug-in web server in the guest OS and registers it with vCenter Server.
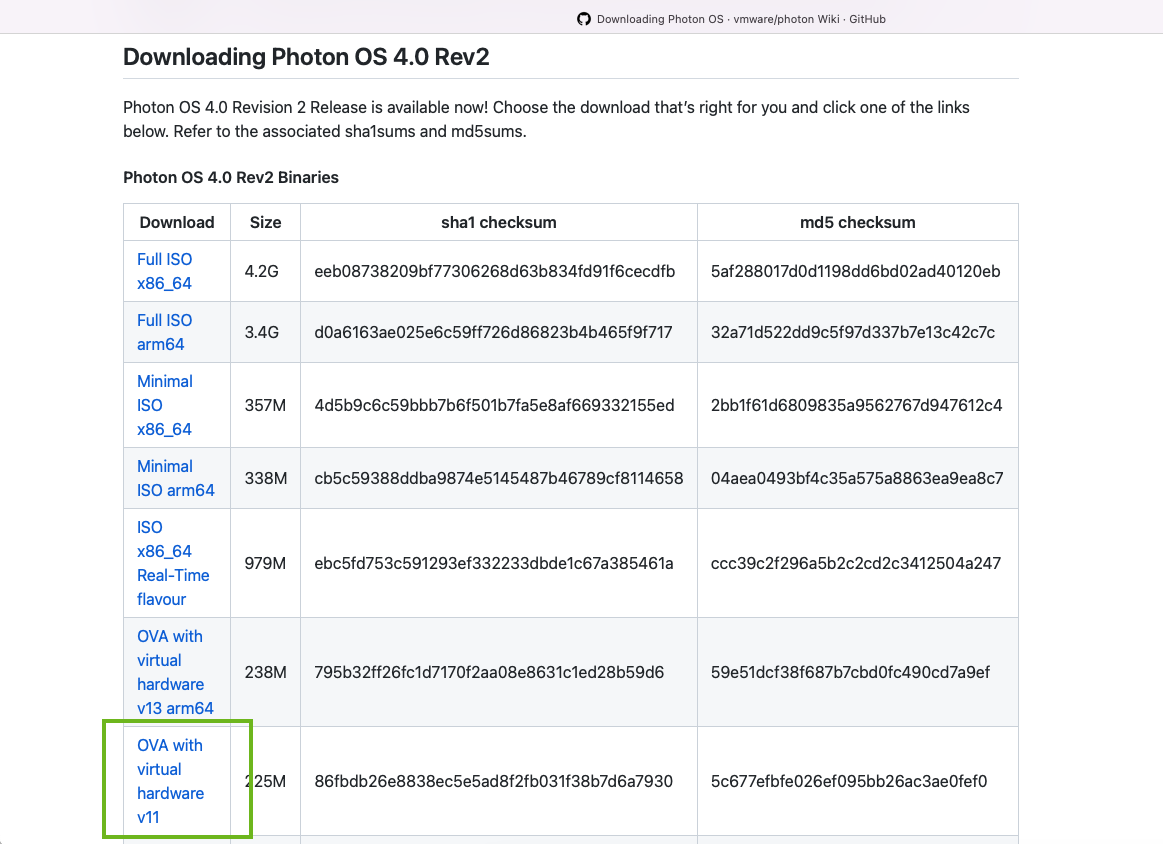
Acquire the OVA File for Photon OS
Photon OS is an open-source, security-hardened, enterprise-grade Linux distribution designed for Cloud and Edge applications.
You can download a Photon OS OVA with virtual hardware v11 from https://github.com/vmware/photon/wiki/Downloading-Photon-OS
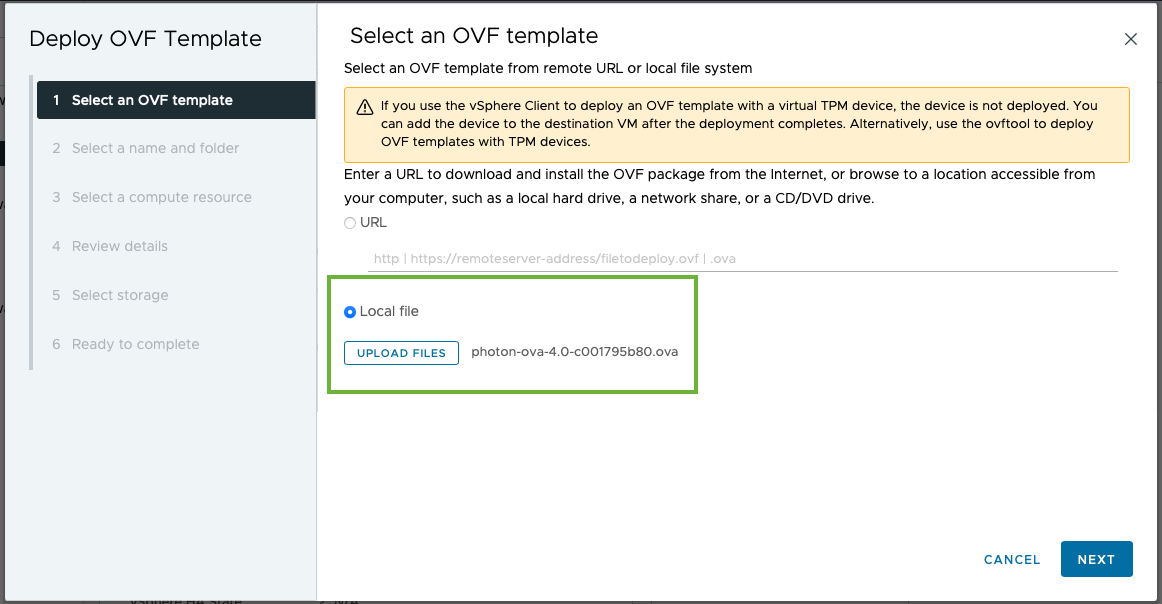
Install the OVA in a vSphere Environment
You need to install the virtual machine in an environment where you can modify its configuration and make some changes in the guest OS. To install the OVA, use the Deploy OVF Template wizard in the vSphere Client.
- Right-click any inventory object that is a valid parent object of a virtual machine, such as a data center, folder, cluster, resource pool, or host.
- Select Deploy OVF Template.
- In the first step of the wizard, Select an OVF template, choose Local file.
- Click UPLOAD FILES and choose the OVA file you downloaded.
- Click NEXT and complete the Deploy OVF Template wizard.
Configure vApp Options
After you install the virtual machine in your development environment, you configure certain vApp properties that will affect the virtual machine when it is deployed to a production environment.
- Navigate to the deployed virtual machine name in the navigation pane on the left.
- Click the Configure tab.
- Select > .
Figure 3. Settings > VApp Options 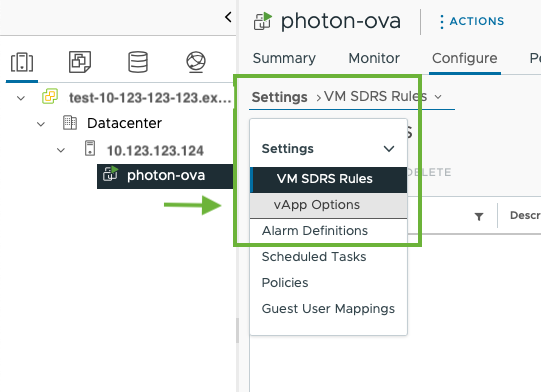
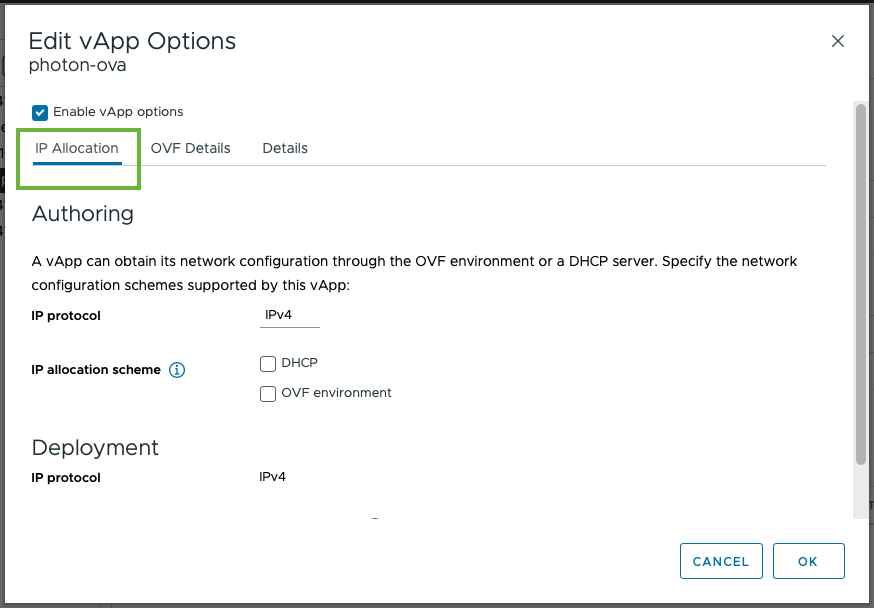
- Click the EDIT button near the top of the VApp Options panel.
On the IP Allocation tab, select network constraints for the virtual machine.
- In the Authoring section, choose one or both of the network protocols (IPv4, IPv6, or both) for the vApp production environment. The choices you make in the Authoring section constrain the choices available in the Deployment section.
If you select OVF Environment in the Authoring section... Choose IP pool settings in the Deployment section. If you choose DHCP in the Authoring section... DHCP service must be available on the vSphere networks where the vApp will be deployed. If you make no selections in the Authoring section... IP addresses must be assigned manually when the vApp is deployed.
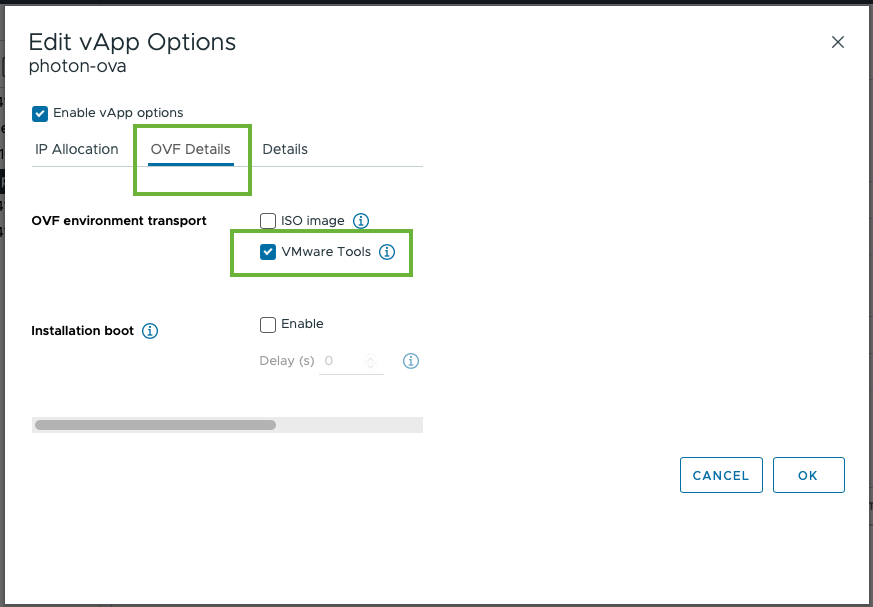
On the OVF Details tab of the Edit vApp Options window, in the OVF environment transport section, enable VMware Tools. When the virtual machine is deployed in a production environment, it will use VMware Tools to read solution properties that were configured in the OVF template. These properties will be injected into the plug-in registration request.
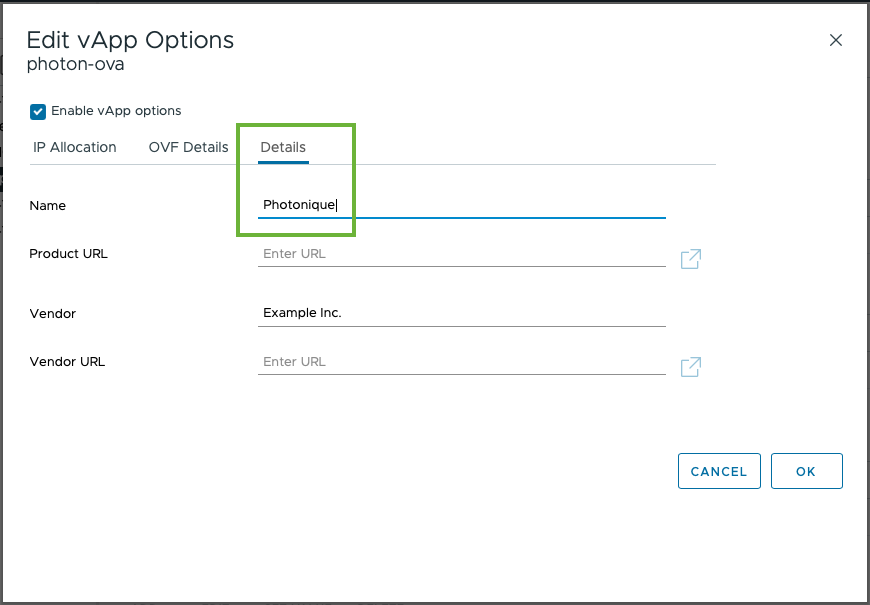
On the Details tab of the Edit vApp Options window, specify a vendor-supplied product name for the plug-in solution.
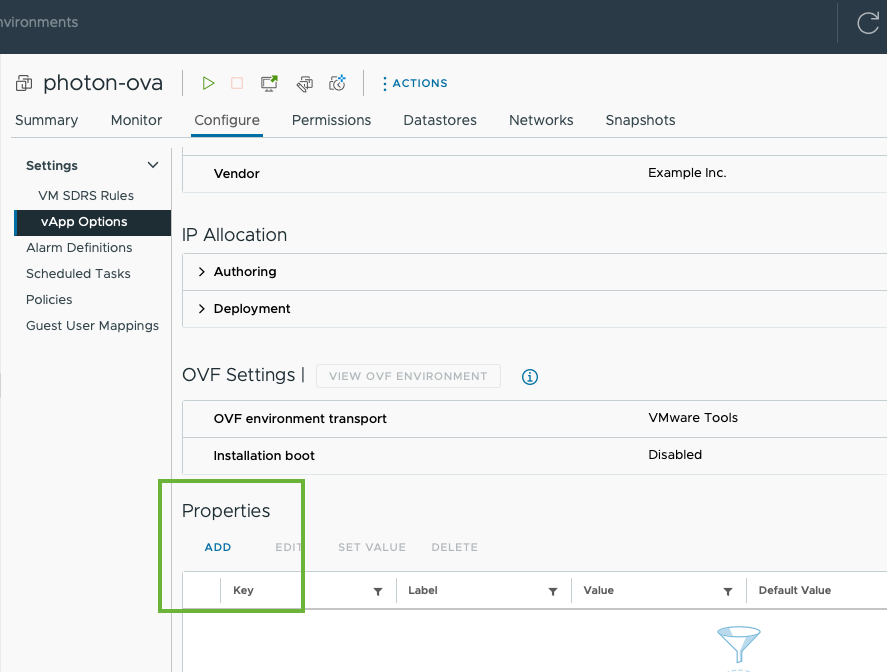
Configure Solution Properties in the OVF
When the virtual machine starts as a plug-in in a production environment, it needs to register itself with vCenter Server. Before you deploy the plug-in, you must configure the OVF template with several solution properties that will be injected into the registration record during startup. These include the solution ID, the plug-in ID, and other properties.
- Navigate to the deployed virtual machine name in the navigation pane on the left
- Power off the virtual machine if it is powered on.
- Select the Configure tab in the selection pane on the left.
- Select .
- In the vApp Options pane, scroll down to the Properties section.
| Property Key | Type | Example Choice List | Example Default Value |
|---|---|---|---|
| vmw.vsphereui.solutioninstall.solutionId |
string choice | "com.example.solution.id" | com.example.solution.id |
| Choice list contains a single vendor-defined element. For example: "com.example.solution.id" | |||
| vmw.vsphereui.solutioninstall.pluginId | string choice | "com.example.plugin.id" | com.example.plugin.id |
| Choice list contains a single vendor-defined element. For example: "com.example.plugin.id". Value may be same as solution ID. | |||
| vmw.vsphereui.solutioninstall.vCenterSupport | string choice | "Single" | Single |
| Choice list contains either "Single" or "Multiple" to indicate whether the solution supports one or many vCenter Server instances. | |||
For more information about these properties and other optional properties, see Integrated Installer Solution Metedata.
Upgrade VM Compatibility
- Power off the virtual machine, if running.
- From the ACTIONS menu, choose .
Figure 8. Upgrading Compatibility for the Virtual Machine 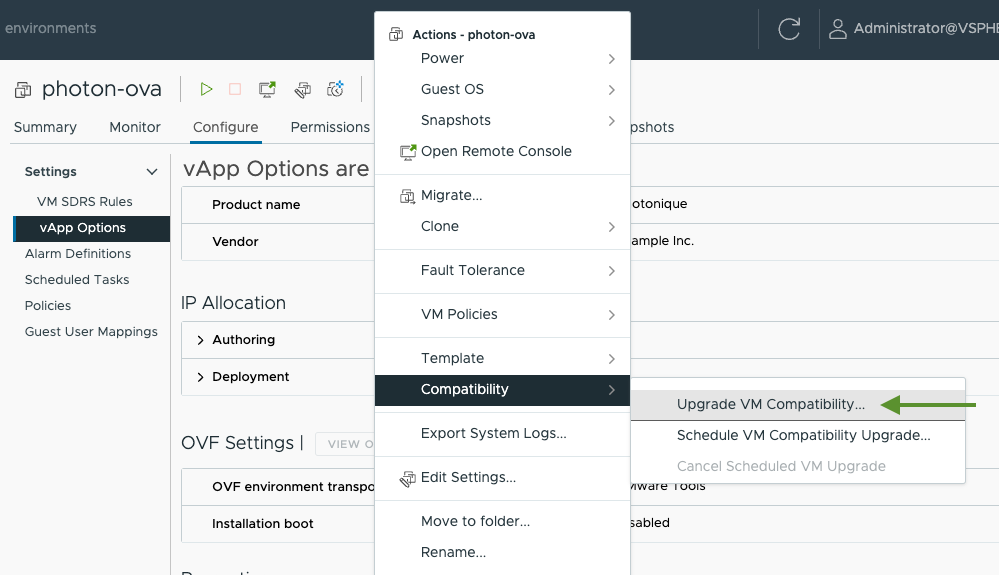
- In the Configure VM Compatibility dialog, choose ESXi 6.7 U2 and later from the Compatible with pop-up menu.
Figure 9. Upgrade VM Compatibility Dialog 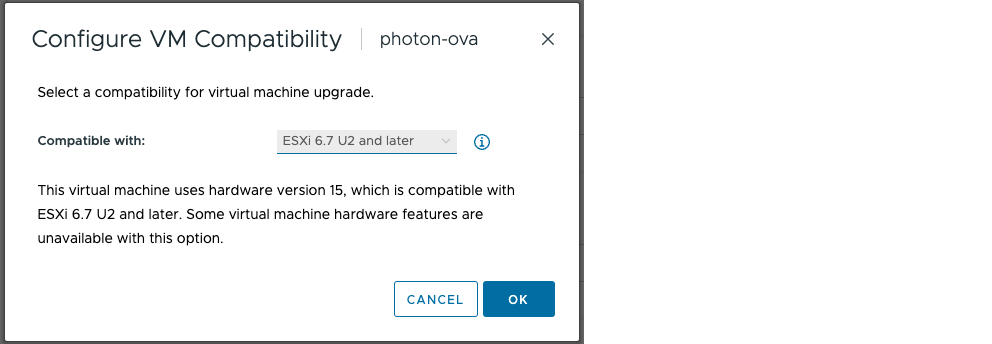
Set the root Password in the Guest OS
When you download the OVA, the root password for the guest OS is insecure. You must change the password before you deploy the virtual machine in a production environment.
- Power on the virtual machine.
- Open a Web Console or Remote Console window to the guest OS.
- The default root password for the Photon OS guest OS is
changeme.
- The default root password for the Photon OS guest OS is
- Set a new, secure, root password.
-
Make a note of the new password, in case you need to update the software or alter the configuration in the future.
-
Install Your Web Application Server in the Guest OS
The virtual machine needs a plug-in server to handle REST queries from the plug-in user interface. You can install the SDK sample starter or other web server, according to your preference.
To install the remote plug-in sample starter provided in the vSphere Client SDK:
- Customize the sample starter as needed for your solution.
- Build the remote-plugin-sample-starter from the SDK.
- Copy the remote-plugin-sample-starter-VERSION.jar into the guest OS. (for this example, we use the /root/ folder of the VM).
# cd /root
# scp [email protected]:/html-client-sdk/samples/remote-plugin-sample-starter/target/*.jar .
Install VMware Tools
If you are using the Photon OS OVA downloaded from github as described in the first step of this procedure, VMware Tools is already installed in the guest. Otherwise, you might need to install VMware Tools manually. In the vSphere Client Hosts and Clusters view, right-click your virtual machine and select . For more detailed instructions, see the knowledge base article https://kb.vmware.com/s/article/2004754.
Copy Startup Files into the Guest OS
When the virtual machine starts up in a production environment, it needs to run startup scripts to register itself with vCenter Server. You must install the scripts in the Linux guest OS before you deploy the virtual machine in a production environment.
- Copy the files rc.local and vsphere_ui_request.py from the SDK directory /samples/solutioninstall/ to the directory /etc/rc.d/ in the guest OS.
# cd /etc/rc.d
# scp [email protected]:/html-client-sdk/samples/solutioninstall/rc.local .
# scp [email protected]:/html-client-sdk/samples/solutioninstall/vsphere_ui_request.py .
- Set execute permissions on the files in the guest OS.
# chmod +x /etc/rc.d/rc.local
# chmod +x /etc/rc.d/vsphere_ui_request.py
When you deploy the virtual machine as a plug-in in vCenter Server, the guest OS runs rc.local, which in turn runs vsphere_ui_request.py. The request script uses VMware Tools to read the solution properties, then builds a registration request and sends it to vCenter Server.
- Reads solution metadata
- Installs a JDK
- Opens a firewall port for incoming HTTPS requests
- Starts the web server
- Launches vsphere_ui_request.py to send the plug-in registration request
Note: If you customize the script, it is important that the vCenter Server thumbprint is verified as part of making the request to the vSphere UI.
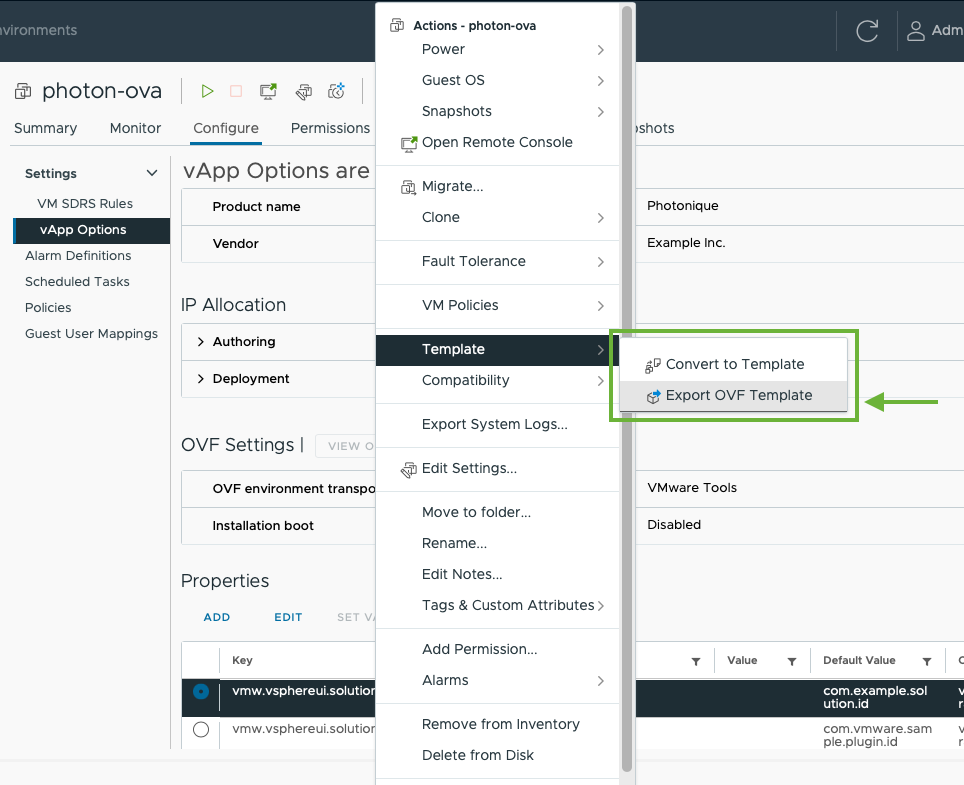
Export a New OVF Template
After you configure VMware Tools, install the startup script, configure injectable solution properties, and install your plug-in web server, you can export the virtual machine as an OVF template that is available to deploy in your production environment.
- Power off the virtual machine.
- Export the virtual machine as an OVF, using the action.
In the Export OVF Template dialog, supply a name and description for the template.
Related Resources
- PhotonOS documentation: https://vmware.github.io/photon/docs/
- nginx downloads: https://hub.docker.com/_/nginx/
