


This topic for operators provides instructions about how to install Redis for VMware Tanzu Application Service. It covers tasks from downloading the file from Broadcom’s Customer Support Portal through verifying the installation after configuration.
Role-based access in Tanzu Operations Manager
Tanzu Operations Manager admins can use Role-Based Access Control (RBAC) to manage which operators can make deployment changes, view credentials, and manage user roles in Tanzu Operations Manager. Therefore, your role permissions might not allow you to follow every procedure in this operator guide.
For more information about roles in Tanzu Operations Manager, see Understand roles in Tanzu Operations Manager.
Download and install the tile
To add Redis for Tanzu Application Service to Tanzu Operations Manager, follow the procedure for adding Tanzu Operations Manager tiles:
- Download the Redis for Tanzu Application Service file from Broadcom’s Customer Support Portal. Select the latest release from the Releases dropdown.
- In the Tanzu Operations Manager Installation Dashboard, click Import a Product to upload the Redis for Tanzu Application Service file.
- Click the + sign next to the uploaded product description to add the tile to your staging area.
- To configure Redis for Tanzu Application Service, click the newly added tile. See configuration instructions in the sections below.
-
After completing the required configuration, in the Tanzu Operations Manager Dashboard, do the following to complete the installation:
- If you are using Tanzu Operations Manager v2.3 or later, click Review Pending Changes. For more information about this Tanzu Operations Manager page, see Reviewing pending product changes.
- Click Apply Changes.
- If you are using Tanzu Operations Manager v2.3 or later, click Review Pending Changes. For more information about this Tanzu Operations Manager page, see Reviewing pending product changes.
For guidance on ports and ranges used in the Redis service, see Select networks below.
Assign AZs and networks
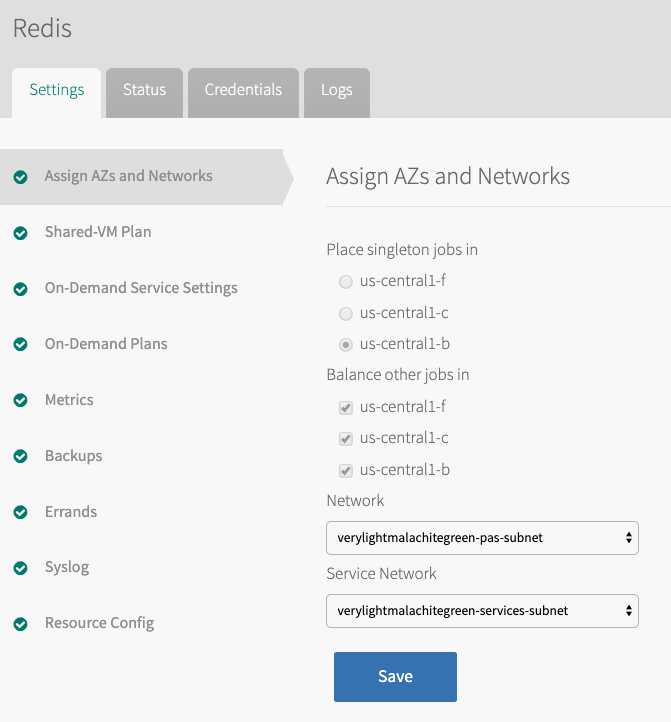
To assign AZs and networks, click the Assign AZs and Networks settings tab.
Assign AZs
You can assign multiple availability zones (AZs) to Redis jobs, however, this does not ensure high availability. You must select AZs that are in the service network you configured in your BOSH Director. For more information, see Availability Zones.
To assign AZs:
-
Select Assign AZs and Networks.
-
Under Place singleton jobs in, select an AZ for the on-demand or shared service broker VM, and any shared instances.
-
Under Balance other jobs in, select the AZs that you want the broker to balance on-demand service instances across.
-
Click Save.
Select networks
You can use Redis for Tanzu Application Service with or without using the on-demand service. To use the Redis for Tanzu Application Service on-demand service, you must select a network in which the service instances are created. For more information, see Networking for On-Demand Services.
To select networks:
-
In the Assign AZs and Networks tab, select a Network.
- VMware recommends that each type of service run in its own network.
- Typically the service broker network and service instance networks are the same.
-
If using the on-demand service, select a Service Network. Otherwise, select an empty service network. For more information, see Creating an empty Services Network when using on-demand Service Tiles for Non-On-Demand usage only in the VMware Tanzu Support knowledge base.
The following ports and ranges are used in Redis for Tanzu Application Service:
| Port | Protocol | Direction and network | Purpose |
|---|---|---|---|
| 8202 | TCP | Inbound to the Cloud Foundry network Outbound from the service broker and service instance networks |
Allows Redis metron_agent to forward metrics to the Cloud Foundry Loggregator |
| 12350 | TCP | Outbound from Cloud Foundry to the cf-redis-broker service broker network |
Allows the cloud controllers to access the cf-redis-broker |
| 8080 | TCP | Outbound from Cloud Foundry to the on-demand service broker network | Allows the cloud controllers to access the on-demand service broker when using an on-demand service |
| 6379 | TCP | Outbound from Cloud Foundry to any on-demand service instance networks | Allows the Diego Cell and Diego Brain networks to access all on-demand service instances |
| 16379 | TCP | Outbound from Cloud Foundry to any on-demand service instance networks | This port allow the Diego Cell and Diego Brain networks to access all on-demand service instances. This access is only required if TLS is set to optional. |
| 32768–61000 | TCP | Outbound from Cloud Foundry to the cf-redis-broker service broker network |
These ports allow Diego Cell and Diego Brain networks to access the service broker VM. This access is only required for the shared service plan. |
| 80 | http | Outbound from any service instance networks | Gives access to the backup blobstore when using service backups |
| 443 | https | Outbound from any service instance networks | Gives access to the backup blobstore when using service backups |
| 8443 and 25555 | TCP | Outbound from any on-demand service broker network to the BOSH Director network | Allows the on-demand service broker to communicate with the BOSH Director |
Configure on-demand service settings
To configure settings that apply across the whole on-demand service offering:
-
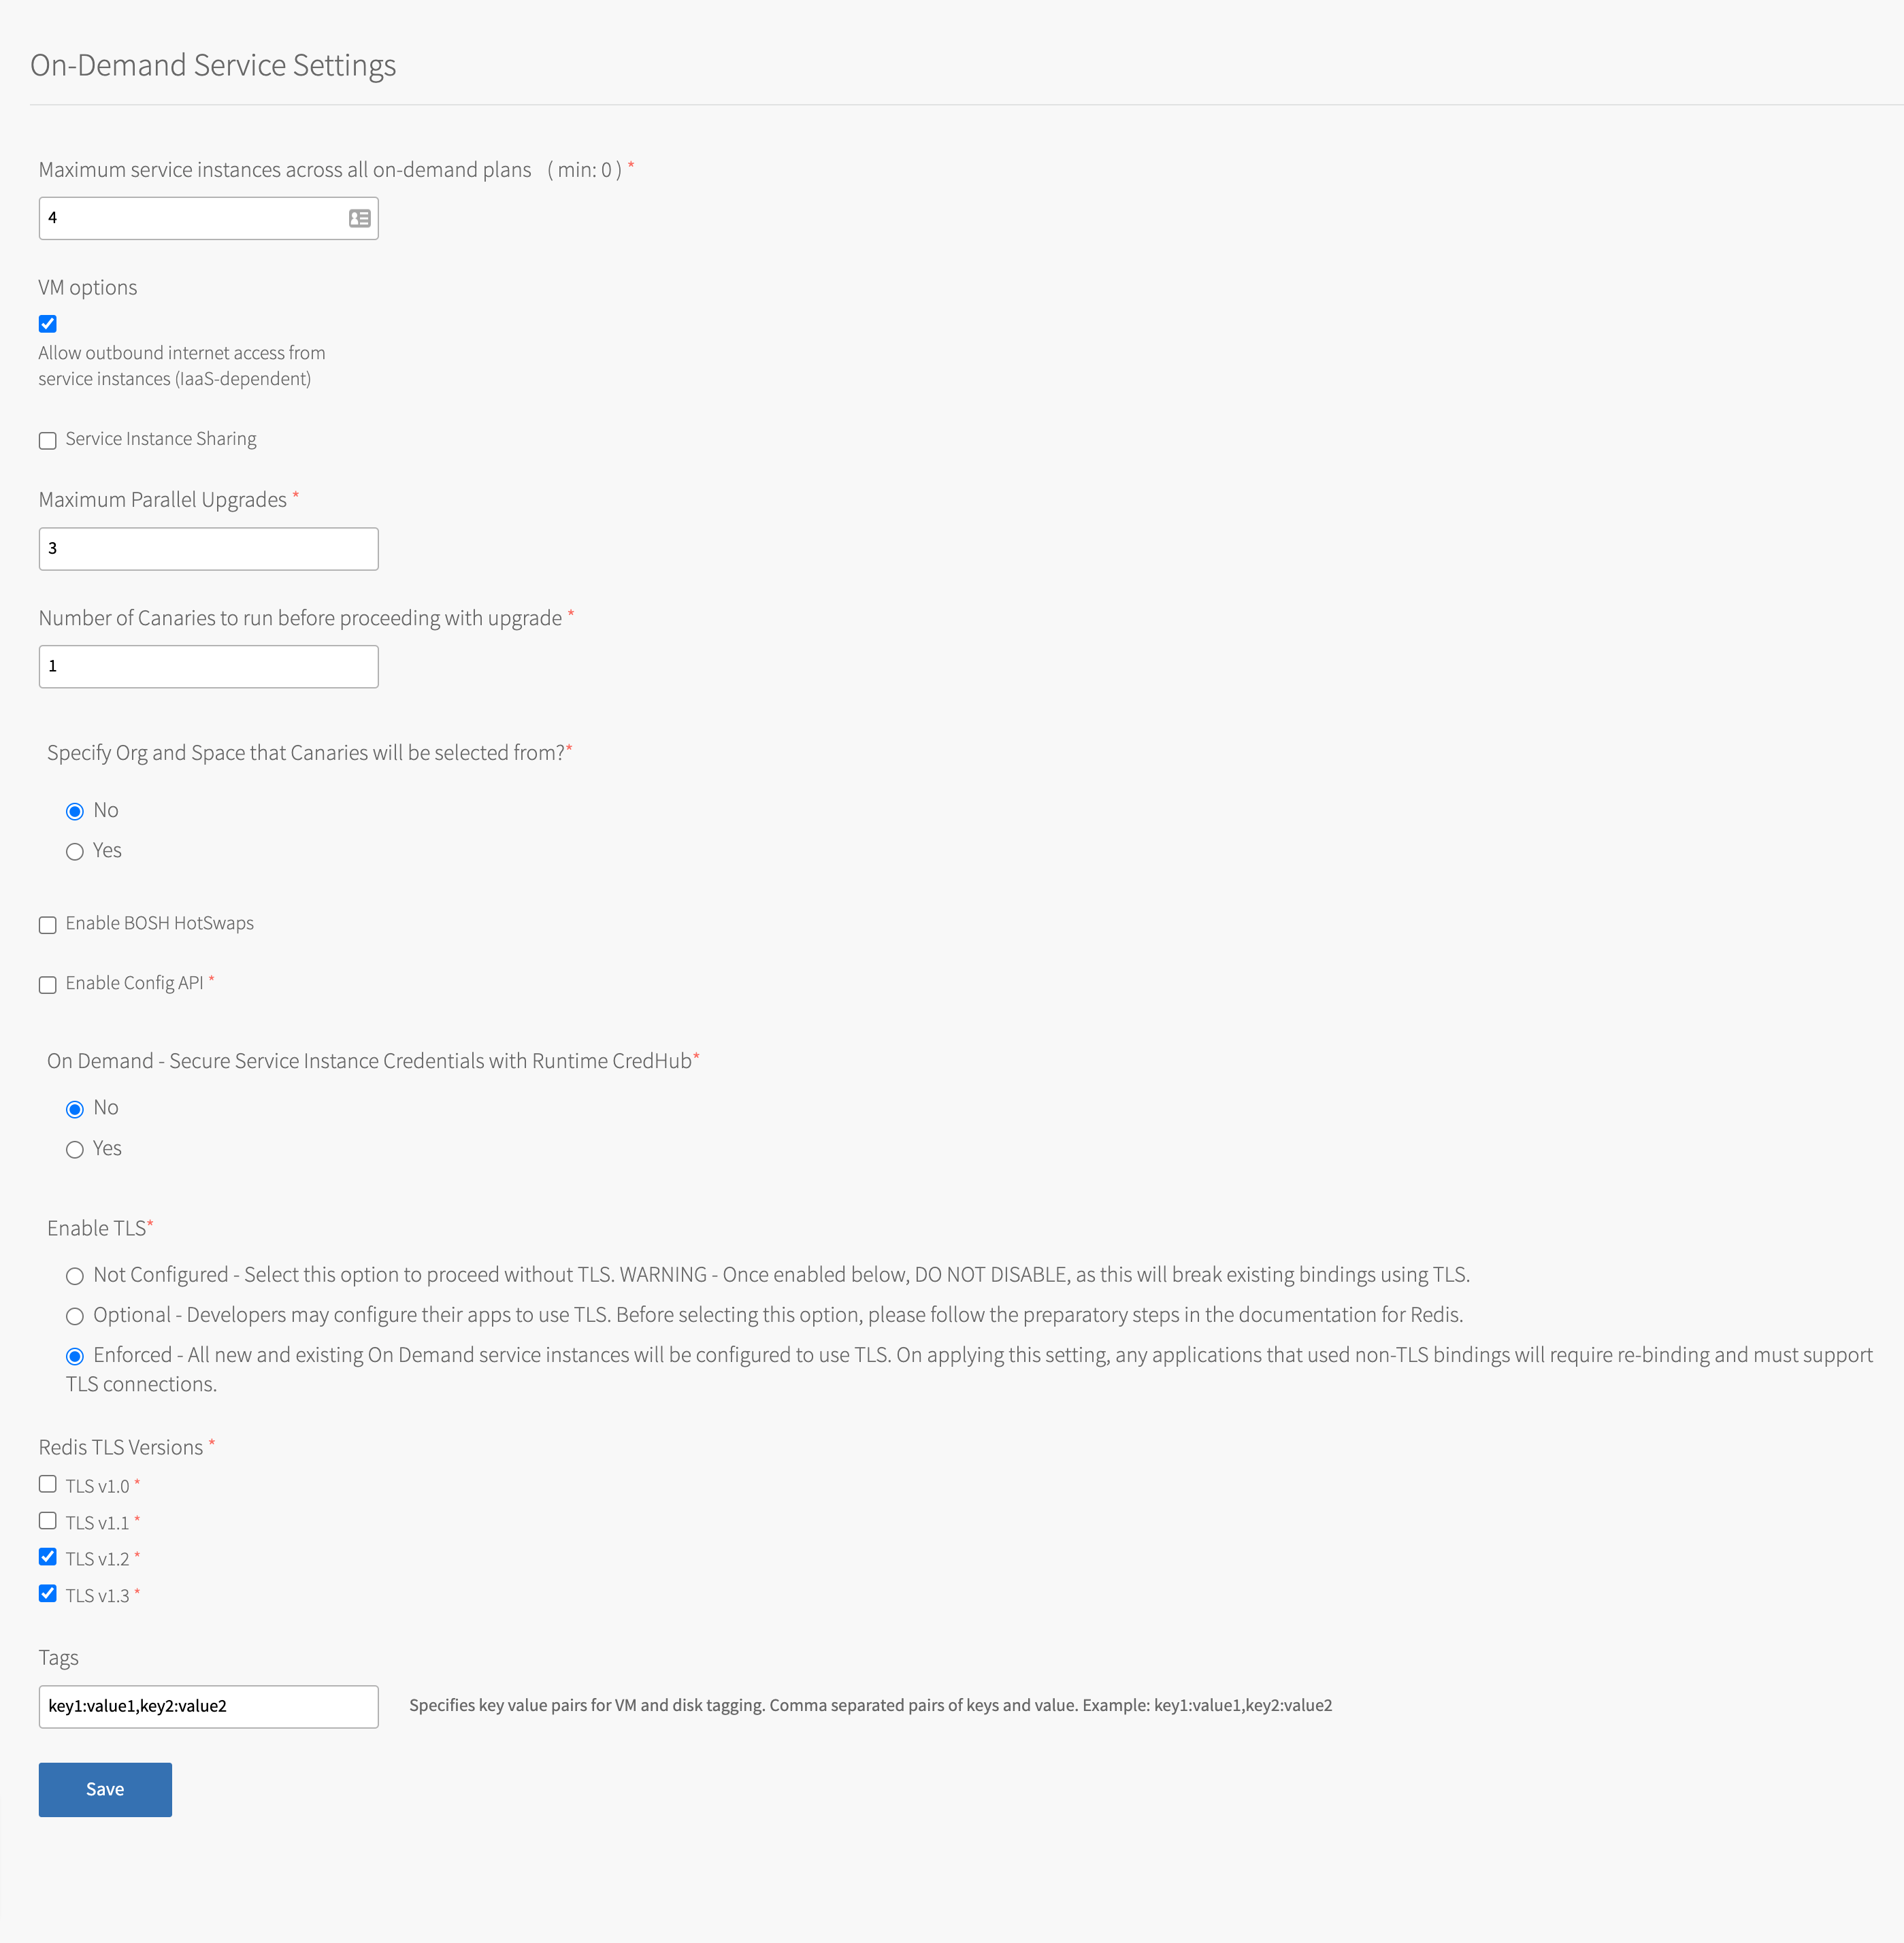
In the Redis for Tanzu Application Service tile, select On-Demand Service Settings.
-
Enter the Maximum service instances across all on-demand plans. The maximum number of instances you set for all your on-demand plans combined cannot exceed this number.
For more information, see Setting Limits for On-Demand Service Instances. -
Select the Allow outbound internet access from service instances checkbox. You must select this checkbox to allow external log forwarding, send backup artifacts to external destinations, and communicate with an external BOSH blobstore. Outbound network traffic rules also depend on your IaaS settings. Consult your network or IaaS admin to ensure that your IaaS allows outbound traffic to the external networks you need.
-
(Optional) Select the checkbox to enable Service Instance Sharing. Turning on sharing enables this feature for all on-demand instances. To enable this feature a user with admin privileges must run
cf enable-feature-flag service_instance_sharing. For information about this feature, see Sharing a Redis Instance with Another Space. -
(Optional) Use the Maximum Parallel Upgrades field to configure the maximum number of Redis service instances that can be upgraded at the same time.
When you click Apply Changes, the on-demand broker upgrades all service instances. By default, each instance is upgraded serially. Allowing parallel upgrades reduces the time taken to apply changes. Multiple Redis service instances are unavailable during the upgrade. -
(Optional) Use the Number of Canaries to run before proceeding with upgrade field and the Specify Org and Space that Canaries will be selected from? options to specify settings for upgrade canaries. Canaries are service instances that are upgraded first. The upgrade fails if any canaries fail to upgrade.
You can limit canaries by number and by org and space. To use all service instances in an org and space as canaries, set the number of canaries to zero. This upgrades all service instances in the selected org and space first.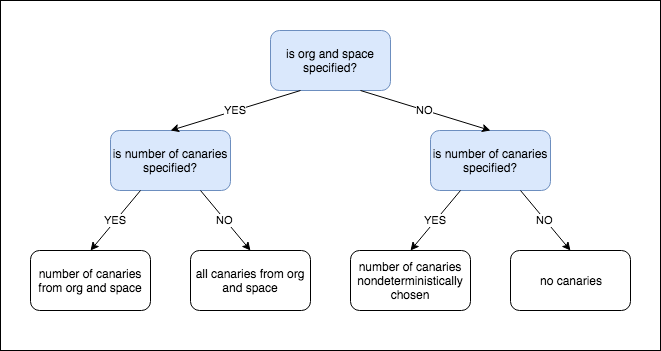
The flowchart above has the following information:
- Is the org and space specified?
- Yes: Is the number of canaries specified?
- Yes: The number of canaries is limited by org and space.
- No: All canaries from the org and space.
- No: Is the number of canaries specified?
- Yes: The number of canaries is chosen non-deterministically.
- No: No canaries.
- Yes: Is the number of canaries specified?
If you specify that canaries should be limited to an org and space that has no service instances, the upgrade fails. Also, Canary upgrades comply with the Maximum Parallel Upgrades settings. If you specify three canaries and a Maximum Parallel Upgrades of two, then two canaries upgrade, followed by the third.
For information about this feature, see
canariesin Upgrade all Service Instances. - Is the org and space specified?
-
(Optional) Select the check box to enable BOSH HotSwaps. This reduces downtime during upgrades. For how this feature works, see Changing VM Update Strategy in the BOSH documentation.
-
(Optional) Select Yes to enable On Demand - Secure Service Instance Credentials with Runtime CredHub. If you do select Yes, you must also follow the steps in Enable Secure Service Instance Credentials for On-Demand Redis later on this page.
-
(Optional) Select the Not Configured option under Enable TLS if you do not want to allow TLS connections to on-demand service instances. TLS support is optional in new installations by default. If TLS is configured in Redis for Tanzu Application Service v2.2, follow the procedures in Preparing for TLS before enabling TLS.
After TLS is activated for the on-demand Redis service, deactivating TLS causes downtime and service outage for all apps that connect to Redis through TLS. If you deactivate TLS, you must unbind all apps bound to on-demand instances from the TLS port, rebind to the non-TLS port, and then restage to resume service access.
-
(Optional) If you selected the Optional option under Enable TLS, select the check box next to each TLS version you want to support.
Selecting TLS optional does not enforce the use of TLS. After deploying the tile, notify developers that they must unbind, bind, and restage existing service instances to ensure Spring and Steeltoe apps use TLS. Further configuration might be needed for other frameworks and languages to ensure use of the TLS port.
-
(Optional) If you selected the Enforced option under Enable TLS, enable the checkbox next to each TLS version you want to support. The Enforced option requires TLS to be enabled.
Breaking change: If TLS is set to Enforced then all existing service instances use TLS after changes from the Upgrade All Service Instances errand are applied. Any apps not using TLS are no longer able to communicate with their service instances. Such apps require a new binding and must be configured to communicate with their Redis for Tanzu Application Service service instance through TLS.
-
(Optional) If you selected the Optional or Enforced option under Enable TLS then select the TLS versions to support. TLS v1.3 and TLS v1.2 are enabled by default. VMware recommends supporting TLS v1.1 and later. VMware does not recommend supporting TLS v1.0 because it is less secure than later versions, but it is an option for apps that only support this protocol. After selecting a TLS version, VMware recommends generating a new service key and then rebinding the service instance with the new service key. This makes the service key’s
tls_versionsfield reflect the new TLS version, which can help developers who use the service key to see the supported TLS version. To create a new service key, follow the steps in Check Availability. To rebind the instance, follow the steps in Bind Existing Apps with TLS. -
(Optional) To add an endpoint to service instances for developers to query Redis configuration parameters, select the Enable Config API checkbox. For more information, see Using the Config API.
-
(Optional) In the Tags field, write a comma-separated list of key-value pairs for tagging service-instance VMs. Ensure the list is in a style that the underlying cloud provider accepts. For example, Google Cloud Platform (GCP) does not permit uppercase characters.
Configure on-demand plan settings
You can configure multiple on-demand plans with memory and disk sizes suited to different use cases. The configuration of resources varies depending on your IaaS.
To add and configure each on-demand service plan:
- In the Redis for Tanzu Application Service tile, select On-Demand Plans.
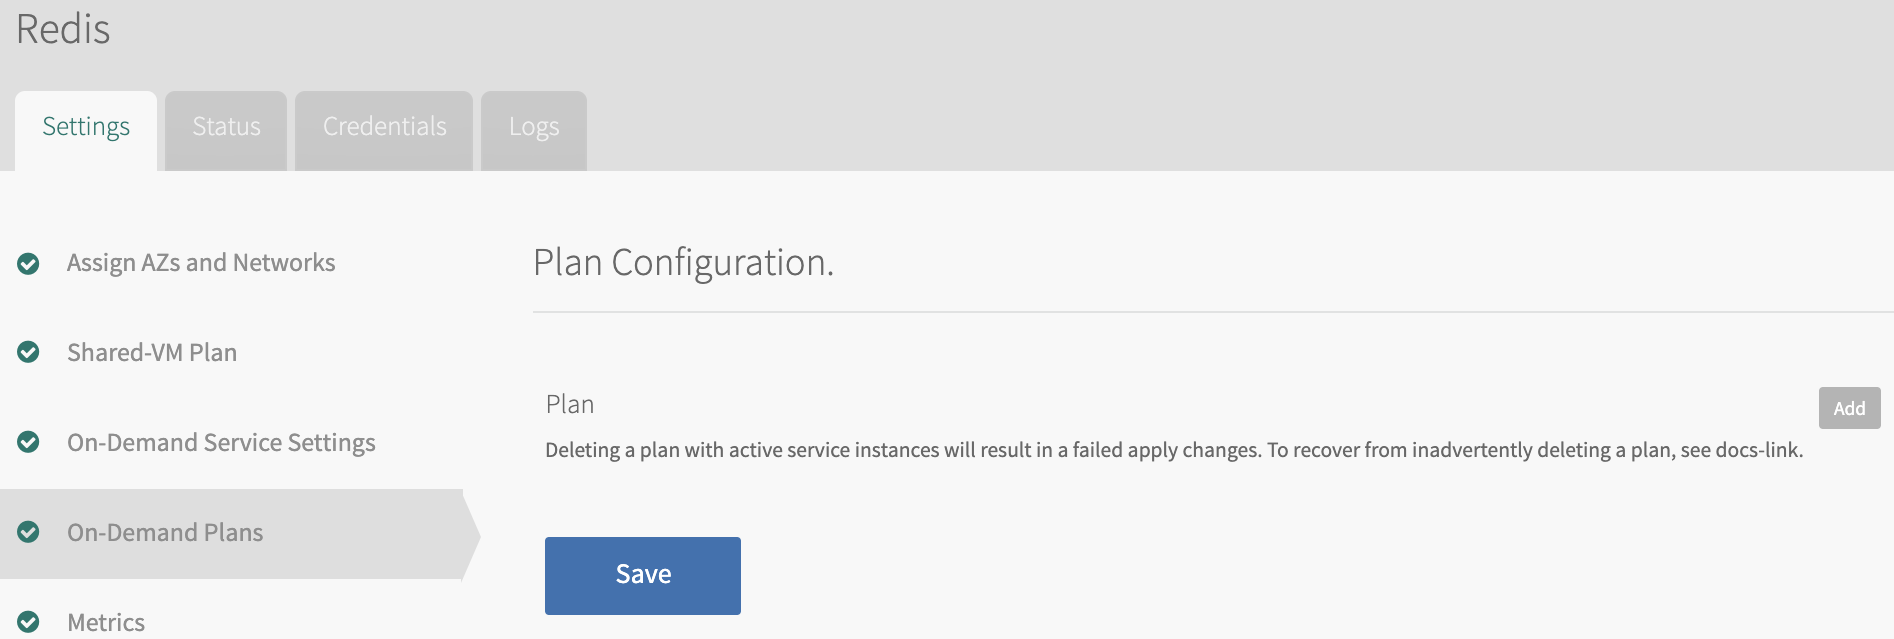
- Click Add to add an on-demand plan.
-
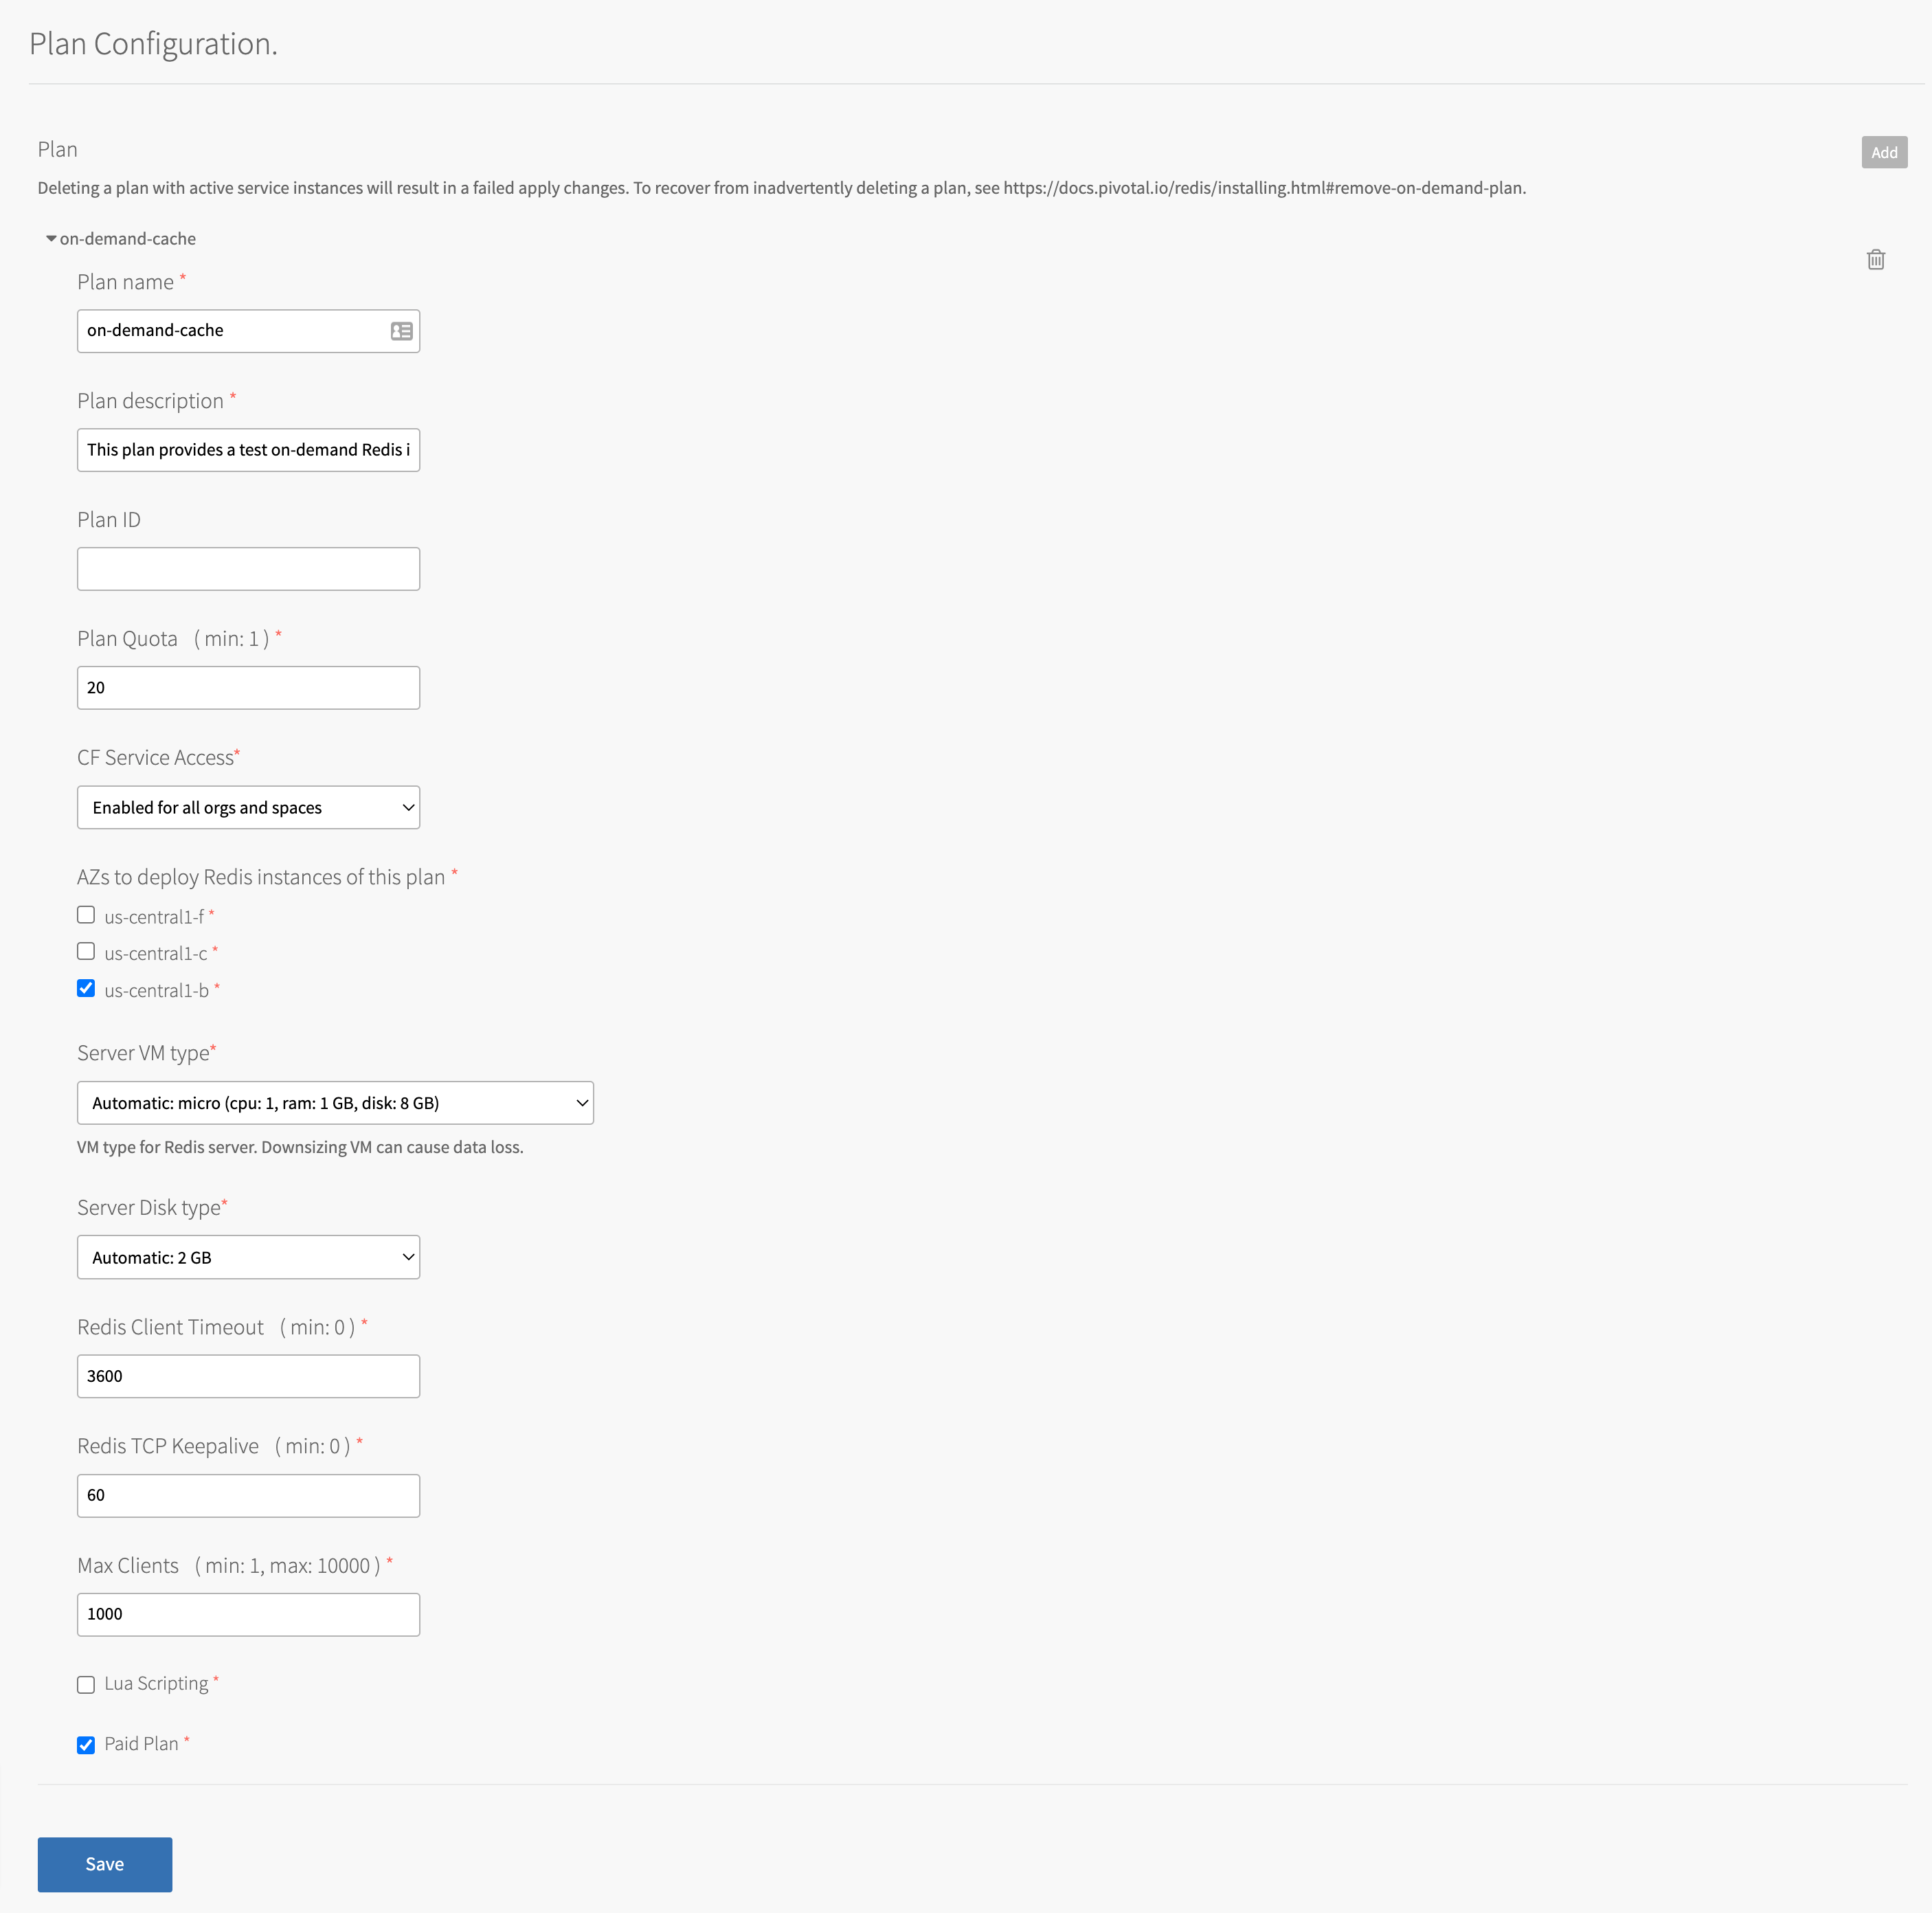
Configure the settings in the following table for your on-demand plans and then click Save.
Do not downsize the VMs or disk size. Doing so can cause data loss in pre-existing instances.
Field Default Description Plan name on-demand-cache The name that you choose for the plan. This is displayed in the Marketplace. VMware recommends that you give your plans descriptive names based on their configuration. Plan Description This plan provides an on-demand Redis instance, tailored for caching use cases with persistence to disk enabled. The description that you write for your plan. This is displayed in the Marketplace. Include details that are relevant to app developers. Plan ID Empty An ID that you configure when recovering deleted plans. Leave this field blank unless it is already configured or you are recovering a deleted plan. Plan Quota 20 The maximum number of instances of this plan that app developers can create. For more information, see Setting Limits for On-Demand Service Instances. CF Service Access Enabled for all orgs and spaces This setting does not modify the permissions that have been previously set, and allows for manual access to be configured from the CLI. AZ to deploy Redis instances of this plan None selected The AZs in which to deploy the Redis instances from the plan. These must be AZs of the service network, which are configured in the BOSH Director tile. If you select multiple AZs, instances are distributed randomly between them. Server VM type Varies depending on IaaS VMware recommends that the persistent disk is at least 2.5x the VM memory for on-demand service instances. Server Disk type Varies depending on IaaS VMware recommends that the persistent disk is at least 2.5x the VM memory for on-demand service instances. Redis Client Timeout 3600 The server timeout for an idle client specified in seconds. Adjust this setting as needed. Redis TCP Keepalive 60 The interval in seconds at which TCP ACKs are sent to clients. Adjust this setting as needed. Max Clients 1000 The maximum number of clients that can be connected at any one time. Adjust this setting as needed. Lua Scripting Deactivated VMware recommends keeping Lua scripting deactivated unless developers are running apps that require Lua scripting, such as .Net Steeltoe apps.
Verify that your apps are using a language that does not require Lua scripting.Paid Plan Deactivated Select this check box to indicate that this service plan is paid. The plan is marked with an asterisk in the cf marketplacelist and labeled "paid" in the "free or paid" column when individual plans are listed.Plan VM Extensions Empty Specify a comma-separated list of supported VM Extensions that you want to apply to service instances created under this plan. You can manage VM Extensions in Ops Manager or through the OM CLI. For more information, see Create or update a VM extension or om create-vm-extension in GitHub. If you specify an extension that is not supported by Ops Manager (not present in the BOSH cloud config), then instance creation attempts fail.
Enable secure service instance credentials for on-demand Redis
If you enabled On Demand - Secure Service Instance Credentials with Runtime CredHub in step 8 of Configure On-Demand Service Settings above, you must follow this procedure.
To secure your on-demand binding credentials in runtime CredHub instead of the Cloud Controller database (CCDB):
-
On the CredHub pane of VMware Tanzu Application Service for VMs (TAS for VMs) select Secure service instance credentials.
For instructions, see Configure CredHub in Configuring TAS for VMs.
-
After deploying the tile, notify developers that they must unbind and rebind existing service instances to secure their credentials with CredHub.
Updating on-demand service plans
Operators can update certain settings after the plans have been created. If the operator updates the VM size, disk size, or the Redis configuration settings (enabling Lua Scripting, max-clients, timeout and TCP keepalive), these settings are implemented in all instances that are already created.
Operators should not downsize the VMs or disk size because this can cause data loss in pre-existing instances. Additionally, operators cannot make a plan that was previously active, inactive, until all instances of that plan have been deleted.
Remove an on-demand service plan
Do not remove an on-demand service plan with service instances deployed. Doing so causes Apply Changes to fail. For how to recover a deleted plan, see Recover a deleted Redis for Tanzu Application Service On-Demand Plan in the VMware Tanzu Support knowledge base.
To remove an on-demand service plan from your tile:
-
Ensure that there are no deployed service instances of the plan by running:
cf servicesFor example:
$ cf services Getting services in org my-org / space my-space as user@example.com... OK name service plan bound apps last operation my-instance p.redis on-demand-cache create succeeded -
In the Redis for Tanzu Application Service tile, select On-Demand Plan Settings.
-
Delete the plan by clicking the trash can icon next to the plan name.
-
Click Save.
-
Go to the Errands page on the Redis for Tanzu Application Service tile, and set the Register On-Demand Broker errand to on. This updates the plans available in the Marketplace.
Remove all on-demand service plans
Do not remove an on-demand service plan with service instances deployed. Doing so causes Apply Changes to fail. For how to recover a deleted plan, see Recover a deleted Redis for Tanzu Application Service on-demand plan in the VMware Tanzu Support knowledge base.
To remove the on-demand service from your tile:
-
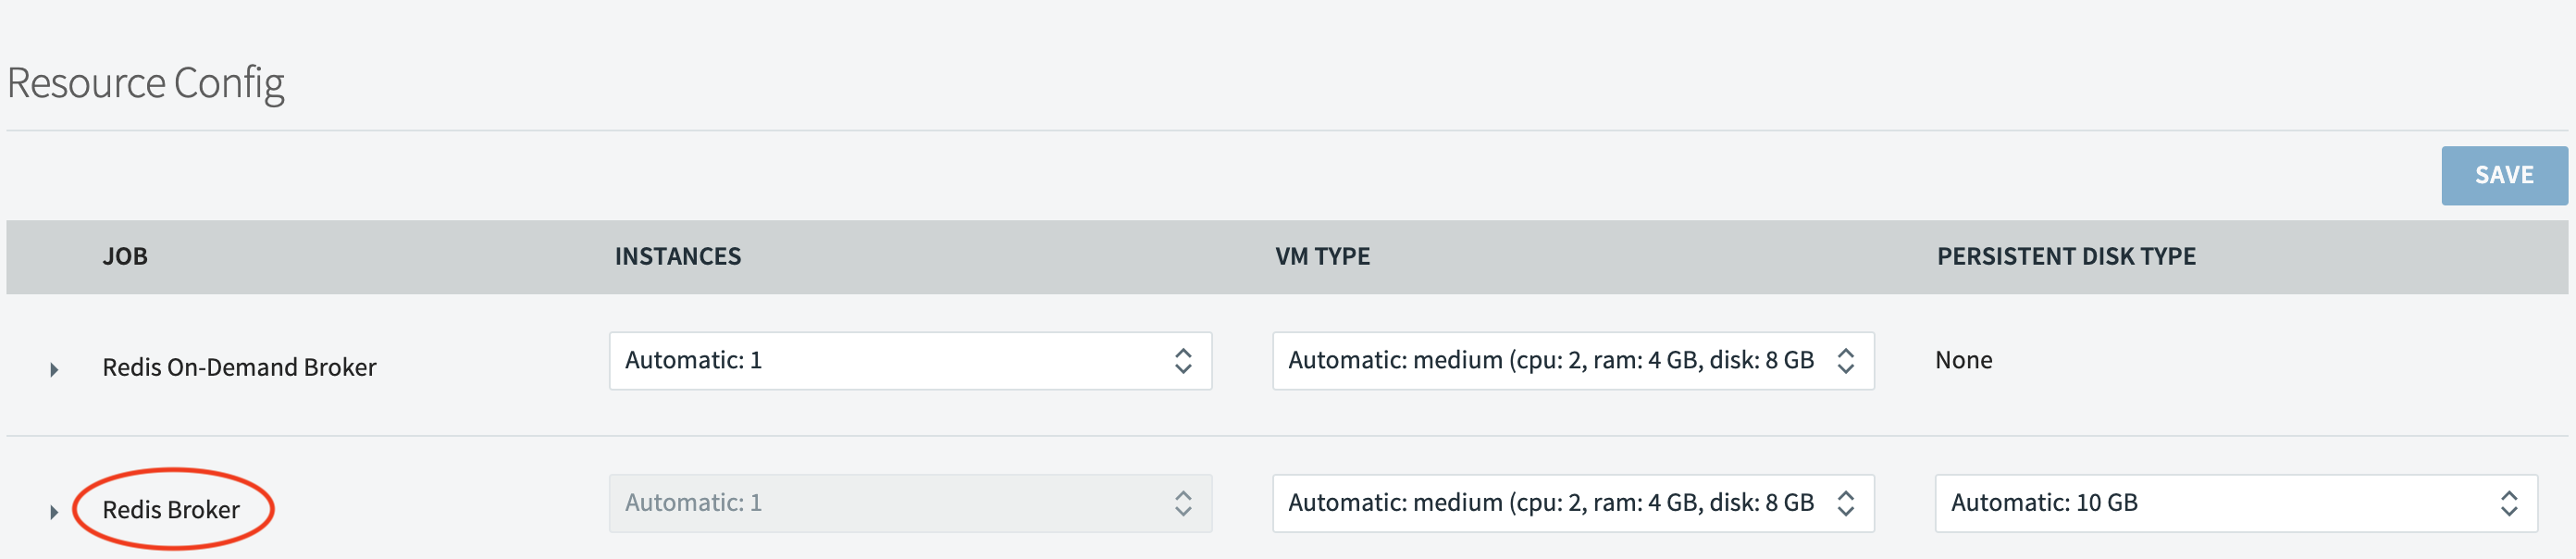
In the Redis for Tanzu Application Service tile, select Resource Config
-
Set the Redis On-Demand Broker job instances to 0.
-
Go to the Errands page on the Redis for Tanzu Application Service tile, and set the following errands to off:
- Register On-Demand Broker
- On-Demand Broker Smoke Tests
- Upgrade All On-Demand Service Instances
- Delete All Service Instances and Deregister On-Demand Broker
-
Create an empty service network. For instructions, see Creating an Empty Services Network when using on-demand Service Tiles for Non-On-Demand Usage Only in the VMware Tanzu Support knowledge base.
-
Go to each On-Demand Plans page on the Redis for Tanzu Application Service tile, and delete each plan by clicking the trash can icon next to the plan name.
Configure shared-VM plan settings
To configure shared-VM service plans:
-
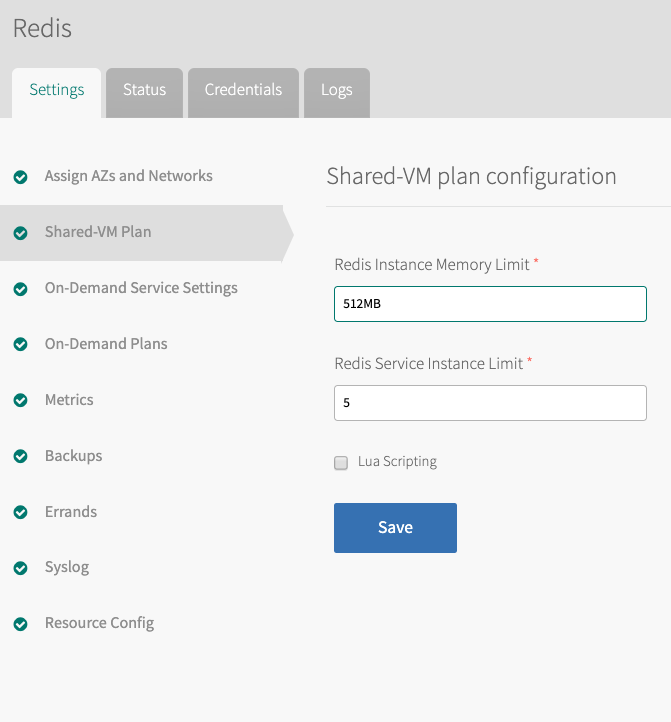
In the Redis for Tanzu Application Service tile, select Shared-VM Plan.
-
Configure these fields:
- Redis Instance Memory Limit—Enter the maximum memory used by a shared-VM instance, for example 512 MB.
- Redis Service Instance Limit—Enter the maximum number of shared-VM instances.
- Lua Scripting—Activate or deactivate Lua Scripting as needed using this checkbox. VMware recommends that Lua Scripting is deactivated unless developers need it to be enabled.
Memory and instance limits depend on the total system memory of your Redis broker VM and require some additional calculation. For more information, see Memory Limits for Shared-VM Plans below.
-
Click Save.
-
If you do not want to use the on-demand service, you must make all of the on-demand service plans inactive. Click the tab for each on-demand plan, and select Plan Inactive. See the example in Step 4 of Remove on-demand service plans above.
-
To change the allocation of resources for the Redis broker, click the Resource Config tab.
The Redis broker server runs all of the Redis instances for your shared-VM plan. From the Resource Config page, you can change the CPU, RAM, Ephemeral Disk, and Persistent Disk made available, as needed.
Configure memory limits for shared-VM plans
Additional calculation is required to configure memory limits for shared-VM plans. With these plans, several service instances share the VM, and the Redis broker also runs on this same VM. Therefore, the memory used by all the shared-vm instances combined should be at most 45% of the memory of the Redis broker VM.
To configure the limits in these fields:
-
Estimate the combined maximum memory that all your Redis shared-VM instances can use.
-
If your estimate is higher than 45% of the Redis broker VM’s total system memory, do any of the following:
- Decrease the Redis Instance Memory Limit in the Shared-VM Plan tab.
- Decrease the number of instances in Redis Service Instance Limit in the Shared-VM Plan tab.
- Increase the RAM for the Redis Broker in the Resource Config tab as shown below.
Here are some examples for setting these limits:
Redis Broker VM total memory Redis instance memory limit Redis service instance limit 16 GB 512 MB 14 16 GB 256 MB 28 64 GB 512 MB 56 You can configure a larger Redis Service Instance Limit if you are confident that the majority of the deployed instances do not use a large amount of their allocated memory, for example, in development or test environments.
However, this practice is not supported and can cause your server to run out of memory, preventing users from writing any more data to any Redis shared-VM instance. Do not use shared-VM instances in production environments.
Configure resources for shared-VM plans
To configure resources for the shared-VM plans, click the Resource Config settings tab on the Redis for Tanzu Application Service tile. The shared-VM plan is on the Redis Broker resource.
The following are the default resource and IP requirements for Redis for Tanzu Application Service when using the shared-VM plans:
| Product | Resource | Instances | CPU | Ram | Ephemeral | Persistent | Static IP | Dynamic IP |
|---|---|---|---|---|---|---|---|---|
| Redis | Redis Broker | 1 | 2 | 3072 | 4096 | 9216 | 1 | 0 |
| Redis | Broker registrar | 1 | 1 | 1024 | 2048 | 0 | 0 | 1 |
| Redis | Broker de-registrar | 1 | 1 | 1024 | 2048 | 0 | 0 | 1 |
| Redis | Compilation | 2 | 2 | 1024 | 4096 | 0 | 0 | 1 |
VMware recommends that the persistent disk is at least 3.5x the VM memory for the shared-VM.
Deactivate shared VM plans
You can deactivate shared-VM plans by doing the following while configuring the Redis tile:
-
Ensure at least one on-demand plan is active.
-
Click the Shared-VM tab.
-
Set Redis Service Instance Limit to 0.
-
Click Save.
-
Click the Errands tab and configure the settings as follows:
- Set Broker Registrar to Off.
- Set Smoke Tests to Off.
- Set Broker Deregistrar to Off.
- Leave all four on-demand errands On.
-
Click Save.
-
Click the Resource Config tab.
-
For VM Type and Persistent Disk Type, leave the configurations as they are or increase the sizes. It is not possible to decrease the sizes.
-
Click Save if you changed the sizes.
Configure syslog forwarding
VMware recommends that operators configure syslog forwarding to a remote destination. Forwarding your system logs to a remote destination lets you:
- View logs from every VM in the Redis for Tanzu Application Service deployment in one place.
- Effectively troubleshooting when logs are lost on the source VM.
- Set up alerts for important error logs to monitor the deployment.
All logs follow RFC5424 format.
To configure syslog forwarding:
-
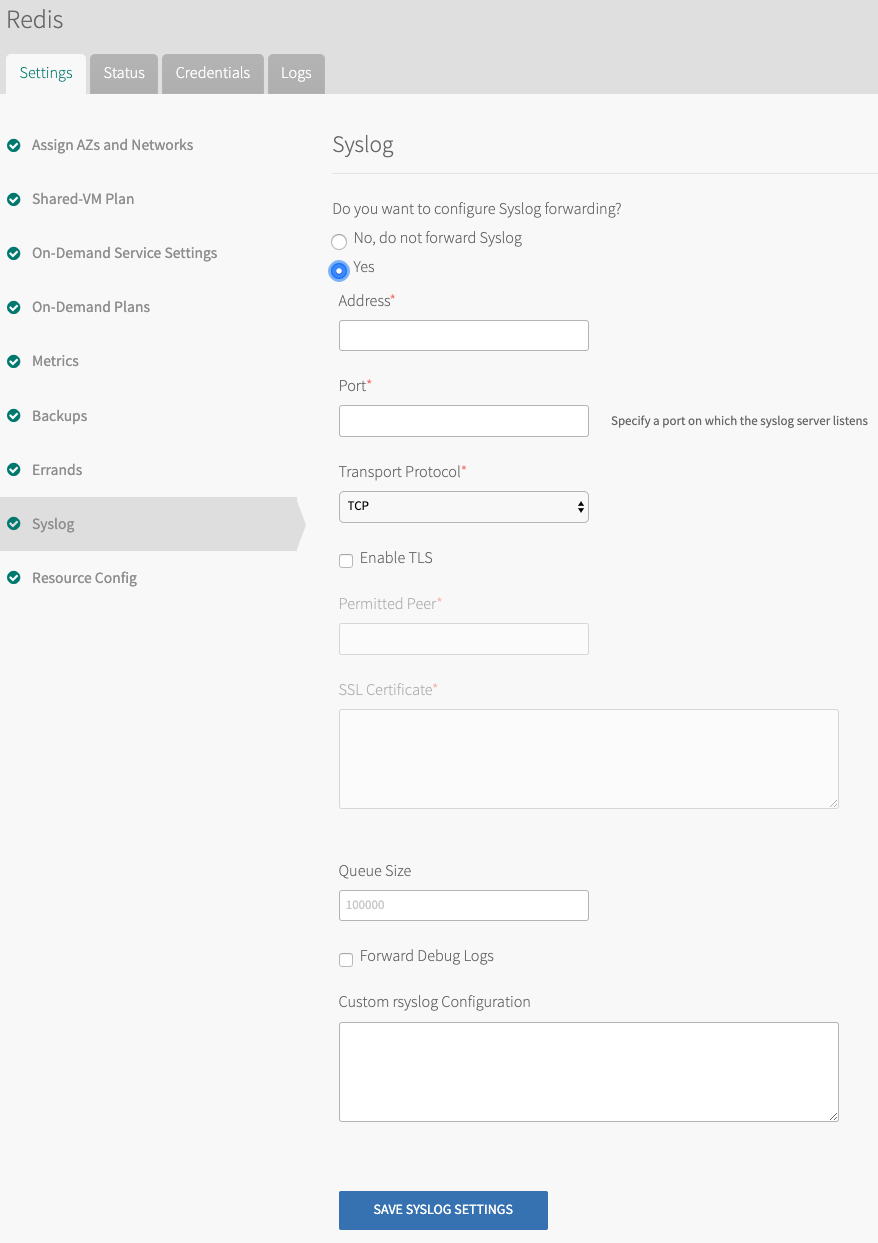
Click Syslog.
-
(Optional) To send Redis for Tanzu Application Service system logs to a remote server, select Yes.
-
In Address, enter the IP address or DNS name for the remote server.
-
In Port, enter the port number that the remote server listens on.
-
In the Transport Protocol drop-down menu, select TCP or UDP to specify the transport protocol to use to send the logs to the remote server.
-
(Optional) Select the Enable TLS check box to send encrypted logs to remote server with TLS. After you select the check box:
- Enter either the name or SHA1 fingerprint of the remote peer in Permitted Peer.
- Enter the SSL certificate for the remote server in SSL Certificate.
Important VMware recommends that you enable TLS encryption when you are forwarding logs. Logs can contain sensitive information, such as cloud provider credentials.
-
(Optional) In Queue Size, enter an integer. This value specifies the number of log entries held in the buffer. The default value is 100,000.
-
(Optional) Select the Forward Debug Logs check box to forward the logs to an external source. This option is deselected by default. If you select it, you might generate a large amount of log data.
-
(Optional) In the Custom rsyslog Configuration text box, enter configuration details for rsyslog. This text box requires the rainerscript syntax.
-
Click Save.
Verify the stemcell
To verify that you have the correct stemcell, follow the procedure in Importing and managing Stemcells.
Apply changes from your configuration
To apply your configuration changes:
-
Return to the Tanzu Operations Manager Installation Dashboard.
-
In the Tanzu Operations Manager Dashboard, do the following to complete the installation:
- If you are using Tanzu Operations Manager v2.3 or later, click Review Pending Changes. For more information about this Tanzu Operations Manager page, see Reviewing pending product changes.
- Click Apply Changes.
- If you are using Tanzu Operations Manager v2.3 or later, click Review Pending Changes. For more information about this Tanzu Operations Manager page, see Reviewing pending product changes.
Create app security groups
To allow this service to have network access, you must create App Security Groups (ASGs). Ensure your security group allows access to the Redis Service Broker VM configured in your deployment. You can obtain the IP addresses for these VMs in Tanzu Operations Manager under the Resource Config section for the Redis for Tanzu Application Service tile.
Without ASGs, this service is unusable.
App container network connections
App containers that use instances of Redis for Tanzu Application Service require the following outbound network connections:
| Destination | Ports | Protocol | Reason |
|---|---|---|---|
ASSIGNED_NETWORK |
32768-61000 | TCP | To enable apps to access shared-VM service instances |
ASSIGNED_NETWORK |
6379 | TCP | To enable apps to access on-demand service instances |
ASSIGNED_NETWORK |
16379 | TCP | To enable apps to have TLS encrypted access to on-demand service instances |
Create an ASG called redis-app-containers with the above configuration and bind it to the appropriate space or, to give all started apps access, bind to the default-running ASG set and restart your apps. Example:
[
  {
    "protocol": "tcp",
    "destination": "ASSIGNED_NETWORK",
    "ports": "6379,16379"
  }
]
Validating the installation
Smoke tests run as part of Redis for Tanzu Application Service installation to verify that the installation succeeded. For more information, see Redis for VMware Tanzu Application Service Smoke Tests.
Uninstall Redis for Tanzu Application Service
To uninstall Redis for Tanzu Application Service:
- In the Tanzu Operations Manager Installation dashboard, click the trash can icon in the lower-right corner of the Redis for Tanzu Application Service tile.
- Confirm the product was deleted.
- If you are using Tanzu Operations Manager v2.3 or later, click Review Pending Changes. For more information about this Tanzu Operations Manager page, see Reviewing pending product changes.
- Click Apply Changes.
