


Blue-Green is a deployment model that uses two Docker hosts that you deploy and configure identically in a Kubernetes cluster. With the Blue and Green deployment model, you reduce the downtime that can occur in your environment when your pipelines in Automation Pipelines deploy your applications.
The Blue and Green instances in your deployment model each serve a different purpose. Only one instance at a time accepts the live traffic that deploys your application, and each instance accepts that traffic at specific times. The Blue instance receives the first version of your application, and the Green instance receives the second.
The load balancer in your Blue-Green environment determines which route the live traffic takes as it deploys your application. By using the Blue-Green model, your environment remains operational, users don't notice any downtime, and your pipeline continuously integrates and deploys your application to your production environment.
The pipeline that you create in Automation Pipelines represents your Blue-Green deployment model in two stages. One stage is for development, and the other stage is for production.
The Automation Pipelines pipeline workspace supports Docker and Kubernetes for continuous integration tasks and custom tasks.
For information about configuring the workspace, see Configuring the Pipeline Workspace.
| Task type | Task |
|---|---|
| Kubernetes | Create a namespace for your Blue-Green deployment. |
| Kubernetes | Create a secret key for Docker Hub. |
| Kubernetes | Create the service used to deploy the application. |
| Kubernetes | Create the Blue deployment. |
| Poll | Verify the Blue deployment. |
| Kubernetes | Remove the namespace. |
| Task type | Task |
|---|---|
| Kubernetes | Green gets the service details from Blue. |
| Kubernetes | Get the details for the Green replica set. |
| Kubernetes | Create the Green deployment, and use the secret key to pull the container image. |
| Kubernetes | Update the service. |
| Poll | Verify that the deployment succeeded on the production URL. |
| Kubernetes | Finish the Blue deployment. |
| Kubernetes | Remove the Blue deployment. |
To deploy your application in your own Blue-Green deployment model, you create a pipeline in Automation Pipelines that includes two stages. The first stage includes the Blue tasks that deploy your application to the Blue instance, and the second stage includes Green tasks that deploy your application to the Green instance.
You can create your pipeline by using the CICD smart pipeline template. The template creates your pipeline stages and tasks for you, and includes the deployment selections.
If you create your pipeline manually, you must plan your pipeline stages. For an example, see Planning a CICD native build in Automation Pipelines before manually adding tasks.
In this example, you use the CICD smart pipeline template to create your Blue-Green pipeline.
Prerequisites
- Verify that you can access a working Kubernetes cluster on AWS.
- Verify that you set up a Blue-Green deployment environment, and configured your Blue and Green instances to be identical.
- Create a Kubernetes endpoint in Automation Pipelines that deploys your application image to the Kubernetes cluster on AWS.
- Familiarize yourself with using the CICD smart pipeline template. See Planning a CICD native build in Automation Pipelines before using the smart pipeline template.
Procedure
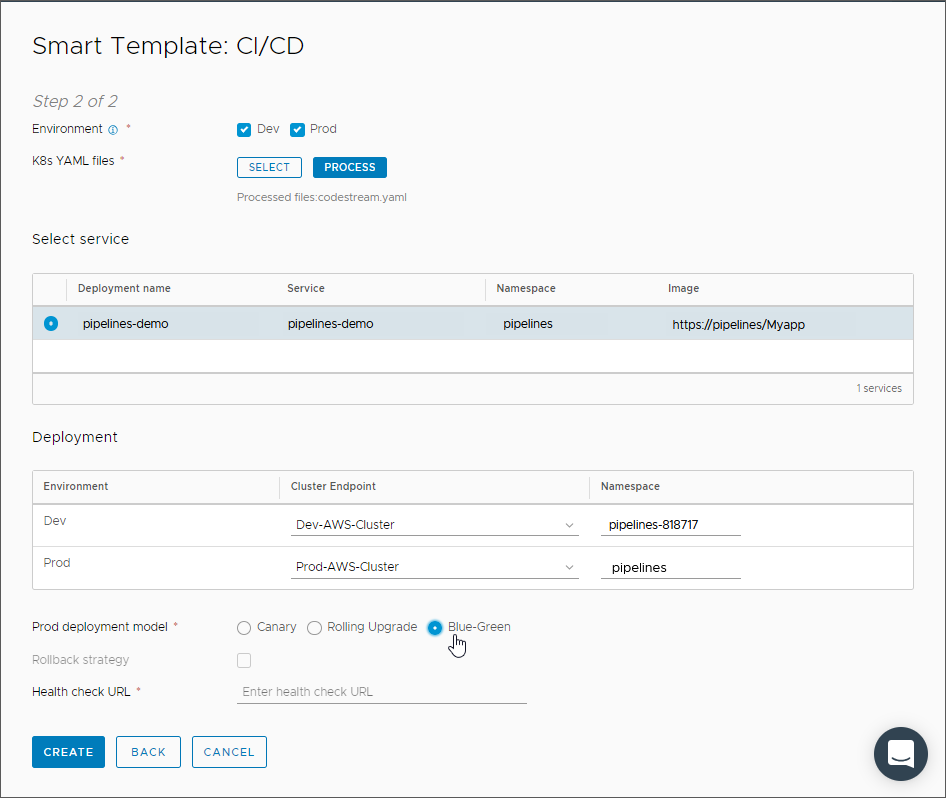
- Complete the CD portion of the smart pipeline template
- Select the environments for your application deployment. For example, Dev and Prod.
- Select the service that the pipeline will use for the deployment.
- In the Deployment area, select the cluster endpoint for the Dev environment and the Prod environment.
- For the Production deployment model, select Blue-Green, and click Create.
Results
Congratulations! You used the smart pipeline template to create a pipeline that deploys your application to your Blue-Green instances in your Kubernetes production cluster on AWS.
Example: Example YAML code for some Blue-Green Deployment Tasks
The YAML code that appears in Kubernetes pipeline tasks for your Blue-Green deployment might resemble the following examples that create the Namespace, Service, and Deployment. If you need to download an image from a privately-owned repository, the YAML file must include a section with the Docker config Secret. See the CD portion of Planning a CICD native build in Automation Pipelines before using the smart pipeline template.
After the smart pipeline template creates your pipeline, you can modify the tasks as needed for your own deployment.
YAML code to create an example namespace:
apiVersion: v1
kind: Namespace
metadata:
  name: pipelines-82855
  namespace: pipelines-82855
YAML code to create an example service:
apiVersion: v1
kind: Service
metadata:
  labels:
    app: pipelines-demo
  name: pipelines-demo
  namespace: bluegreen-799584
spec:
  minReadySeconds: 0
  ports:
  - port: 80
  selector:
    app: pipelines-demo
    tier: frontend
  type: LoadBalancer
YAML code to create an example deployment:
apiVersion: extensions/v1
kind: Deployment
metadata:
  labels:
    app: pipelines-demo
  name: pipelines-demo
  namespace: bluegreen-799584
spec:
  minReadySeconds: 0
  replicas: 1
  selector:
    matchLabels:
      app: pipelines-demo
      tier: frontend
  template:
    metadata:
      labels:
        app: pipelines-demo
        tier: frontend
    spec:
      containers:
      - image: ${input.image}:${input.tag}
        name: pipelines-demo
        ports:
        - containerPort: 80
          name: pipelines-demo
      imagePullSecrets:
      - name: jfrog-2
      minReadySeconds: 0
What to do next
To learn more about how you can use Automation Pipelines, see Tutorials for using Automation Pipelines.
To roll back a deployment, see How do I roll back my deployment in Automation Pipelines.
For more information, see the additional resources under Getting Started with VMware Aria Automation.
