


The following differences exist between the commercial VMware Aria Automation product and the VMware Aria Automation in VMware Aria Suite Cloud for US Public Sector version of that offering.
Where appropriate, links are provided to VMware Aria Automation user guide topics about the related feature or consideration.
The standard (commercial) SaaS version of VMware Aria Automation can only be configured to support the standard (commercial) version of VMware Cloud on AWS. It cannot be configured to support the VMware Aria Suite Cloud for US Public Sector environment, previously VMware Cloud on AWS GovCloud (US).
The VMware Aria Automation in VMware Aria Suite Cloud for US Public Sector can only be configured to support the VMware Cloud on AWS in VMware Aria Suite Cloud for US Public Sector environment.
Note: The on-premises version of VMware Aria Automation can be configured to support either standard (commercial) VMware Cloud on AWS or VMware Cloud on AWS in VMware Aria Suite Cloud for US Public Sector, but not both.
Update the provisioning-service configuration file
VMware Aria Automation in VMware Aria Suite Cloud for US Public Sector requires that you update the default provisioning-service configuration file in theVMware Cloud on AWS in VMware Aria Suite Cloud for US Public Sector environment to set the following properties:
This section is only needed if you are using on-premises VMware Aria Automation. It is not applicable if you are using SaaS (cloud-based) VMware Aria Automation.
- vmc.sddc.csp.hostname
The default value is
console.cloud.vmware.com. Change this value toconsole.cloud-us-gov.vmware.com. - vmc.sddc.api.hostname
The default value is
vmc.vmware.com. Change this value towww.vmc-us-gov.vmware.com. - vmc.sddc.api.schema
The default value is
https. Thehttpsvalue is required.
To update the provisioning-service configuration file, perform the following steps:
- Take a snapshot of the VMware Aria Automation appliance VM.
- SSH into the VMware Aria Automation appliance VM.
- Edit the K8s deployment with the following command:
kubectl -n prelude edit deploy provisioning-service-app
- When the VIM session is open, scroll to the following section:
  - name: JAVA_OPTS
   value: |-
   -Dhttps.proxyHost=$(JAVA_PROXY_HOST)
   -Dhttp.proxyHost=$(JAVA_PROXY_HOST)
- Add the following statements to the option list:
Note: Be very careful with spaces. Do not use Tabs. These options must be aligned with the other options.
-Dvmc.sddc.csp.hostname=<new host name>
-Dvmc.sddc.api.hostname=<new host name>
- Compare your file with the following example to verify the alignment of the options that you just added:
- name: JAVA_OPTS value: |- -Dvmc.sddc.csp.hostname=console.cloud-us-gov.vmware.com -Dvmc.sddc.api.hostname=www.vmc-us-gov.vmware.com -Dhttps.proxyHost=$(JAVA_PROXY_HOST) -Dhttp.proxyHost=$(JAVA_PROXY_HOST) - To save the change, press :wq. Or, to exit without saving, press :q!.
After you save the provisioning-service configuration file changes, K8s redeploys the pod with the new settings.
For the additional and required connection prerequisites, see Prepare your VMware Cloud on AWS SDDC to connect with VMware Cloud on AWS cloud accounts in VMware Aria Automation.
Deploy a new cloud proxy
To connect to a vCenter appliance when creating and using vCenter-based cloud accounts, you must use a cloud proxy.
The process for obtaining and deploying a cloud proxy is documented in Add a cloud proxy to a vCenter in Automation Assembler. Several differences exist between what is documented in that topic and what you must do in your VMware Aria Automation in VMware Aria Suite Cloud for US Public Sector environment.
You must approve all agents (such as cmx-agent, codestream-agent, and so on) that are to be installed on the cloud proxy's target vCenter appliance.
To install a cloud proxy in the VMware Aria Automation in VMware Aria Suite Cloud for US Public Sector environment, you require access to different domains than those documented in Add a cloud proxy to a vCenter in Automation Assembler.
- Replace instances of
ci-data-collector.s3.amazonaws.comwithhttps:/customerconnect.vmware.com/downloads/info/slug/infrastructure_operations_management/vmware_vrealize_cloud_universal/subscription#drivers_tools. - Replace instances of
symphony-docker-external.jfrog.iowithhttps://registry.vrealize-gov.vmware.com. - Replace instances of
data.mgmt.cloud.vmware.comwithdata.vrealize-gov.vmware.com. - Replace instances of
api.mgmt.cloud.vmware.comwithapi.vrealize-gov.vmware.com. - Replace instances of
console.cloud.vmware.comwithconsole.vrealize-gov.vmware.com.
For related information about deploying a new cloud proxy, see the Procedure section of Add a cloud proxy to a vCenter in Automation Assembler.
The following differences and additional information are required when working in the VMware Aria Automation in VMware Aria Suite Cloud for US Public Sector environment.
- Log in to VMware Aria Automation in VMware Aria Suite Cloud for US Public Sector and open the Automation Assembler service as an Automation Assembler administrator.
- Click .
- Click New to open the Install Cloud Proxy page.
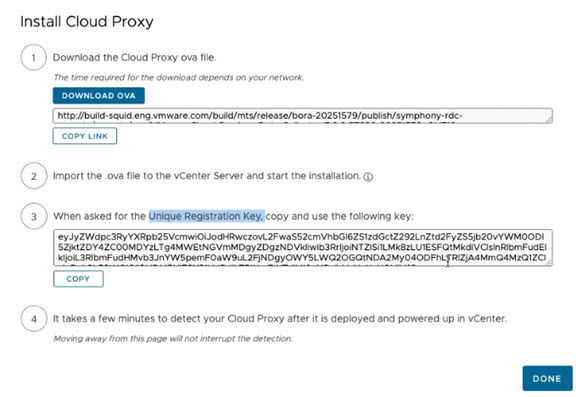
Note: As shown in item 3 on the Install Cloud Proxy, One Time Key (OTK) is renamed to Unique Registration Key for the VMware Aria Automation in VMware Aria Suite Cloud for US Public Sector environment.
Note: When you deploy the OVA, you use the copied links from items 1 and 3 on the Install Cloud Proxy page.
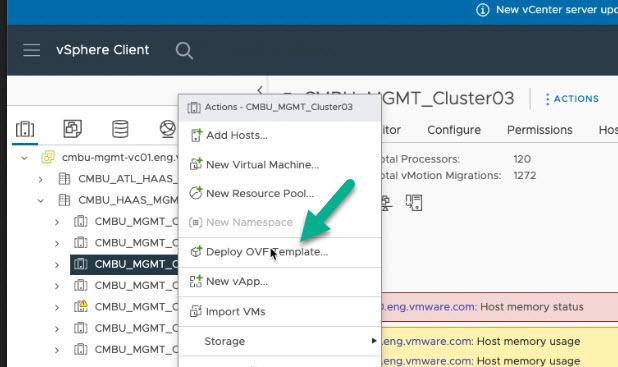
- Log in to the vCenter (vSphere client) on which you want to deploy the cloud proxy and click Deploy OVF Template.
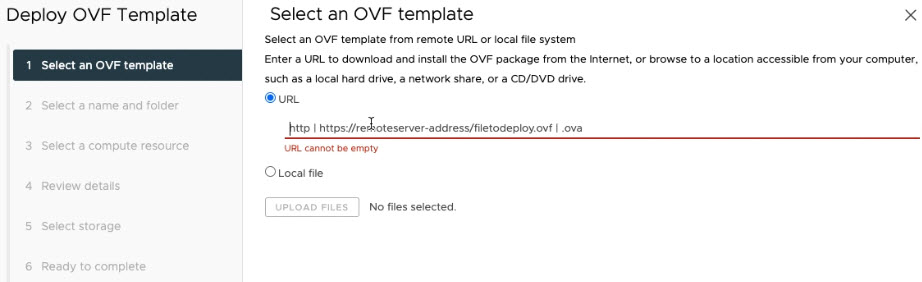
- On the Select an OVF Template page, click URL, copy the OVA URL from item 1 on the Install Cloud Proxy page into the URL field, and click Next. A sample screen is shown below.
- Enter a unique VM name and target location as prompted and click Next.
- Select a compute resource as prompted and click Next.
- Review details as prompted and click Next.
- Accept license agreements as prompted and click Next.
- Select storage and network settings as prompted and click Next.
- On the Customize template page, take the following actions:
- Enter your cloud proxy display name.
This name appears in VMware Aria Automation in VMware Aria Automation when prompting you to select a cloud proxy.
- If prompted, enter your user name and password.
- Copy the Unique Registration Key from item 3 on the Install Cloud Proxy page as prompted and paste that key into the Key field on the Customize template page. A sample screen is shown below.
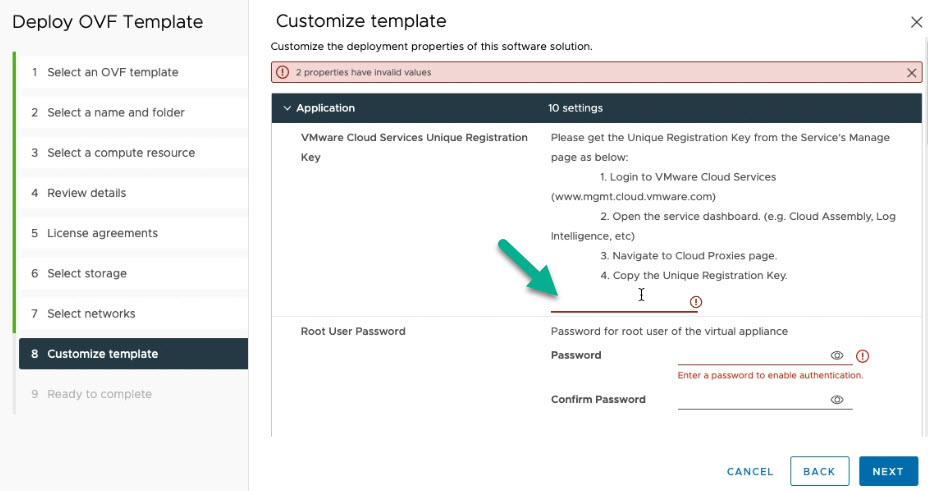
- In the Root User Password section, enter the root user password for the cloud proxy (VA) and confirm the password as prompted. This password is used for SSH access.
- In the FIPS Mode section, select Strong and then click Next.
The Strong setting is required by the VMware Aria Automation in VMware Aria Automation environment.
Note: All other settings on the Customize template page are customer-optional.
- Enter your cloud proxy display name.
- Click Finish as prompted.
For related information about verifying the cloud proxy, see Verify that a cloud proxy is running on a target virtual machine.
Approve the cloud proxy
You must approve the new cloud proxy before you can use it. Until you approve the cloud proxy, no service proxies (agents) are installed on the VA.
To approve, or decline, a cloud proxy when working in the VMware Aria Automation in VMware Aria Automation environment, you must have the Automation Assembler Administrator role and/or Automation Service Broker Administrator role.
Verify that you have the required Automation Assembler Administrator role and/or Automation Service Broker Administrator role and then approve the cloud proxy.
- Log in to VMware Aria Automation in VMware Aria Automation and select VMware Aria Automation Assembler from the services access option in the upper right corner of the screen.
- To verify that you have the Automation Assembler Administrator role, click the services access option in the upper right corner of the screen and select Identity & Access Management from the VMware Cloud Services panel to open the Active Users page.
- On the Active Users page, enter your name in the Search bar to display the roles to which you have been assigned.
- Verify that you are assigned Automation Assembler Administrator and/or Automation Service Broker Administrator role.
For related information, see What are the VMware Aria Automation user roles.
- Reopen the Automation Assembler service.
- To approve or decline a cloud proxy, select and open the cloud proxy from the page and select either Approve or Decline from the Cloud Proxies > Details page.
After you approve a cloud proxy, it appears on the Cloud Proxies page and you can use it to access the associated server. Cloud proxies that are declined also appear on the page. A declined cloud proxy cannot access the server, including any agents on that server.
For related information, see Setting up cloud accounts that require a cloud proxy and Setting up integrations that require a cloud proxy.
Upgrade an existing cloud proxy
You can upgrade an existing cloud proxy agent for vCenter-based cloud accounts and integrations for use with VMware Aria Automation in VMware Aria Automation by using the product user interface or the command line.
This section is only needed if you are using a VMware Aria Automation on-premises instance to create a VMware Cloud on AWS cloud account. It is not needed if you are using a VMware Aria Automation SaaS instance to create a VMware Cloud on AWS cloud account.
Before you begin, verify that you are assigned the Automation Assembler Administrator and/or Automation Service Broker Administrator role. If you are performing this task in VMware Aria Automation, you do not need the Automation Service Broker Administrator role. Information about how to verify your role access is provided above.
Upgrade an existing cloud proxy in the product user interface
You can upgrade an existing cloud proxy agent by using the following user interface sequence.
- Click and select the cloud proxy that you want to upgrade.
- From the Cloud Proxies > Details page, click Manage Service Proxies Upgrade.
- Click Confirm to continue with the upgrade.
Upgrade an existing cloud proxy in the command line
You can upgrade an existing cloud proxy agent by using the following command line sequence.
- Download the update bundle from the Customer Connect Downloads page.
- SSH into the cloud proxy VM.
- Copy the update bundle to the
/tmp/directory on the cloud proxy VM. - Set up an offline repository by running following command.
sh /proxy-upgrade.sh offline-repo /tmp/update-bundle-name.tar.gz
- Verify the offline repository setup by running the following command.
sh /proxy-upgrade.sh update --check
Wait for the--checkcommand to finish. The following or similar output appears if updates are available.Checking for available updates, this process can take a few minutes... . Available Updates - <version> Build <build no>
- Upgrade the cloud proxy by running the following command.
sh /proxy-upgrade.sh
The following or similar output appears if the upgrade is successful.<date and time> *********System updated successfully*********
Specify the NSX IP address when creating a cloud account
When creating the VMware Cloud on AWS cloud account, do not use the default NSX Manager IP address/ FQDN setting. Instead, you must specify the NSX IP address that is identified in the VMware Aria Suite Cloud for US Public Sector SDDC.
- Open the VMware Aria Suite Cloud for US Public Sector SDDC. For related information, about the VMware Cloud on AWS software-defined data center, see Managing the VMware Cloud on AWS Data Center.
- Find the IP address of the NSX that is associated to that VMware Aria Automation in VMware Aria Suite Cloud for US Public Sector SDDC.
- On the VMware Cloud on AWS (VMC) cloud account creation page, replace the default FQDN value with the IP address value obtained in the above step. For related information about creating a VMware Cloud on AWS (VMC) cloud account, see VMware Aria Automation product documentation
Download and deploy a cloud extensibility proxy
Before you can create a VMware Aria Automation Orchestrator integration for VMware Aria Automation in VMware Aria Suite Cloud for US Public Sector, you must deploy a cloud extensibility proxy. The process for obtaining and deploying a cloud extensibility proxy is documented in Download and deploy a cloud extensibility proxy. Differences may exist between what is documented in that topic and what you need to do to for your VMware Aria Automation in VMware Aria Suite Cloud for US Public Sector environment.
Contact VMware to enable support for public cloud accounts and integrations
To support your creation and use of public cloud accounts and integrations such as Amazon Web Services (AWS), Microsoft Azure, GitHub, GitLab, and so on within VMware Aria Automation in VMware Aria Suite Cloud for US Public Sector, contact Customer Connect.
For related information, see Setting up cloud accounts that require a cloud proxy and Setting up integrations that require a cloud proxy.
Unsupported features
- Terraform configurations, for example, as a resource in an Automation Assembler cloud template. Terraform usage is not supported for VMware Aria Automation in VMware Aria Suite Cloud for US Public Sector.
- Integration with VMware Automation Config and VMware Aria Automation for Secure Hosts. These two feature integrations are not supported for VMware Aria Automation in VMware Aria Suite Cloud for US Public Sector.
