In this step, you download and install an on-premises Workspace ONE Access connector. You create a password that is stored in the configuration file you download with the Workspace ONE Access connector installer.

The Workspace ONE Access connector you install in this task is used to continuously sync groups and users from your enterprise Active Directory with the Workspace ONE Access tenant. The Workspace ONE Access tenant instance is created and configured as part of the self-service federation workflow. It acts as an identity broker (service provider) to your identity provider and is not involved in the actual user authentication.
Note: By default, the Workspace ONE Access connector syncs newly added groups and users from your enterprise Active Directory once per week. Post-federation, sync frequency can be modified or sync can be run manually.

In this task, you configure a password that is used to encrypt the contents of the configuration file you download with the Workspace ONE Access connector installer. When you run the installer, you will be prompted for the location of the downloaded configuration file and the password to decrypt the file contents and get the connection details of the Workspace ONE Access tenant. The connector uses these details to establish a secure communication with the Workspace ONE Access instance.

To complete this step, you must step out of the self-service federation workflow and complete the installation and configuration of the Workspace ONE Access connector on an on-premises Windows machine.
Note: If your enterprise uses a third-party IdP for user authentication, the federation setup requires you to create a default installation of the Workspace ONE Access connector with User Auth Service and Directory Sync Service. For this type of setup, you do not need to install the Kerberos Auth Service. If your enterprise does not use a SAML 2.0 based IdP for user authentication, you can use the authentication methods supported by the Workspace ONE Access connector. You can install the Kerberos Auth Service and use it for cloud-based user authentication. For detailed installation information, see Installing VMware Workspace ONE Access Connector.
  • Internally, the connector establishes an intranet connection with your enterprise Active Directory.
    Note: If you are using security policies to control access to the machine hosting your enterprise Active Directory, make sure you include the machine on which you install Workspace ONE Access connector in the allowed list of your AD host.
  • Externally, the connector establishes a secure outbound connection to a hosted instance of a VMware Workspace ONE Access tenant created for your enterprise as part of the self-service federation process.
  • The hosted instance of the Workspace ONE Access tenant acts as an identity broker (service provider) to your third-party SAML 2.0 IdP. It is not involved in the actual user authentication.
  • If the Workspace ONE Access based authentication method is used, then the Workspace ONE Access tenant authenticates users directly against your enterprise Active Directory through the on-premises connector.
Important: Workspace ONE Access tenant or Workspace ONE Access connector does not persist any user credentials.

Prerequisites

  • To proceed with this step, you must have completed Step 1 of the self-service federation wizard.
  • Verify that you have access to a machine with installed MS Windows Server 2008 or later.
  • Verify that you can access your enterprise Active Directory from the host Windows machine.
  • The host Windows machine must have a static IP address and a DNS resolvable FQDN.
  • The connector must have network access to Active Directory on ports 389/636.
  • Verify that your corporate firewall is configured to make an outbound connection from the Workspace ONE Access connector to port 443 for interaction with the hosted Workspace ONE Access tenant service.
  • If you already have the Workspace ONE Access connector installation file, verify that you have the latest version.

Procedure

  1. In the Install Workspace ONE Access connector section, click Start.
    The Set connector password section expands.
  2. Select one of the options to generate a password and save it.
    Important: The password you generate in this step is stored in the configuration file you download with the Workspace ONE Access connector installer. You must provide this password during the installation of the connector to validate that the user who created the configuration file is the same as the user installing the connector. Make sure the password you create is safely stored and accessible.
  3. Click Next.
    The Download installer and configuration section expands.
  4. Download the Workspace ONE Access connector installer.
    Note: You need a My VMware account to download the Workspace ONE Access connector installation file.
    If you must run the installer on a different machine than the one from which you access the self-service federation workflow, copy the link to the Workspace ONE Access connector installer. You can then open the link in a browser window on your target Windows machine.
  5. Check the version of the Workspace ONE Access connector installer you downloaded. If you downloaded version 21.08.0.0 or later, refer to Step 12 for additional instructions.
  6. Download the encrypted configuration file.
    Caution: The configuration file contains sensitive information, such as the tenant URL, tenant ID, the client ID, and client secret for each of the enterprise services, and the password hash. It is critical that you do not share the file or expose it publicly.
  7. On your Windows server, open the installer file location.
  8. Run the Workspace ONE Access connector installer as an administrator.
  9. On the Welcome page, click Next.
  10. Read and accept the license agreement, and click Next.
  11. Select Directory Sync Service and User Auth Service for the installation.
  12. If the connector version is 21.08.0.0 or later, deselect the Virtual App service as shown in the screenshot below.
    The Virtual App Service deselected in the Workspace ONE Access Connector installation wizard.
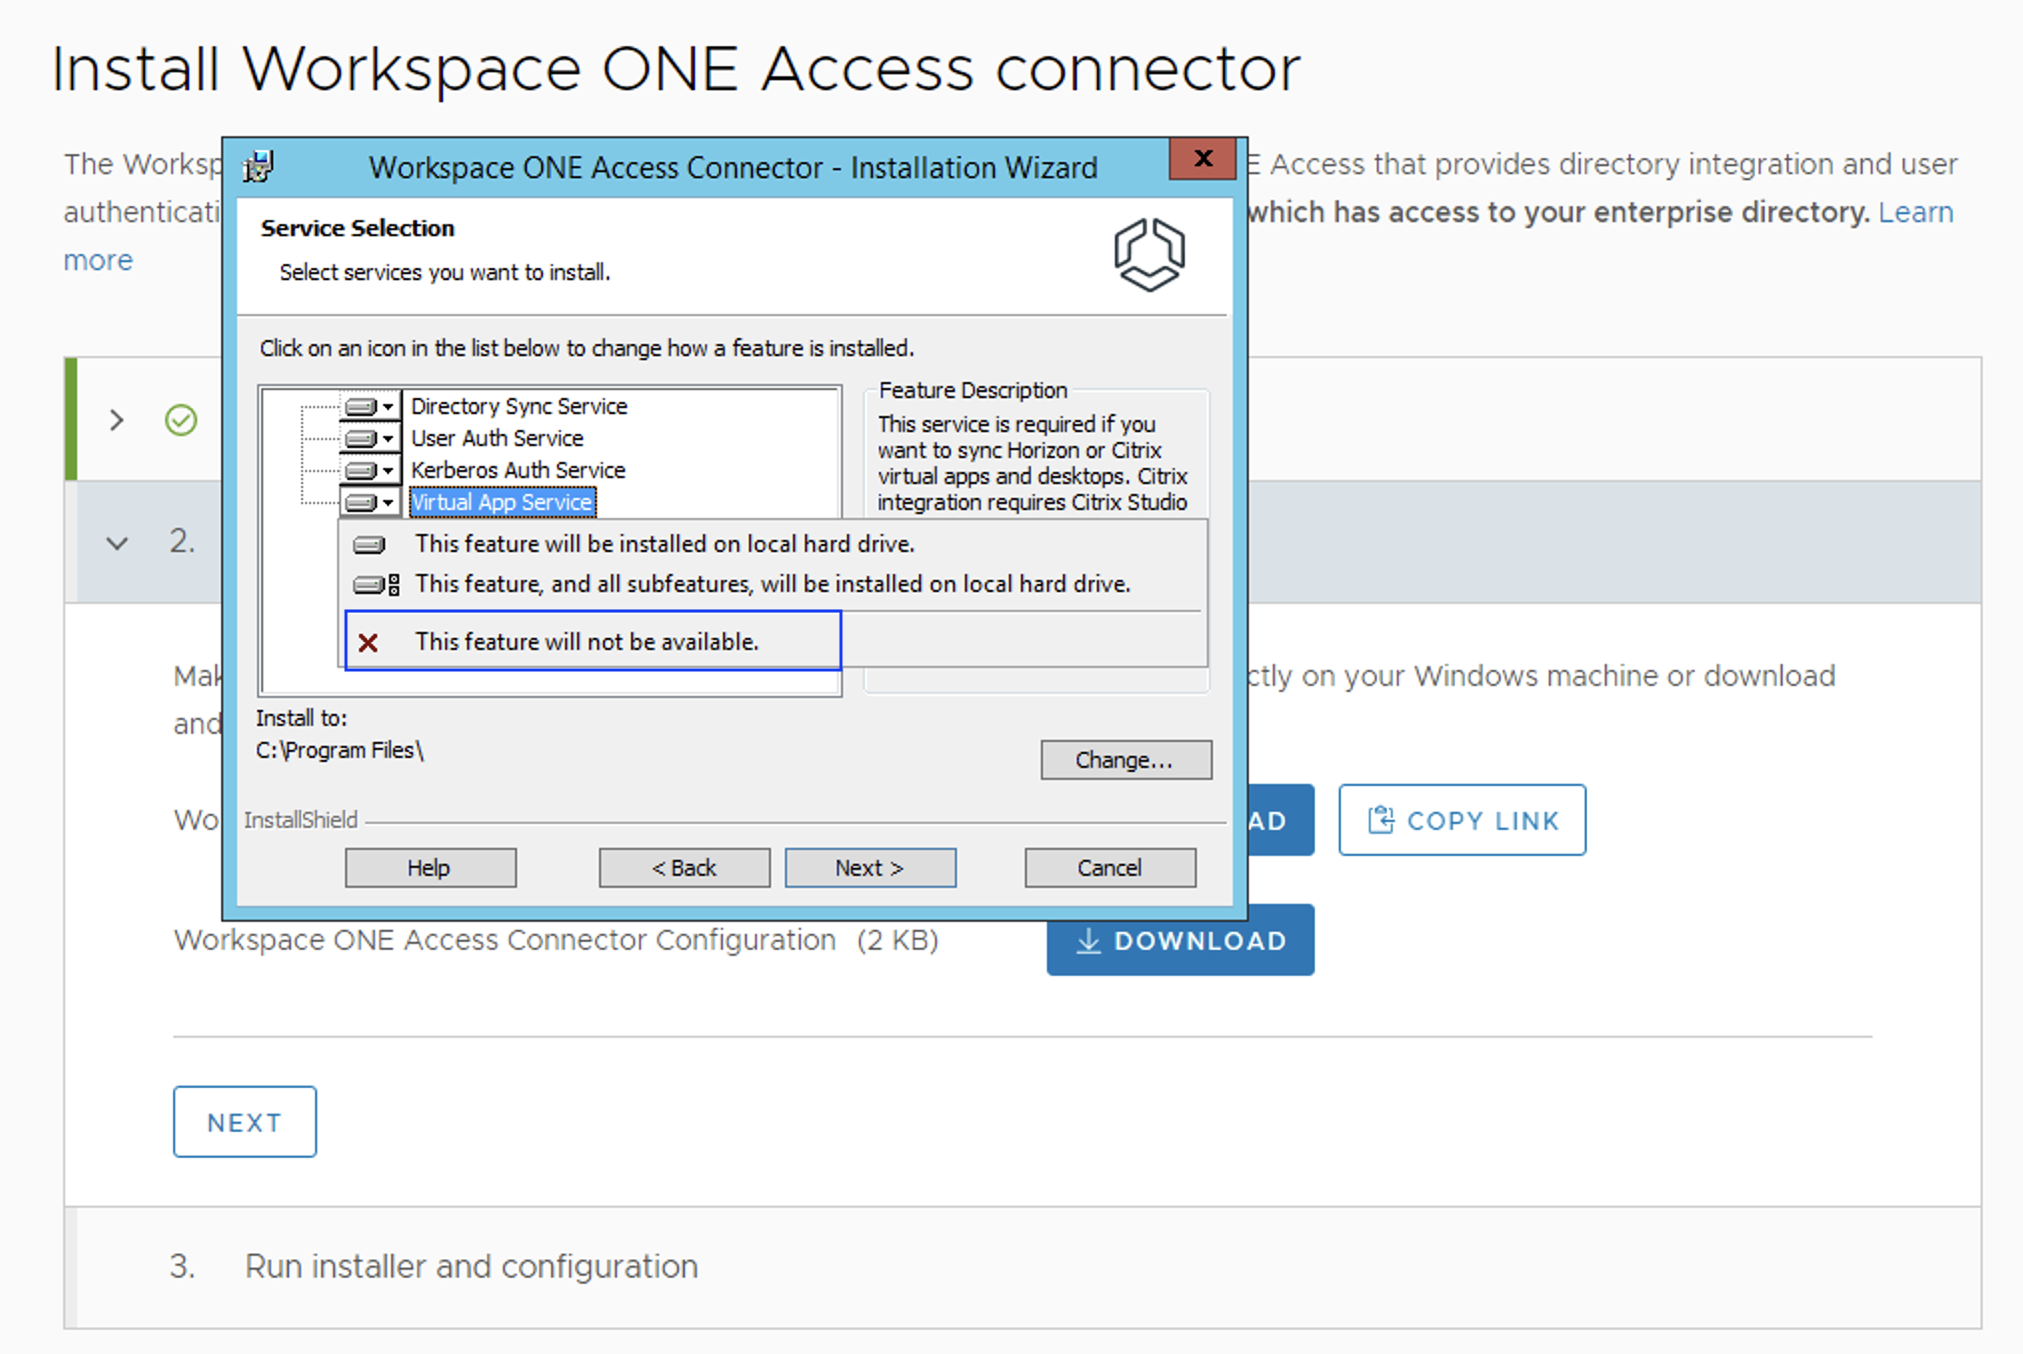
    Note: Ignore this step for all other Workspace ONE Access connector versions.
  13. Click Next.
    By default, the services are installed in C:\Program Files. To change the installation folder, click Change and select a new folder.
  14. On the Specify Configuration File page:
    1. Select the configuration file that you downloaded from the Install Workspace ONE Access connector > Download installer and configuration files step of the self-service federation workflow.
    1. Enter the password you set for the configuration file.
    2. Click Next.
  15. For the purposes of this example, select the Default installation menu item and click Next again.
    Note: If your Windows server host setup uses a normal or an authenticated proxy, you must select the Custom installation menu item. If you decide to switch from a non-proxy default connector installation to a proxy custom installation setup, you can run the installation file again and make the necessary changes.
  16. In the Ready to Install the Program page, review your selections, then click Install.
    The installation takes a few minutes.
  17. After the installation finishes successfully, verify that the services you installed are running on the Windows server.
    The following services must be running on the Windows server.
    • VMware Directory Sync Service
    • VMware User Auth Service
    After the installation, the enterprise services that you installed are registered with the Workspace ONE Access tenant.
  18. Open the Cloud Services Console and log in to the ACME Management Organization.
  19. Navigate to Install Workspace ONE Access connector > Run installer and configuration and click Check Connection.
    The status of the connection changes to Connector Installed Successfully.
    Important: If connection status does not change to Connector Installed Successfully, refer to Troubleshooting Federation and troubleshoot the problem. If the problem persists, you can file a support ticket with VMware Cloud Services Support.
  20. Click Continue.

Results

The home page of the self-service federation workflow displays.

What to do next

The next step of the self-service federation setup is to sync groups and users between your enterprise Active Directory and the Workspace ONE Access tenant.