


You can install, configure, and deploy the VMware SQL with MySQL for Tanzu Application Service tile. The VMware Tanzu for MySQL service enables you to create and use MySQL service instances on demand.
Role-based access in Tanzu Operations Manager
Tanzu Operations Manager admins can use Role-Based Access Control (RBAC) to manage which operators can make deployment changes, view credentials, and manage user roles in Tanzu Operations Manager.
Your role permissions might not permit you to do every procedure in this topic.
For more information about roles in Tanzu Operations Manager, see Roles in Tanzu Operations Manager.
Prerequisites
Before you install the VMware Tanzu for MySQL tile, you must:
- Create an App Security Group for VMware Tanzu for MySQL.
- Enable the BOSH Resurrector.
- Prepare for TLS. Required to enable TLS and required for Multi‑Site Replication and HA cluster plans.
- Prepare for Multi‑Site Replication: Only required if you want to replicate data across multiple foundations or data centers.
Creating an App Security Group for VMware Tanzu for MySQL
To enable apps running on VMware Tanzu Application Service for VMs to communicate with the MySQL service network, you must create an App Security Group (ASG). The ASG enables smoke tests to run when you first install the VMware Tanzu for MySQL service and apps to access the service after it is installed.
To create an ASG for VMware Tanzu for MySQL:
-
Go to Tanzu Operations Manager Installation Dashboard > BOSH Director.
-
Click Create Networks.
-
Click your services network and record the CIDR.

-
Create a JSON file named
mysql-asg.jsonusing the following template:[ { "protocol": "tcp", "destination": "CIDR", "ports": "3306" } ]Where
CIDRis the CIDR that you recorded in the previous step. -
Create an ASG by running:
cf create-security-group p.mysql ./mysql-asg.json -
Bind the ASG to all running apps by running:
cf bind-running-security-group p.mysql
For more information about ASGs, see App Security Groups.
Enabling the BOSH Resurrector
VMware recommends activating the BOSH Resurrector when installing VMware Tanzu for MySQL. The BOSH Resurrector increases the availability of VMware Tanzu for MySQL by restarting and resuming MySQL service.
The BOSH Resurrector does the following:
- Reacts to hardware failures and network disruptions by restarting VMs on active, stable hosts.
- Detects operating system failures by continuously monitoring VMs and restarts them as required.
- Continuously monitors the BOSH Agent running on each service instance VM and restarts the VM as required.
For more information about the BOSH Resurrector, see BOSH Resurrector.
To enable the BOSH Resurrector:
-
Go to Tanzu Operations Manager Installation Dashboard > BOSH Director.
-
Click Director Config.
-
Select the Enable VM Resurrector Plugin check box.
-
Click Save.
Download and import the tile
To download and import the VMware Tanzu for MySQL tile:
-
Download the product file from Broadcom Support.
-
Go to the Tanzu Operations Manager Installation Dashboard and click Import a Product to upload the product file.
-
Under Import a Product, click + next to the version number of VMware Tanzu for MySQL. This adds the tile to your staging area.
-
Click the newly-added VMware Tanzu for MySQL tile to open its configuration panes.
Configuring the tile
To configure the VMware Tanzu for MySQL tile, do the following procedures.
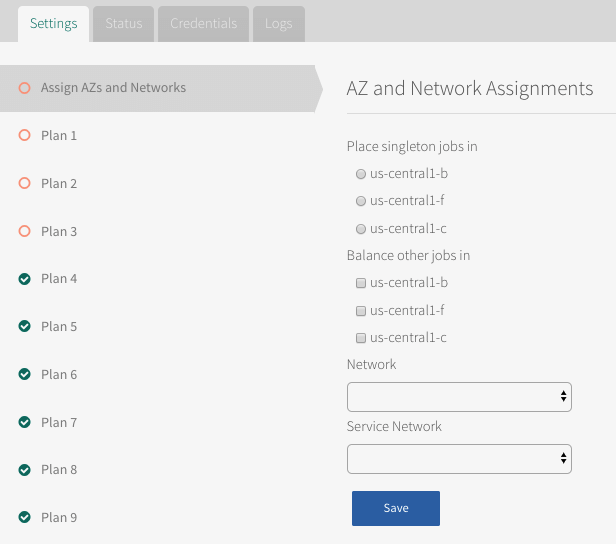
Configure AZs and Networks
To configure an availability zone (AZ) to run the service broker and networks for the broker and MySQL service instances:
-
Click Assign AZs and Networks.
-
Configure the fields as follows:
Field Instructions Place singleton jobs in Select the AZ that you want the MySQL broker VM to run in. The broker runs as a singleton job. Balance other jobs in Ignore; not used. Network Select a subnet for the MySQL broker. This is typically the same subnet that includes the VMware Tanzu Application Service for VMs (TAS for VMs) component VMs.
This network is represented by the Default Network in diagram in Default Network and Service Network.Service Network Select the subnet for the on-demand service instances. This network is represented by the Service Network in diagram in Default Network and Service Network.
If you are adding IPsec to encrypt MySQL communication, VMware recommends that you deploy MySQL to its own network to avoid conflicts with services that are not IPsec compatible.Warning: You cannot change the regions or networks after you Apply Changes.
-
Click Save.
Configuring service plans
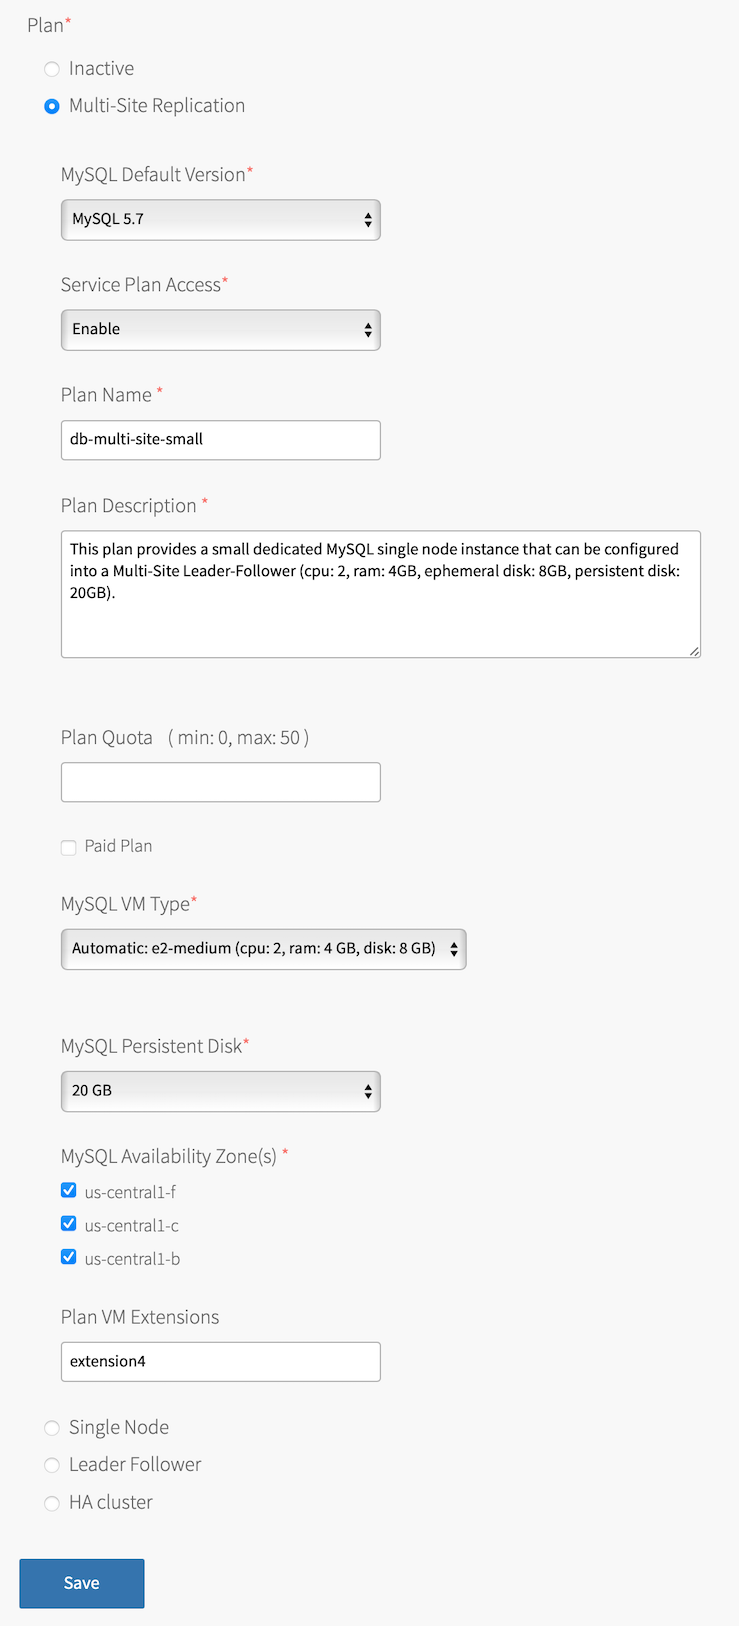
VMware Tanzu for MySQL enables you to configure as many as 18 service plans. Each service plan has a corresponding section in the tile configuration, such as Plan 1, Plan 2, and so on.
By default, plans 1 through 3 are active and plans 4 through 9 are inactive. The following procedures describe how to change these defaults.
You must not set Plan 1 to Inactive. If you deactivate Plan 1, your installation fails when you apply changes.
About creating plans for restoring multi-node service instances
If you offer leader-follower or highly available (HA) cluster plans, then you must configure single-node or Multi‑Site Replication plans that can be used to restore a multi-node plan from backup.
| If you offer service plans of type… | Then configure a service plan of type… |
|---|---|
| leader-follower | single node, with the persistent disk as large as the largest leader-follower plan offered. |
| HA cluster | Multi‑Site Replication, with the persistent disk as large as the largest HA cluster plan offered. |
For information about how multi-node service instances are restored, see Restore a Service Instance in Backing Up and Restoring VMware SQL with MySQL for Tanzu Application Service.
Procedure for configuring service plans
For each plan that you want to use in your deployment:
-
Click the section for the plan. For example, Plan 1.
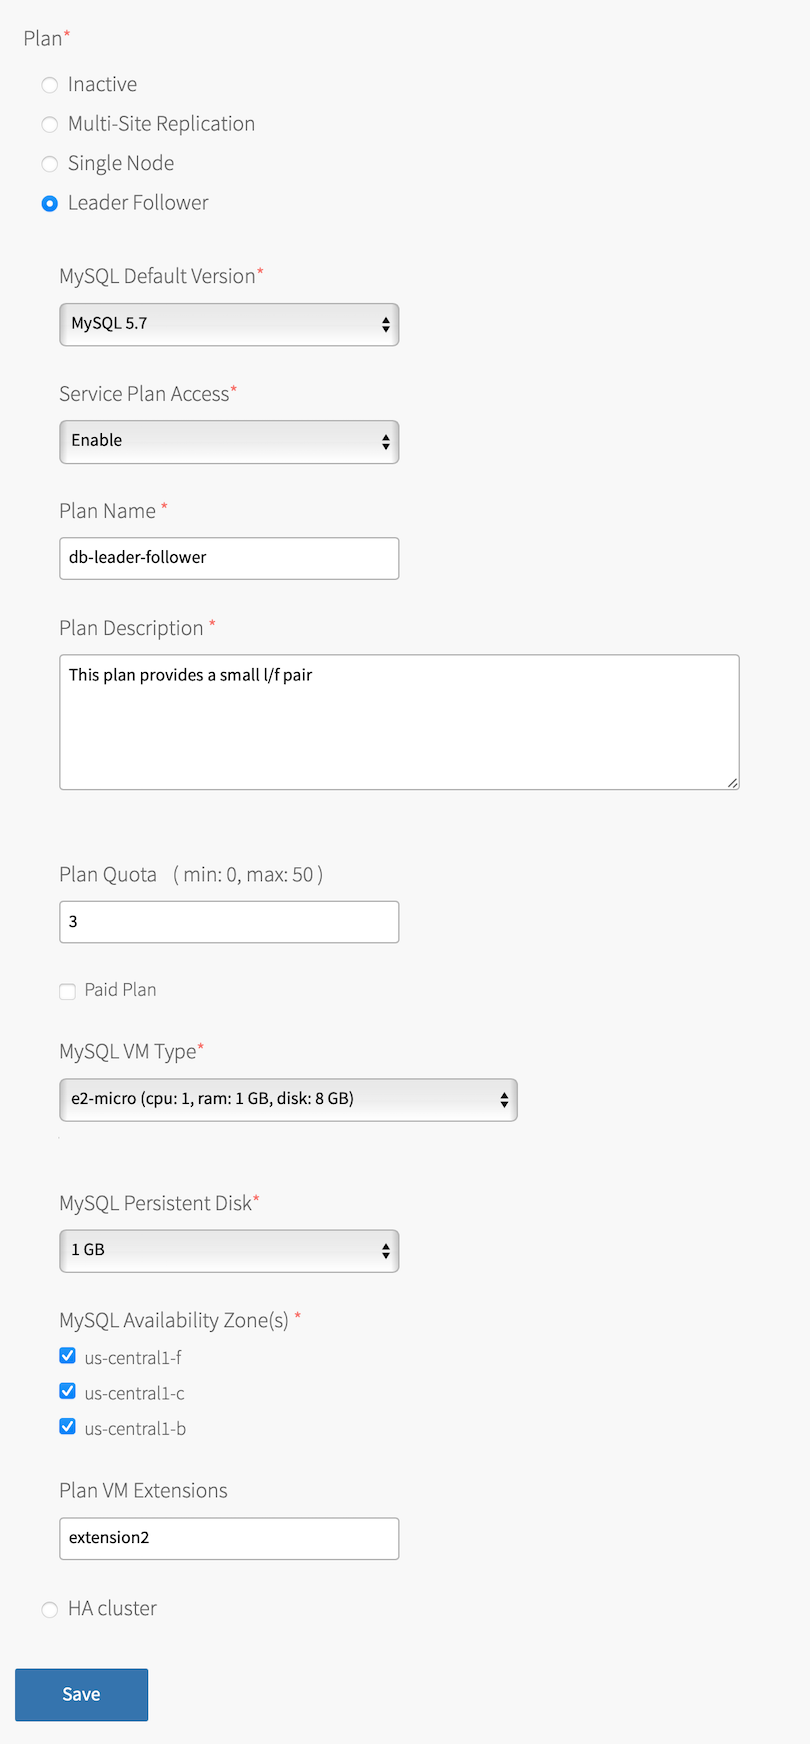
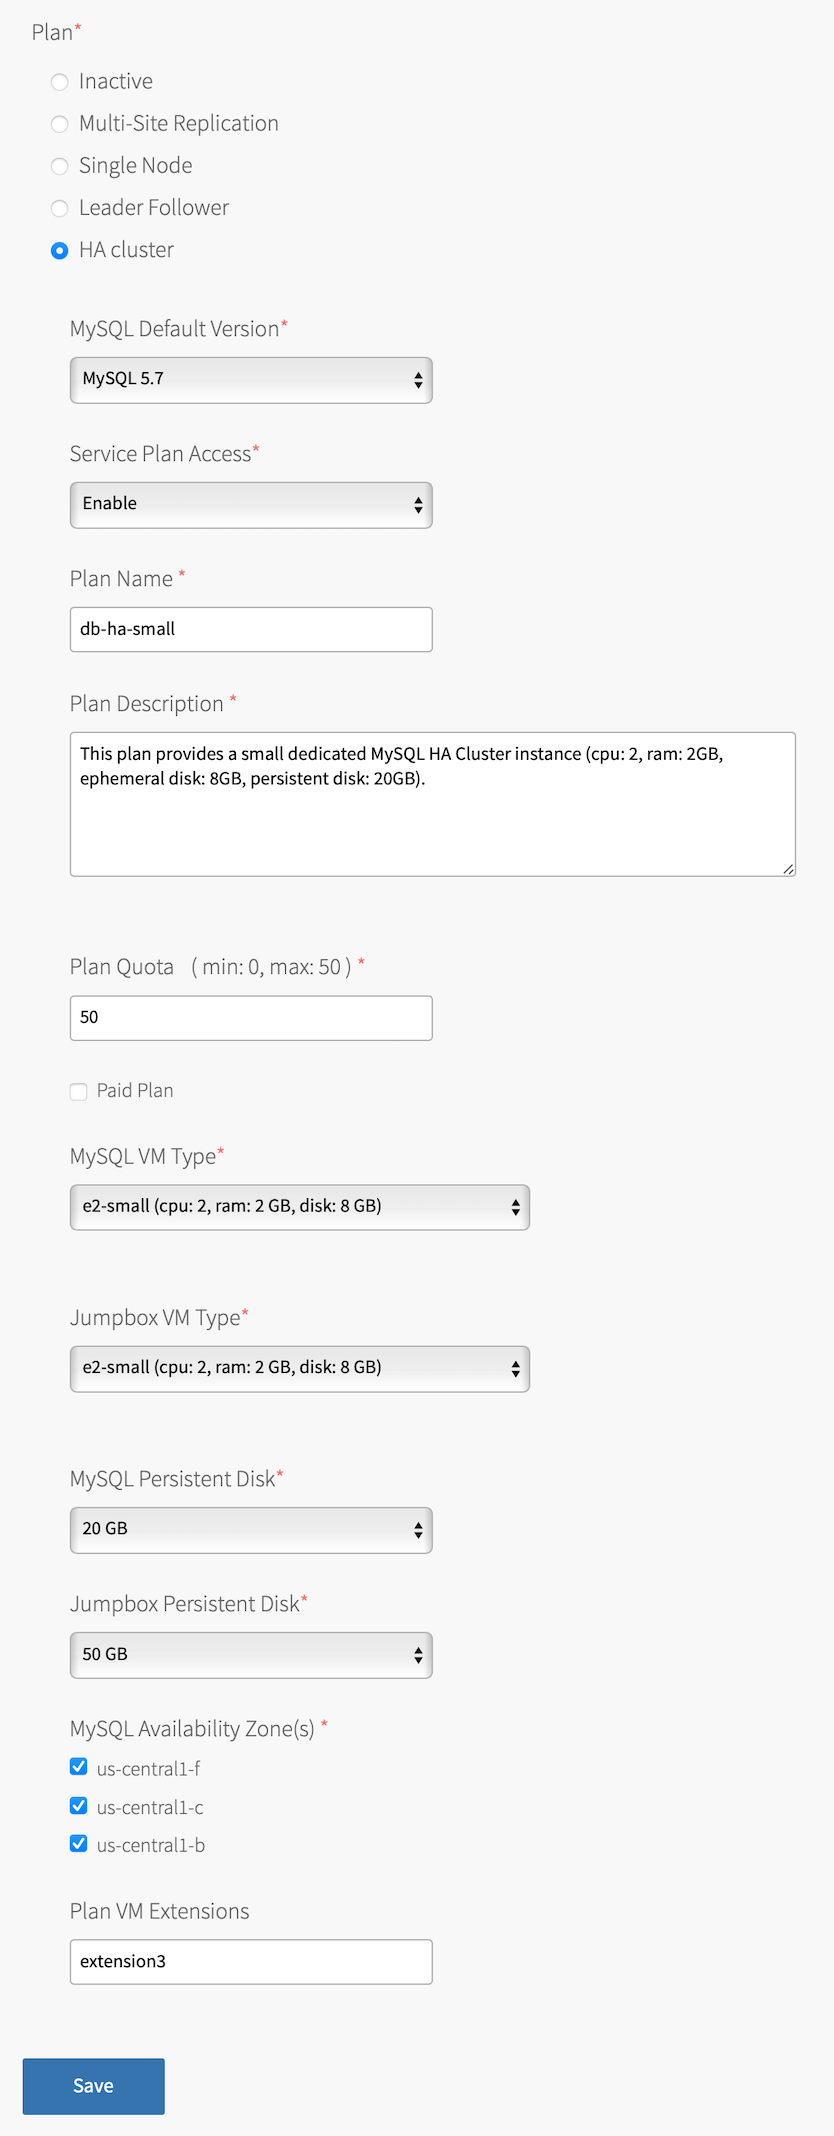
-
Select the plan for your desired topology.
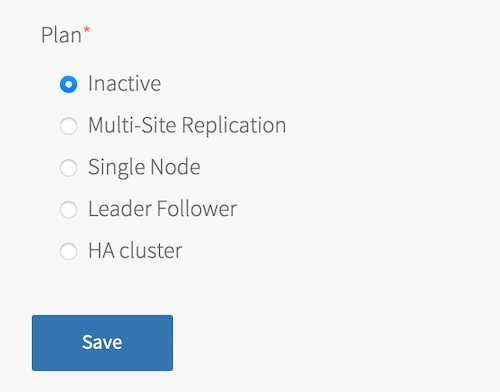
The following tabs expand to show an example image of each plan:

-
Configure the fields as follows:
If you want to replicate data across multiple foundations or data centers, you must configure a Multi‑Site Replication plan in both foundations using the same configurations.
Field Description MySQL Default Version Select one of the following options:
- MySQL 8.0: (Default selection) Sets MySQL 8.0 as the default version for the service plan.
- MySQL 5.7: Sets MySQL 5.7 as the default version for the service plan.
Service Plan Access Select one of the following options:
- Enable (Default): Gives access to all orgs and displays the service plan to all developers in the Marketplace.
- Disable: Deactivates access to all orgs and hides the service plan to all developers in the Marketplace. This deactivates creating new service instances of this plan.
- Manual: Lets you manually control service access with the cf CLI. For more information, see Controlling Access to Service Plans by Org.
Plan Name Accept the default or enter a name. This is the name that appears in the Marketplace for developers. Plan Description Accept the default or enter a description to help developers understand plan features. VMware recommends adding VM type details and disk size to this field. Plan Quota Enter the maximum number of service instances that can exist at one time. If the plan quota field is blank, the plan quota is set to the global quota by default.
For information about the global quota, see Setting Limits for On-Demand Service Instances.Paid Plan Select this box to indicate that this service plan is paid. MySQL VM Type Select a VM type for the MySQL nodes. Jumpbox VM Type Only for highly available cluster plans. Select a VM type for the MySQL jumpbox node. This VM is also called mysql-monitor.MySQL Persistent Disk Select a disk size. This disk stores the MySQL data.
For sizing recommendations, see Persistent Disk Usage.Jumpbox Persistent Disk Only for highly available cluster plans. Select a disk size. This disk stores backups.
For sizing recommendations, see Persistent Disk Usage.MySQL Availability Zone(s) BOSH deploys your service instances to the selected AZs. If more than one AZ is selected, BOSH randomizes which AZ to place each VM.
Plan VM Extensions Specify a comma-separated list of supported VM Extensions you want to apply to service instances created under this plan.
You can manage VM Extensions in Ops Manager or through the OM CLI. For more information, see Create or Update a VM Extension or om create-vm-extension in GitHub.
If you specify an extension that is not supported by Ops Manager (not present in the BOSH cloud config), then instance creation attempts fail.
-
Click Save.
Important If you expect your developers to upgrade from one plan to another, do not place the plans in separate AZs. For example, if you create Plan 1 in AZ1 and Plan 2 in AZ2, developers receive an error and cannot continue if they try to upgrade from Plan 1 to Plan 2. This prevents them from losing their data by orphaning their disk in AZ1.
If you need to manually migrate the data from one AZ to another, see About Data Migration in VMware Tanzu for MySQL.
MySQL 8.0 is the MySQL Default Version assigned to any Inactive plans that you configure. This includes plans that you previously configured and saved with MySQL Default Version set to MySQL 5.7, and then later made Inactive. If you re-activate such a plan (by selecting its topology), its MySQL Default Version is reset to MySQL 8.0.
If you reactivate an Inactive plan, pay especially close attention to the MySQL Default Version for that plan.
Deactivate Service Plan (Optional)
To deactivate a service plan:
- If the service plan has existing service instances:
- Click the section for the plan. For example, Plan 2.
- Under Service Plan Access, select Disable.
- Click Save.
- Return to the Tanzu Operations Manager Installation Dashboard and click Apply Changes to redeploy.
- When the deployment has redeployed, use the cf CLI or Apps Manager to delete all existing service instances on the service plan.
- Return to the VMware Tanzu for MySQL tile configuration.
- Click the section for the plan. For example, Plan 2.
- Click Inactive.
- Click Save.
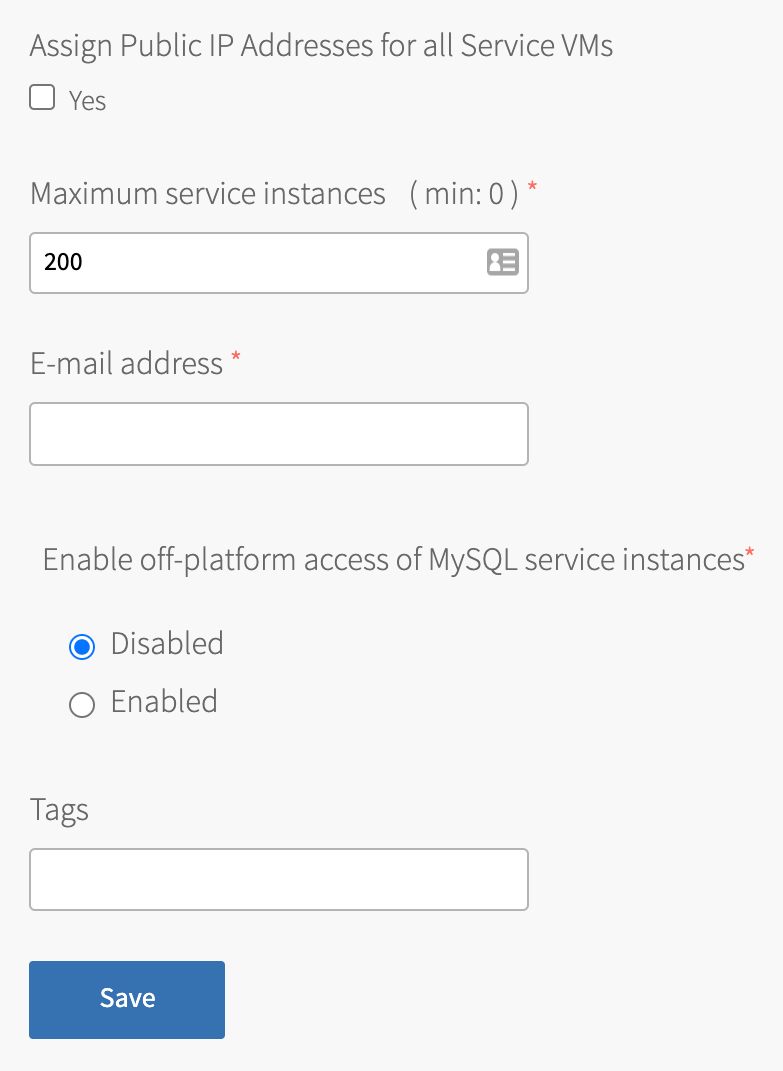
Configure Global Settings
To configure global settings for all service instances:
-
Click Settings.
-
Configure the fields as follows:
Field Instructions Provide public IP addresses to all Service VMs Select this check box if either of the following apply: - Your service instances need an external backup, blobstore, or syslog storage
- You have configured BOSH to use an external blobstore
Maximum service instances Enter the global quota for all on-demand instances summed across every on-demand plan. For information about determining global quotas, see Service Plan Recommended Usage and Limitations. Email address Enter an email address to send MySQL monitoring notifications to. Enable off-platform access of MySQL service instances For information about configuring off-platform access, see Enabling Service-Gateway Access. Tags Enter a comma separated list of key-value pairs for tagging service instance VMs and disks. The accepted format depends on the underlying Cloud Provider. For example, Google Cloud Platform does not allow uppercase characters. -
Click Save.
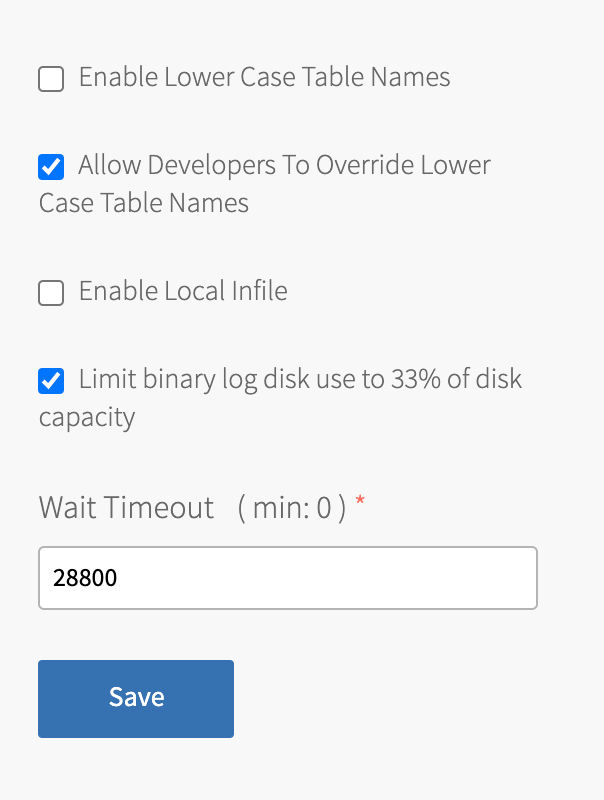
Configuring MySQL
To set MySQL defaults and enable developers to customize their instances:
-
Click Mysql Configuration.
-
Configure the fields as follows:
Field Instructions Enable Lower Case Table Names Select this check box to store all table names in lowercase. This sets the MySQL server system variable lower_case_table_namesto1on all VMware Tanzu for MySQL instances by default.
To permit developers to override this default, see the following check box.
For more information aboutlower_case_table_names, see the MySQL documentation.Warning: Before you activate this feature, ensure all tables have lowercase names. Tables with uppercase names are inaccessible after enabling lowercase table names.
Allow Developers To Override Lower Case Table Names Select this check box to permit developers to override the configured default Enable Lower Case Table Names value. For more information, see Optional Parameters for the VMware Tanzu for MySQL Service Instances. Enable Local Infile Select this check box to activate data downloading from the local file system of the client. VMware discourages selecting this check box. Before you activate local in-file, review the security issues associated with LOAD DATA LOCAL. See the MySQL documentation.Limit binary log disk use to 33% of disk capacity Select this check box if you have leader-follower or Multi‑Site Replication instances with high-transaction rates. Limiting the size of the transaction logs reduces the risk of the persistent disk reaching capacity and causing service interruption. Wait Timeout Enter the amount of time in seconds that MySQL waits to close inactive connections. For more information about wait\_timeout, see the MySQL documentation.
Configuring backups
To learn how backups work, see About Backups.
You must configure backups. You cannot deactivate this feature.
To configure backups:
-
Click Backups.

-
Select a Backup configuration and follow the procedure for your storage solution in the Configuring Automated Backups topic:
-
Ceph or Amazon S3: VMware Tanzu for MySQL runs an Amazon S3 client that saves backups to an S3 bucket, a Ceph storage cluster, or another S3-compatible endpoint certified by VMware.
For instructions about using Ceph or Amazon S3 for backups, see Back Up to Ceph or S3. - SCP: VMware Tanzu for MySQL runs an Secure Copy Protocol (SCP) command that secure-copies backups to a VM or physical machine operating outside of your deployment. This is the fastest option.
SCP enables you to securely transfer files between two hosts. You can provision the backup machine separately from your installation.
For instructions about using SCP for backups, see Back Up with SCP. - GCS: VMware Tanzu for MySQL runs a Google Cloud Storage (GCS) SDK that saves backups to an GCS bucket.
For instructions about using GCS for backups, see Back Up to GCS. - Azure: VMware Tanzu for MySQL runs an Azure SDK that saves backups to an Azure storage account.
For instructions about using Azure for backups, see Back Up to Azure Storage.
Configuring security
To configure the security settings for the MySQL service, do one or both:
- Enable TLS for the MySQL service. See Configure TLS.
- Store your service instance credentials in runtime CredHub. See Configure Secure Service Instance Credentials.
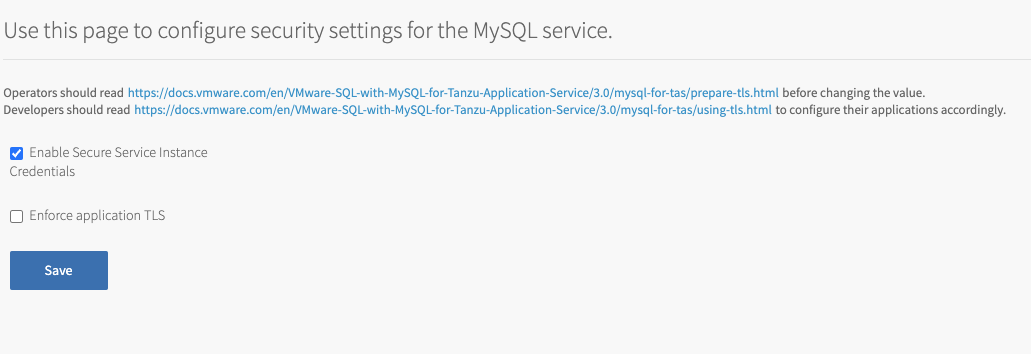
Configure TLS
To activate TLS for the MySQL service:
-
Do the procedures in Preparing for TLS.
-
Click Security.
-
For Enforce application TLS, if you select Accept only TLS v1.2 connections, TLS v1.2 is enforced as the minimum TLS version for client connections. In addition, selecting Required breaks any apps that are not currently connecting over TLS.
Enforcing TLS v1.2 has the following effects: * For apps using MySQL Connector/J 5.1.44 and earlier, apps might break. * For apps using MySQL Connector/J 5.1.44 to 5.1.48, developers have to rebind the apps. The TLS v1.2 restriction is a global setting, so it applies to every service instance. Any apps in the foundation using an old version of MySQL Connector/J fail to connect to MySQL after this new setting is applied.
-
Click Save.
- After you deploy the tile, notify your developers that they must activate TLS for their service instances and activate TLS for their apps. See Using TLS.
Configuring secure service instance credentials
You can store your service instance credentials in runtime CredHub instead of the Cloud Controller database (CCDB).
For more information about runtime CredHub, see CredHub.
To store your service instance credentials in runtime CredHub:
- Ensure that you have configured the TAS for VMs tile to support securing service instance credentials in runtime CredHub. For instructions, see Step 1: Configure the TAS for VMs Tile.
- Click Security.
- Select the Enable Secure Service Instance Credentials check box.
- Click Save.
-
After deploying the tile, notify the developers that they must unbind and rebind any existing service instances bindings if they want to use secure service instance credentials. Developers must:
-
Unbind the service instance from the app by running:
cf unbind-service APP SERVICE-INSTANCE -
Rebind the service instance to the app by running:
cf bind-service PP SERVICE-INSTANCE -
Restart the app to apply the new binding by running:
cf restart APP -
Verify that the binding includes CredHub pointers in the
VCAP_SERVICESenvironment variable by running:cf env APPFor example:
$ cf env my-app
Getting env variables for app my-app in org system / space example as admin...
OK
System-Provided:
{
 "VCAP_SERVICES": {
  "p.mysql": [
   {
    "credentials": {
     "credhub-ref": "/c/548966e5-e333-4d65-8773-7b4e3bb6ca97/4a246b0b-83bb-46d0-b8ac-35a93374ae67/caf6e32e-7361-4869-9a57-54ab8ae67b3f/credentials"
    },
[...]
-
If a developer rebinds an app to the VMware Tanzu for MySQL service after unbinding, they must also rebind any existing custom schemas to the app. When you rebind an app, stored code, programs, and triggers break. For more information about binding custom schemas, see Use custom schemas.
Configuring monitoring
To activate monitoring and logging in the MySQL service:
-
Click Monitoring.
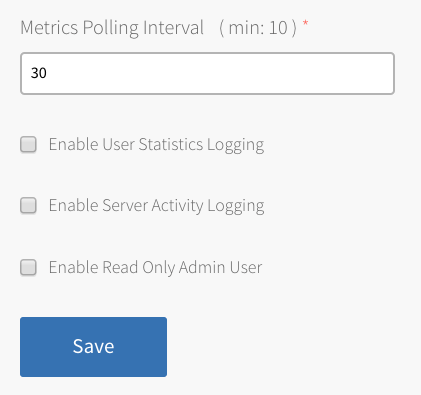
-
Configure the fields as follows:
Field Instructions Metrics Polling Interval Enter the amount of time in seconds for the frequency that the monitor polls for metrics. All service instances emit metrics about the health and status of the MySQL server. Enable User Statistics Logging Select this check box to collect user statistics. You can use these statistics to better understand server activity and identify load sources. For more information about user statistics, see the Percona documentation. Enable Server Activity Logging Select this check box to record that connects to the servers and what queries are processed using the Percona Audit Log Plugin. For more information, see the Percona documentation Note: MySQL audit logs are not forwarded to the syslog server because they can contain personally identifying information (PII) and secrets.
Enable Read Only Admin User Select this check box to create a read-only admin user, named roadmin, on each service instance. This user can be used for auditing and monitoring without risking mutating or changing any data. This is becauseroadmincannot make changes to data.
For instructions about retrieving the credentials forroadmin, see Retrieve Admin and Read-Only Admin Credentials for a Service Instance. The read-only admin user is always namedroadmin, however, the password varies by service instance.Field Instructions Metrics Polling Interval Enter the amount of time in seconds for the frequency that the monitor polls for metrics. All service instances emit metrics about the health and status of the MySQL server. Enable User Statistics Logging Select this check box to collect user statistics. You can use these statistics to better understand server activity and identify load sources. For more information about user statistics, see the MySQl documentation. Enable Server Activity Logging Select this check box to record that connects to the servers and what queries are processed using the Percona Audit Log Plugin. For more information, see the Retrieve Admin and Read-Only Admin Credentials for a Service Instance. The read-only admin user is always named roadmin, however, the password varies by service instance. -
Click Save.
Configuring system logging
To activate RFC 5424 system logging for the MySQL broker and service instance VMs:
-
Click Syslog.
-
Click Yes.
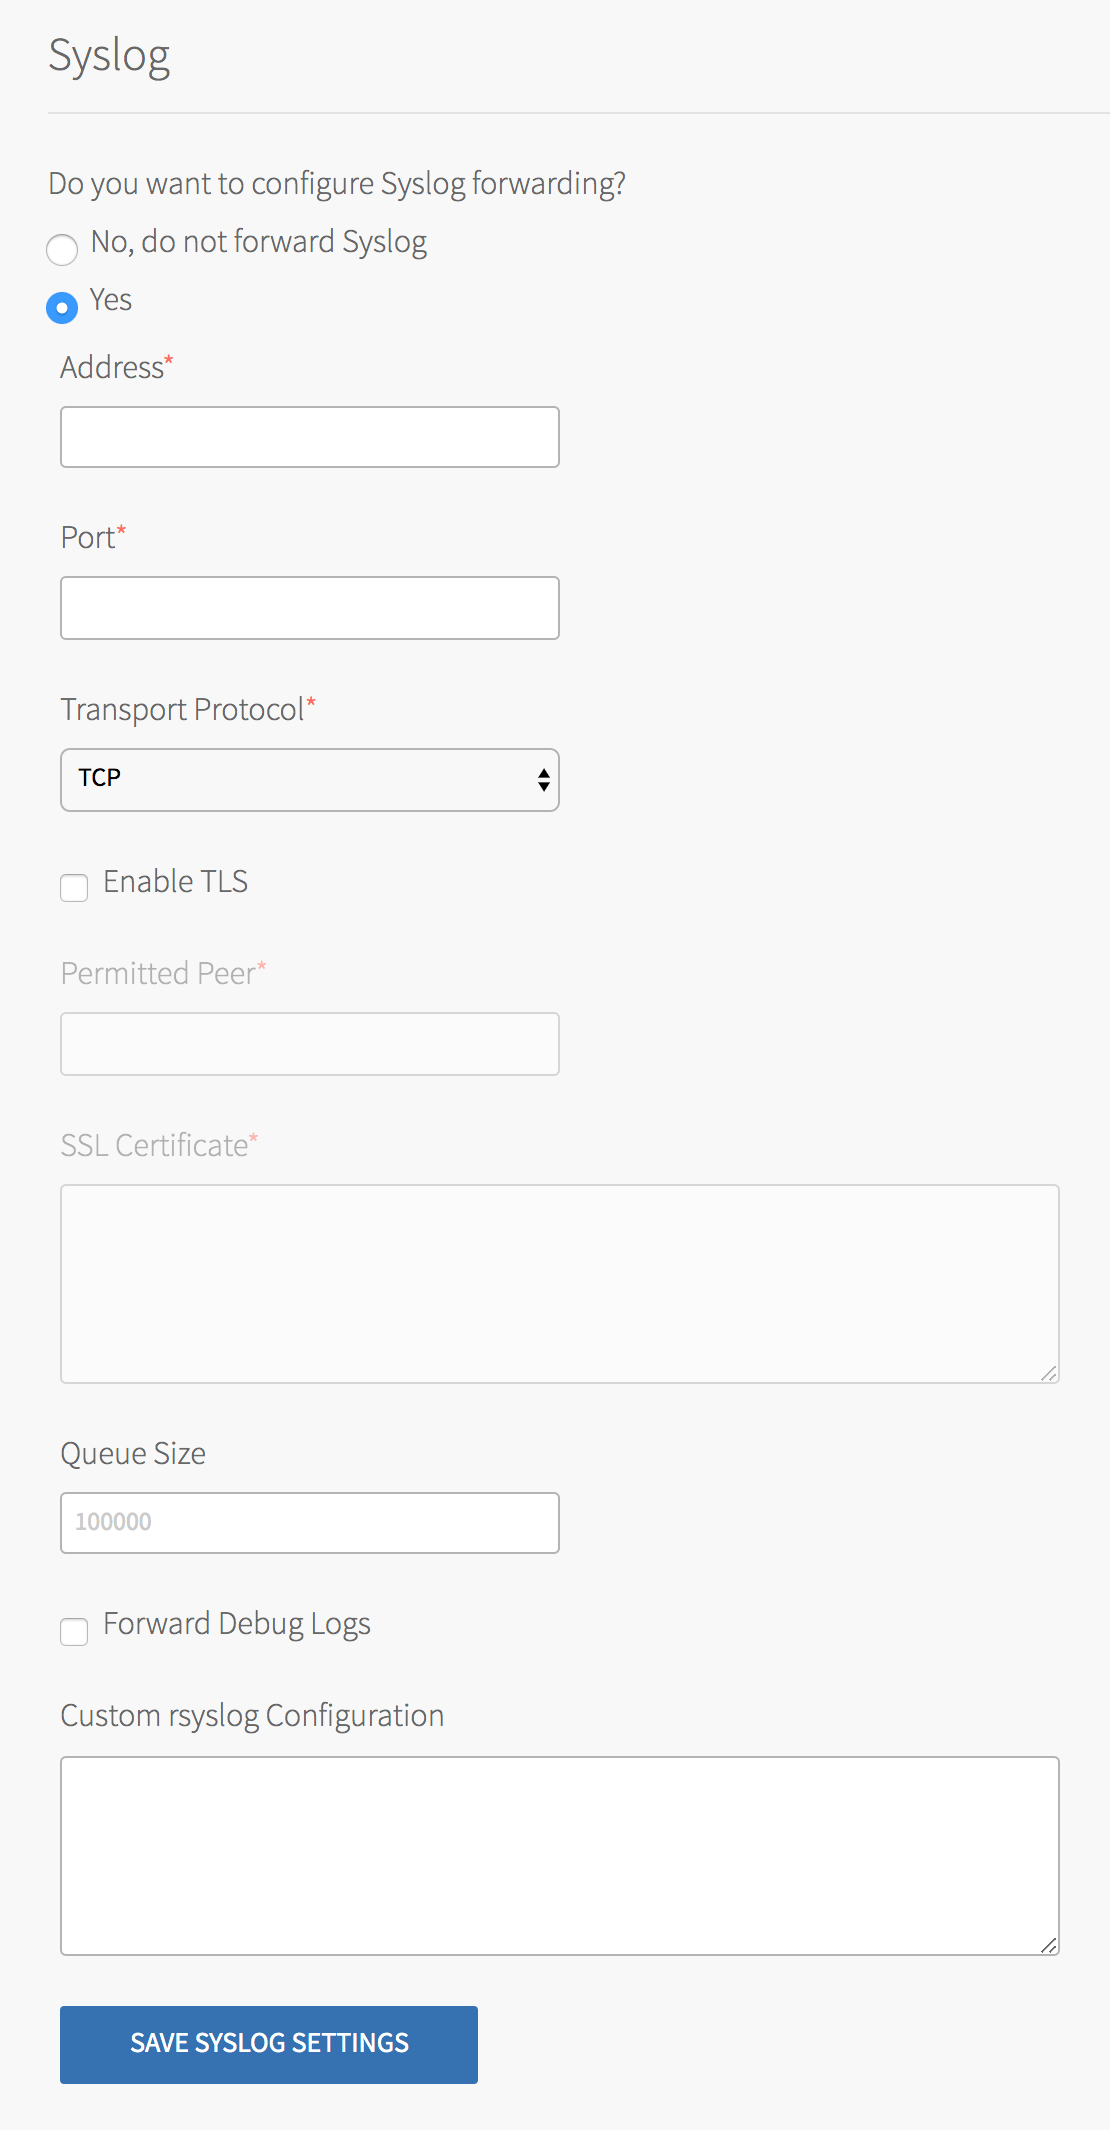
-
Configure the fields as follows:
Field Instructions Address Enter the IP address or hostname of the syslog server for sending logs. For example: logmanager.example.com.Port Enter the port of the syslog server for sending logs. For example: 29279.Transport Protocol Select the protocol you want to use to send system logs. VMware recommends using TCP. Enable TLS If you select TCP, you can also select to send logs encrypted over TLS. Permitted Peer Enter either: - The accepted fingerprint in SHA1 format.
- The name of the remote peer. For example:
*.example.com.
SSL Certificate Enter the SSL certificates for the syslog server. This ensures the logs are transported securely. If your syslog server is external to your deployment, you might need to select Provide public IP addresses to all Service VMs on the Settings page. See Configure Global Settings.
-
Click Save.
Configuring service instance upgrades
This section configures the upgrade-all-service-instances errand. VMware Tanzu for MySQL uses this errand to upgrade service instances. For more information about the upgrade-all-service-instances errand, see upgrade-all-service-instances.
To configure service instance upgrades.
-
Click Service Instance Upgrades.
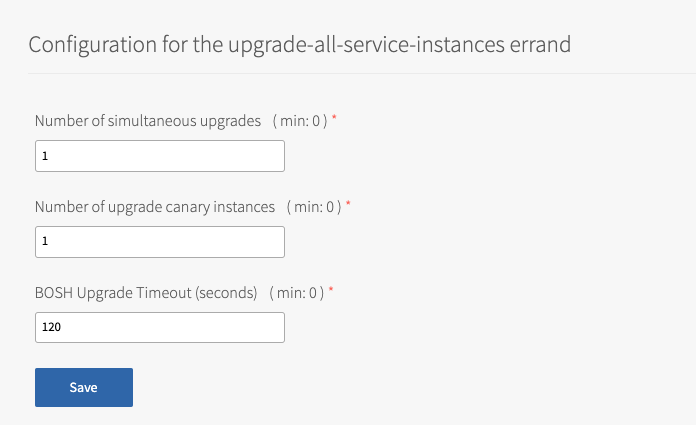
-
Configure the fields as follows:
Field Instructions Number of simultaneous upgrades Enter the maximum number of service instances that can upgrade at the same time. The minimum value is 0 and the maximum is 1 less than the number of BOSH workers. Increasing this value reduces the runtime of service instance upgrades. Note: To determine the number of BOSH workers, go to BOSH Director > Director Config and locate the value of Director Workers.
Number of upgrade canary instances Enter the number of service instances to upgrade first before upgrading the rest of the instances. Increasing this value activates service instance upgrades to fail faster. BOSH Upgrade Timeout Enter the amount of time in seconds to wait for BOSH to respond before timing out when upgrading service instances. Increasing this value activates service instance upgrades to fail faster. -
Click Save.
Review errands (Optional)
Errands are scripts that run at specific times to do various tasks. VMware Tanzu for MySQL can run errands to manage the broker and service instances. You do not need to change the default configurations for errands.
The Delete All Service Instances and Deregister Broker errand does necessary cleanup tasks when you delete the VMware Tanzu for MySQL tile or re-define plans. Setting this errand to Off can cause problems when attempting to install the tile again or re-define plans. VMware recommends that you do not set this errand to Off.
VMware Tanzu for MySQL uses the following types of errands:
- Post-Deploy Errands: These errands run when you click Apply Changes.
- Pre-Delete Errands: These errands run before you delete the VMware Tanzu for MySQL tile.
VMware Tanzu for MySQL also uses errands to configure leader-follower service instances. For more information about leader-follower errands, see Errands.
You can use errands when troubleshooting the broker or service instances. For more information about using errands for troubleshooting, see Run Service Broker Errands to Manage Brokers and Instances.
To review errands:
-
Click Errands.
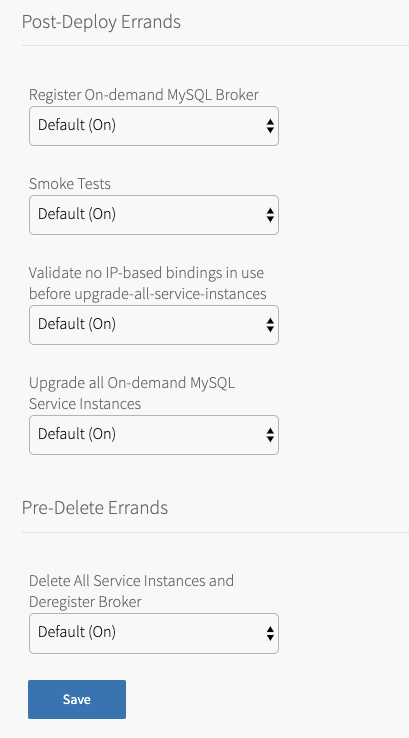
-
Review the settings for the following errands:
Errand Description Post-Deploy Errands Register On-demand MySQL Broker Registers a broker with the Cloud Controller and lists it in the Marketplace. Smoke Tests Validates basic MySQL operations. Validate no IP-based bindings in use before upgrade-all-service-instances Checks if service instances have app bindings or service keys using IP addresses or have a TLS certificate that is signed with an IP address. If either is true, the installation fails. Upgrade all On-demand MySQL Service Instances Upgrades existing instances of a service to its latest installed version.
If you want developers to individually upgrade service instances, set this errand toOFF. For more information about individual service instance upgrades, see About Individual Service Instance Upgrades.Pre-Delete Errands Delete All Service Instances and Deregister Broker Deletes all service instances and deregisters the broker.
Verifying stemcell version and apply all changes
To verify your stemcell version and apply all changes:
-
Click Stemcell Library. For more information about using the Stemcell Library, see Importing and Managing Stemcells.
-
Verify and, if necessary, import a new stemcell version.
-
Go to Tanzu Operations Manager Dashboard > Review Pending Changes.
-
Click Apply Changes.
For information about the stemcells that are compatible with VMware Tanzu for MySQL, see Release Notes or Broadcom Support.
