


The Workspace ONE Assist client provides support tools to facilitate troubleshooting and remotely controlling end-user devices. Not all client tools are available for all platforms. You can also assign tool-specific role permissions to your admins from the Workspace ONE UEM console.
Main Menu Toolbar

The main menu toolbar appears in the top-center of the screen, giving you direct access to multiple features and functions.
![]() – The Home button gives you access to all the client tools including Manage Files, Remote Shell, Registry Editor, and Share Screen.
– The Home button gives you access to all the client tools including Manage Files, Remote Shell, Registry Editor, and Share Screen.
![]() – The Info button displays the session logs, the VMware Privacy Policy, and the version number of Workspace ONE Assist.
– The Info button displays the session logs, the VMware Privacy Policy, and the version number of Workspace ONE Assist.
![]() – The Screen Share button indicates when an active Screen Share session is running.
– The Screen Share button indicates when an active Screen Share session is running.
![]() – The Fit to Screen button stretches or shrinks the remote device skin in a way that makes it fully visible given the current size of the Assist window.
– The Fit to Screen button stretches or shrinks the remote device skin in a way that makes it fully visible given the current size of the Assist window.
![]() – The Multi-Monitor button appears when your host machine has more than one monitor attached. It allows you to select which monitor you want to view or control. Only one monitor may be viewed or controlled at any given time.
– The Multi-Monitor button appears when your host machine has more than one monitor attached. It allows you to select which monitor you want to view or control. Only one monitor may be viewed or controlled at any given time.
![]() – The Virtual Keyboard button starts the on-screen keyboard. You can find details about the virtual keyboard in its own section of this topic.
– The Virtual Keyboard button starts the on-screen keyboard. You can find details about the virtual keyboard in its own section of this topic.
![]() – The Record button initiates a video recording of the remote session. For more information, see Capture Video and Images.
– The Record button initiates a video recording of the remote session. For more information, see Capture Video and Images.
![]() – The Screenshot button takes a static screenshot of the remote session. For more information, see Capture Video and Images.
– The Screenshot button takes a static screenshot of the remote session. For more information, see Capture Video and Images.
![]() – The Remote View button indicates that a Remote View is in session and selecting it lets you request a session elevation (to Control Screen) from the host device end-user.
– The Remote View button indicates that a Remote View is in session and selecting it lets you request a session elevation (to Control Screen) from the host device end-user.
![]() – The Control Screen button indicates that a Control Screen session is running and you can select it to demote your session to Remote View.
– The Control Screen button indicates that a Control Screen session is running and you can select it to demote your session to Remote View.
![]() – The Manage Files button gives you access to storage space on the host device. For more information, see Manage Files.
– The Manage Files button gives you access to storage space on the host device. For more information, see Manage Files.
![]() – The Add Folder button lets you add a new storage folder on the host device.
– The Add Folder button lets you add a new storage folder on the host device.
![]() – The Refresh button refreshes folder views and their contents. This can be useful when you work with session collaborators who contribute files to host storage.
– The Refresh button refreshes folder views and their contents. This can be useful when you work with session collaborators who contribute files to host storage.
![]() – The Session Collaborate button lets you invite other participants into your active Share Screen and Remote View session. Getting extra help can be useful to troubleshoot advanced issues. Select this button to invite Guests to your active session. For more information, see Session Collaboration.
– The Session Collaborate button lets you invite other participants into your active Share Screen and Remote View session. Getting extra help can be useful to troubleshoot advanced issues. Select this button to invite Guests to your active session. For more information, see Session Collaboration.
![]() – The Chat button lets you exchange text messages, including private messages, between all the participants of an Assist session: the remote user host, the Assist console user who initiated the session, and all session collaborators. See below for details.
– The Chat button lets you exchange text messages, including private messages, between all the participants of an Assist session: the remote user host, the Assist console user who initiated the session, and all session collaborators. See below for details.
![]() – The Ellipsis button contains access to Shortcuts and the System Summary. You can find details about each of these screens in their own sections of this topic.
– The Ellipsis button contains access to Shortcuts and the System Summary. You can find details about each of these screens in their own sections of this topic.
![]() – The Fullscreen button maximizes the Assist window in such a way that it fills the display at its current maximum resolution.
– The Fullscreen button maximizes the Assist window in such a way that it fills the display at its current maximum resolution.
![]() – The End Session button stops the currently running session.
– The End Session button stops the currently running session.
Virtual Keyboard
The virtual keyboard is used to send platform-specific key commands, language-specific keys, and other special keystrokes to the remote device.
For example, if your remote management device is an Apple Mac, you must use the virtual keyboard to send a Windows key keystroke to the Windows 10 remote device.
If you remote into a device that is configured in a different language than your remote management device, you must use the virtual keyboard to access those special keys.
Lastly, the virtual keyboard lets you send special keystrokes to the remote device, ensuring they are not confused with keystrokes for your own device, for example Ctrl-Alt-Del.
Copy & Paste with Virtual Keyboard
The virtual keyboard is the method by which you can copy a string of text from your remote management device, and paste it onto the remote device.
Initiate copy & paste during a Share Screen session by taking the following steps.
- On the remote management device, select a text string from your application of choice.
- Copy it to the clipboard by hitting Ctrl-C on your keyboard.
- Switch to the Share Screen session and open the virtual keyboard.
- Click anywhere in the grey colored area that runs across the top of the virtual keyboard, to the right of the Auto Send switch.
- Paste it onto the virtual keyboard by hitting Ctrl-V on your keyboard.
- Ready the application on the host device to receive the text string. Do this by placing the pointer on the spot you want the text string to be pasted.
- Switch back to the virtual keyboard and select the green send button to the far-right of the virtual keyboard to paste it onto the application you made ready above.
Chat
You can exchange text messages to and from the device end user and session collaborators no matter what client tool you use. You can also send private messages to individual session participants. Chat is available during Assist sessions on Android, macOS, and Windows 10 devices.
- Initiate a chat session by selecting the Chat icon
 from the main menu toolbar of the Assist Console.
 - End users access the Chat tab from the Assist application installed on their devices in both Attended and Unattended modes.
- Only devices connected by Attended mode receive notifications about chat messages.
- The Chat feature is available while using any Assist Client Tool including Manage Files, Remote Shell, and so on.
- To send a private chat message, select an individual participant from the To: drop down menu.
- You can get the device end user's attention of an incoming chat message by selecting the Chat Bullhorn button
 . This button directs the connected device to emit an audible signal, which can be useful for when the end user is in a noisy environment.
Shortcuts
The shortcuts menu grants access to common administrator tools and useful functions. You can pin the shortcut menu to the screen, giving you immediate access to these functions without having to select the ![]() button from the toolbar.
button from the toolbar.
- Command Prompt
- Control Panel
- Ctrl-Alt-Del
- Event Viewer
- Lock Screen
- Log Out of device (including confirmation prompt for end user)
- Network and Sharing screen
- Registry Editor
- Restart PC
- Services
- Show Desktop
- Task Manager
System Summary
The System Summary contains information similar to Device Details in Workspace ONE UEM. Use this information to diagnose issues on a device while connected. There are five subsections within System Summary.
- The Device Information pane provides at-a-glance information about the remote device during troubleshooting. The pane displays signal strength, battery, network status, storage, and main memory information.
- The Application List subsection displays all the installed applications on the device.
- The Process List subsection displays all processes running on the device and includes the option to kill or stop only those processes that can be killed.
- The Service Book subsection displays all services running on the device.
- The Share Screen subsection displays a historical log of all prior remote sessions.
All the content in each subsection can be searched using the Search list below feature, located in the upper-right corner of the System Summary screen.
You can also select the Export button (to the right of the search function) to export each subsection to an Excel-viewable file saved to your device for detailed analysis.
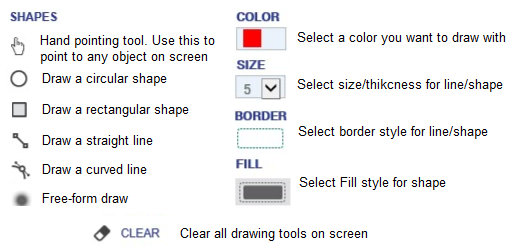
Device Whiteboard
The device whiteboard functionality allows you to highlight a specific item to the user. The whiteboard allows you to draw, highlight, and point to areas on the screen.
To use the whiteboard, select the whiteboard icon (![]() ) in the bottom right of the device screen view.
) in the bottom right of the device screen view.
The whiteboard menu consists of the following items.
This feature is supported by Android, macOS, and Windows 10 devices.
Be sure that the Android devices in your fleet are configured to use the Whiteboarding feature. For more information, see Configure Android Devices for Whiteboarding Feature.
