


Custom attributes in Workspace ONE UEM enable you to extract specific values from a managed device (for example, IMEI, location, among many others) and use it as assignment criteria for products. You can also configure a 3rd party application to create custom attributes and display them on the launcher.
What Is A Custom Attribute?
A custom attribute is a placeholder for additional device information collected by Workspace ONE Intelligent Hub or by a third party application. This placeholder can be used in many different ways.
- It can be used to assign content such as provisioned products.
- ...for example, you can provision product XYZ to only devices that are checked out and in the field.
- It can provide information to the admin on the UEM console or to the end user on the device.
- ...for example, a delivery driver can view an in-house developed app to determine their next stop, furnished by a custom attribute that collects the location of the device.
- It can be used to move newly enrolled devices to a specific organization group.
- ...for example, you can move all newly enrolled devices whose model number equals Zebra VC80 to an organization group that is designed to serve that specific model.
Custom attributes (and the rules generator) are only configurable and useable at Customer-level organization groups.
For details about available options regarding device assignment rules based on custom attributes, see Enable Device Assignments.
There are many ways to generate custom attributes, both within the UEM console and on the device itself.
How Do You Create Custom Attributes On the Device Using an XML File Generated by the UEM Console
In some use cases, you might need to create custom attributes on the device that are then transferred back to the Workspace ONE UEM console by way of the Workspace ONE Intelligent Hub.
You can do this by writing an XML file that generates the custom attribute. There are two ways the XML file can be placed on a device: 1) let a 3rd party application on the device write an XML file for you or 2) send the XML file to the device in a provisioned product.
This task allows you to send an XML file to a device in a provisioned product.
- Create an XML file that defines your custom attributes and their values using the following example as a template.
<?xml version="1.0" encoding="utf-8"?>
<attributes>
  <attribute name="CustomAttribute1" value="12345" />
  <attribute name="CustomAttribute2" value="67890" />
  <attribute name="CustomAttribute3" value="abcde" />
</attributes>
- Save this file as
CustomAttributeExample.XML. - Navigate to and select the Add Files/Action button.
- Select Android as the platform.
- Complete the Name and Description text boxes in the General tab.
- Select the Files tab and then select the Add Files button.
- Browse to the location where you saved the
CustomAttributeExample.XMLfile, select it, and then select the Open button. - Select Save to upload the XML file to the UEM console.
- The Download Path text box must be completed in the following way.
- For Zebra devices, the download path must be
/enterprise/usr/attributes - For non-Zebra devices, the download path must be
/sdcard/Android/data/com.airwatch.androidagent/files/attributes
- For Zebra devices, the download path must be
- Select Save to include the XML file and download path to the Files/Action component.
- Select Save again to save the Files/Action itself.
- Navigate to and select the Add Product button.
- Select Android as the platform.
- In the General tab, complete the Name, Description, and Assigned Groups options.
- In the Manifest tab, select the Add button.
- In the Action(s) To Perform drop down menu, select "File/Action - Install"
- In the Files/Actions text box, select the name of the Files/Action you saved previously.
- Select Save to save the Files/Action to the product.
- Select Activate to display a preview of devices scheduled to be provisioned with the product.
- Select Activate again to finalize provisioning.
- Navigate to and locate your product from the listing. Notice the 6 columns in the listing that display the various statuses of the devices that are provisioned with this product that contains your custom attribute.
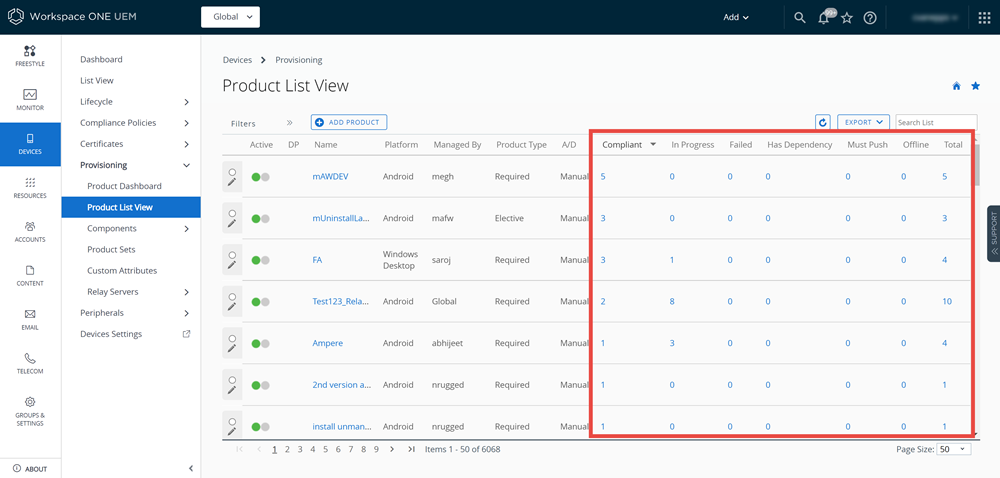
- Select the number in the Total column for your product.
The View Devices screen displays, containing all the device scheduled to be provisioned by the product.
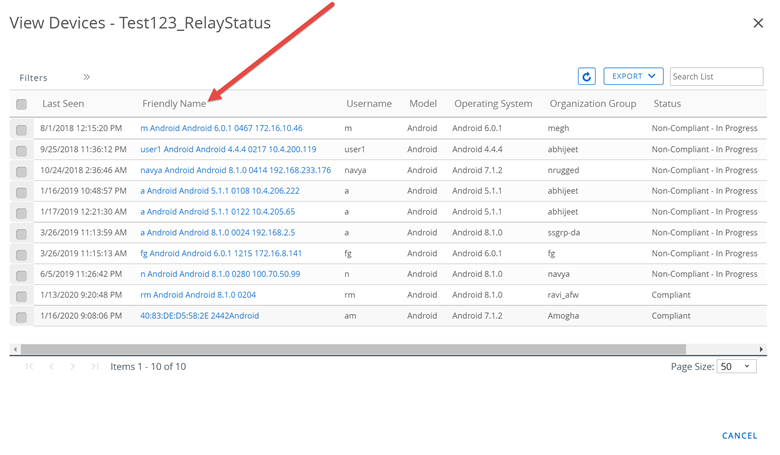
- Select a device's Friendly Name from the listing.
The device Details View displays, showing you the activated products.
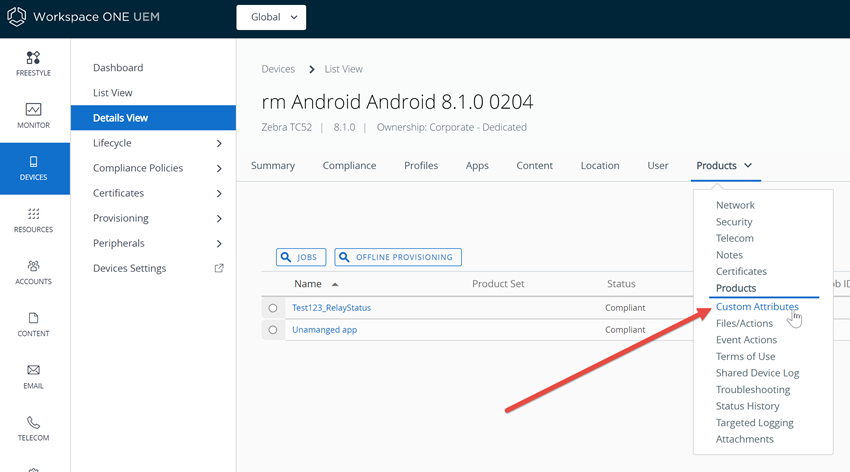
- Select from Details View.
Verify that the custom attributes added from the XML file are displayed in the listing. If the custom attributes are not listed, check the device in to the console and repeat steps 21 - 24 again.
How Do You Create Custom Attributes On the Device Using an XML File Generated by a 3rd Party App
In some use cases, you might need to create custom attributes on the device that are then transferred back to the Workspace ONE UEM console by way of the Workspace ONE Intelligent Hub.
You can do this by writing an XML file that generates the custom attribute. There are two ways the XML file can be placed on a device: 1) send the XML file to the device in a provisioned product or 2) let a 3rd party application on the device write an XML file for you.
This task allows a 3rd party application sent to the device to write an XML file that creates a custom attribute on the device.
- Work with your developer to create an application that generates an XML file of the following structure.
<?xml version="1.0" encoding="utf-8"?>
<attributes>
  <attribute name="CustomAttribute1" value="54321" />
  <attribute name="CustomAttribute2" value="09876" />
  <attribute name="CustomAttribute3" value="edcba" />
</attributes>
- The file must be written according to the following oem-specific locations.
- For Zebra devices, the storage path must be
/enterprise/usr/attributes - For non-Zebra devices, the storage path must be
/sdcard/Android/data/com.airwatch.androidagent/files/attributes
- For Zebra devices, the storage path must be
- Create a product that includes this application and provision it to the devices you want the custom attribute to be written to.
- Activate this product and wait for the device to check in to the console.
- Navigate to and select the Friendly Name from the listing of one of the devices that is provisioned with your 3rd party application.
The device Details View displays.
- From Details View, select .
The custom attributes you defined in the XML code now appear in the list.
How Do You Create a Custom Attribute and Assign it to a Single Device
Create a custom attribute and values to push to a device in Workspace ONE UEM. You can create assignment rules for products to provision based on these attributes and their values.
- If you are not already in a customer type organization group (OG), move to one now. You cannot create custom attributes in any other kind of OG. For more information, see Organization Group Type Functions.
- Navigate to .
- Select Add and then select Add Attribute.
- Under the Settings tab, enter an Attribute Name.
- Enter the optional Description of what the attribute identifies.
- Enter the name of the Application that gathers the attribute. The application can be a third-party app or Workspace ONE Intelligent Hub.
If you are not using a third-party app to generate the custom attribute, then use any name with an XML extension. For example,
TruckRegCA.xml - Select Collect Value for Rule Generator to make the values of the attribute available in the drop-down menu of the rule generator.
- Select Use in Rule Generator if you want to use the attribute in the rule generator.
- Select Persist to prevent the removal of the custom attribute from the Workspace ONE UEM console unless an Admin or an API call explicitly removes it.
Otherwise, the attribute is removed as normal. If you delete a custom attribute reported from a device to the UEM console, a persisted custom attribute remains in the UEM console. Custom attribute persistence is only available to Android and Windows Rugged devices.
- Select Use as Lookup Value to use the custom attribute as a lookup value anywhere in the UEM console.
This option is important if you want the custom attribute to be available to Launcher or other tools.
- Select the Values tab.
- Select Add Value to add values to the custom attribute.
You do not need to enter all possible values of the attribute. The list of attributes entered here is not a requirement or constraint on what values the device can report. Instead, enter only expected values used to pre-define organization group assignment rules.
- Select Save.
- Navigate to , search for the device you want to assign the custom attribute to, and select its Friendly Name to display Details View.
- Select the
 tab, then select Custom Attributes, followed by the Add button.
The Custom Attributes screen displays.
- Select the Add button on the Custom Attributes screen.
- In the Application column drop-down, select the application name you entered in step 6. Then select the Attributes and Value in their respective drop-downs.

- Select Save.
You can now use this custom attribute in the UEM console and in Launcher, in the following form.
{{CustomAttributeName::ApplicationName}}
{{TruckRegValue::TruckRegCA.xml}}
For more information, see the section in this topic entitled Display Custom Attributes in Launcher.
How Do You Import Custom Attributes and Assign Them to Specific Devices
The custom attribute batch import feature in Workspace ONE UEM allows you to load custom attributes and corresponding values into the system in bulk. In the templates provided, each column corresponds to one custom attribute and each row corresponds to their different values or devices.
With the templates, you can import custom attributes in different ways and with different information.
To import custom attributes and assign them to specific devices, you must import two different CSV files, 1) one that defines the custom attributes and 2) another that defines the value of the custom attribute and assigns it to devices.
- Navigate to and select the Add button followed by Batch Import.
The Batch Import screen displays.
- Scroll down to where the template links can be seen and select two of the provided links to download both templates and save them to your device.
- Custom Attributes – Download template for this batch type
- Device Custom Attribute Values – Download template for this batch type
You can either leave the Batch Import screen displayed while you complete the process of filling out the templates OR you can select the Cancel button, complete the templates, and return to the console later.
- Browse your device and locate the two CSV files. Open the one titled Template - CustomAttributes.csv and fill in the fields that correspond to the headers.
- Leave the Value column blank.
- For the ApplicationName column, if you are not using an actual app on the device to generate the custom attribute, just enter any name with an XML extension, for example, SampleAppName.xml
- The ShowOnDevicesGrid column corresponds to the Use As Lookup Value option. If you plan to display these custom attributes on the Launcher screen, the records for each attribute must be 1 in this column to enable the option.
- Save the CSV file as
SampleCustomAttributes.CSV. - Open the other template you downloaded in step 2, titled Template - CustomAttributeValuesXref.csv.
- You must customize this template differently than the first template. The value entered in column A, XRefType, defines for the console how you want to identify devices, according to the following list.
1. DeviceID
2. Serial Number
3. UDID
4. MAC Address
5. IMEI Number
- In column B, XRefValue, supplies the value that corresponds to column A.
For example, if you enter 2 for each row in the XRefType column A, then you must enter the serial number for each device that accepts a custom attribute in the XRefValue column B.
- For column C, change the header using the format
ApplicationName||CustomAttributeName, according to your actual custom attribute designations. When you fill out the values in column C, you are assigning values to the custom attribute that is specific to the device identified in column B. - Add subsequent columns for each custom attribute you want to assign to devices. Here is a sample completed Device Custom Attribute Values template. The text colored red are the portions you must customize.
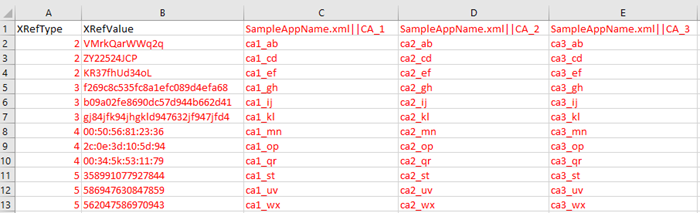
Note the different device identifiers in column A and how column B changes with it. You are free to use a single device identifier for the entire template. This is just an example that demonstrates the relationships.
- Save the CSV file as
SampleCustomAttributeValues.CSV. - Navigate back to and select the Add button followed by Batch Import.
- Enter Batch Name, Description, Batch Type as 'Custom Attributes', then select the Choose File button.
- Locate your previously saved
SampleCustomAttributes.CSVfile (from step 7) and select it to upload. - Select Save to complete the batch import process.
- Navigate to and review all the newly imported custom attributes.
- If you want to use these custom attributes in Launcher, select the pencil edit icon (
 ) for each custom attribute and enable the Use As Lookup Value check box.
 - Repeat steps 14 through 17 for the other CSV file (
SampleCustomAttributeValues.CSV) you saved in step 13.
Result: You can display any custom attribute (with the Use As Lookup Value option enabled) in the console and Launcher using the {{CustomAttributeName::ApplicationName}} format. For more information, see How Do You Display Custom Attributes in Launcher (Multi App Mode) and How Do You Display Custom Attributes in Launcher (Template Mode).
How Do You Display Custom Attributes in Launcher (Multi App Mode)
- If you are not already in a customer type organization group (OG), move to one now. You cannot assign custom attributes in any other kind of OG. For more information, see Organization Group Type Functions.
- Navigate to and select the Add button followed by Add Profile.
- Select either Android or Android (Legacy). Launcher is available for each, however the Launcher configuration layout is slightly different.
The Add a New Android Profile screen displays with the payload listing on the left side panel.
- Select the Launcher payload.
- Select the Configure button.
The Select App Mode screen displays.
- Select the Multi App mode, which allows you to configure a collection of approved apps on the home screen for your end users to access. You can also customize the layout including company branding and more.
A self directed tutorial appears. Acquaint yourself with each step to see what the Launcher Multi App can offer, including layout, apps, the canvas, app level actions, hidden apps, settings, and the preview feature.
- You can insert the following standard lookup values into the title bar of the launcher shown below and also to section headings.
- {DeviceAssetNumber}
- {DeviceFriendlyName}
- {DeviceModel}
- {DeviceOperatingSystem}
- {DeviceSerialNumber}
- {DeviceSerialNumberLastFour}
- {DeviceUid}
- {DeviceUidLastFour}
- {DeviceUuid}
- {DeviceWLANMac}
- {EnrollmentUser}
- {FirstName}
- {GroupIdentifier}
- {LastName}
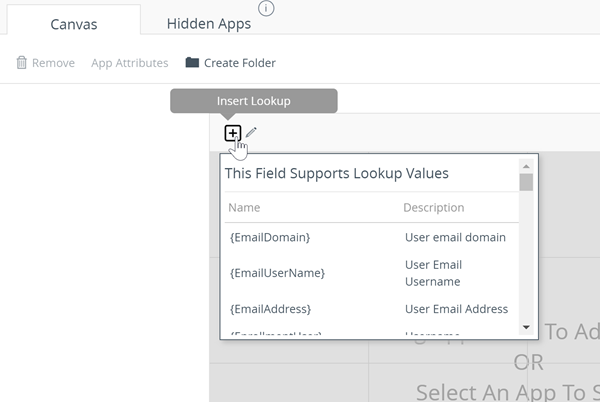
- You can display your own custom attributes on the Launcher screen in place of lookup values, provided you insert them onto the canvas using the following format.
{{CustomAttributeName::ApplicationName}}Get the Application Name and Custom Attribute Name by navigating to .
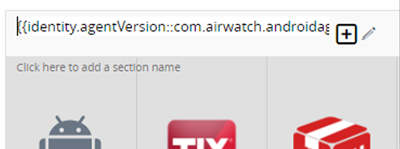
You can also add custom attributes to section headers in the same way, using the same
{{CustomAttributeName::ApplicationName}}format. You are limited to one custom attribute per section header and the font cannot be adjusted. Here is an example of a configured Launcher Multi App layout and how it looks on the device.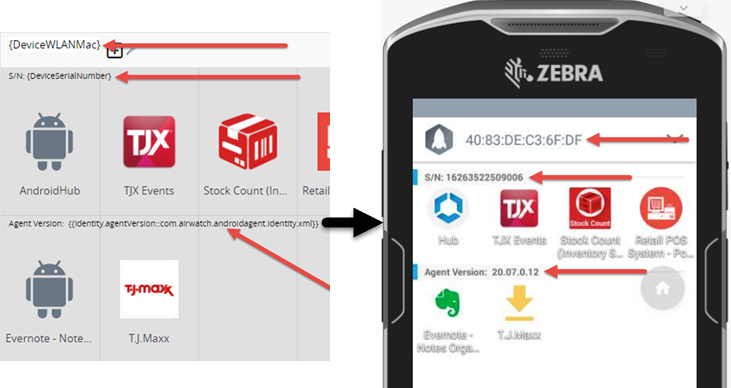
How Do You Display Custom Attributes in Launcher (Template Mode)
Template Mode is the fully customizable mode of Workspace ONE Launcher. You can add apps, images, text boxes, backgrounds, and other layout settings to customize the device lock down screen. Text fields in the Launcher Template layout can display lookup values including custom attributes.
- If you are not already in a customer type organization group (OG), move to one now. You cannot assign custom attributes in any other kind of OG. For more information, see Organization Group Type Functions.
- Navigate to and select the Add button followed by Add Profile.
- Select either Android or Android (Legacy). Launcher is available for each, however the Launcher configuration layout is slightly different.
The Add a New Android Profile screen displays with the payload listing on the left side panel.
- Select the Launcher payload.
- Select the Configure button.
The Select App Mode screen displays.
- Select the Template mode, which offers the greatest amount of flexibility in designing the appearance of Launcher.
A self directed tutorial appears. Acquaint yourself with each step to see what the Launcher Template can offer, including layout, apps, the canvas and its images and text boxes it can display, app level actions, hidden apps, settings, and the preview feature.
- In the Launcher Template screen, drag Elements (Text, Image, and App) from the left side and drop them onto the Launcher Canvas, completing options such as Text Color, Backgroud Color, Text Position, and so on.
- You can insert the following standard lookup values into Text Boxes that you create on the canvas.
- {DeviceAssetNumber}
- {DeviceFriendlyName}
- {DeviceModel}
- {DeviceOperatingSystem}
- {DeviceSerialNumber}
- {DeviceSerialNumberLastFour}
- {DeviceUid}
- {DeviceUidLastFour}
- {DeviceUuid}
- {DeviceWLANMac}
- {EnrollmentUser}
- {FirstName}
- {GroupIdentifier}
- {LastName}
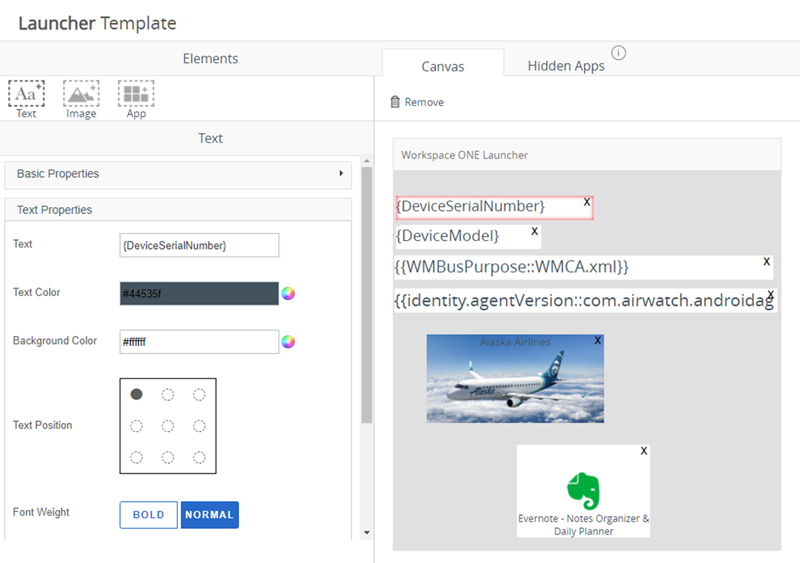
- Provided you enabled the Use as Lookup Valule option when you made your custom attributes, you can also display these custom attributes onto the Launcher canvas, using the
{{CustomAttributeName::ApplicationName}}format.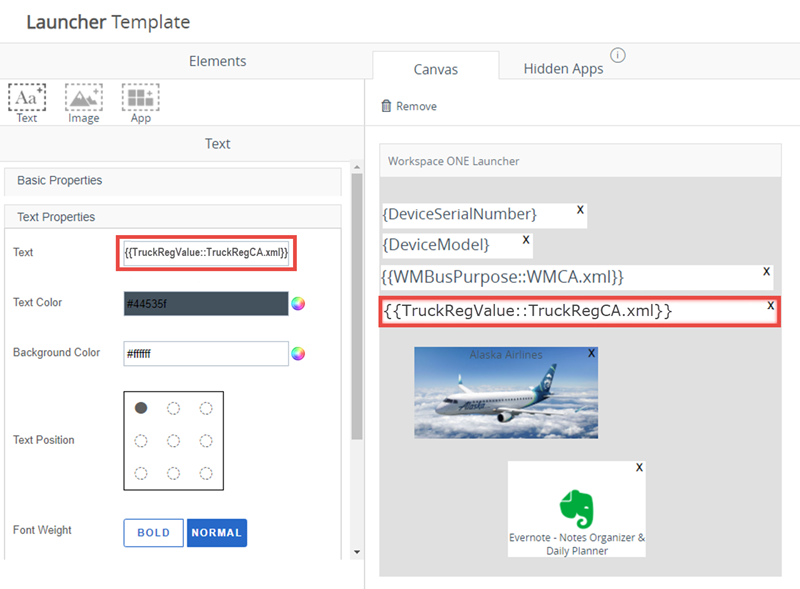
How Do You Assign Organization Groups Using Custom Attributes
Configure rules that control how devices are assigned to organization groups following enrollment in Workspace ONE UEM. You are limited to one custom attribute assignment rule per organization group (OG).
- Ensure that you are currently in a customer type organization group.
- Navigate to .
- Set Device Assignment Rules to Enabled.
- Set the Type to Organization Group by Custom Attribute.
For more information about device assignment rules, see Enable Device Assignments.
- Select Save.
- Navigate to and create a custom attribute if you have not already done so.
See the section on this page entitled Create a Custom Attribute.
- Navigate to .
- Select the Organization Group to which the rule assigns devices.
- Select Add Rule to configure the logic of the rule.
Setting Description Attribute/ Application This custom attribute determines device assignment. Select from among Device Model, Serial Number, and any custom attribute or XML file that is available in the customer OG you are in.
Operator This operator compares the Attribute to the Value to determine if the device qualifies for the product.
When using more than one Operator in a rule, you must include a Logical Operator between each Operator.
Note:When making an assignment rule, comparisons using the less than (<) and greater than (>) operators (and their variants) can only be used to compare numerical values including integers.
The exception is when you are comparing OEM build versions, you can apply < and > operators on non-numerical ASCII strings. An example is when an OEM update filename includes hyphens, periods, and other characters together with numbers. Such assignment rules must identify a device manufacturer in the rule logic and that comparison is deemed accurate when the format on the device matches the one specified on the server.
Value All values from all applicable devices are listed here for the Attribute selected for the rule. Add Logical Operator Select to display a drop-down menu of logical operators such as AND, OR, NOT, and parentheses. Allows for more complex rules. - Select Save after configuring the logic of the rule.
Results: When a device enrolls with an assigned attribute, the rule assigns the device to the configured organization group.
Custom Attributes Database
Custom attributes are stored as XML files and in the Workspace ONE Intelligent Hub database, each stored on the device. When using the database, custom attributes are sent as samples to Workspace ONE UEM periodically for asset tracking of key/value pairs.
If a record in the device database is configured with 'Create Attribute' = TRUE, then the Workspace ONE Intelligent Hub automatically retrieves the Name and Value sent with the custom attributes sample. The key/value pair displays in the Device Details page for the device in the Custom Attributes tab.
