


You can view and manage enrolled devices from the Workspace ONE Express Device Dashboard. The device dashboard provides a high-level view of your entire device fleet and allows you to examine individual devices and take MDM actions.
You can view graphical representations of relevant device information for your fleet, such as device ownership type, compliance statistics, and platform and OS breakdowns. Access each set of devices in the List View quickly by selecting any of the available data views from the Device Dashboard.
From the List View, you can take administrative action: send messages, lock devices, delete devices, and change groups associated with the device.
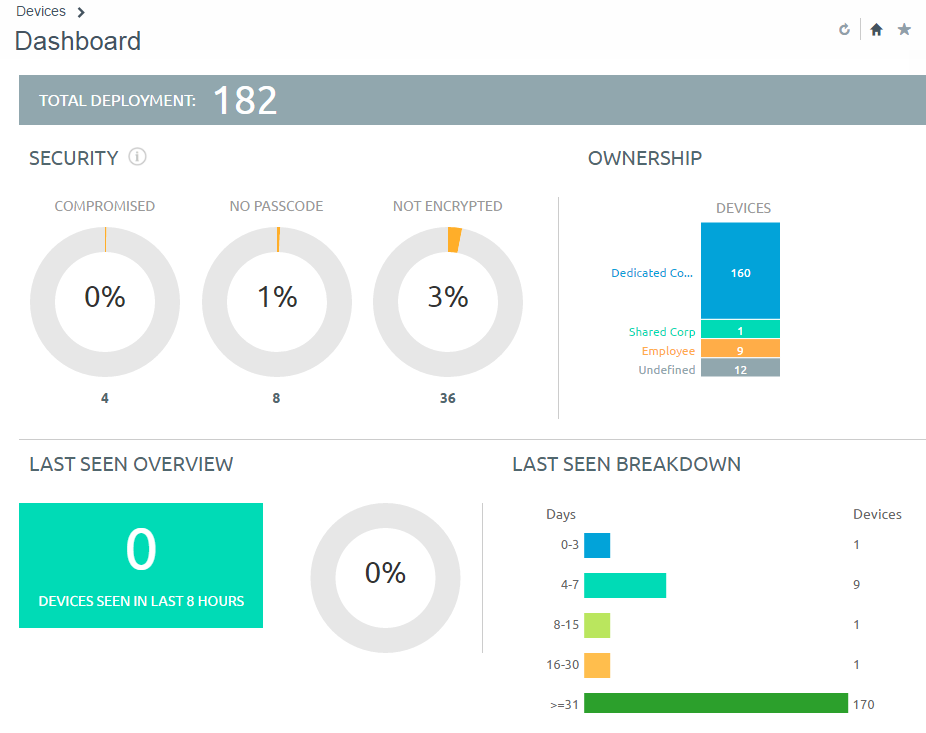
- Security – View the top causes of security issues in your device fleet. Selecting any of the donut charts displays a filtered Device List view comprised of devices affected by the selected security issue. If supported by the platform, you can configure a compliance policy and act on these devices.
- Compromised – The number and percentage of compromised devices (jailbroken or rooted) in your deployment.
- No Passcode – The number and percentage of devices without a passcode configured for security.
- No Encryption – The number and percentage of devices that are not encrypted for security. This reported figure excludes Android SD Card encryption. Only those Android devices lacking disc encryption are reported in the donut graph.
- Ownership – View the total number of devices in each ownership category. Selecting any of the bar graph segments displays a filtered Device List view comprised of devices affected by the selected ownership type.
- Last Seen Overview/Breakdown – View the number and percentage of devices that have recently communicated with the Workspace ONE Express server. For example, if devices have not been seen in over 30 days, select the bar graph to display a filtered Device List of only those devices. You can add more filters if needed (for example, Corporate Dedicated), and follow-up with the users accordingly.
- Platforms – View the total number of devices in each device platform category. Select any bar graph to display a filtered Device List view comprised of devices under the selected platform.
- Enrollment – View the total number of devices in each enrollment category. Selecting any of the bar graph segments displays a filtered Device List view comprised of devices with the selected enrollment status.
- Operating System Breakdown – View devices in your fleet based on operating system. There are separate charts for the major supported platforms. Display a filtered Device List view comprised of devices running the selected OS version by selecting any bar graph.
Device List View
Use the Device List View in Workspace ONE Express to see a full listing of devices in the currently selected organization group.
The Last Seen column displays an indicator showing the number of minutes elapsed since the device has checked-in. The indicator is red or green, depending on the number of minutes defined in Device Inactivity Timeout (min). This indicator can be set by navigating to .
Select a device-friendly name in the General Info column at any time to open the details page for that device. A Friendly Name is the label you assign to a device to help you differentiate devices of the same make and model.
Sort by columns and configure information filters to review activity based on specific information. For example, sort by the Compliance Status column to view only devices that are currently out-of-compliance and target only those devices. Search all devices for a friendly name or user name to isolate one device or user.
Add a Device from List View
You can add or register a device in your Workspace ONE Express environment including user assignment, custom attributes, and tagging.
- Navigate to or .
- Select the Add Device button. The Add Device page displays. Complete the following settings.
Table 1. User Setting Description Search Text Each device must be assigned to a user. Search for a user with this text box by entering search parameters and select the Search User button. You can select a user from among the search results or select the link Create New User. Table 2. Create New User Settings Description Security Type Select between Basic and Directory users. For more information, see the topics, Basic Authentication, and Active Directory Authentication. User name Enter the user name by which your user is identified in your environment. Password, Confirm Password Enter and confirm the password that corresponds to the user name. Email Address Enter the email address for the user account. Enrollment Organization Group The organization group (OG) that serves as the enrollment OG for the device enrollment. Show advanced user details Display all the advanced user details, including comprehensive information covering user name, user phone number, and manager name. Also included are optional identification settings such as department, employee ID, and cost center.
Select the default User Role for the user you are adding which determines which permissions the user has while using a connected device. For more information, see the topic User Roles.
Table 3. Device Settings Description Expected Friendly Name A device's Expected Friendly Name is the label you assign to a device to help you differentiate devices of the same make and model.
You can opt for a manually entered friendly name or you can incorporate lookup values. For details, see Lookup Values.
Organization Group Pre-populated setting reflects the existing organization group. Ownership Select the device ownership from the drop-down menu. Select between None, Corporate - Dedicated, Corporate - Shared, and Employee-Owned. Platform Select the platform of the device from the drop-down menu. Show advanced device information options Display all the advanced device information settings. Table 4. Advanced Device Information Settings Settings Description Model Select the device model from the drop-down listing. The contents of this drop-down menu depend upon the selection made in the Platform drop-down menu. OS Select the device's operating system from the drop-down listing. The contents of this drop-down menu depend upon the selection made in the Platform drop-down menu. UDID Enter the device's Unique Device Identifier. Serial Number Enter the device's serial number. IMEI Enter the device's 15-digit International Mobile Station Equipment Identity. SIM Enter the device's SIM card specifications. Asset Number Enter the asset number for the device. This number is created internally from within your organization and this setting is provided to hold this data point. Table 5. Messaging Setting Description Message Type Select the type of message you want to send (None, SMS, or Email) to the device upon a successful enrollment to the environment. Email Address Enter the email address to which you want the enrollment message sent.
This text box is only available when Email is selected as the Message Type.
Email Message Template Select the email template from the drop-down menu. There is a link you can use to open the Message Template page where you can create an email message template. Phone Number Enter the phone number to which you want the SMS text message sent.
This text box is only available when SMS is selected as the Message Type.
SMS Message Template Select the SMS template from the drop-down menu. There is a link you can use to open the Message Template page where you can create an SMS message template. - (Optional) Assign Custom Attributes to the device. Select the Add button and supply an Attribute and its Value.
- (Optional) Assign Tags to the device. Select the Add button and select a tag from the drop-down menu for each tag you want to assign.
- Select Save.
Search in Device List View
You can search for a single device for quick access to its information and take remote action on the device.
To run a search, navigate to , select the Search List bar and enter a user name, device-friendly name, or other device-identifying element. This action initiates a search across all devices, using your search parameter, within the current organization group and all child groups.
Customize Device List View Layout
Display the full listing of visible columns in the Device List view by selecting the Layout button and select the Custom option. This view enables you to display or hide Device List columns per your preferences.
There is also an option to apply your customized column view to all administrators. For instance, you can hide 'Asset Number' from the Device List views seen by your admins.
Once all your customizations are complete, select the Accept button to save your column preferences and apply this new column view. You can return to the Layout button settings at any time to tweak your column display preferences.
