


Integrate Workspace ONE UEM with the Zebra Print Server
Initiate the integration between Workspace ONE UEM and the Zebra print server by sharing the UID and HMAC Tokens between servers and adding the Zebra print server to a dedicated Organization Group from the UEM console. You can enroll a print server to a parent organization group and if required move it to a child organization group using the Change Organization Group option in the List View page.
To integrate Workspace ONE UEM and Zebra print server:
- Navigate to
-
Ensure that the correct Organization Group is displayed at the top of the page.
-
Select Add Print Server.
- Copy the HMAC Token that was automatically generated.
-
Select the enrollment user associated with the print server from the User ID drop-down menu. Please note that the users created in parent organization group are not available for selection in the child organization group.
-
Enter the Service UID or use the Generate UID option. The service UID should be a 16 to 36 character alphanumeric value (applicable only when manually entered by the IT admin). Once entered on the UEM console, the value has to be copied to the Unique ID for Zebra Server field on the installation page of the Zebra AirWatch connector. Click Save.
- Run the Zebra Connector software on the selected server. IIS must not be installed on the relevant server, as the Zebra connector uses Tomcat as its server. A screen that collects certificate details from the end is displayed.

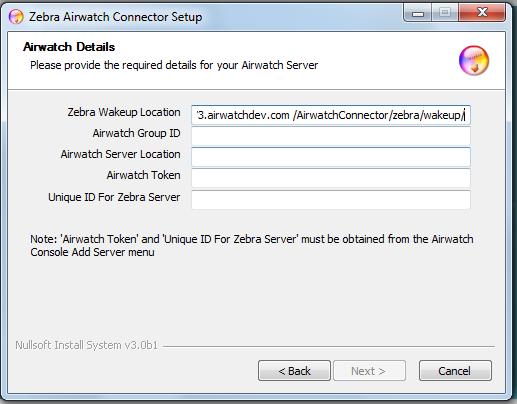
- The Workspace ONE UEM Details page displays the following:
- Zebra Wakeup Location - Zebra endpoint that Workspace ONE UEM needs to connect to, for pushing management commands. This is automatically generated. After the registration process is successful, send this endpoint to Workspace ONE UEM and it must appear on the Print Server page.
- Workspace ONE UEM Group ID - Group ID of the server where the print server record has been added.
- Workspace ONE UEM Server Location - Print server application sends its registration request to registration endpoint URL for Workspace ONE UEM, to associate itself within a certain organization group within Workspace ONE UEM.
- Workspace ONE UEM Token - Copy this into the print server application. This gets automatically generated on UEM console. All subsequent requests from print server are signed with the HMAC Token.
- Unique ID for Zebra Server- Copy this into the print server application. It is created on the UEM console or created and copied by the IT admin.
- Select Browse to choose a destination folder, where the downloaded printer server is installed. Select Install.

- At this point, the certificate request is created and the signed certificate is received back from Zebra.
- To check if the Zebra Connector has been installed successfully, navigate to the UEM console and check if the ‘Notification Endpoint’ (earlier automatically filled in by the print server as the ‘Zebra Wakeup Location’), has been changed to the URL (It was ‘Pending Registration’ earlier).
